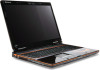
Gateway P-79 Gateway Notebook User's Guide - English
Gateway P-79 Manual
 |
View all Gateway P-79 manuals
Add to My Manuals
Save this manual to your list of manuals |
Gateway P-79 manual content summary:
- Gateway P-79 | Gateway Notebook User's Guide - English - Page 1
Gateway Notebook USERGUIDE ® - Gateway P-79 | Gateway Notebook User's Guide - English - Page 2
- Gateway P-79 | Gateway Notebook User's Guide - English - Page 3
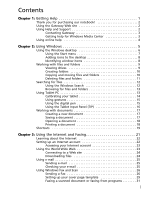
Gateway Web site 2 Using Help and Support 2 Contacting Gateway 3 Getting help for Windows Media Center 3 Using online help 4 Chapter 2: Using Windows 5 Using the Windows Web site 24 Downloading files 24 Using e-mail 25 Sending e-mail 25 Checking your e-mail 25 Using Windows Fax and Scan - Gateway P-79 | Gateway Notebook User's Guide - English - Page 4
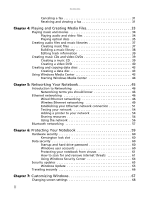
and hard drive password 60 Windows user accounts 60 Protecting your notebook from viruses 61 How to scan for and remove Internet threats 61 Using Windows Security Center 64 Security updates 65 Windows Update 65 Traveling securely 66 Chapter 7: Customizing Windows 67 Changing screen settings - Gateway P-79 | Gateway Notebook User's Guide - English - Page 5
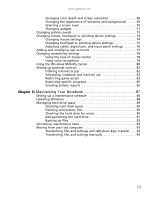
schedule 88 Updating Windows 88 Managing hard drive space 89 Checking hard drive space 89 Deleting unnecessary files 90 Checking the hard drive for errors 90 Defragmenting the hard drive 91 Backing up files 92 Scheduling maintenance tasks 93 Moving from your old computer 93 Transferring - Gateway P-79 | Gateway Notebook User's Guide - English - Page 6
Contents iv - Gateway P-79 | Gateway Notebook User's Guide - English - Page 7
CHAPTER 1 Getting Help • Using the Gateway Web site • Using Help and Support • Using online help 1 - Gateway P-79 | Gateway Notebook User's Guide - English - Page 8
this manual carefully to familiarize yourself with your notebook's software features. Gateway stands behind our value proposition to our customers-to provide best-of-class service and support in addition to high-quality, brand-name components at affordable prices. If you ever have a problem, our - Gateway P-79 | Gateway Notebook User's Guide - English - Page 9
(keyword) in the Search Help box located at the top of any Help and Support screen, then press ENTER. For each search, you receive a list of suggested topics. To Gateway Customer Care will need this information if you call for help. Getting help for Windows Media Center If your notebook has Windows - Gateway P-79 | Gateway Notebook User's Guide - English - Page 10
most online help information by selecting a topic from a Help menu or by clicking the Help button on the menu bar and selecting Online Support from the list. Available information depends on the particular Help site to which you are taken. Many provide FAQs (Frequently Asked Questions), a search - Gateway P-79 | Gateway Notebook User's Guide - English - Page 11
CHAPTER 2 Using Windows • Using the Windows desktop • Working with files and folders • Searching for files • Using Tablet PC • Working with documents • Shortcuts 5 - Gateway P-79 | Gateway Notebook User's Guide - English - Page 12
first screen you see is the Windows desktop. The desktop is like the top of a real desk. Think of the desktop as your personalized work space where you open programs and perform other tasks. Help For more information about the Windows desktop, click Start, then click Help and Support. Type Windows - Gateway P-79 | Gateway Notebook User's Guide - English - Page 13
www.gateway.com Using the Start menu Help For more information about the Windows Start menu, click Start, then click Help and Support. Type Windows Start Á All Programs Á 1 Click (Start) on the lower left of the Windows desktop. The Start menu opens, showing you the first level of menu items. 2 - Gateway P-79 | Gateway Notebook User's Guide - English - Page 14
ENTER. When you double-click the icon for a drive, folder, file, or program, a window opens on the desktop. This example shows the Local Disk (C:) window, which opens after you double-click the Local Disk (C:) icon in the Computer window. Search box Title Menu Close Maximiz Minimiz Every program - Gateway P-79 | Gateway Notebook User's Guide - English - Page 15
hold files and folders. A notebook may have more than one drive. Each drive has a letter, usually Local Disk (C:) for the hard drive. You may also have more drives such as a disc drive. To view the drives, folders, and files on your notebook: 1 Click (Start), then click Computer. Hard Disc drive 9 - Gateway P-79 | Gateway Notebook User's Guide - English - Page 16
), then click Computer on the Start menu. 2 Double-click the drive where you want to put the new folder. Typically, Local Disk (C:) is your hard drive. 3 If you as soon as you copy or cut a different file or folder, the original file or folder is deleted from the clipboard. The skills you need to - Gateway P-79 | Gateway Notebook User's Guide - English - Page 17
and folders you have thrown away since you last emptied it. 2 Click the files or folders that you want to restore. For instructions on how to select multiple files and folders, see "Shortcuts" on page 19. 3 Click Restore. Windows returns the deleted files or folders to their original locations. 11 - Gateway P-79 | Gateway Notebook User's Guide - English - Page 18
restored. 1 Double-click the Recycle Bin icon on the Windows desktop. The Recycle Bin window opens. 2 Click Empty the Recycle Bin. Windows remember where they are stored on your hard drive, you can use the Search utility folder names containing the letters you typed. 12 3 Open a file, folder, or - Gateway P-79 | Gateway Notebook User's Guide - English - Page 19
gateway for a file: 1 Click (Start), then click Computer. The Computer window opens. 2 Double-click the drive or folder that you think contains the file or folder display screen, and Input Panel. • Table PC Input Panel (TIP)-Use its writing pad or soft keyboard for entering data. • Windows Journal- - Gateway P-79 | Gateway Notebook User's Guide - English - Page 20
Programs, Accessories, then click or tap Windows Mobility Center. The Windows Mobility Center window opens. 2 Click or tap opens. (Change Tablet PC settings). The Tablet PC Settings dialog box 3 Click or tap the General tab. 4 Click or tap Calibrate, then follow the on-screen instructions. 14 - Gateway P-79 | Gateway Notebook User's Guide - English - Page 21
control the insertion point in the active program. When you use these gestures, you get the same result as pressing the corresponding key on a standard keyboard object on the screen before you tap, in cases where the pointer and digital pen point are out of alignment. The screen reads the position - Gateway P-79 | Gateway Notebook User's Guide - English - Page 22
left side of the screen to open the Tablet Input Panel (TIP). Use the TIP to enter data by hand or soft keyboard into a word processing program or a text-entry form. Access the TIP keyboard and writing pad by tapping or clicking the buttons near the top left of the window. TIP tips • Open - Gateway P-79 | Gateway Notebook User's Guide - English - Page 23
www.gateway.com Working with documents Computer documents composing your document. Use the menus and toolbar buttons at the top of the window to format the document. Saving a document After you create a document, you click Help and Support. Type saving in the Search Help box, then press ENTER. 17 - Gateway P-79 | Gateway Notebook User's Guide - English - Page 24
Using Windows more information about opening documents, click Start, then click Help and Support. Type opening files in the Search Help box, then press ENTER. or have access to a network printer. For more information about installing or using your printer, see the printer documentation. To print a - Gateway P-79 | Gateway Notebook User's Guide - English - Page 25
www.gateway.com Shortcuts Help For more information about Windows keyboard shortcuts, click Start, then click Help and Support. Type Windows keyboard shortcuts in the Search Help box, then press ENTER. The following table shows a few shortcuts that you can use in Windows and almost all programs - Gateway P-79 | Gateway Notebook User's Guide - English - Page 26
CHAPTER 2: Using Windows 20 - Gateway P-79 | Gateway Notebook User's Guide - English - Page 27
CHAPTER 3 Using the Internet and • Learning about the Internet • Setting up an Internet account • Using the World Wide Web • Using e-mail • Using Windows Fax and Scan • Sending a Fax • Receiving and viewing a fax Faxing 21 - Gateway P-79 | Gateway Notebook User's Guide - English - Page 28
other computers or servers using a telephone, DSL, or cable television line. Your notebook may have a built-in dial-up telephone modem. Cable and DSL modems connect to your notebook through an Ethernet jack and provide a faster connection speed than a standard telephone modem. • An Internet service - Gateway P-79 | Gateway Notebook User's Guide - English - Page 29
service. With this type of service, your cost is the same regardless of the amount of time you use your Internet connection. Accessing your Internet account Help For general information about using Internet accounts, click Start, then click Help and Support read the news, download programs, and much - Gateway P-79 | Gateway Notebook User's Guide - English - Page 30
service www.gateway.com Support. Type connecting to a Web site in the Search Help box, then press ENTER. The Web browser locates the server computer on the Internet, downloads download. 5 Follow the on-screen instructions for saving the file in the folder that you want. A copy of the file is downloaded - Gateway P-79 | Gateway Notebook User's Guide - English - Page 31
gateway.com 7 Install or view the downloaded file by double-clicking it. If applicable, follow the instructions provided on the Web site to run or install the program. Help For more information about downloading files, click Start, then click Help and Support. Type downloading Internet service - Gateway P-79 | Gateway Notebook User's Guide - English - Page 32
click Start, then click Help and Support. Type e-mail in the Search Out Your Notebook" in your Notebook Reference Guide. Your fax cover page, on which instructions. Many Internet services exist that let you send or receive faxes using a broadband connection. Your dial-up modem cable must be installed - Gateway P-79 | Gateway Notebook User's Guide - English - Page 33
using (fax modem or fax server). The Choose a modem name screen opens. 5 Type the name of the fax modem in the dialog box, then click Next. The Choose how to receive faxes screen opens. 6 Click how you want to receive faxes, then click Unblock when the Security Alert window opens. The New Fax - Gateway P-79 | Gateway Notebook User's Guide - English - Page 34
CHAPTER 3: Using the Internet and Faxing 7 Create your fax, then open the Cover Page menu by clicking the arrow and selecting a cover page from the list. The Sender Information dialog box opens. 8 Type your information in the spaces provided, then click OK. The New Fax dialog box opens. 9 To enter - Gateway P-79 | Gateway Notebook User's Guide - English - Page 35
gateway.com 10 Type your location information, then click OK. The Dialing Rules dialog box opens. 11 Highlight your location, then click Edit. The Edit Location dialog box opens. 12 you can use in place of the cover page templates that Windows Fax and Scan provides for you. To create a cover page - Gateway P-79 | Gateway Notebook User's Guide - English - Page 36
CHAPTER 3: Using the Internet and Faxing 3 Click Tools, Cover Pages, then click New. The Fax Cover Page Editor opens. 30 - Gateway P-79 | Gateway Notebook User's Guide - English - Page 37
gateway a logo that appears on your cover page, copy it to the Windows clipboard, then paste it into the Cover Page Editor and move it Click Print. The Send Fax Wizard opens. 5 Complete the wizard by following the instructions in "Sending a Fax" on page 26, or "Faxing a scanned document or faxing - Gateway P-79 | Gateway Notebook User's Guide - English - Page 38
CHAPTER 3: Using the Internet and Faxing 32 - Gateway P-79 | Gateway Notebook User's Guide - English - Page 39
CHAPTER 4 Playing and Creating Media Files • Playing music and movies • Creating audio files and music libraries • Creating music CDs and video DVDs • Creating and copying data discs • Using Windows Media Center 33 - Gateway P-79 | Gateway Notebook User's Guide - English - Page 40
Start Á Computer Á find the file Á double-click the file 1 Click (Start), All Programs, then click Windows Media Player. Windows Media Player opens. 2 Click Library, then double-click the media file you want to play. 34 Playback Media library 3 Click one of the following to control playback - Gateway P-79 | Gateway Notebook User's Guide - English - Page 41
more information about playing optical discs, click Start, then click Help and Support. Type playing discs in the Search Help box, then press ENTER. Playing an optical disc using Windows Media Player Use Windows Media Player to listen to CDs or watch movies on DVDs, HD-DVDs, or Blu-ray Discs. For - Gateway P-79 | Gateway Notebook User's Guide - English - Page 42
automatically, click (Start), All Programs, then click Windows Media Player. Windows Media Player opens. 36 Playback 4 If the disc is not already playing, click (play). 5 Click one of the following to control playback: Playlist Video screen Repeat Rewind Fast forward Volume Shuffle Stop - Gateway P-79 | Gateway Notebook User's Guide - English - Page 43
Start, then click Help and Support. Type recording audio or ripping files Sound recorder is a simple Windows program that lets you record and jack on your notebook. For the location of the microphone jack, see your notebook's Reference Guide. -ORUse the built-in microphone available on select Gateway - Gateway P-79 | Gateway Notebook User's Guide - English - Page 44
your music files. 3 Insert a music CD into your optical disc drive. 4 Click the Rip tab. The Rip screen opens. 5 Click to clear the check box for any track you do not want to record, then click Start Rip. Windows Media Player records the tracks to your hard drive. A progress bar appears next to each - Gateway P-79 | Gateway Notebook User's Guide - English - Page 45
Media Player: 1 Click (Start), All Programs, then click Windows Media Player. Windows Media Player opens. 2 Insert a blank, writable CD into your recordable disc drive. Important Make sure that you use a writable CD for creating music CDs. Most automobile stereos will not play DVDs. 3 If a dialog - Gateway P-79 | Gateway Notebook User's Guide - English - Page 46
CD. Creating a video DVD If your notebook has Windows Vista Home Premium or Windows Vista Ultimate Edition, you can create video DVDs using Windows . To create a video DVD using Windows DVD Maker: 1 Insert a blank, writeable DVD into your recordable optical disc drive. 2 If a dialog box opens and - Gateway P-79 | Gateway Notebook User's Guide - English - Page 47
www.gateway.com 3 Click (Start), All Programs, then click Windows DVD Maker. The Windows DVD Maker introduction window opens. 4 Click Choose Photos and Videos. The main screen opens. 5 Click Add items. The Add Items to DVD dialog box opens. 41 - Gateway P-79 | Gateway Notebook User's Guide - English - Page 48
the videos you want to add to the video DVD, then click Add. The videos are added to the video list, and a graphic in the lower left corner of the window shows you how much disc capacity will be used. 7 Click Next. The Ready to burn disc dialog box opens. 8 Click any - Gateway P-79 | Gateway Notebook User's Guide - English - Page 49
. The following instructions show you how to burn a disc using the Mastered format, which can be read by all computers, regardless of the operating system installed. Help For information about burning a disc using the Live File System format, click Start, then click Help and Support. Type live - Gateway P-79 | Gateway Notebook User's Guide - English - Page 50
click OK. The Windows Media Center's main screen opens. 3 Use the arrow buttons on your keyboard to select a Media Center menu option, then press OK. • TV + Movies lets you play TV programs you have recorded, play a DVD or Blu-ray movie, or set up your TV tuner card (if installed). • Online Media - Gateway P-79 | Gateway Notebook User's Guide - English - Page 51
CHAPTER 5 Networking Your Notebook • Introduction to Networking • Ethernet networking • Bluetooth networking 45 - Gateway P-79 | Gateway Notebook User's Guide - English - Page 52
electrician must install special Ethernet cables in your home or office. Using a router The most common way to set up a wired Ethernet network is Dynamic Host Control Protocol (DHCP) using a router. A DHCP network configuration uses a router to automatically assign IP addresses to each computer or - Gateway P-79 | Gateway Notebook User's Guide - English - Page 53
www.gateway.com Example router-based Ethernet network The following is an example of a wired Ethernet network. The network is made up of a router, a cable or DSL modem, your computers, and cables connecting each of these components. The router is the central control point for the network. Tip To add - Gateway P-79 | Gateway Notebook User's Guide - English - Page 54
, you need to install Ethernet cards and drivers on the computers that do not have Ethernet already installed. Use the documentation that comes with your Ethernet cards for instructions on installing the card and any required drivers. Plug your Ethernet cable into your computer's jack and the router - Gateway P-79 | Gateway Notebook User's Guide - English - Page 55
the power adapter into the AC connector on the router and the other end into a grounded, 110V electrical outlet. 2 Turn on your computers. 3 Plug one end Ethernet jack on the DSL or cable modem. Wireless Ethernet networking Wireless Ethernet networking is the latest advance in computer communication - Gateway P-79 | Gateway Notebook User's Guide - English - Page 56
purchase wireless equipment: Access point Wireless cards supported 802.11a 802.11a only 802.11b Ethernet device is already installed on your computer To determine if a wireless Ethernet card is already installed on your computer: 1 Click (Start), then click Control Panel. The Control Panel window - Gateway P-79 | Gateway Notebook User's Guide - English - Page 57
your hard drive to download viruses or view your personal data, like credit card numbers, Social Security numbers, and personal online banking information. Check your access point documentation for information about installing the access point and setting network security. Establishing your Ethernet - Gateway P-79 | Gateway Notebook User's Guide - English - Page 58
, click Start, then click Help and Support. Type the following keywords in the Search Help box, then press ENTER. • Connect to an available network • Manually add a wireless Ethernet network • Connecting to wireless Ethernet network. After you have named your computer and workgroup, you need to set - Gateway P-79 | Gateway Notebook User's Guide - English - Page 59
www.gateway.com To connect to your wireless Ethernet network: 1 Click (Start), then click Network. The Network window opens. 2 Click Network and Sharing Center. The Network and Sharing Center window opens. 3 Click Connect to a network on the left of the window. The Connect to a network dialog box - Gateway P-79 | Gateway Notebook User's Guide - English - Page 60
, you can share drives (for example hard drives and DVD drives) and printers among the computers connected to the network. Important To share a printer among the network computers, each computer must have the shared printer's drivers installed. Follow the instructions included with your printer - Gateway P-79 | Gateway Notebook User's Guide - English - Page 61
gateway.com After the drives and printers on each network computer are shared, you can access them as though they were attached directly to your computer. Then you can: • View a network drive • Open and copy files stored on other network computers • Print documents on network printers Sharing drives - Gateway P-79 | Gateway Notebook User's Guide - English - Page 62
: 1 Click (Start), then click Network. The Network window opens. 2 If no drives or folders are displayed, click the option bar under the menu bar, then click Turn on network discover and file sharing. 3 Double-click the name of the computer containing the drive or folder you want to view. All shared - Gateway P-79 | Gateway Notebook User's Guide - English - Page 63
port on your computer. To install a Bluetooth enabled device: 1 Turn on your Bluetooth radio and the Bluetooth device. 2 Click (Start), Control Panel, then click Hardware and Sound. 3 Click Bluetooth Devices. 4 Click Add, then follow the on-screen instructions. To install a Bluetooth printer: 1 Turn - Gateway P-79 | Gateway Notebook User's Guide - English - Page 64
personal area network: 1 Turn on your Bluetooth radio and the Bluetooth device. 2 Click (Start), Control Panel, then click Network and Internet. 3 Click Network and Sharing Center. 4 Click Manage Network Connections. The Network Connections window opens. 5 Under Personal Area Network, click - Gateway P-79 | Gateway Notebook User's Guide - English - Page 65
CHAPTER 6 Protecting Your Notebook • Hardware security • Data security • Security updates • Traveling securely 59 - Gateway P-79 | Gateway Notebook User's Guide - English - Page 66
Tip For instructions on creating a startup and hard drive password, see your notebook's Reference Guide. Make sure that you use a password you can remember. The password feature is very secure, and you cannot bypass it. If you forget your password, you will have to return your notebook to Gateway so - Gateway P-79 | Gateway Notebook User's Guide - English - Page 67
user can install or run. Help For more information about Windows user accounts, click Start, then click Help and Support. Type user accounts in the Search Help box, then press ENTER. Protecting your notebook from viruses A virus is a program that attaches itself to a file on a computer, then spreads - Gateway P-79 | Gateway Notebook User's Guide - English - Page 68
Your Notebook 1 Click (Start), All Programs, Norton 360, then click Norton 360. Norton 360 opens. 2 Click on the left PC Security column. The PC Security window opens. 3 At the bottom of the window first click on Run Scans and then choose which scan you would like to run and click Go. 62 - Gateway P-79 | Gateway Notebook User's Guide - English - Page 69
www.gateway.com Norton 360 scans your computer for viruses and spyware and removes any that it finds. When the scan is finished, a summary of fixed problems appears. Important Extend your Norton 360 subscription before it expires to remain protected against online threats. If you are using Norton - Gateway P-79 | Gateway Notebook User's Guide - English - Page 70
To modify security settings: 1 Click (Start), Control Panel, then click Security. 2 Click Security Center. The Windows Security Center dialog box opens. 3 Click: • Windows Update to run Windows Update or modify the Windows Update settings. • Windows Firewall to prevent outsiders from accessing the - Gateway P-79 | Gateway Notebook User's Guide - English - Page 71
: • Install Updates to download and install updates on your notebook. These updates include security updates. • Install Extras to download additional Windows software for your notebook. Help For more information about Windows Update, click Start, then click Help and Support. Type Windows update in - Gateway P-79 | Gateway Notebook User's Guide - English - Page 72
to the schedule settings, then click OK. Traveling securely For information about traveling securely with your notebook, see "Traveling with Your Notebook" in your Reference Guide. 66 - Gateway P-79 | Gateway Notebook User's Guide - English - Page 73
CHAPTER 7 Customizing Windows • Changing screen settings • Changing system sounds • Changing mouse, touchpad, or pointing device settings • Adding and modifying user accounts • Changing accessibility settings • Setting up parental controls 67 - Gateway P-79 | Gateway Notebook User's Guide - English - Page 74
. Help For more information about adjusting the screen, click Start, then click Help and Support. Type adjusting monitor settings in the Search Help box, then press ENTER. To change the color depth or screen resolution: 1 Click (Start), Control Panel, then under Appearance and Personalization, click - Gateway P-79 | Gateway Notebook User's Guide - English - Page 75
www.gateway.com Changing the appearance of windows and backgrounds You can change the appearance of Windows desktop items, such as the colors of windows and dialog boxes and the color and design of the desktop background. To change Window colors and effects: 1 Click (Start), Control Panel, then - Gateway P-79 | Gateway Notebook User's Guide - English - Page 76
your notebook. Windows supplies a variety of screen savers that you can choose from, and many more are available from the Internet and as commercial products. To select a screen saver: 1 Click (Start), Control Panel, Appearance and Personalization, then click Change screen saver. The Screen Saver - Gateway P-79 | Gateway Notebook User's Guide - English - Page 77
running mini-programs that are visible on your Windows desktop. They can be moved, removed, resized, and configured according to your preference. Although you can position them anywhere on your desktop, gadgets are usually visible on the right edge of your screen in the Sidebar. Gadgets can include - Gateway P-79 | Gateway Notebook User's Guide - English - Page 78
gadget. The gadget's built-in control panel appears on the gadget. (Slideshow gadget shown) 2 Click the control you want to operate. Configuring the starts each time Windows starts • Whether the Sidebar is always on top of other windows (always visible) • The side of the screen the sidebar appears - Gateway P-79 | Gateway Notebook User's Guide - English - Page 79
www.gateway.com Changing system sounds You can change the sounds that play for system events, such as Windows startup and shut down, logging on and logging off, window maximizing and minimizing, and error messages. To change system sounds: 1 Click (Start), Control Panel, Hardware and Sound, then - Gateway P-79 | Gateway Notebook User's Guide - English - Page 80
Windows Changing mouse, touchpad, or pointing device settings Help For more information about mouse settings, click Start, then click Help and Support. your mouse settings: Shortcut Start Á Control Panel Á Hardware and Sound Á Mouse 1 Click (Start), Control Panel, then under Hardware and Sound, - Gateway P-79 | Gateway Notebook User's Guide - English - Page 81
www.gateway.com Changing touchpad or pointing device settings To change your touchpad or pointing device settings: Shortcut Start Á Control Panel Á Hardware and Sound Á Mouse 1 Click (Start), Control Panel, then under Hardware and Sound, click Mouse. The Mouse Properties dialog box opens. 2 Click - Gateway P-79 | Gateway Notebook User's Guide - English - Page 82
change tablet, digital pen, and input panel settings: 1 Click or tap (Start), All Programs, Accessories, then click or tap Windows Mobility Center. The Windows Mobility Center window opens. 2 Click or tap opens. (Change Tablet PC settings). The Tablet PC Settings dialog box 3 To change the tablet - Gateway P-79 | Gateway Notebook User's Guide - English - Page 83
able to install some older computers on the network. To add, delete, or modify user accounts: 1 Click (Start), Control Panel, then under User Accounts and Family Safety, click Add or remove user accounts. [ • To create a new account, click Create a new account, then follow the on-screen instructions - Gateway P-79 | Gateway Notebook User's Guide - English - Page 84
settings Your notebook can be a powerful tool, but it may be less useful to you if items on the screen are difficult to see, or if the mouse is difficult to control. Windows has several tools that help you use it more easily. Using the Ease of Access Center Use the Ease of - Gateway P-79 | Gateway Notebook User's Guide - English - Page 85
your mouse pointer. • Start On-Screen Keyboard displays a keyboard on the screen. You can press keys on the on-screen keyboard by clicking them with your mouse. • Start Narrator reads on-screen text and describes graphics. • Set up High Contrast changes the Windows color scheme to use high-contrast - Gateway P-79 | Gateway Notebook User's Guide - English - Page 86
on your notebook's features, some of these controls may not be available. To access the Windows Mobility Center: • Click (Start), All Programs, Accessories, then click Windows Mobility Center. The Windows Mobility Center window opens. Control Description ■ Click (Change display brightness settings - Gateway P-79 | Gateway Notebook User's Guide - English - Page 87
Control www.gateway.com Description ■ Click (Change wireless network settings) to open the Connect to a network dialog box and select a wireless network to connect to or disconnect from. For more information, see "Connecting to a wireless Ethernet network" on page 52. ■ Click Turn wireless on to - Gateway P-79 | Gateway Notebook User's Guide - English - Page 88
and Family Safety, click Set up parental controls for any user. The Parental Controls dialog box opens. 2 Click the user account to set up restrictions for. The User Controls dialog box opens. 3 Click On, enforce current settings, then click Windows Vista Web Filter. The Web Restrictions dialog - Gateway P-79 | Gateway Notebook User's Guide - English - Page 89
www.gateway.com 4 Specify the settings you want to use for this user, then click OK. The settings are saved. Scheduling notebook and Internet use To schedule the times a user can access the Internet: 1 Click (Start), Control Panel, then under User Accounts and Family Safety, click Set up parental - Gateway P-79 | Gateway Notebook User's Guide - English - Page 90
Windows 3 Click Set game ratings. The Game Restrictions dialog box opens. 4 Click the level of games you want allowed, then click OK. The settings are saved. To restrict specific games: 1 Click (Start), Control Panel, then under User Accounts and Family Safety, click Set up parental controls - Gateway P-79 | Gateway Notebook User's Guide - English - Page 91
www.gateway.com 4 Click the level of access you want for each game listed, then click OK. If the game you want to restrict access to is not shown on the list, see "Restricting specific programs" on page 85. Restricting specific programs To restrict specific programs: 1 Click (Start), Control Panel, - Gateway P-79 | Gateway Notebook User's Guide - English - Page 92
CHAPTER 7: Customizing Windows 86 - Gateway P-79 | Gateway Notebook User's Guide - English - Page 93
CHAPTER 8 Maintaining Your Notebook • Setting up a maintenance schedule • Updating Windows • Managing hard drive space • Scheduling maintenance tasks • Moving from your old computer 87 - Gateway P-79 | Gateway Notebook User's Guide - English - Page 94
Windows Update, see "Windows Update" on page 65. Windows Update can also be controlled through the Windows Security Center. For more information, see "Protecting Your Notebook" on page 59. Help For more information about Windows Update, click Start, then click Help and Support. Type windows update - Gateway P-79 | Gateway Notebook User's Guide - English - Page 95
www.gateway.com Managing hard drive space Windows provides several utilities you can use to check hard drive space, delete unnecessary files, defragment files, and back up files. Checking hard drive space To check hard drive space: Shortcut Start Á Computer Á right-click drive Á Properties 1 Click ( - Gateway P-79 | Gateway Notebook User's Guide - English - Page 96
and files in the Recycle Bin, to free hard drive space. To delete unnecessary files: Shortcut Start Á Computer Á right-click drive Á Properties Á Disk Cleanup 1 Click (Start), All Programs, Accessories, System Tools, then click Disk Cleanup. The Disk Cleanup dialog box opens. 2 Click one of the - Gateway P-79 | Gateway Notebook User's Guide - English - Page 97
provides a summary of the problems that it found. 4 Correct any problems that are found by following the on-screen instructions. 5 Click OK. Help For more information about checking the hard drive for errors, click Start, then click Help and Support. Type checking for disk errors in the Search Help - Gateway P-79 | Gateway Notebook User's Guide - English - Page 98
complete hard drive backup. To back up files: 1 Click (Start), then click Computer. The Computer window opens. 2 Right-click the drive that you want to back up, click Properties, then click the Tools tab. 92 3 Click Backup Now, then click Run a file backup now. 4 Follow the on-screen instructions - Gateway P-79 | Gateway Notebook User's Guide - English - Page 99
If your old computer does not use Windows XP or Windows Vista, you must manually move your data by using a writeable disc, flash drive, or external hard drive. To move files and settings from your old computer: 1 If you want to transfer program settings to your new notebook, install those programs - Gateway P-79 | Gateway Notebook User's Guide - English - Page 100
manually transfer your personal data files by copying them to removable media, such as a writable disc, an external hard drive, a network location, or a flash drive. Finding your documents Many programs save your personal data files in the Documents or My Documents folder. Look in your old computer - Gateway P-79 | Gateway Notebook User's Guide - English - Page 101
is not responsible for inaccurate information which may appear in this manual. For the latest product updates, consult the Gateway Web site at www.gateway.com. In no event will Gateway be liable for direct, indirect, special, exemplary, incidental, or consequential damages resulting from any defect - Gateway P-79 | Gateway Notebook User's Guide - English - Page 102
CHAPTER 8: Maintaining Your Notebook 96 - Gateway P-79 | Gateway Notebook User's Guide - English - Page 103
15 disconnecting from Internet 22 Disk Cleanup 90 Disk Defragmenter 91 display using screen saver 70 documentation Gateway Web site 2 help 2 Help and Support 2 online help 4 documents creating 17 opening 18 printing 18 saving 17 downloading files 24 drivers updating 2 drives backing up files 92 - Gateway P-79 | Gateway Notebook User's Guide - English - Page 104
11 renaming 19 searching for 12, 13 sharing 55 un-sharing 55 viewing list 9 fragmentation 91 G gadgets adding 71 configuring 71 configuring Sidebar 72 control panel 72 Sidebar 71 using 71 game access restricting 83 Gateway Web address 2 Web site 2 Gigabit Ethernet 46 H hard drive backing up files 92 - Gateway P-79 | Gateway Notebook User's Guide - English - Page 105
19 restoring files and folders 11 router configuring 52 S saving documents 17 Scheduled Tasks Wizard 93 scheduling computer use 83 screen adjusting settings 68 controls 68 saver 70 using screen saver 70 Search utility 12 searching for files and folders 12, 13, 94 in Help and Support 3 security - Gateway P-79 | Gateway Notebook User's Guide - English - Page 106
Web page 23 Web site 23 connecting to 24 downloading files 24 Gateway 2 window 8 close button 9 closing 9, 19 maximize button 9 menu bar 9 minimize button 9 title bar 8 Windows clipboard 10 Search utility 12 Windows Media Center 43 help 3 Windows Media Player building music library 38 creating music - Gateway P-79 | Gateway Notebook User's Guide - English - Page 107
- Gateway P-79 | Gateway Notebook User's Guide - English - Page 108
MAN GW GENERIC PTB USRGDE
-
 1
1 -
 2
2 -
 3
3 -
 4
4 -
 5
5 -
 6
6 -
 7
7 -
8
-
9
-
10
-
11
-
12
-
13
-
14
-
15
-
16
-
17
-
18
-
19
-
20
-
21
-
22
-
23
-
24
-
25
-
26
-
27
-
28
-
29
-
30
-
31
-
32
-
33
-
34
-
35
-
36
-
37
-
38
-
39
-
40
-
41
-
42
-
43
-
44
-
45
-
46
-
47
-
48
-
49
-
50
-
51
-
52
-
53
-
54
-
55
-
56
-
57
-
58
-
59
-
60
-
61
-
62
-
63
-
64
-
65
-
66
-
67
-
68
-
69
-
70
-
71
-
72
-
73
-
74
-
75
-
76
-
77
-
78
-
79
-
80
-
81
-
82
-
83
-
84
-
85
-
86
-
87
-
88
-
89
-
90
-
91
-
92
-
93
-
94
-
95
-
96
-
97
-
98
-
99
-
100
-
101
-
102
-
103
-
104
-
105
-
106
-
107
-
108
 |
 |

®
Gateway Notebook
USER
GUIDE