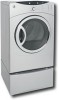
GE DCVH660EHMS Owners Manual
GE DCVH660EHMS - G.E. 7.0 Cu.Ft. Electric Dryer Manual
 |
UPC - 084691167402
View all GE DCVH660EHMS manuals
Add to My Manuals
Save this manual to your list of manuals |
GE DCVH660EHMS manual content summary:
- GE DCVH660EHMS | Owners Manual - Page 1
Instructions Control Panels 6-8 Cycle Options 9, 10 Dryer Features 10 Loading and Using the Dryer 16, 17 Reversing the Door Swing . . . .11-15 Stacking 19-22 Venting the Dryer 18 Troubleshooting Tips . . . .23-25 Consumer Support Consumer Support 28 Warranty 27 Owner's Manual DBVH520 - GE DCVH660EHMS | Owners Manual - Page 2
or any other appliance. I Installation and service must be performed by a qualified installer, service agency or the gas supplier. WHAT TO DO IF YOU SMELL GAS: 1 Do not try to light a match, or cigarette, or turn on any gas or electrical appliance. 2 Do not touch any electrical switch; do not - GE DCVH660EHMS | Owners Manual - Page 3
Safety Instructions ge.com PROPER INSTALLATION This dryer must be properly installed and located in accordance with the Installation Instructions before it is used. If you did not receive an Installation Instructions sheet, you can receive one by visiting ge.com, or by calling 800.GE.CARES (800. - GE DCVH660EHMS | Owners Manual - Page 4
carefully follow the garment manufacturer's care instructions. I Do not dry articles containing dryer uses. I To minimize the possibility of electric shock, unplug this appliance from the power supply or disconnect the dryer appliance from the power supply. Troubleshooting Tips Consumer Support 4 - GE DCVH660EHMS | Owners Manual - Page 5
appliance or attempt any servicing unless specifically recommended in this Owner's Manual or in published user-repair instructions that you understand and have the skills to carry out. READ AND FOLLOW THIS SAFETY INFORMATION CAREFULLY. SAVE THESE INSTRUCTIONS Troubleshooting Tips Consumer Support - GE DCVH660EHMS | Owners Manual - Page 6
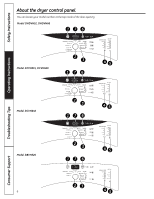
Safety Instructions About the dryer control panel. You can locate your model number at the top inside of the door opening. Model DHDVH52, DHDVH66 176 Operating Instructions Model DCVH515, DCVH660 2 3 176 45 Troubleshooting Tips Model DCVH640 2 3 45 176 Consumer Support Model DBVH520 - GE DCVH660EHMS | Owners Manual - Page 7
Instructions Operating Instructions ge.com 1 Power Press to "wake up" the display. If the display is active, press to put the dryer in the standby mode. NOTE: Pressing POWER does not disconnect the appliance for ironing). For leaving items partially damp. Troubleshooting Tips Consumer Support 7 - GE DCVH660EHMS | Owners Manual - Page 8
Safety Instructions Operating Instructions About the dryer control panel. 5 for three seconds to store your selection. A beep will sound and the pad will light up. To recall your stored MY CYCLE combination: Press the MY CYCLE button before is activated. Troubleshooting Tips Consumer Support 8 - GE DCVH660EHMS | Owners Manual - Page 9
Instructions Operating Instructions About cycle options. NOTE: Not all features are available on all dryer TIME REMAINING display will show 00. ge.com DAMP ALERT Damp Alert (on some models) This option causes the dryer to beep when clothes have dried to Troubleshooting Tips Consumer Support 9 - GE DCVH660EHMS | Owners Manual - Page 10
details. About dryer features. Drum Lamp Before replacing the light bulb, be sure to unplug the dryer power cord or disconnect the dryer at the household above dryer opening from inside the drum. Remove the bulb and replace with the same size bulb. Troubleshooting Tips Consumer Support Drying - GE DCVH660EHMS | Owners Manual - Page 11
-Blade Screwdriver Troubleshooting Tips Consumer Support Hinge Assembly Hinge Cover Plastic Cover Large Tapping Screw (#10) - 6 Tapping Screw (#8) - 2 Machine Screw (#8) - 6 Nut (#8) - 2 Washer - 2 STEP-BY-STEP INSTRUCTIONS Before You Start 1. Unplug the dryer from its electrical outlet - GE DCVH660EHMS | Owners Manual - Page 12
, turn the door over and separate the silver cover part of the door from the door frame and set aside. 7. Unlock the 4 tabs on the plastic cover and separate the plastic cover from the frame. NOTE: Disregard the "DO NOT REMOVE" label on the plastic cover. Troubleshooting Tips Consumer Support 12 - GE DCVH660EHMS | Owners Manual - Page 13
Safety Instructions Operating Instructions ge.com STEP-BY-STEP INSTRUCTIONS (cont.) Remove Hinge IMPORTANT: Note the location of the hinge (left or right) before removing. 8.With the door frame part of tighten the 2 screws (#8) holding the hinge assembly. 13 Troubleshooting Tips Consumer Support - GE DCVH660EHMS | Owners Manual - Page 14
Reversing the door swing. STEP-BY-STEP INSTRUCTIONS (cont.) Reinstall Nuts and Hinge Cover 14. Place the door on its edge. Assemble the 2 machine in place with the 4 tabs. 18. Place the outer door onto the inner door. Troubleshooting Tips Consumer Support Top of Door Outer Door Inner Door 14 - GE DCVH660EHMS | Owners Manual - Page 15
Safety Instructions ge.com STEP-BY-STEP INSTRUCTIONS (cont.) Reassemble Door Assembly (cont.) 19. After reversing door, there will be a mismatch between the outer door and the inner door. Make sure that the handle part of the outer door is opposite the hinge, as shown. 20. Turn the door over and - GE DCVH660EHMS | Owners Manual - Page 16
Troubleshooting Tips Consumer Support Sorting and Loading Hints As a general rule, if clothes are sorted properly for the washer, they are sorted properly for the dryer Dryer Sheets have been approved for use in all GE Dryers when used in accordance with the manufacturer's instructions. - GE DCVH660EHMS | Owners Manual - Page 17
time. Follow these steps: 1 Turn off electrical supply by disconnecting the plug from the wall socket. 2 Disconnect the duct from the dryer. 3 Vacuum the duct with the hose attachment insects, etc.) nesting inside the duct or hood. Operating Instructions Troubleshooting Tips Consumer Support 17 - GE DCVH660EHMS | Owners Manual - Page 18
Instructions. I Use only rigid metal or flexible metal 4″ diameter ductwork inside the dryer dryer. The lowered protector will prevent the duct from getting crushed (on some models). Correct Venting Incorrect Venting Vent protector in place (on some models) Troubleshooting Tips Consumer Support - GE DCVH660EHMS | Owners Manual - Page 19
floor to overhead cabinets, ceiling, etc. is 43″ without pedestal, 55″ with pedestal and 84″ stacked. I The dryer MUST be vented to the outdoors. Refer to dryer Installation Instructions for details. I Minimum clearance between dryer cabinet and adjacent walls or other surfaces is: 0″ either side - GE DCVH660EHMS | Owners Manual - Page 20
Remove the packaging. Flatten the product carton to use as a pad to lay the dryer down on its side. Continue using the carton to protect the finished floor in front of the installation location. 4 #12 x 1" Screws 4 #8 x 1/2" Screws Gloves Level Troubleshooting Tips Consumer Support 20 - GE DCVH660EHMS | Owners Manual - Page 21
dryer leveling legs. ge.com Operating Instructions Troubleshooting Tips Back out and remove all 4 leveling legs 2. Install Rubber Pads to Dryer Base Locate the 4 rubber pads in the parts bottom right corner of the dryer. C. Set the dryer upright. NOTE: Make sure to set the dryer on a piece of - GE DCVH660EHMS | Owners Manual - Page 22
and dryer into place. Use felt pads or other sliding device to assist moving and to protect flooring. WARNING! Potential Personal Injury. Do not push on the dryer once installed to top of the washer. Pushing on the dryer may result in pinched fingers. Troubleshooting Tips Consumer Support 22 - GE DCVH660EHMS | Owners Manual - Page 23
Before you call for service... Troubleshooting Tips Save time and money! Review the charts on the following pages, or visit ge.com. You may not need to call for service. ge.com Operating Instructions Troubleshooting Tips PROBLEM Dryer shakes or makes noise Clothes take too long to dry - GE DCVH660EHMS | Owners Manual - Page 24
service... Safety Instructions Operating Instructions PROBLEM Time Remaining jumped to a lower number Possible Causes What To Do The estimated time may change • This is normal. when a smaller load than usual is drying Cannot make a selection and the dryer Troubleshooting Tips Consumer Support - GE DCVH660EHMS | Owners Manual - Page 25
Safety Instructions Operating Instructions ge.com PROBLEM Clothes shrink Possible Causes What To Do. Some fabrics will naturally shrink • To avoid shrinkage, follow garment care labels exactly. when washed. Others can be safely washed, but will shrink in the dryer • Some items may be pressed - GE DCVH660EHMS | Owners Manual - Page 26
Notes. 26 Consumer Support Troubleshooting Tips Operating Instructions Safety Instructions - GE DCVH660EHMS | Owners Manual - Page 27
which vary from state to state. To know what your legal rights are, consult your local or state consumer affairs office or your state's Attorney General. Warrantor: General Electric Company. Louisville, KY 40225 Troubleshooting Tips Consumer Support 27 - GE DCVH660EHMS | Owners Manual - Page 28
Support. GE Appliances Website ge.com Have a question or need assistance with your appliance? Try the GE Appliances Website, any day of the year! For greater convenience and faster service, you can now download Owner's Manuals, order parts or even schedule service on-line. Schedule Service ge - GE DCVH660EHMS | Owners Manual - Page 29
Secadoras ge.com Instrucciones de seguridad 2-5 Instrucciones de operación Cómo cambiar el la solucíon de problemas 23-25 Soporte al consumidor Soporte al consumidor 28 Garantía 27 Manual del propietario DBVH520 DCVH515 DCVH640 DCVH660 DHDVH52 DHDVH66 Escriba el número de modelo y de serie - GE DCVH660EHMS | Owners Manual - Page 30
INFORMACIÓN DE SEGURIDAD IMPORTANTE. LEA TODAS LAS INSTRUCCIONES ANTES DE USAR. ¡ADVERTENCIA! Por su seguridad, debe seguir las indicaciones de este manual para minimizar el riesgo de incendio o explosión, descarga eléctrica, o para evitar daños a la propiedad, lesiones personales o muerte. I No - GE DCVH660EHMS | Owners Manual - Page 31
Hoja de instrucciones de instalación, puede obtener una visitando ge.com o llamando al 800.GE.CARES (800.432.2737). I Conecte la secadora No quite el protector de la rejilla de ventilación que se encuentra en la parte posterior de la secadora (en algunos modelos). I Jale el protector hacia afuera y - GE DCVH660EHMS | Owners Manual - Page 32
artículo sobre el cual usted usó Esto podría ocasionar irritación en la piel debido un solvente de limpieza o que contenga materiales a las partículas restantes que se podrían adherir a inflamables (tales como paños de limpieza, la ropa durante usos subsecuentes de la secadora. trapeadores - GE DCVH660EHMS | Owners Manual - Page 33
ge.com CUANDO USE SU SECADORA (cont.) I Nunca intente operar éste electrodoméstico si está dañado, si no funciona bien, si está parcialmente desarmado, o si le faltan partes ninguna parte de éste electrodoméstico ni intente llevar a cabo ningún tipo de servicio a no ser que lo recomiende el Manual - GE DCVH660EHMS | Owners Manual - Page 34
Seguridad Panel de control de la secadora. Puede ubicar el número de modelo en la parte superior del interior de la apertura de la puerta. Modelos DHDVH52, DHDVH66 176 Modelos DCVH515, DCVH660 2 3 176 45 Operación Solucionar problemas Modelo DCVH640 2 3 45 176 - GE DCVH660EHMS | Owners Manual - Page 35
ge.com Seguridad Operación 1 Power (Encendido) Presione este botón para "iniciar" la pantalla. Si la pantalla se encuentra activa, presione este botón para poner la secadora - GE DCVH660EHMS | Owners Manual - Page 36
Seguridad Panel de control de la secadora. 5 Dry Temp (Temperatura de secado) Puede cambiar la temperatura de su ciclo de secado. ANTI-BACTERIAL Esta opción sólo se puede usar con los ciclos COTTONS o MIXED LOAD. Esta opción reduce (en algunos modelos) el 99,9% de ciertos tipos de bacterias, - GE DCVH660EHMS | Owners Manual - Page 37
. La alarma sonora se activará cada 2 minutos para recordarle que las retire. La pantalla ESTIMATED TIME REMAINING (Tiempo restante estimado) mostrará 00. ge.com DAMP ALERT Damp Alert (Alerta de humedad) (en algunos modelos) Esta opción hace que la secadora alerte cuando las prendas hayan secado - GE DCVH660EHMS | Owners Manual - Page 38
Seguridad Operación Opciones de ciclo. NOTA: No todas las funciones están disponibles en todos los modelos de secadoras. Bloquear Puede bloquear los controles para evitar que se realice cualquier selección. O puede bloquear los controles después de haber iniciado un ciclo. Cuando se selecciona - GE DCVH660EHMS | Owners Manual - Page 39
Seguridad Cómo cambiar el sentido de apertura de la puerta. ge.com NOTAS IMPORTANTES: I Lea todas las instrucciones antes de comenzar. I Manipule las piezas con cuidado para evitar rayar la pintura. I Coloque los tornillos cercanos a sus - GE DCVH660EHMS | Owners Manual - Page 40
, y los 4 tornillos mecanizados (#8) #10 en el lado de la bisagra. 2 tornillos mecanizados #8 6. Una vez retirados los tornillos, dé vuelta a la puerta y separe la parte de la cubierta plateada de la puerta del marco de la misma y coloque a un lado. 7. Destrabe las 4 lengüetas de la cubierta pl - GE DCVH660EHMS | Owners Manual - Page 41
Seguridad Operación ge.com INSTRUCCIONES PASO A PASO (cont.) Retire la bisagra IMPORTANTE: Observe la ubicación de la bisagra (izquierda o derecha) antes de quitar. 8.Manteniendo la parte del marco de la puerta asentado en una superficie protegida y suave, quite la cubierta de la bisagra retirando - GE DCVH660EHMS | Owners Manual - Page 42
la puerta interior y asegure en su lugar con las 4 lengüetas. 18. Coloque la puerta exterior sobre la puerta interior. Solucionar problemas Soporte al consumidor Parte superior de la puerta Puerta exterior Puerta interior 14 - GE DCVH660EHMS | Owners Manual - Page 43
Seguridad ge.com INSTRUCCIONES PASO A PASO (cont.) Reensamble el conjunto de puerta (cont.) 19. Después de invertir la puerta, la puerta exterior y la puerta interior estarán desfasadas. Asegúrese que la parte de la manija de la puerta exterior se encuentre en el lado opuesto de la bisagra según se - GE DCVH660EHMS | Owners Manual - Page 44
/ Mediana Low / Baja No heat/air / Sin calor/Con aire Special instructions / Instrucciones especiales Line dry/ hang to dry / Cuelgue para secar Drip dry y carga de la ropa Como regla general, si la ropa es clasificada apropiadamente para GE de acuerdo con las instrucciones 16 del fabricante. - GE DCVH660EHMS | Owners Manual - Page 45
Seguridad Siempre siga las instrucciones del fabricante de la ropa cuando lave. ge.com Cuidado y limpieza de la secadora El exterior: Pásele un trapo y elimine el polvo o cualquier derrame de productos de lavandería con un trapo húmedo. Los - GE DCVH660EHMS | Owners Manual - Page 46
sobre objetos filosos. I La ventilación debe complir con los códigos de construcción locales. I No quite el protector de la rejilla de ventilación de la parte posterior de la secadora (en algunos modelos). I Doble el protector hacia abajo a su posición más baja y conecte el conducto de escape en la - GE DCVH660EHMS | Owners Manual - Page 47
Seguridad Operación Apilado. ge.com ANTES DE COMENZAR Lea estas instrucciones por completo y con cuidado. en una etiqueta en la parte trasera de la secadora. I El espacio vertical mínimo del piso los armarios aéreos, techo, etc., es de 43″ sin el pedestal, 55″ con el pedestal y 84″ apilada. I - GE DCVH660EHMS | Owners Manual - Page 48
Seguridad Operación Apilado. CONTENIDO DEL JUEGO Abrazadera derecha 4 almohadillas de caucho Abrazadera izquierda HERRAMIENTAS QUE NECESITARÁ Destornillador Phillips Pinzas Llave española PREPARACIÓN PARA LA INSTALACIÓN Retire el embalaje. Aplaste el cartón del producto para utilizarlo como - GE DCVH660EHMS | Owners Manual - Page 49
Seguridad ge.com INSTALACIÓN DEL JUEGO DE ABRAZADERAS DE APILADO 1. Retire las patas niveladoras de la secadora A. Apoye la secadora sobre el material de embalaje de manera tal que las abrazaderas que estén adosadas a la parte inferior de la secadora no dañen el piso. 21 Soporte al consumidor - GE DCVH660EHMS | Owners Manual - Page 50
manos aquí 22 5. Instale la secadora y la abrazadera en la lavadora A. Levante la secadora y colóquela sobre la lavadora. Tenga cuidado de no rayar la parte superior de la lavadora con las abrazaderas. Proteja el panel de control de la lavadora con cartón u otra protección. Asegúrese de levantar la - GE DCVH660EHMS | Owners Manual - Page 51
Seguridad Consejos para la solución de problemas ¡Ahorre tiempo y dinero! Consulte primero las tablas de las páginas siguientes o visite ge.com y quizás no necesite llamar al servicio. Operación Solucionar problemas Problema La secadora tiembla o produce ruido Causas posibles Un poco de temblor - GE DCVH660EHMS | Owners Manual - Page 52
tambor • Esto es normal. Bajo ciertas condiciones de secado e iluminación ambiental de la habitación, el brillo de los calentadores podría ser visibles en la parte trasera del tambor. Las prendas aún Se abrió la puerta a la mitad del • Se debe volver a seleccionar un ciclo de secado cada vez se - GE DCVH660EHMS | Owners Manual - Page 53
Seguridad Operación ge.com Problema Las prendas están arrugadas Causas posibles Sobresecado Las utilizar un suavizador de telas. • Bounce® Fabric Conditioner Dryer Sheets ha sido aprobado para ser usado con todas las Secadoras GE y cuando se usen de acuerdo con las instrucciones del fabricante - GE DCVH660EHMS | Owners Manual - Page 54
Notas. 26 Soporte al consumidor Solucionar problemas Operación Seguridad - GE DCVH660EHMS | Owners Manual - Page 55
está situado en un área que no dispone de servicio por parte de un proveedor de servicio autorizado de GE, podría tener que hacerse cargo de los costes de envío Oficina de su Procurador General. Garante: General Electric Company. Louisville, KY 40225 Solucionar problemas Soporte al consumidor - GE DCVH660EHMS | Owners Manual - Page 56
normales de oficina. GE Consumer Home Services estará aún ahí cuando su garantía termine. Piezas y accesorios ge.com Aquellos individuos con o escríbanos a: General Manager, Customer Relations GE Appliances, Appliance Park Louisville, KY 40225 Registre su electrodoméstico ge.com ¡Registre su
-
 1
1 -
 2
2 -
 3
3 -
 4
4 -
 5
5 -
 6
6 -
 7
7 -
8
-
9
-
10
-
11
-
12
-
13
-
14
-
15
-
16
-
17
-
18
-
19
-
20
-
21
-
22
-
23
-
24
-
25
-
26
-
27
-
28
-
29
-
30
-
31
-
32
-
33
-
34
-
35
-
36
-
37
-
38
-
39
-
40
-
41
-
42
-
43
-
44
-
45
-
46
-
47
-
48
-
49
-
50
-
51
-
52
-
53
-
54
-
55
-
56
 |
 |

Safety Instructions
. . . . . . . . 2–5
Operating Instructions
Control Panels . . . . . . . . . . . . . . . . 6–8
Cycle Options . . . . . . . . . . . . . . . .9, 10
Dryer Features . . . . . . . . . . . . . . . . .10
Loading and Using
the Dryer . . . . . . . . . . . . . . . . . . . .16, 17
Reversing the Door Swing . . . .11–15
Stacking
. . . . . . . . . . . . . . . . . . .19–22
Venting the Dryer
. . . . . . . . . . . . . .18
Troubleshooting Tips
. . . .23–25
Consumer Support
Consumer Support . . . . . . . . . . . . . 28
Warranty
. . . . . . . . . . . . . . . . . . . . . 27
ge.com
Dryers
175D1807P606
49-90338
10-07 JR
DBVH520
DCVH515
DCVH640
DCVH660
DHDVH52
DHDVH66
Owner’s Manual
Write the model and serial
numbers here:
Model #
______________
Serial #
______________
They are on the label on
the front of the dryer behind
the door.