GE GTS18GBSCC Use and Care Manual
GE GTS18GBSCC - 18.2 cu. Ft. Top-Freezer Refrigerator Manual
 |
UPC - 084691125297
View all GE GTS18GBSCC manuals
Add to My Manuals
Save this manual to your list of manuals |
GE GTS18GBSCC manual content summary:
- GE GTS18GBSCC | Use and Care Manual - Page 1
Controls 4 Installation Instructions Preparing to Install the Refrigerator 7 Reversing the Door Swing . . .11-14 Water Line Installation 8-10 Troubleshooting Tips Before You Call For Service . . 15, 16 Normal Operating Sounds . . . . . .15 Consumer Support Consumer Support . . . . Back Cover - GE GTS18GBSCC | Use and Care Manual - Page 2
Support Troubleshooting Tips Installation Instructions Operating Instructions Safety Instructions IMPORTANT SAFETY INFORMATION. READ ALL INSTRUCTIONS BEFORE USING. WARNING! Use this appliance only for its intended purpose as described in this Owner's Manual moving parts of any servicing be problems - GE GTS18GBSCC | Use and Care Manual - Page 3
Safety Instructions Operating Instructions Installation Instructions Troubleshooting Tips Consumer Support IMPORTANT SAFETY INFORMATION. READ ALL INSTRUCTIONS BEFORE USING. ge.com WARNING! HOW TO CONNECT ELECTRICITY Do not, under any circumstances, cut or remove the third (ground) prong from - GE GTS18GBSCC | Use and Care Manual - Page 4
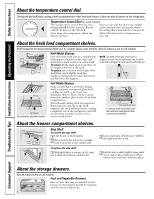
Consumer Support Troubleshooting Tips Installation Instructions Operating Instructions Safety Instructions About the temperature full-width sliding shelf has stop-locks. When placed correctly on the shelf supports, the shelf will stop before coming completely out of the refrigerator and will - GE GTS18GBSCC | Use and Care Manual - Page 5
Safety Instructions Operating Instructions Installation Instructions Troubleshooting Tips Consumer Support About the storage stop location. Full-Width Drawer with Plastic Cover To remove the cover, lift it off its supports, pull it forward, tilt it and take it out. Twin Drawer Shelf To remove: - GE GTS18GBSCC | Use and Care Manual - Page 6
Support Troubleshooting Tips Installation Instructions Operating Instructions Safety Instructions unplug the refrigerator from its electrical outlet, unscrew the bulb freezing, have a qualified servicer drain the water supply system It is available at most appliance parts stores. 6 Preparing to Move - GE GTS18GBSCC | Use and Care Manual - Page 7
tubing, shutoff valve, fittings and instructions) is available at extra cost from your at www.geappliances.ca) or from Parts and Accessories, 1.800.661.1616. support it fully loaded. CLEARANCES Allow the following clearances for ease of installation, proper air circulation and plumbing and electrical - GE GTS18GBSCC | Use and Care Manual - Page 8
or icemaker manufacturer. Follow these instructions carefully to minimize the risk house plumbing can cause damage to refrigerator parts and lead to water leakage or flooding. areas where temperatures fall below freezing. When using any electrical device (such as a power drill) during installation, - GE GTS18GBSCC | Use and Care Manual - Page 9
Installation Instructions Install the shutoff valve on the nearest frequently used drinking water line. 1 SHUT OFF THE MAIN WATER SUPPLY AND UNPLUG REFRIGERATOR Turn on the nearest - GE GTS18GBSCC | Use and Care Manual - Page 10
Installation Instructions 1 INSTALLING THE WATER LINE (CONT.) 7 CONNECT THE TUBING TO THE REFRIGERATOR NOTES: • Before making the connection to the refrigerator, be sure the refrigerator power cord - GE GTS18GBSCC | Use and Care Manual - Page 11
instructions all the way through before starting. • Handle parts carefully to avoid scratching paint. • Set screws down by their related parts -end wrench 1 BEFORE YOU START 1.1 Unplug the refrigerator from its electrical outlet. 1.2 Empty all door shelves, including the dairy compartment. CAUTION - GE GTS18GBSCC | Use and Care Manual - Page 12
Installation Instructions 2 REVERSING THE DOOR SWING (CONT.) 3 REMOVE THE FRESH FOOD DOOR 3.1 Tape the door shut with masking tape. 3 REMOVE THE FRESH FOOD DOOR (CONT.) 3.5 Transfer the - GE GTS18GBSCC | Use and Care Manual - Page 13
Installation Instructions 4 REVERSING THE HARDWARE (CONT.) 4.2 Interchange hinge and screws at top right with screws at top left of cabinet. Do not tighten screws on hinge side - GE GTS18GBSCC | Use and Care Manual - Page 14
Installation Instructions 2 REVERSING THE DOOR SWING (CONT.) 5 REVERSING THE DOOR HANDLES is brought into position, slide the hinge under the head of the screw which earlier had been partly driven into the outermost hole. Insert the remaining screw, then tighten both screws securely. 5.4.3 Remove - GE GTS18GBSCC | Use and Care Manual - Page 15
Safety Instructions Operating Instructions Installation Instructions Troubleshooting Tips Consumer Support Normal operating sounds. ge. service... Troubleshooting Tips Save time and money! Review the charts on the following pages first and you may not need to call for service. Problem - GE GTS18GBSCC | Use and Care Manual - Page 16
Consumer Support Troubleshooting Tips Installation Instructions Operating Instructions Safety Instructions Before you call for service... Troubleshooting Tips Problem Motor operates for long periods or cycles on and off frequently. (Modern refrigerators with more storage space and a larger space - GE GTS18GBSCC | Use and Care Manual - Page 17
and All Other Brands: One (1) Year One (1) Year Parts Repair or Replace at Mabe's Option GE Profile: Ten instructions supplied by Mabe and is connected to an adequate and proper utility service electrical, manual, proper setting of controls. • Product not accessible to provide required service - GE GTS18GBSCC | Use and Care Manual - Page 18
strive to provide you with excellent service in a professional and timely manner. Place your confidence in GE and call us in the U.S. toll-free at 1.800.626.2224 for more information. *Most brands covered up to 15 years old in the continental U.S. SPP is a trademark of General Electric Company. 18 - GE GTS18GBSCC | Use and Care Manual - Page 19
For refrigerators installed in the U.S. ✁ Cut here Please place in envelope and mail to: General Electric Company Warranty Registration Department P.O. Box 32150 Louisville, KY 40232-2150 For refrigerators installed in Canada Please place in envelope and mail to: Veuillez mettre dans - GE GTS18GBSCC | Use and Care Manual - Page 20
Name Apt. # E-mail Address* Zip City State Code Date Placed In Use Month Day Year Phone _ _ Number GE Consumer & Industrial Appliances General Electric Company Louisville, KY 40225 ge.com * Please provide your e-mail address to receive, via e-mail, discounts, special offers and other - GE GTS18GBSCC | Use and Care Manual - Page 21
Safety Instructions Operating Instructions Installation Instructions Troubleshooting Tips Consumer Support Refrigerator Warranty. (For customers in the United States) All warranty service provided by our Factory Service Centers, or an authorized Customer Care® technician. To schedule service, on- - GE GTS18GBSCC | Use and Care Manual - Page 22
devez bien installer et placer votre réfrigérateur, conformément aux Instructions d'installation avant de l'utiliser. ■ Ne permettez jamais aux enfants de parer. NOTE : Nous vous recommandons fortement de faire accomplir tout service par un technicien qualifié. ■ Lorsque vous réglez la commande sur - GE GTS18GBSCC | Use and Care Manual - Page 23
IMPORTANTES DE SÉCURITÉ. LISEZ TOUTES LES INSTRUCTIONS AVANT D'UTILISER VOTRE RÉFRIGÉRATEUR. AVERTISSEMENT! www.electromenagersge.ca BRANCHEMENT . LISEZ ET SUIVEZ SOIGNEUSEMENT CES MESURES DE SÉCURITÉ. CONSERVEZ CES INSTRUCTIONS Installation Conseils de dépannage Soutien au consommateur 23 - GE GTS18GBSCC | Use and Care Manual - Page 24
position 0. 1 est la température la plus élevée, 9 la plus basse. Au départ, réglez le bouton de commande à la position 5. Après avoir utilisé le réfrigé largeur possède des butées. Lorsqu'elle est placée correctement sur ses supports, la clayette s'arrêtera aux butées et ne sortira pas complètement - GE GTS18GBSCC | Use and Care Manual - Page 25
les côtés lorsque le bac dépasse la position de butée stop. Bac pleine largeur avec couvercle en plastique Pour enlever le couvercle, soulevez-le de ses supports, tirez-le vers l'avant, inclinez-le pour l'enlever. Soutien au consommateur 25 - GE GTS18GBSCC | Use and Care Manual - Page 26
de température peut le briser. 3 Enlevez le cadre du bac (enlevez toujours le couvercle en verre avant d'enlever le cadre). Soulevez le cadre des supports de chaque côté et derrière, tirez-le vers l'avant. Inclinez-le pour le retirer. Pour remettre les bacs : 1 Placez le cadre pour qu'il repose - GE GTS18GBSCC | Use and Care Manual - Page 27
coin avant du réfrigérateur vers la gauche pour que les roulettes supportent le poids du réfrigérateur. Tirez le réfrigérateur en ligne droite coupe pas l'alimentation électrique au circuit des lampes. Préparation de départ en vacances Pour de longues vacances ou absences, enlevez tous vos aliments - GE GTS18GBSCC | Use and Care Manual - Page 28
le robinet d'arrêt, les joints et les instructions) chez votre revendeur ou en vous adressant à notre site Web à l'adresse www.electromenagersge.ca ou à notre service de Pièces et accessoires au numéro place, tournez les pieds vers la droite jusqu'à ce qu'ils supportent le poids du réfrigérateur. 28 - GE GTS18GBSCC | Use and Care Manual - Page 29
frigérateur ou de machine à glaçons. Suivez soigneusement ces instructions pour minimiser le risque de dommages onéreux d'inondation. Les coups joints énumérés ci-dessous) chez votre distributeur local ou en le commandant au service de pièces et accessoires, au 1.800.661.1616. • Une alimentation d' - GE GTS18GBSCC | Use and Care Manual - Page 30
Instructions d'installation 1 INSTALLATION DE LA CONDUITE D'EAU (SUITE) Installez le robinet d'arrêt sur la canalisation d'eau potable la plus fréquemment utilisée. 1 FERMEZ L'ALIMENTATION PRINCIPALE D'EAU - GE GTS18GBSCC | Use and Care Manual - Page 31
Instructions d'installation 5 BRANCHEZ LE TUYAU AU ROBINET Placez un écrou de compression et une bague (manchon) à l'extrémité du tuyau et branchez-les au robinet d'arrêt. - GE GTS18GBSCC | Use and Care Manual - Page 32
Instructions d'installation 1 INSTALLATION DE LA CONDUITE D'EAU (SUITE) 7 BRANCHEZ LE TUYAU À VOTRE RÉFRIGÉRATEUR (SUITE) Insérez l'extrémité du tuyau dans le branchement du robinet d' - GE GTS18GBSCC | Use and Care Manual - Page 33
Instructions d'installation 2 INVERSION DE L'OUVERTURE DES PORTES NOTES IMPORTANTES Pour inverser le sens d'ouverture des portes : • Lisez toutes les directives avant de commencer. • Manipulez les piè - GE GTS18GBSCC | Use and Care Manual - Page 34
Instructions d'installation 2 INVERSION DE L'OUVERTURE DES PORTES (SUITE) 3 ENLÈVEMENT DE LA PORTE DU RÉFRIG suffisamment d'espace sous la tête de la vis pour pour l'épaisseur du support. 3.3 Enlevez le ruban et inclinez la porte en l'éloignant de la caisse. Relevez la porte de l'axe dans le - GE GTS18GBSCC | Use and Care Manual - Page 35
Instructions d'installation 4 INVERSION DE LA QUINCAILLERIE 4.1 Déplacez le support de la charnière inférieure et la rondelle en plastique du côté droit au côté gauche. Rondelle en plastique Support de charnière Changez l'axe de charnière au côté opposite de la charnière. 5 INVERSION DES POIGNÉES - GE GTS18GBSCC | Use and Care Manual - Page 36
Instructions d'installation 2 INVERSION DE L'OUVERTURE DES PORTES (SUITE) 5 INVERSION DES POIGNÉES DE PORTE (SUITE) 5.1 Transfert de la poignée de porte du réfrigérateur (suite) 5.1.5 Retirez - GE GTS18GBSCC | Use and Care Manual - Page 37
Instructions d'installation 6 REMONTAGE DES PORTES 6.1 Remontage de la porte du réfrigérateur 6.1.1 Placez la porte du réfrigérateur sur l'axe de charnière inférieure. Assurezvous - GE GTS18GBSCC | Use and Care Manual - Page 38
Notes. 38 Soutien au consommateur Conseils de dépannage Installation Fonctionnement Mesures de sécurité - GE GTS18GBSCC | Use and Care Manual - Page 39
Mesures de sécurité Fonctionnement Bruits normaux de fonctionnement. www.electromenagersge.ca Les réfrigérateurs plus récents font des bruits différents de ceux des anciens. Les réfrigérateurs modernes présentent plus de fonctions et sont plus avancés sur le plan technologique. Entendez-vous ce - GE GTS18GBSCC | Use and Care Manual - Page 40
Mesures de sécurité Fonctionnement Avant d'appeler un réparateur... En cas de panne Économisez votre temps et votre argent! Consultez les tableaux des pages suivantes, vous éviterez peut-être d'appeler un réparateur. Problème Votre réfrigérateur ne fonctionne pas Vibrations ou bruits de casse ( - GE GTS18GBSCC | Use and Care Manual - Page 41
Mesures de sécurité Fonctionnement Installation www.electromenagersge.ca Problème La machine à glaçons automatique ne fonctionne pas (sur certains modèles) Bourdonnement fréquent Glaçons trop petits La formation des glaçons est lente Les glaçons ont une odeur ou un goût De l'humidité se forme - GE GTS18GBSCC | Use and Care Manual - Page 42
au Canada, lorsque le réfrigérateur a été installé conformément aux instructions fournies par Mabe et est alimenté correctement en eau et en électricité. preuve d'achat et preuve de la date d'achat. Mabe vous offre ses services dans tout le pays. Pour de plus amples renseignements sur la présente - GE GTS18GBSCC | Use and Care Manual - Page 43
votre appareil électroménager? Contactez-nous par Internet au site www.electromenagersge.ca 24 heures par jour, tous les jours de l'année. Service de réparations Service de réparations GE est tout près de vous. Pour faire réparer votre électroménager GE, il suffit de nous téléphoner. 1.800.561 - GE GTS18GBSCC | Use and Care Manual - Page 44
fin para el cual fue diseñado como se describe en este Manual del propietario. PRECAUCIONES DE SEGURIDAD Al usar aparatos eléctricos, se evite el contacto con las partes en movimiento del mecanismo eyector, o con el elemento calefactor localizado en la parte inferior del dispositivo para hacer - GE GTS18GBSCC | Use and Care Manual - Page 45
Información de seguridad Instrucciones de operación ge.com ¡ADVERTENCIA! CÓMO CONECTAR LA ELECTRICIDAD Bajo ninguna circunstancia, no corte ni retire la tercera pata (conexión a tierra) del cable de electricidad. Por seguridad personal, este aparato debe estar correctamente conectado a tierra. - GE GTS18GBSCC | Use and Care Manual - Page 46
, el estante frena antes de salirse completamente del refrigerador y no se inclinará cuando coloque o retire alimentos del mismo. Levante la parte posterior Levante la parte posterior Consejos para la solución de problemas Soporte al consumidor Tire a la frente Para retirar los estantes de tama - GE GTS18GBSCC | Use and Care Manual - Page 47
Información de seguridad Instrucciones de operación Sobre los estantes del compartimiento del congelador. ge.com 12 3 Estante de escalón Para retirar el estante de escalón: 1 Levante el lado izquierdo del escalón ligeramente. Para reemplazar el estante de escalón: 1 Con el estante inclinado - GE GTS18GBSCC | Use and Care Manual - Page 48
una máquina de hielos automática, existe un kit accesorio para la máquina de hielos que está disponible por un costo adicional. Revise en la parte posterior del refrigerador en busca del kit para la máquina de hielos específica que necesita para su modelo. 48 Soporte al consumidor - GE GTS18GBSCC | Use and Care Manual - Page 49
0. Barra o aspire el polvo. Para mejores resultados use un cepillo especialmente diseñado para este fin. Está disponible en la mayoría de tiendas de partes de electrodomésticos. Mover el refrigerador Tenga cuidado al mover el refrigerador lejos de la pared. Todos los tipos de cubiertas de piso se - GE GTS18GBSCC | Use and Care Manual - Page 50
, accesorios e instrucciones) está disponible con un costo adicional a través de su proveedor, visitando nuestra página Web ge.com o bien a través de Partes y Accesorios, 1.800.661.1616. UBICACIÓN DEL REFRIGERADOR • No instale el refrigerador donde la temperatura baje de 60°F (16°C) ya que no correr - GE GTS18GBSCC | Use and Care Manual - Page 51
daño costoso debido al agua. El martilleo del agua (agua golpeando contra la tubería) en la tubería de la casa puede causar daños a las partes del refrigerador y conducir a un goteo o inundación por el agua. Llame a un plomero calificado para corregir el martilleo del agua antes de instalar la tuber - GE GTS18GBSCC | Use and Care Manual - Page 52
de una tubería vertical de agua. Cuado sea necesario conectarla en una tubería horizontal de agua, haga la conexión en la parte superior o al lado, en vez de hacerlo en la parte de abajo, para evitar retirar cualquier sedimento de la tubería del agua. Perfore un orificio de 1/4″ en la tubería del - GE GTS18GBSCC | Use and Care Manual - Page 53
corriente del refrigerador no esté conectado en el tomacorriente de la pared. • Recomendamos instalar un filtro de agua si su suministro de agua tiene arena o partículas que podrían obstruir la malla de la válvula de agua del refrigerador. Instálelo en la tubería del agua cerca al refrigerador. Si - GE GTS18GBSCC | Use and Care Manual - Page 54
la bisagra superior del gabinete. 2.3 Levante la bisagra directamente hacia arriba para liberar el pasador de la bisagra del casquillo en la parte superior de la puerta y colóquela a un lado, junto con los tornillos correspondientes. Bisagra superior Destornillador de estrella Cinta de enmascarar - GE GTS18GBSCC | Use and Care Manual - Page 55
16,″ retire los dos tornillos que sostienen la bisagra central al gabinete. Levante la bisagra central para liberar el pasador del casquillo en la parte superior de la puerta y coloque la bisagra y los tornillos a un lado. Tenga cuidado de no perder el espaciador y la arandela de la bisagra central - GE GTS18GBSCC | Use and Care Manual - Page 56
puerta Lado derecho 5.1.2 Retire la manija. Lado izquierdo Freno plástico de la puerta Lado derecho 5.1.3 Retire los tornillos del borde derecho de la parte superior de la puerta e insértelos en los orificios de los tornillos de la manija en el lado opuesto. Tornillos para los orificios de la - GE GTS18GBSCC | Use and Care Manual - Page 57
freno de la puerta, como se muestra en la sección 5.2 anterior. 5.4.5 Una la manija al borde derecho de la puerta con tornillos en la parte superior e inferior, usando los orificios que quedan al retirar los tornillos del freno de la puerta. 6 CÓMO VOLVER A COLGAR LAS PUERTAS 6.1 Vuelva a colgar la - GE GTS18GBSCC | Use and Care Manual - Page 58
Información de seguridad Instrucciones de operación Sonidos normales de operación. Los refrigeradores más nuevos producen sonidos diferentes a los modelos más antiguos. Los refrigeradores modernos tienen más funciones y usan tecnología más reciente. ¿Usted escucha lo que yo escucho? Estos sonidos - GE GTS18GBSCC | Use and Care Manual - Page 59
ge.com Información de seguridad Instrucciones de operación Instrucciones para la instalación Problema El motor opera con frecuencia por largos periodos o ciclos de forma intermitente (Los refrigeradores modernos con más espacio de almacenamiento y un congelador más grande requieren de más tiempo - GE GTS18GBSCC | Use and Care Manual - Page 60
Notas. 60 Soporte al consumidor Consejos para la solución de problemas Instrucciones para la instalación Instrucciones de operación Información de seguridad - GE GTS18GBSCC | Use and Care Manual - Page 61
Notas. ge.com Información de seguridad Instrucciones de operación Instrucciones para la instalación Consejos para la solución de problemas Soporte al consumidor 61 - GE GTS18GBSCC | Use and Care Manual - Page 62
Unidos. Si el producto está situado en un área que no dispone de servicio por parte de un proveedor de servicio autorizado de GE, podría tener que hacerse cargo de los del consumidor local o la oficina del Attorney General en su localidad. 62 Garante: General Electric Company. Louisville, KY 40225 - GE GTS18GBSCC | Use and Care Manual - Page 63
al (1.888.261.2133) durante horas normales de oficina. GE Consumer Home Services estará aún ahí cuando su garantía termine. Piezas y accesorios ge.com en este manual cubren los procedimientos a seguir por cualquier usuario. Cualquier otra reparación debería, por regla general, referirse a - GE GTS18GBSCC | Use and Care Manual - Page 64
.661.1616 during normal business hours. Instructions contained in this manual cover procedures to be performed by any user. Other servicing generally should be referred to qualified service personnel. Caution must be exercised, since improper servicing may cause unsafe operation. Customers in Canada
-
 1
1 -
 2
2 -
 3
3 -
 4
4 -
 5
5 -
 6
6 -
 7
7 -
8
-
9
-
10
-
11
-
12
-
13
-
14
-
15
-
16
-
17
-
18
-
19
-
20
-
21
-
22
-
23
-
24
-
25
-
26
-
27
-
28
-
29
-
30
-
31
-
32
-
33
-
34
-
35
-
36
-
37
-
38
-
39
-
40
-
41
-
42
-
43
-
44
-
45
-
46
-
47
-
48
-
49
-
50
-
51
-
52
-
53
-
54
-
55
-
56
-
57
-
58
-
59
-
60
-
61
-
62
-
63
-
64
 |
 |
ge.com
Refrigerators
Top-Freezer
197D5226P005
49-60512-1
08-08 JR
Safety Instructions
. . . . . . . . . .2, 3
Operating Instructions
Automatic Icemaker . . . . . . . . . . . .5
Care and Cleaning . . . . . . . . . . . . .6
Shelves . . . . . . . . . . . . . . . . . . . . . . .4
Storage Drawers
. . . . . . . . . . . . .4, 5
Temperature Controls
. . . . . . . . . .4
Installation Instructions
Preparing to Install
the Refrigerator
. . . . . . . . . . . . . . .7
Reversing the Door Swing . . .11–14
Water Line Installation . . . . . . .8–10
Troubleshooting Tips
Before You Call For Service . .15, 16
Normal Operating Sounds . . . . . .15
Consumer Support
Consumer Support . . . . Back Cover
Product Registration
(Canadian) . . . . . . . . . . . . . . . 19, 20
Product Registration (U.S.)
. 18–20
Warranty for
Canadian Customers . . . . . . . . . . 17
Warranty for U.S. Customers
. . . 21
Réfrigérateurs
Congélateur supérieur
Refrigeradores
Congelador superior
Models 16,17,18
Manuel d’utilisation
et d’installation
Owner’s Manual and
Installation Instructions
Manual del propietario
e instalación
La section française commence à la page 22
La sección en español empieza en la página 44
Write the model and serial
numbers here:
Model #
__________________________
Serial #
__________________________
You can find them on a label on
the upper left side of the fresh food
compartment.
Refrigerators
Top-Freezer
Mesures de sécurité
. . . . . . . 22–23
Instructions de fonctionnement
Bacs de rangement . . . . . . . . .25, 26
Clayettes
. . . . . . . . . . . . . . . . .24, 25
Commandes de
la température
. . . . . . . . . . . . . . .24
Entretien et nettoyage . . . . . . . . .27
Machine à glaçons
automatique
. . . . . . . . . . . . . . . . .26
Instructions d’installation
Installation de la
conduite d’eau
. . . . . . . . . . . .29–32
Inversion de
l’ouverture des portes . . . . . . .33–37
Préparation à l’installation
du réfrigérateur
. . . . . . . . . . . . . .28
En cas de panne
Avant d’appeler
un réparateur . . . . . . . . . . . . . .40, 41
Bruits normaux
de fonctionnement . . . . . . . . . . . .39
Soutien au consommateur
Garantie . . . . . . . . . . . . . . . . . . . . .42
Soutien au consommateur . . . . . .43
Información de seguridad
. . . 44–45
Instrucciones de operación
Control
. . . . . . . . . . . . . . . . . . . . .46
Cuidado y limpieza
. . . . . . . . . . .49
Estantes . . . . . . . . . . . . . . . . . .46, 47
Gavetas de
almacenamiento . . . . . . . . . . .47, 48
Máquina de
hielos automática
. . . . . . . . . . . . .48
Instrucciones para la instalación
Cómo invertir el
vaivén de la puerta . . . . . . . . .56–57
Instalación de la
tubería del agua
. . . . . . . . . . .51–55
Preparación para
instalar el refrigerador . . . . . . . . .50
Consejos para la solución
de problemas
Antes de solicitar
un servicio . . . . . . . . . . . . . . . .58, 59
Sonidos normales
de operación . . . . . . . . . . . . . . . . .58
Soporte al consumidor
Garantía
. . . . . . . . . . . . . . . . . . . .62
Soporte al consumidor . . . . . . . . .63
Escriba aquí el modelo y el número
de serie:
Modelo
#
________________________
Serie #
__________________________
Encuentre estos números en la etiqueta
en el lado izquierdo de la parte superior
del compartimiento del refrigerador.
Écrivez ici le numéro de modèle et le
numéro de série :
Modèle #__________________________
Série #
__________________________
Vous les trouvez sur une étiquette
dans le coin supérieur gauche du
compartiment réfrigérateur.