GE PFSS9PKYSS Use and Care Manual
GE PFSS9PKYSS - 28.5 CF Ref Manual
 |
UPC - 084691194187
View all GE PFSS9PKYSS manuals
Add to My Manuals
Save this manual to your list of manuals |
GE PFSS9PKYSS manual content summary:
- GE PFSS9PKYSS | Use and Care Manual - Page 1
Pans 18 Dispenser 14 Freezer 19 Fresh Food Storage Options . . . .16, 17 Replacing the Light Bulbs 23 Water Filter 15 Installation Instructions Installing the Refrigerator 26-34 Installing the Water Line 35-37 Preparing to Install the Refrigerator 24, 25 Troubleshooting Tips . . . . . .38 - GE PFSS9PKYSS | Use and Care Manual - Page 2
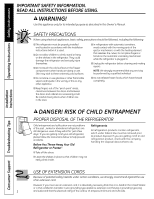
. I Unplug the refrigerator before cleaning and making repairs. NOTE: We strongly recommend that any servicing be performed by a qualified individual. I Do not refreeze frozen foods which have thawed completely. I Keep fingers out of the "pinch point" areas; clearances between the doors and between - GE PFSS9PKYSS | Use and Care Manual - Page 3
abrasion damage along its length or at either end. When moving the refrigerator away from the wall, be careful not to roll over or damage the power cord. READ AND FOLLOW THIS SAFETY INFORMATION CAREFULLY. SAVE THESE INSTRUCTIONS Installation Instructions Troubleshooting Tips Consumer Support 3 - GE PFSS9PKYSS | Use and Care Manual - Page 4
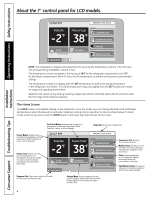
available. Dispenser Tab: Select water, crushed ice or cubed ice. Also access the dispenser light. Settings Menu: Access refrigerator functions such as TurboCool, Energy Saver and Door Alarm. Change brightness of the display and replace the water filter. 4 Consumer Support Troubleshooting Tips - GE PFSS9PKYSS | Use and Care Manual - Page 5
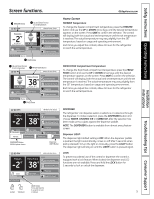
. Each time you adjust the controls, allow 24 hours for the refrigerator to reach the set temperature. Installation Instructions Troubleshooting Tips Consumer Support 12:00 PM FREEZER -2 WATER FILTER: GOOD FRESH FOOD 38 EXTRAS CONVERSIONS NUTRITION FACTS LOCK DISPENSHEORLD 3 SECONDS SETTINGS - GE PFSS9PKYSS | Use and Care Manual - Page 6
unit Installation Instructions Consumer Support Troubleshooting Tips DISPENSER WATER HOME 12:00 PM FREEZER -2 Nutrition Facts Button WATER FILTER: GOOD FRESH FOOD 38 EXTRAS CONVERSIONS NUTRITION FACTS LOCK HOLD 3 SECONDS SETTINGS PHOTOS SUBSTITUTIONS DISPENSER WATER Choose ingredient - GE PFSS9PKYSS | Use and Care Manual - Page 7
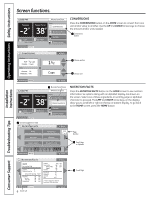
Instructions Operating Instructions GEAppliances.com Installation Instructions 12:00 PM FREEZER -2 WATER FILTER: GOOD FRESH FOOD 38 EXTRAS CONVERSIONS NUTRITION FACTS LOCK HOLD 3 SECONDS SETTINGS PHOTOS SUBSTITUTIONS DISPENSER WATER PHOTOS Use the PHOTOS button to upload and display - GE PFSS9PKYSS | Use and Care Manual - Page 8
feature will give you access to: I TurboCool™ settings I TurboFreeze™ settings I instructions for changing the water filter I access to systems such as door alarm I Metric/English display REFRIGERATOR Press the REFRIGERATOR button to access the TurboCool setting for the fresh food compartment and - GE PFSS9PKYSS | Use and Care Manual - Page 9
HOME WATER FILTER BACK Water Filter Replacement Info: Replace with a GE "MWF" water filter. In the US go to ge.com or call 1-800-626-2002. In Canada consult the yellow pages for the nearest Mabe Service Center. FILTER STATUS: GOOD DISPENSER WATER REMIND LATER REPLACE HOME Troubleshooting - GE PFSS9PKYSS | Use and Care Manual - Page 10
Installation Instructions Screen functions. SETTINGS BACK REFRIGERATOR WATER FILTER SYSTEM SCREEN DISPENSER WATER DOOR ALARM Button SYSTEM DOOR ALARM BUTTON TONES SYSTEM Button HOME BACK TIME (SET TIME) UNITS ENGLISH METRIC ENERGY SAVER ICE MAKER COOLING SYSTEM DISPENSER WATER ENERGY - GE PFSS9PKYSS | Use and Care Manual - Page 11
Installation Instructions SYSTEM DOOR ALARM BUTTON TONES ENERGY SAVER METRIC Button BACK TIME (SET TIME) UNITS ENGLISH METRIC ICE MAKER COOLING SYSTEM DISPENSER WATER ICEMAKER Button HOME 12:00 PM FREEZER -18 C FRESH FOOD 3C WATER FILTER: GOOD EXTRAS CONVERSIONS NUTRITION FACTS LOCK - GE PFSS9PKYSS | Use and Care Manual - Page 12
KEEPER ˚F 38˚ F Recommended ICE OFF RESET FILTER CUBED CRUSHED WATER ALARM/ LIGHT Light ON/OFF (Hold 3 seconds) ADJUST REFRIGERATOR (Hold 3 sec for Turbo Cool) ICE OFF/ LOCK (Hold 3 sec to Lock Control) Model 29 Installation Instructions Consumer Support Troubleshooting Tips NOTE: The - GE PFSS9PKYSS | Use and Care Manual - Page 13
freezer temperature cannot be changed during TurboFreeze. I The refrigerator temperature is not affected during TurboFreeze. I When opening the freezer door during TurboFreeze, the fans will continue to run if they have cycled on. Installation Instructions Troubleshooting Tips Consumer Support 13 - GE PFSS9PKYSS | Use and Care Manual - Page 14
˚F 38˚ F Recommended ICE OFF RESET FILTER CUBED CRUSHED WATER ALARM/ LIGHT Light ON/OFF (Hold 3 seconds) ADJUST REFRIGERATOR (Hold 3 sec for Turbo Cool) ICE OFF/ LOCK (Hold 3 sec to Lock Control) To Use the Dispenser Select CUBED , CRUSHED or WATER by pressing the ICE & WATER pad. Press the - GE PFSS9PKYSS | Use and Care Manual - Page 15
Filter Bypass Plug ICE & WATER (Hold 3 sec to Reset Filter) Water Filter Cartridge The water filter cartridge is located in the back upper right corner of the refrigerator compartment. When to Replace the Filter The filter cartridge should be replaced when indicated on the control panel. The water - GE PFSS9PKYSS | Use and Care Manual - Page 16
(just like spillproof shelves). NOTE: The location of the upper Quick Space Shelf is not adjustable. Slide-Out Spillproof Shelves These shelves can be slid out to provide easy access to items near the back of the refrigerator and to provide easy cleaning. 16 Consumer Support Troubleshooting Tips - GE PFSS9PKYSS | Use and Care Manual - Page 17
dairy bin straight up, then pull out. GEAppliances.com To replace: Engage the bin in the molded door supports and push down. The bin will lock in place. Adjustable Bins on the Door Adjustable bins can easily be carried from refrigerator to work area. To remove: Lift bin straight up, then pull out - GE PFSS9PKYSS | Use and Care Manual - Page 18
bottles at this setting for a long period of time, If they are frozen, they can break and cause personal injury. How to Remove and Replace the Adjustable Deli/Produce Drawer To remove: Pull the drawer out to the stop position. To replace: Lift the cover up. Lift the front of the drawer up and - GE PFSS9PKYSS | Use and Care Manual - Page 19
. Non-Adjustable Bin in the Freezer To remove: Pull the brackets upward until you hear a clicking sound and remove the bin. To replace: Hook the ends of the bin into both brackets and push down until the bin locks into place. Installation Instructions Troubleshooting Tips Consumer Support 19 - GE PFSS9PKYSS | Use and Care Manual - Page 20
cloudy, taste stale and shrink. NOTE: In homes with lower-than-average water pressure, you may hear the icemaker cycle multiple times when making one batch of ice. NOTE: If the water supply is shut off, press and release the ICE OFF/LOCK pad on the control panel of the non-LCD model. For the LCD - GE PFSS9PKYSS | Use and Care Manual - Page 21
the refrigerator with a soiled dish cloth or wet towel. These may leave a residue that can erode the paint. Do not use scouring pads, powdered cleaners, bleach or cleaners containing bleach because these products can scratch and weaken the paint finish. The stainless steel panels and door handles - GE PFSS9PKYSS | Use and Care Manual - Page 22
ICE OFF/LOCK pad on the control panel (the icon displays) and shut off the water supply to the refrigerator. LCD Models: Turn off the icemaker by following the screen commands shown in the LCD Controls section. If the temperature can drop below freezing, have a qualified servicer drain the water - GE PFSS9PKYSS | Use and Care Manual - Page 23
. Turn the bulb counterclockwise. Replace with an appliance bulb of the same or lower wattage. Replace the shield. Plug the refrigerator back in. NOTE: Appliance bulbs may be ordered from GE Parts and Accessories, 800.626.2002. Installation Instructions Troubleshooting Tips Consumer Support 23 - GE PFSS9PKYSS | Use and Care Manual - Page 24
, see the Removing the Freezer Drawer section. WATER SUPPLY TO THE ICEMAKER AND DISPENSER If the refrigerator has an icemaker, it will have to be connected to a cold water line. A GE water supply kit (containing tubing, shutoff valve, fittings and instructions) is available at extra cost from your - GE PFSS9PKYSS | Use and Care Manual - Page 25
353⁄4″ Installation Instructions Case Depth w/o Doors 291⁄8″ 225⁄8″ Height from floor 70 ″ 681⁄2″ to hinge cover top 6913⁄16″ 355⁄8″ Additional Dimensions Overall Height to Top of Hinge Cover at Max. Height Height from Floor to Lower Level of Hinge Cover Case Depth without Doors Height to - GE PFSS9PKYSS | Use and Care Manual - Page 26
hand truck to move this refrigerator. Place the refrigerator on the hand truck with a side against the truck. We strongly recommend that TWO PEOPLE move and complete this installation. 1 REMOVE THE FRESH FOOD DOOR HANDLE Stainless steel: A REMOVING THE DOOR HANDLE: Loosen the set screws - GE PFSS9PKYSS | Use and Care Manual - Page 27
Installation Instructions 3 ATTACH THE FRESH FOOD DOOR HANDLE Stainless steel handle: A Attach the handle to the handle A mounting fasteners and tighten the set screws with a 3/32″ Allen wrench. Mounting Fasteners 4 ATTACH THE FREEZER DOOR HANDLE Stainless steel and plastic handles: A - GE PFSS9PKYSS | Use and Care Manual - Page 28
from the center hinge. Set the hinge, bolts and screw aside. 6 REPLACING THE REFRIGERATOR DOORS A Install the center hinge on each side. E To disconnect the water coupling, push in on the gray coupling and pull out the tubing. Gray Coupling F Remove the two ground wires with a Phillips-head - GE PFSS9PKYSS | Use and Care Manual - Page 29
Installation Instructions 6 REPLACING THE REFRIGERATOR DOORS (cont.) D Insert the top hinge pin into the hinge hole on top of the refrigerator door. Make sure the door is aligned with the cabinet and opposite door. Attach the hinge to the top of the cabinet. Do not tighten bolts completely. 7 - GE PFSS9PKYSS | Use and Care Manual - Page 30
Installation Instructions INSTALLING THE REFRIGERATOR (cont.) 7 REMOVE THE FREEZER DOOR (cont.) E Use the tip of a screwdriver to separate the rail from the rail cover. Tilt the front end up and lift the entire door. 8 REMOVING THE LEVELING LEGS (if applicable) (cont.) 29-cu.-ft. models Two - GE PFSS9PKYSS | Use and Care Manual - Page 31
back so the front end is off of the floor. B Replace the 2 bolts to secure the leveling leg bracket to the underside of the refrigerator cabinet. Do this on both sides. 10 REPLACING THE FREEZER DOOR Two people may be required to complete this procedure. ATTACH AND SECURE THE DRAWER FRONT - GE PFSS9PKYSS | Use and Care Manual - Page 32
could clog the screen of the refrigerator's water valve. Install it in the water line near the refrigerator. If using GE SmartConnect™ Refrigerator Tubing Kit, you will need an additional tube (WX08X10002) to connect the filter. Do not cut plastic tube to install filter. A If you are using copper - GE PFSS9PKYSS | Use and Care Manual - Page 33
Instructions 12 TURN ON THE WATER SUPPLY Turn the water on at the shutoff valve (house water supply) and check for any leaks. 13 PLUG IN THE REFRIGERATOR 15 LEVEL THE REFRIGERATOR DOORS Remember a level refrigerator is necessary for getting the doors perfectly even. If you need help, review - GE PFSS9PKYSS | Use and Care Manual - Page 34
Installation Instructions INSTALLING THE REFRIGERATOR (cont.) 16 LEVEL THE FREEZER DOOR 16 LEVEL THE FREEZER DOOR (cont.) C Find the best position to align the door slope. A Locate the height adjuster in the freezer door. Slightly loosen the four Phillips-head screws from the door on each side ( - GE PFSS9PKYSS | Use and Care Manual - Page 35
is operated before the water connection is made to the icemaker, press and release the ICE OFF/LOCK pad on the control panel to disengage the icemaker. When the refrigerator has been connected to the water supply, press and release the ICE OFF/LOCK pad on the control panel to engage the icemaker - GE PFSS9PKYSS | Use and Care Manual - Page 36
types of plastic will crack or rupture with age and cause water damage to your home. • A GE water supply kit (containing tubing, shutoff valve and fittings listed below) is available at extra cost from your dealer or from Parts and Accessories, 800.626.2002 (in Canada 1.800.661.1616). • A cold - GE PFSS9PKYSS | Use and Care Manual - Page 37
nut and ferrule (sleeve) for copper tubing onto the end of the tubing and connect it to the shutoff valve. Make sure the tubing is fully inserted into the valve. Tighten the compression nut securely. For plastic tubing from a GE SmartConnect™ Refrigerator Tubing kit, insert the molded end of the - GE PFSS9PKYSS | Use and Care Manual - Page 38
! Review the charts on the following pages first and you may not need to call for service. Installation Instructions Consumer Support Troubleshooting Tips Problem Refrigerator does not operate Vibration or rattling (slight vibration is normal) 38 Possible Causes Refrigerator in defrost cycle - GE PFSS9PKYSS | Use and Care Manual - Page 39
release the ICE OFF/LOCK pad on the control panel to turn on the Ice Off feature, and then the icon will be displayed. Keeping the Ice Off feature on will damage the water valve. LCD models: • On the LCD screen, select SETTING, then SYSTEM to get access to the icemaker. • Replace filter cartridge - GE PFSS9PKYSS | Use and Care Manual - Page 40
Instructions Safety Instructions Before you call for service... Troubleshooting Tips Problem Ice cubes have odor/taste Possible Causes Food transmitting odor/taste to ice cubes. Interior of refrigerator needs cleaning. Slow ice cube freezing Refrigerator has odor Door left open. Freezer control - GE PFSS9PKYSS | Use and Care Manual - Page 41
be trapped in the water system. Water in reservoir is frozen because the controls are set too cold. • See Installing the water line. • Replace filter cartridge or remove filter and install plug. • Press the dispenser arm for at least 2 minutes. • Set the refrigerator control to a warmer setting and - GE PFSS9PKYSS | Use and Care Manual - Page 42
• See About the water filter for more information. Handle is loose / handle Handle needs adjusting. has a gap • See Attach the Fresh Food handle and Attach the Freezer handle sections for detailed instructions. Refrigerator beeping This is the door alarm. • Close door. Control setting is not - GE PFSS9PKYSS | Use and Care Manual - Page 43
Please place in envelope and mail to: Veuillez mettre dans une enveloppe et envoyez à : OWNERSHIP REGISTRATION P.O. BOX 1780 MISSISSAUGA, ONTARIO L4Y 4G1 (FOR CANADIAN CONSUMERS ONLY) 43 - GE PFSS9PKYSS | Use and Care Manual - Page 44
44 - GE PFSS9PKYSS | Use and Care Manual - Page 45
also provide, free of charge, a replacement water filter cartridge. GE PROFILE MODELS ONLY: Five Years (GE Profile models only) From the date of the original purchase Any part of the sealed refrigerating system (the compressor, condenser, evaporator and all connecting tubing) which fails due to - GE PFSS9PKYSS | Use and Care Manual - Page 46
. What is covered How Long Warranted (From Date of Sale) Parts Repair or Replace at Mabe's Option Labour Compressor GE Profile: Ten (10) Years GE Profile: Ten (10) Years GE Profile: Five (5) Years GE and All Other GE and All Other GE and All Other Brands: One (1) Year Brands: One (1) Year - GE PFSS9PKYSS | Use and Care Manual - Page 47
instructions, parts and service availability, and standard warranty are included with the product when shipped. ‡ This drinking water system must be maintained according to manufacturer's instructions, including replacement of filter NSF® Manufactured for: General Electric Company, Louisville, KY - GE PFSS9PKYSS | Use and Care Manual - Page 48
State of California Department of Health Services Water Treatment Device Certificate Number 05 - 1698 Date Issued: February 2, 2005 Trademark/Model Designation MWF Manufacturer: General Electric Company Replacement Elements MWF The water treatment device(s) listed on this certificate have met the - GE PFSS9PKYSS | Use and Care Manual - Page 49
Mesures de sécurité Fonctionnement Installation Mesures de sécurit 50, 51 Fonctionnement Congélateur 67 Contrôle pour les modèles ACL 52-59 Contrôle pour les modèles non équipés d'un écran ACL 60, 61 Entretien et nettoyage du réfrigérateur 69, 70 Le distributeur 62 Le filtre à eau 63 Les - GE PFSS9PKYSS | Use and Care Manual - Page 50
Conseils de dépannage DANGER! RISQUES POUR LES ENFANTS COMMENT VOUS DÉBARRASSER CONVENABLEMENT DE VOTRE ANCIEN RÉFRIGÉRATEUR Les enfants pris au piège ou morts d'asphyxie sont toujours d'actualité. Les réfrigérateurs abandonnés sont toujours aussi dangereux, même si on n'attend que «quelques jours - GE PFSS9PKYSS | Use and Care Manual - Page 51
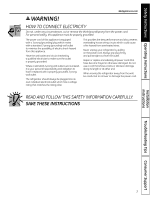
Mesures de sécurité Fonctionnement www.electromenagersge.ca AVERTISSEMENT! RACCORDEMENT ÉLECTRIQUE Ne coupez ni retirez en aucun cas la troisième broche (mise à la terre) de la fiche du cordon d'alimentation. Pour votre sécurité, cet appareil doit être correctement mis à la terre. Le cordon d' - GE PFSS9PKYSS | Use and Care Manual - Page 52
-2 WATER FILTER: GOOD FRESH FOOD 38 EXTRAS CONVERSIONS NUTRITION FACTS LOCK HOLD 3 SECONDS SETTINGS PHOTOS SUBSTITUTIONS DISPENSER WATER REMARQUE revenir à cet écran, vous pouvez appuyer en tout temps sur le bouton HOME (écran principal) qui se trouve dans le coin inférieur droit de l'écran - GE PFSS9PKYSS | Use and Care Manual - Page 53
WATER FILTER: GOOD FREEZER -02 ACTUAL: 0˚F (RECOMMENDED: 0˚F) LOCK HOLD 3 SECONDS FRESH FOOD 38 SET TEMP SAVE SETTINGS EXTRAS CONVERSIONS NUTRITION FACTS PHOTOS SUBSTITUTIONS DISPENSER WATER Écran Home DISPENSER (distributeur), puis choisissez WATER (eau), CRUSHED ICE (glace pilée) ou CUBED ICE - GE PFSS9PKYSS | Use and Care Manual - Page 54
é Installation Conseils de dépannage DISPENSER WATER HOME 12:00 PM FREEZER -2 Bouton de Valeurs Nutritionnelles WATER FILTER: GOOD FRESH FOOD 38 EXTRAS CONVERSIONS NUTRITION FACTS LOCK HOLD 3 SECONDS SETTINGS PHOTOS SUBSTITUTIONS DISPENSER WATER VALEURS NUTRITIONNELLES Appuyez sur le - GE PFSS9PKYSS | Use and Care Manual - Page 55
WATER FILTER: GOOD PHOTOS FREEZER -2 FRESH FOOD 38 EXTRAS CONVERSIONS NUTRITION FACTS LOCK HOLD 3 SECONDS SETTINGS PHOTOS SUBSTITUTIONS DISPENSER WATER vous sera toujours possible d'annuler l'action en appuyant sur DISPENSER WATER HOME CANCEL (annuler) avant que les photos ne soient - GE PFSS9PKYSS | Use and Care Manual - Page 56
FRESH FOOD 38 WATER FILTER: GOOD EXTRAS CONVERSIONS NUTRITION FACTS LOCK HOLD 3 SECONDS SETTINGS PHOTOS SUBSTITUTIONS DISPENSER WATER Bouton SETTINGS (Réglages) Bouton REFRIGERATOR (Réfrigérateur) SETTINGS BACK REFRIGERATOR WATER FILTER SYSTEM SCREEN DISPENSER WATER HOME RÉGLAGES La - GE PFSS9PKYSS | Use and Care Manual - Page 57
À EAU HOME WATER FILTER BACK Water Filter Replacement Info: Replace with a GE "MWF" water filter. In the US go to ge.com or call 1-800-626-2002. In Canada consult the yellow pages for the nearest Mabe Service Center. FILTER STATUS: GOOD DISPENSER WATER REMIND LATER REPLACE HOME Conseils de - GE PFSS9PKYSS | Use and Care Manual - Page 58
BACK REFRIGERATOR WATER FILTER SYSTEM SCREEN DISPENSER WATER Bouton ALARME DE LA PORTE SYSTEM DOOR ALARM BUTTON TONES Bouton SYSTÉME HOME BACK TIME (SET TIME) UNITS ENGLISH METRIC ENERGY SAVER ICE MAKER COOLING SYSTEM DISPENSER WATER Bouton ÉCONOMISEUR D'ÉNERGIE HOME SYSTEM DOOR ALARM - GE PFSS9PKYSS | Use and Care Manual - Page 59
ICE MAKER COOLING SYSTEM DISPENSER WATER HOME Bouton ICEMAKER (machine à glaçons) 12:00 PM FREEZER -18 C FRESH FOOD 3C WATER FILTER: GOOD EXTRAS CONVERSIONS NUTRITION FACTS LOCK HOLD 3 SECONDS SETTINGS DISPENSER WATER PHOTOS SUBSTITUTIONS SETTINGS DISPENSER WATER REFRIGERATOR WATER - GE PFSS9PKYSS | Use and Care Manual - Page 60
TURBO COOL ˚F -2˚ F Recommended CLIMATE KEEPER ˚F 38˚ F Recommended ICE OFF RESET FILTER CUBED CRUSHED WATER ALARM/ LIGHT Light ON/OFF (Hold 3 seconds) ADJUST REFRIGERATOR (Hold 3 sec for Turbo Cool) ICE OFF/ LOCK (Hold 3 sec to Lock Control) Modèle de 29 Installation Conseils de dépannage - GE PFSS9PKYSS | Use and Care Manual - Page 61
érateur se mettront immédiatement en marche pendant deux heures et demie puis se reviendront ensuite au paramètre de départ. Utilisation Appuyez sur la touche ADJUST REFRIGERATOR (réglage réfrigérateur) et tenez-la appuyée pendant 3 secondes jusqu'à ce vous entendiez un bip et que s'affiche. Quand - GE PFSS9PKYSS | Use and Care Manual - Page 62
CLIMATE KEEPER ˚F 38˚ F Recommended ICE OFF RESET FILTER CUBED CRUSHED WATER ALARM/ LIGHT Light ON/OFF (Hold 3 seconds) ADJUST REFRIGERATOR (Hold 3 sec for Turbo Cool) ICE OFF/ LOCK (Hold 3 sec to Lock Control) Bac de trop-plein ICE & WATER Pour utiliser le distributeur Sélectionnez CUBED - GE PFSS9PKYSS | Use and Care Manual - Page 63
Support de cartouche Bouchon de dérivation du filtre ICE & WATER (Hold 3 sec to Reset Filter - Changez bientôt Rouge - Changez immédiatement Suivez les instructions de la section FILTRE À EAU, À propos du Panneau www.electromenagersge.ca, ou appelez le Service des pièces et accessoires au 800 - GE PFSS9PKYSS | Use and Care Manual - Page 64
Fonctionnement Mesures de sécurité Installation À propos des options de conservation du réfrigérateur. Mise en place des clayettes Les clayettes du réfrigérateur sont réglables. Enlèvement : Enlevez tous les articles de la clayette. Soulevez la clayette à l'avant. Soulevez la clayette à l'arrière - GE PFSS9PKYSS | Use and Care Manual - Page 65
Mesures de sécurité Fonctionnement www.electromenagersge.ca Bac non réglable à produits laitiers Enlèvement : Soulevez le bac à produits laitiers vers le haut, puis enlevez-le. Remise en place : Insérez le bac dans les soutiens moulés de la porte et poussez-le vers le bas. Le bac se verrouillera - GE PFSS9PKYSS | Use and Care Manual - Page 66
Fonctionnement Mesures de sécurité Installation Bacs à rangement et bacs à légume. Bacs à fruits et légumes Gardez vos fruits et légumes dans des compartiments séparés pour un accès plus facile. Vous devez bien essuyer toute eau en excès qui peut s'accumuler au fond des bacs ou en dessous des bacs - GE PFSS9PKYSS | Use and Care Manual - Page 67
le bac vers vous puis vers le haut pour le retirer des guides. Remise en place : Placez les roulettes du bac sur les guides et poussez le bac en l'abaissant. Bac non réglable du congélateur Enlèvement : Tirez les supports vers le haut jusqu'à ce que vous entendiez un clic, puis enlevez - GE PFSS9PKYSS | Use and Care Manual - Page 68
érateur nouvellement installé commence à produire des glaçons. ICE OFF/ LOCK (Hold 3 sec to Lock Control) Machine à glaçons automatique L'appareil est fourni avec de l'écran pour les opérations avec écran ACL puis suivez les instructions à l'écran pour désactiver la machine à glaçons. Un réfrigé - GE PFSS9PKYSS | Use and Care Manual - Page 69
Mesures de sécurité Fonctionnement Entretien et nettoyage de votre réfrigérateur. www.electromenagersge.ca Nettoyage de l'extérieur Les poignées de porte et les garnitures. Nettoyez avec un linge trempé dans de l'eau savonneuse. Séchez avec un linge doux. N'appliquez pas de cire sur les poignées - GE PFSS9PKYSS | Use and Care Manual - Page 70
et en relâchant la touche ICE OFF/LOCK (glace désactivée/ verrouillage) sur le panneau de contrôle (l'icône s'affiche) et coupez l'alimentation d'eau du réfrigérateur. Modèles équipés d'un écran ACL : Désactivez la machine à glaçons en suivant les instructions à l'écran que vous pouvez consulter - GE PFSS9PKYSS | Use and Care Manual - Page 71
par une ampoule de la même puissance ou inférieure. Replacez le capot. Rebranchez le réfrigérateur. NOTE : Les ampoules peuvent être commandées au service après-vente GE, au 800.626.2002. Installation Conseils de dépannage Soutien au consommateur 71 - GE PFSS9PKYSS | Use and Care Manual - Page 72
d'eau froide. Vous pouvez acheter une trousse d'alimentation d'eau GE (contenant la tuyauterie, le robinet d'arrêt, les joints et les instructions) chez votre revendeur ou en vous adressant à notre site Web à l'adresse www.electromenagersge.ca ou à notre service de Pièces et accessoires au numéro de - GE PFSS9PKYSS | Use and Care Manual - Page 73
Instructions d'installation DIMENSIONS 90,8 cm (353⁄4 po) 177,8 cm (70 po) 174 cm (681⁄2 po) Profondeur de la caisse sans les portes 74 cm (291⁄8 po) 57,5 cm (225⁄8) Hauteur depuis le sol jusqu'au-dessus du couvercle supérieur de la charnière 177 cm (6913⁄16 po) Dimensions supplémentaires 90,5 - GE PFSS9PKYSS | Use and Care Manual - Page 74
Instructions d'installation INSTALLATION DU RÉFRIGÉRATEUR EMPLACEMENT DU RÉFRIGÉRATEUR • N'installez jamais votre réfrigérateur dans un emplacement où la température ambiante sera inférieure à 16 °C ( - GE PFSS9PKYSS | Use and Care Manual - Page 75
Instructions d'installation 3 FIXEZ LA POIGNÉE DE LA PORTE DU COMPARTIMENT ALIMENTS FRAIS Poignée en acier inoxydable : A Fixez la poignée aux fixations de montage de la poignée - GE PFSS9PKYSS | Use and Care Manual - Page 76
Instructions d'installation INSTALLATION DU RÉFRIGÉRATEUR (suite) 5 DÉMONTAGE DES PORTES DU RÉFRIGÉRATEUR A Ouvrez les portes du réfrigérateur. B Retirez les capuchons frontaux à l'aide d'un tournevis à tê - GE PFSS9PKYSS | Use and Care Manual - Page 77
Instructions d'installation 6 REMONTAGE DES PORTES DU RÉFRIGÉRATEUR (suite) D Insérez CONGÉLATEUR A Ouvrez à fond la porte du congélateur. B Enlevez le bac du congélateur en tirant les deux supports vers le haut en même temps. (Voir page 69.) E Sur la porte de gauche, passez les fils et la - GE PFSS9PKYSS | Use and Care Manual - Page 78
Instructions d'installation INSTALLATION DU RÉFRIGÉRATEUR (suite) 7 DÉMONTAGE DE LA PORTE DU CONG façon à ce que la partie avant ne touche pas le sol. B Retirez les deux boulons maintenant le support du pied de nivellement sur le dessous du réfrigérateur. Répétez cette procédure des deux côtés. F - GE PFSS9PKYSS | Use and Care Manual - Page 79
Instructions d'installation 9 REMISE EN PLACE DES PIEDS DE NIVELLEMENT (si nécessaire) ( ce que la partie avant ne touche pas le sol. B Remettez en place les deux boulons pour maintenir le support du pied de nivellement sur le dessous du réfrigérateur. Répétez cette procédure des deux côtés. 10 - GE PFSS9PKYSS | Use and Care Manual - Page 80
Instructions d'installation INSTALLATION DU RÉFRIGÉRATEUR (suite) 10 REMONTAGE DE LA PORTE DU CONGÉLATEUR (suite) REMISE EN PLACE DU BAC DE CONGÉLATEUR Insérez les extrémités du bac de congélateur dans les deux supports utilisez une trousse GE SmartConnect™ Refrigerator Tubing, vous aurez besoin - GE PFSS9PKYSS | Use and Care Manual - Page 81
Instructions d'installation 14 METTEZ LE RÉFRIGÉRATEUR DE NIVEAU Les pieds de nivellement jouent deux rôles : 1) Elles peuvent être réglées de manière à permettre à l'appareil - GE PFSS9PKYSS | Use and Care Manual - Page 82
Instructions d'installation INSTALLATION DU RÉFRIGÉRATEUR (suite) 16 NIVELLEMENT DE LA PORTE DU CONGÉLATEUR 16 NIVELLEMENT DE LA PORTE DU CONGÉLATEUR (suite) C Trouvez la - GE PFSS9PKYSS | Use and Care Manual - Page 83
sur le bouton ICE OFF/LOCK situé sur le suivez les instructions à l'écran GE SmartConnect™ Refrigerator Tubing sont disponibles dans les dimensions GE (contenant un tuyau en cuivre, un robinet d'arrêt et les joints énumérés ci-dessous) chez votre distributeur local ou en le commandant au service - GE PFSS9PKYSS | Use and Care Manual - Page 84
Instructions d'installation INSTALLATION DE LA CONDUITE D'EAU (suite) CE DONT VOUS AUREZ un raccord à compression. Ne coupez jamais l'extrémité finie d'un tuyau de la trousse GE SmartConnect™ Refrigerator Tubing. • Un robinet d'arrêt pour brancher le tuyau d'eau froide. Le robinet d'arrêt doit - GE PFSS9PKYSS | Use and Care Manual - Page 85
Instructions d'installation 4 FIXEZ LE ROBINET D'ARRÊT Fixez le robinet d'arrêt au tuyau robinet. Serrez fort l'écrou de compression. Pour le tuyau en matière plastique d'une trousse GE SmartConnect™ Refrigerator Tubing, insérez l'extrémité moulée du tuyau dans le robinet d'arrêt et serrez l'écrou - GE PFSS9PKYSS | Use and Care Manual - Page 86
Notes 86 - GE PFSS9PKYSS | Use and Care Manual - Page 87
Mesures de sécurité Fonctionnement Installation Bruits de fonctionnement normaux. www.electromenagersge.ca Les réfrigérateurs plus récents font des bruits différents de ceux des anciens. Les réfrigérateurs modernes présentent plus de fonctions et sont plus avancés sur le plan technologique. - GE PFSS9PKYSS | Use and Care Manual - Page 88
ée) est activée. Modèles non équipés d'un écran ACL : • Appuyez et relâchez la touche ICE OFF/LOCK (glace désactivée/ verrouillage) du panneau de contrôle pour désactiver la fonctionnalité Ice Off (glace désactivée), puis l'icône disparaît. Modèles ACL : • Sur l'écran ACL, sélectionnez SETTING - GE PFSS9PKYSS | Use and Care Manual - Page 89
Mesures de sécurité Fonctionnement Installation www.electromenagersge.ca Problème Odeur/saveur anormale des glaçons Formation lente des glaçons Odeur dans le réfrigérateur De la condensation s'accumule à l'extérieur De l'humidité se forme à l'intérieur (quand il fait humide, l'air transporte de - GE PFSS9PKYSS | Use and Care Manual - Page 90
érature de réfrigération et attendez 24 heures. Si l'eau ne coule pas réglage est trop froide. du distributeur près 24 heures, appelez le service. La cartouche du filtre vient d'être installée. La conduite d'eau ou le robinet d'arrêt est bouché. Le filtre à eau est bouché. Cartouche de filtre - GE PFSS9PKYSS | Use and Care Manual - Page 91
ICE & WATER (glace & eau) et tenez-la appuyée pendant 3 secondes. Consultez la section Filtre d'eau pour de plus amples informations. Modèles ACL : • Sur l'écran ACL, sélectionnez SETTING (réglages) puis WATER FILTER (filtre à eau). Sélectionnez REPLACE ées les touches ADJUST FREEZER (églage du HOME - GE PFSS9PKYSS | Use and Care Manual - Page 92
GE Profile : Cinq (5) ans GE et toutes autre marques : Un (1) an Un (1) an Un (1) an Un (1) an TERMES ET CONDITIONS : La présente garantie ne s'applique qu'à l'utilisation domestique par une seule famille au Canada, lorsque le réfrigérateur a été installé conformément aux instructions service - GE PFSS9PKYSS | Use and Care Manual - Page 93
MWF du système de Filtration d'eau GE SmartWater Ce système a été essayé ciaux ‡ Les directives d'installation, la disponibilité de pièces et de service ainsi que la garantie standard sont expédiées avec le produit. Fabriquée pour : General Electric Company, Louisville, KY 40225 EPA EST. No. 070595-MN - GE PFSS9PKYSS | Use and Care Manual - Page 94
par Internet au site www.electromenagersge.ca 24 heures par jour, tous les jours de l'année. Service de réparations Service de réparations GE est tout près de vous. Pour faire réparer votre électroménager GE, il suffit de nous téléphoner. 1.800.561.3344 Studio de conception réaliste Sur demande - GE PFSS9PKYSS | Use and Care Manual - Page 95
Instrucciones de operación Cómo reemplazar las bombillas de luz 117 Congelador 113 Control para modelos de LCD 98-105 Control para modelos que no son de LCD 106, 107 Cuidado y limpieza una etiqueta en el interior del compartimiento de refrigerador en la parte del medio en el lado izquierdo. 95 - GE PFSS9PKYSS | Use and Care Manual - Page 96
aparato sólo para los fines que se describen en este Manual del propietario. PRECAUCIONES DE SEGURIDAD Cuando use electrodomésticos, , evite el contacto con las partes móviles del mecanismo de expulsión, o con el elemento calefactor localizado en la parte inferior del dispositivo para hacer hielo - GE PFSS9PKYSS | Use and Care Manual - Page 97
Seguridad Operación GEAppliances.com ¡ADVERTENCIA! COMO CONECTAR LA ELECTRICIDAD Bajo ninguna circunstancia debe cortar o quitar la tercera punta (tierra) de la clavija. Para su seguridad personal, este aparato deberá conectarse debidamente a tierra. El cable eléctrico de este aparato está - GE PFSS9PKYSS | Use and Care Manual - Page 98
panel de control de 7" para modelos de LCD. Seguridad Operación Instalación 12:00 PM FREEZER -2 WATER FILTER: GOOD FRESH FOOD 38 EXTRAS CONVERSIONS NUTRITION FACTS LOCK HOLD 3 SECONDS SETTINGS PHOTOS SUBSTITUTIONS DISPENSER WATER . La pantalla HOME (inicio) La pantalla HOME (inicio) es - GE PFSS9PKYSS | Use and Care Manual - Page 99
ón FRESH FOOD (alimentos frescos): WATER FILTER: GOOD FREEZER 0SET TEMP SAVE FRESH FOOD 38 ACTUAL: 38˚F (RECOMMENDED: 38˚F) LOCK HOLD 3 SECONDS SETTINGS EXTRAS CONVERSIONS NUTRITION FACTS PHOTOS SUBSTITUTIONS DISPENSER WATER Botón SAVE (guardar) Pantalla HOME (Inicio) TEMPERATURA DEL FREEZER - GE PFSS9PKYSS | Use and Care Manual - Page 100
ón Elija la unidad Operación Instalación Servicio al consumidor Solucionar problemas DISPENSER WATER HOME 12:00 PM FREEZER -2 LOCK HOLD 3 SECONDS FRESH FOOD 38 SETTINGS Botón de datos de nutrición WATER FILTER: GOOD EXTRAS CONVERSIONS NUTRITION FACTS PHOTOS SUBSTITUTIONS DATOS DE NUTRICI - GE PFSS9PKYSS | Use and Care Manual - Page 101
WATER FILTER: GOOD FRESH FOOD 38 EXTRAS CONVERSIONS NUTRITION FACTS LOCK HOLD 3 SECONDS SETTINGS PHOTOS SUBSTITUTIONS DISPENSER WATER el botón PHOTOS de la pantalla HOME para ver fotos predeterminadas y para comenzar 30) PHOTO UPLOAD SECURE DIGITAL REFRIGERATOR AVAILABLE: 7 PHOTOS PAGE 3 - GE PFSS9PKYSS | Use and Care Manual - Page 102
FOOD 38 WATER FILTER: GOOD EXTRAS CONVERSIONS NUTRITION FACTS LOCK HOLD 3 SECONDS SETTINGS PHOTOS SUBSTITUTIONS DISPENSER WATER Botón SETTINGS (configuraciones) Botón REFRIGERATOR (refrigerador) SETTINGS BACK REFRIGERATOR WATER FILTER SYSTEM SCREEN DISPENSER WATER HOME CONFIGURACIONES - GE PFSS9PKYSS | Use and Care Manual - Page 103
LOCK HOLD 3 SECONDS DISPENSER WATER SETTINGS PHOTOS SUBSTITUTIONS TURBO COOL seleccionado SETTINGS REFRIGERATOR WATER FILTER SYSTEM SCREEN BACK DISPENSER WATER Botón WATER FILTER (filtro de agua) WATER FILTER HOME BACK Water Filter Replacement Info: Replace with a GE "MWF" water filter - GE PFSS9PKYSS | Use and Care Manual - Page 104
ón SETTINGS REFRIGERATOR WATER FILTER SYSTEM SCREEN BACK DISPENSER WATER Botón SYSTEM Botón DOOR ALARM (sistema) (alarma de la puerta) HOME SYSTEM DOOR ALARM BACK TIME (SET TIME) BUTTON TONES UNITS ENGLISH METRIC ENERGY SAVER ICE MAKER COOLING SYSTEM DISPENSER WATER Botón ENERGY - GE PFSS9PKYSS | Use and Care Manual - Page 105
ICE MAKER COOLING SYSTEM DISPENSER WATER Botón ICEMAKER (máquina de hielo) HOME 12:00 PM FREEZER -18 C FRESH FOOD 3C WATER FILTER: GOOD EXTRAS CONVERSIONS NUTRITION FACTS LOCK HOLD 3 SECONDS SETTINGS DISPENSER WATER PHOTOS SUBSTITUTIONS SETTINGS DISPENSER WATER REFRIGERATOR WATER FILTER - GE PFSS9PKYSS | Use and Care Manual - Page 106
TURBO COOL ˚F -2˚ F Recommended CLIMATE KEEPER ˚F 38˚ F Recommended ICE OFF RESET FILTER CUBED CRUSHED WATER ALARM/ LIGHT Light ON/OFF (Hold 3 seconds) ADJUST REFRIGERATOR (Hold 3 sec for Turbo Cool) ICE OFF/ LOCK (Hold 3 sec to Lock Control) Modelo 29 Operación Instalación Servicio al - GE PFSS9PKYSS | Use and Care Manual - Page 107
funcionarán inmediatamente hasta 21⁄2 horas y luego volverán al valor de configuración original. Cómo usar Presione y sostenga el botón ADJUST REFRIGERATOR (ajuste de refrigerador) durante 3 segundos hasta escuchar el sonido y aparezca . Después de que TurboCool sea completado, el compartimiento - GE PFSS9PKYSS | Use and Care Manual - Page 108
KEEPER ˚F 38˚ F Recommended ICE OFF RESET FILTER CUBED CRUSHED WATER ALARM/ LIGHT Light ON/OFF (Hold 3 seconds) ADJUST REFRIGERATOR (Hold 3 sec for Turbo Cool) ICE OFF/ LOCK (Hold 3 sec to Lock Control) Recogedor ICE & WATER ICE OFF/ LOCK (Hold 3 sec to Lock Control) Para usar el dispensador - GE PFSS9PKYSS | Use and Care Manual - Page 109
incluidas en WATER FILTER (filtro de agua) en la sección Sobre el panel de control de LCD de lo apriete demasiado. Presione y sostenga el botón ICE & WATER (hielo y agua) durante 3 segundos para reconfigurar nuestro sitio Web, ge.com, o llame a GE para partes y accesorios al 800.626.2002 - GE PFSS9PKYSS | Use and Care Manual - Page 110
los elementos del estante. Incline el estante en la parte del frente. Levante el estante hacia arriba en la parte de atrás y saque el estante. Para reemplazar: ranura de la corredera. Baje el frente del estante hasta que la parte inferior del estante se ajuste en su lugar. Estantes a prueba de - GE PFSS9PKYSS | Use and Care Manual - Page 111
Seguridad Operación Gaveta para lácteos no ajustable Para retirar: Levante la gaveta de lácteos hacia arriba, luego tire hacia afuera. GEAppliances.com Para reemplazar: Enganche la gaveta en los soportes moldeados de la puerta y presione hacia abajo. La gaveta se trabará en su lugar. - GE PFSS9PKYSS | Use and Care Manual - Page 112
Deli). No guarde lechuga u otro vegetal de hojas en este cajón. Controles del modelo 29 (ubicados en el lado derecho del cajón) PRECAUCIÓN: No reemplazar: Tire del cajón hacia afuera hasta que se detenga. Enganche la parte trasera de la división sobre la pared trasera del cajón. Levante el lado - GE PFSS9PKYSS | Use and Care Manual - Page 113
de la canasta Para retirar: Quite la gaveta del congelador. (Ver más abajo). Tire del cajón hacia afuera hasta que se detenga. Incline hacia arriba la parte trasera de la gaveta. Levántela para quitarla. Para reemplazar: Coloque la canasta sobre el montaje de rieles. Remoción de la división de la - GE PFSS9PKYSS | Use and Care Manual - Page 114
hielos varias veces al hacer un lote de hielo. NOTA: Si el suministro de agua se encuentra apagado, presione y libere el botón ICE OFF/LOCK (apagado hielo/bloqueo) del panel de control del modelo que no es de LCD. Para el modelo de LCD, ver ICEMAKER (máquina de hielo) bajo la sección Funciones de - GE PFSS9PKYSS | Use and Care Manual - Page 115
desprender el acabado de pintura. Los paneles y las manijas de las puertas de cuando se limpie alrededor de botones, bombillas o controles. Use cera para electrodomésticos en el interior puede hacer que se rompe en pedazos. No lave partes plásticas del refrigerador en el lavaplatos. Piezas pl - GE PFSS9PKYSS | Use and Care Manual - Page 116
la característica Ice Off (apagado hielo) presionando y liberado el botón ICE OFF/LOCK (apagado hielo/trabado) del panel de control (puede verse el Al usar una carretilla para mover el refrigerador, no haga descansar la parte frontal o trasera del refrigerador contra la carretilla. Esto podría da - GE PFSS9PKYSS | Use and Care Manual - Page 117
del artefacto del mismo vataje o menor. Vuelva a colocar la pantalla. Vuelva a enchufar el refrigerador. NOTA: Las bombillas del artefacto pueden solicitarse en Piezas y Accesorios de GE, 800.626.2002. Operación Instalación Solucionar problemas Servicio al consumidor 117 - GE PFSS9PKYSS | Use and Care Manual - Page 118
Instrucciones para la Instalación Refrigerador Profile Modelos 26, 29 ¿Preguntas? Llame al 800.GE.CARES (800.432.2737) o bien visite , visitando nuestra página Web GEAppliances.com o bien a través de Partes y Accesorios, 800.626.2002. HERRAMIENTAS QUE USTED PUEDE NECESITAR Llave ajustable - GE PFSS9PKYSS | Use and Care Manual - Page 119
la altura máx. Altura desde el piso hasta el nivel más bajo de la tapa de la bisagra Profundidad de la carcasa sin puertas Altura hasta la parte superior del gabinete Ancho total de la carcasa exterior Profundidad total exterior puertas/ cajones arqueados con manijas 70″ (177,8 cm) 6913⁄16″ (177 cm - GE PFSS9PKYSS | Use and Care Manual - Page 120
Phillips. 2 RETIRE LA MANIJA DE LA PUERTA DEL CONGELADOR Manijas de acero inoxidable y plástico: A Afloje los tornillos de fijación ubicados en la parte inferior de la manija con una llave Allen de 1/8″ y retire la manija. NOTA: Para ajustar o retirar los tornillos de montaje de la manija utilice - GE PFSS9PKYSS | Use and Care Manual - Page 121
DEL CONGELADOR Manijas de acero inoxidable y plástico: A Sujete la manija firmemente a los tornillos de montaje y ajuste los tornillos de fijación en la parte inferior de la manija con una llave Allen de 1/8″. A Manija plástica: A Para sujetar la manija a los tornillos de montaje alinee las ranuras - GE PFSS9PKYSS | Use and Care Manual - Page 122
de la bisagra esté sobre el perno de la bisagra central o dentro del orificio del perno de la bisagra de la puerta ubicado en la parte inferior de la puerta. C Coloque cinta para que la puerta no se abra o solicite a una segunda persona que sostenga la puerta. Cable a tierra PRECAUCIÓN: Cuando - GE PFSS9PKYSS | Use and Care Manual - Page 123
superior de la puerta del refrigerador. Verifique que la puerta esté alineada con el gabinete y la puerta opuesta. Conecte la bisagra a la parte superior del gabinete. No ajuste los pernos por completo. 7 QUITE LA PUERTA DEL CONGELADOR A Abra la puerta del congelador al máximo. B Quite la gaveta - GE PFSS9PKYSS | Use and Care Manual - Page 124
refrigerador hacia atrás de modo que el frente quede hacia arriba. B Quite los 2 pernos que fijan el soporte de la pata de nivelación a la parte inferior del gabinete del refrigerador. Hágalo sobre ambos lados. F Coloque el frente de la puerta sobre una superficie que no raye. G Empuje los montajes - GE PFSS9PKYSS | Use and Care Manual - Page 125
refrigerador hacia atrás de modo que el frente quede hacia arriba. B Coloque los 2 pernos para fijar el soporte de la pata de nivelación a la parte inferior del gabinete del refrigerador. Hágalo sobre ambos lados. 10 CÓMO VOLVER A COLOCAR LA PUERTA DEL CONGELADOR (cont.) B Cuelgue el frente de la - GE PFSS9PKYSS | Use and Care Manual - Page 126
tuberías de GE SmartConnect,™ inserte el extremo moldeado de la tubería en la conexión del refrigerador en la parte posterior del refrigerador agua, recomendamos que instale uno si su suministro de agua tiene arena o partículas que pudieran obstruir la pantalla de la válvula de agua del refrigerador - GE PFSS9PKYSS | Use and Care Manual - Page 127
Instrucciones para la instalación 14 CÓMO NIVELAR EL REFRIGERADOR Las patas niveladoras tienen dos propósitos: 1) Las patas niveladoras se ajustan para que el refrigerador esté colocado firmemente en el piso y no tambalee. 2) Las patas niveladoras sirven como un freno estabilizador para sostener el - GE PFSS9PKYSS | Use and Care Manual - Page 128
és del ajuste, apriete todos los tornillos. B Afloje el tornillo regulador con un destornillador Phillips para ajustar el nivel. 17 AJUSTE LOS CONTROLES Ajuste los controles donde se recomienda. 18 RETIRE EL EMBALAJE INICIE LA MÁQUINA DE HIELO A) Retire toda la cinta y el embalaje protector y de - GE PFSS9PKYSS | Use and Care Manual - Page 129
hielo, presione y libere el botón ICE OFF/LOCK (apagado hielo/bloqueo) del panel de control para desconectar la máquina de hielo. agua de GE (contiene tubería, válvula de apagado y accesorios enumerados abajo) está disponible a un costo adicional en su tienda o por medio de Partes y Accesorios, - GE PFSS9PKYSS | Use and Care Manual - Page 130
Si está usando un kit de tubería para el refrigerador SmartConnect™ de GE, los accesorios necesarios ya vienen preinstalados en la tubería. • Si su tuber de agua, haga la conexión en la parte superior o al lado, en vez de hacerlo en la parte de abajo, para evitar retirar cualquier sedimento de - GE PFSS9PKYSS | Use and Care Manual - Page 131
en la válvula. Apriete la tuerca de compresión firmemente. Para tubería de plástico de un kit de tubería para el refrigerador SmartConnect ™ de GE, inserte el extremo moldeado de la tubería en la válvula de apagado y apriete la tuerca de compresión hasta que esté firmemente apretada a mano, luego - GE PFSS9PKYSS | Use and Care Manual - Page 132
cuando el refrigerador se conecta por primera vez. Esto pasa a medida que el refrigerador se enfría hasta la temperatura correcta. I El control del congelador produce un chasquido cuando el compresor inicia o para. I Expansión y contracción de las bobinas durante o después del ciclo de descongelaci - GE PFSS9PKYSS | Use and Care Manual - Page 133
ajuste. es normal) • Vea Cómo nivelar el refrigerador. El motor opera durante Es normal cuando períodos prolongados o el refrigerador es . • Presione y libere el botón ICE OFF/LOCK (apagado hielo/trabado) en el panel de control para apagar la característica Ice Off (apagado hielo), y luego el - GE PFSS9PKYSS | Use and Care Manual - Page 134
ICE OFF/LOCK (apagado hielo/trabado) en el panel de control para encender la característica Ice Off (apagado hielo), y luego podrá verse el ícono . Mantener la característica Ice la bombilla. Aire caliente de la parte de abajo del refrigerador Motor de enfriamiento normal del flujo del aire - GE PFSS9PKYSS | Use and Care Manual - Page 135
instalado. El dispensador de agua no se uso por mucho tiempo. • Dispense el agua hasta que todo el sistema del agua se llene de nuevo. depósito está congelada porque los controles están configurados a una temperatura muy baja. •Configure el control del refrigerador a una temperatura más elevada - GE PFSS9PKYSS | Use and Care Manual - Page 136
ICE & WATER (hielo y agua). Ver Sobre el filtro de agua para más información. Modelos de LCD: • En la pantalla de LCD, seleccione SETTING (configuración), luego WATER FILTER (filtro de agua). Seleccione REPLACE control no se alumbran, inspeccione en la parte SYSTEM. Seleccione HOME. Ahora usted - GE PFSS9PKYSS | Use and Care Manual - Page 137
Por el período de: GE reemplazará: MODELOS GE y GE PROFILE: Un año A partir de la fecha de la compra original Cualquier parte del refrigerador que falle debido a del consumidor local o la oficina del Attorney General en su localidad. Garante: General Electric Company. Louisville, KY 40225 137 - GE PFSS9PKYSS | Use and Care Manual - Page 138
de Filtración GE SmartWater Cartucho incorporados para la utilización no medida) Parámetros Cloro Sabor y olor Partículas** USEPA MCL - - - Calidad del influente concentración 2,0 mg/L Reducción de quistes y asbestos Hecho por General Electric, Appliance Park, Louisville, KY 40225 EPA EST. - GE PFSS9PKYSS | Use and Care Manual - Page 139
o llamar al (800.626.2224) durante horas normales de oficina. GE Consumer Home Services estará aún ahí cuando su garantía termine. Piezas y accesorios en este manual cubren los procedimientos a seguir por cualquier usuario. Cualquier otra reparación debería, por regla general, referirse a - GE PFSS9PKYSS | Use and Care Manual - Page 140
! For greater convenience and faster service, you can now download Owner's Manuals, order parts or even schedule service on-line. In Canada: www.GEAppliances.ca Schedule Service In the U.S.: GEAppliances.com Expert GE repair service is only one step away from your door. Get on-line and schedule
-
 1
1 -
 2
2 -
 3
3 -
 4
4 -
 5
5 -
 6
6 -
 7
7 -
8
-
9
-
10
-
11
-
12
-
13
-
14
-
15
-
16
-
17
-
18
-
19
-
20
-
21
-
22
-
23
-
24
-
25
-
26
-
27
-
28
-
29
-
30
-
31
-
32
-
33
-
34
-
35
-
36
-
37
-
38
-
39
-
40
-
41
-
42
-
43
-
44
-
45
-
46
-
47
-
48
-
49
-
50
-
51
-
52
-
53
-
54
-
55
-
56
-
57
-
58
-
59
-
60
-
61
-
62
-
63
-
64
-
65
-
66
-
67
-
68
-
69
-
70
-
71
-
72
-
73
-
74
-
75
-
76
-
77
-
78
-
79
-
80
-
81
-
82
-
83
-
84
-
85
-
86
-
87
-
88
-
89
-
90
-
91
-
92
-
93
-
94
-
95
-
96
-
97
-
98
-
99
-
100
-
101
-
102
-
103
-
104
-
105
-
106
-
107
-
108
-
109
-
110
-
111
-
112
-
113
-
114
-
115
-
116
-
117
-
118
-
119
-
120
-
121
-
122
-
123
-
124
-
125
-
126
-
127
-
128
-
129
-
130
-
131
-
132
-
133
-
134
-
135
-
136
-
137
-
138
-
139
-
140
 |
 |
GEAppliances.com
Refrigerators
Bottom Freezer
225D2649P002
49-60598-2
05-09 JR
Safety Instructions
...........
2, 3
Operating Instructions
Automatic Icemaker
...............
20
Care and Cleaning
.............
21, 22
Control for LCD Models
..........
4–11
Control for Non-LCD Models
....
12, 13
Crispers and Pans
.................
18
Dispenser
.........................
14
Freezer
............................
19
Fresh Food Storage Options
....
16, 17
Replacing the Light Bulbs
..........
23
Water Filter
........................
15
Installation Instructions
Installing the Refrigerator
.......
26–34
Installing the Water Line
........
35–37
Preparing to Install
the Refrigerator
................
24, 25
Troubleshooting Tips
......
38–42
Normal Operating Sounds
..........
38
Consumer Support
Consumer Support
........
Back Cover
Owner’s Registration
for Canadian Customers
........
43, 44
Performance Data Sheet
...........
47
State of California Water
Treatment Device Certificate
.......
48
Warranty for Canadian
Customers
.........................
46
Warranty for U.S. Customers
.......
45
Réfrigérateurs
Congélateur inférieur
Refrigeradores
Congelador inferior
Write the model and serial
numbers here:
Model #
____________________
Serial #
____________________
Find these numbers on a label
on the left side, near the middle
of the refrigerator compartment.
Profile
™
Models 26, 29
Manuel d’utilisation
et d’installation
Owner’s Manual and
Installation Instructions
Manual del
propietario y
instalación
La section française commence à la page 49
La sección en español empieza en la página 95