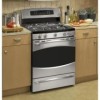
GE PGB916SEMSS Use and Care Manual
GE PGB916SEMSS - Profile 30" - Convection Gas R Manual
 |
UPC - 084691166320
View all GE PGB916SEMSS manuals
Add to My Manuals
Save this manual to your list of manuals |
GE PGB916SEMSS manual content summary:
- GE PGB916SEMSS | Use and Care Manual - Page 1
the Range to Gas 44-46 Dimensions and Clearances . . .42 Electrical Connections . . . . .47, 48 Leveling the Range 50 LP 51 Troubleshooting Tips 52-55 Owner's Manual & Installation Instructions JGB500 JGB605 PGB900 PGB908 PGB910 PGB916 PGB918 PGB975 Accessories 57 Consumer Support Consumer - GE PGB916SEMSS | Use and Care Manual - Page 2
properly. If you did not receive an anti-tip bracket with your purchase, call 1.800.626.8774 to receive one at no cost (in Canada, call 1.800.561.3344). For installation instructions of the bracket, 2 visit GEAppliances.com (in Canada, GEAppliances.ca). Consumer Support Troubleshooting Tips - GE PGB916SEMSS | Use and Care Manual - Page 3
with the Installation Instructions. Any adjustment and service should be performed only by qualified gas range installers or service technicians. ■ Do not attempt to repair or replace any part of your range unless it is specifically recommended in this manual. All other service should be referred - GE PGB916SEMSS | Use and Care Manual - Page 4
range can be converted for use with either type of gas. See the Installation of the range section. WARNING: These adjustments must be made by a qualified service technician in accordance with the manufacturer's instructions and 4 overheating of the oven. Consumer Support Troubleshooting Tips - GE PGB916SEMSS | Use and Care Manual - Page 5
for top-of-range cooking. ■ gas, turn off the gas to the range and call a qualified service range. ■ When disabling Gas/Control Lockout, make sure the surface controls are set to the OFF position. This will preclude gas flow when the range is turned on. 5 Troubleshooting Tips Consumer Support - GE PGB916SEMSS | Use and Care Manual - Page 6
oven cleaner or oven liner of any kind should be used in or around any part of the oven. Residue from oven cleaners will damage the inside of the oven when the self-clean cycle is used. ■ Clean only parts listed in this Owner's Manual. Installation Instructions Consumer Support Troubleshooting - GE PGB916SEMSS | Use and Care Manual - Page 7
proper cooking performance, always bake and broil with the oven door closed. ■ Never place, use or self-clean the lower oven drawer pan in the upper oven. READ AND FOLLOW THIS SAFETY INFORMATION CAREFULLY. SAVE THESE INSTRUCTIONS Installation Instructions Troubleshooting Tips Consumer Support 7 - GE PGB916SEMSS | Use and Care Manual - Page 8
is on. An electric shock may result, which could cause you to knock over hot cookware. Installation Instructions Consumer Support Troubleshooting Tips Medium Small Large Center (oval) Extra Large (on some models) Sealed Gas Burners Your gas range cooktop has five sealed gas burners. They offer - GE PGB916SEMSS | Use and Care Manual - Page 9
above allowable standards. This could be dangerous to your health. Installation Instructions Troubleshooting Tips Consumer Support In Case of Power Failure In case of a power failure, you can light the gas surface burners on your range with a match. Hold a lit match to the burner, then push in - GE PGB916SEMSS | Use and Care Manual - Page 10
guide below; then switch to the desired cook setting. Type of Food Warming Tortillas Pancakes Hamburgers Fried Eggs Bacon Preheat Conditions none 7 (MED-HI) 3 min. 7 (MED-HI) 5 min. HI 5 min. none Cook Setting 3 (MED-LOW . Installation Instructions Consumer Support Troubleshooting Tips 10 - GE PGB916SEMSS | Use and Care Manual - Page 11
Safety Instructions Operating Instructions Using the oven controls. (Throughout this manual, features and appearance may vary from your model.) GEAppliances.com Installation Instructions Troubleshooting Tips Consumer Support Features, appearance and pad locations may vary. Oven Control, Clock, - GE PGB916SEMSS | Use and Care Manual - Page 12
. or Installation Instructions Consumer Support Troubleshooting Tips Features, appearance and pad locations may vary. Oven Control, Clock, Timer and Features (on some models) Bake Pad Touch to select the bake function. Broil Hi/Lo Pad Touch to select the broil function. Convection Bake Multi - GE PGB916SEMSS | Use and Care Manual - Page 13
until the glow bar has reached operating temperature. Upper Oven Light Touch the Oven Light pad on the upper control panel to turn the light on or off. On some models, the Oven Light switch is on the lower front control panel. Installation Instructions Troubleshooting Tips Consumer Support 13 - GE PGB916SEMSS | Use and Care Manual - Page 14
Operating Instructions Safety Instructions Using the upper oven. If your model has a door latch, do not lock the oven door with the latch during baking or roasting. The latch is used for self-cleaning only. How to Set the Upper Oven for Baking or Roasting The oven has a special low rack (R) - GE PGB916SEMSS | Use and Care Manual - Page 15
pad is touched. The 6-second tone can be canceled by following the steps in the Special features of your oven control section under Tones at the End of a Timed Cycle. Troubleshooting Tips Consumer Support To Reset the Timer If the display is still showing the time remaining, you may change it by - GE PGB916SEMSS | Use and Care Manual - Page 16
automatically, food left in the oven will continue cooking after the oven turns off. Installation Instructions Consumer Support Troubleshooting Tips How to Set a Delayed Start and Automatic Stop The upper oven will turn on at the time of day you set, cook for a specific length of time and then - GE PGB916SEMSS | Use and Care Manual - Page 17
as meat loaf or casseroles. Insert the probe into the meatiest part of the inner thigh from below and parallel to the leg of a whole turkey. Installation Instructions Troubleshooting Tips Consumer Support How to Set the Upper Oven For Cooking When Using the Probe Insert the probe into the food - GE PGB916SEMSS | Use and Care Manual - Page 18
in the recipe. ■ Some package instructions for frozen casseroles, main dishes or baked goods have been developed using commercial convection ovens. For best results in this oven, preheat the oven and use the temperature, for regular baking, on the package. Consumer Support Troubleshooting Tips 18 - GE PGB916SEMSS | Use and Care Manual - Page 19
temperature is reached. Installation Instructions Troubleshooting Tips Consumer Support When convection baking with only 1 rack, follow the rack positions recommended in the Using the Oven section. Multi-Rack Baking The number of racks provided depends on your model. Because heated air is - GE PGB916SEMSS | Use and Care Manual - Page 20
Operating Instructions Safety Instructions Using the convection oven. (on some models) If your model has a door latch, do not lock the oven door with the latch during convection cooking. The latch is used for self-cleaning only. For best results when roasting large turkeys and roasts, we recommend - GE PGB916SEMSS | Use and Care Manual - Page 21
325˚F 170˚F * Stuffed birds generally require 30-45 minutes additional roasting time. cooking it to only 140˚F means some food poisoning organisms may survive." (Source: Safe Food Book. Your Kitchen Guide. USDA Rev. June 1985.) Installation Instructions Troubleshooting Tips Consumer Support - GE PGB916SEMSS | Use and Care Manual - Page 22
Instructions Consumer Support Troubleshooting Tips How to Set a Delayed Start and Automatic Stop The upper oven will turn on at the time of day you set, cook for a specific length of time and then turn off automatically. Make sure the clock shows the correct time of day. Touch the Convection - GE PGB916SEMSS | Use and Care Manual - Page 23
features mode. Fahrenheit or Celsius Temperature Selection Your oven control is set to use the Fahrenheit temperature selections until the display shows SF. Touch the Broil Hi/Lo and Cooking Time pads again at the same time. The display will Instructions Troubleshooting Tips Consumer Support 23 - GE PGB916SEMSS | Use and Care Manual - Page 24
the Clock pad again to black out the clock display. The display will show OFF. If this is the choice you want, touch the Start pad. NOTE: If the clock is in the blackout mode, you will not be able to use the Delay Start function. Installation Instructions Consumer Support Troubleshooting Tips 24 - GE PGB916SEMSS | Use and Care Manual - Page 25
using the number pads and touch the Start pad. When cooking is finished, the display will change from ⊃ to ⊃ and 0:00 will appear, indicating that the oven has turned OFF but is still set in Sabbath. Remove the cooked food. Installation Instructions Troubleshooting Tips Consumer Support 25 - GE PGB916SEMSS | Use and Care Manual - Page 26
the oven will not automatically turn off. Touch the Start pad. NOTE: If a power outage occurred while the oven was in Sabbath, the oven will automatically turn off and stay off even when the power returns. The oven control must be reset. Installation Instructions Consumer Support Troubleshooting - GE PGB916SEMSS | Use and Care Manual - Page 27
your oven as you would normally. NOTE: The thermostat adjustment for Baking will also affect Convection Baking or Convection Roasting. The oven temperature to contain at least 80% fat by weight. Low-fat spreads, on the other hand, contain less Instructions Troubleshooting Tips Consumer Support 27 - GE PGB916SEMSS | Use and Care Manual - Page 28
Instructions Safety Instructions Using the electric warming drawer. (on some models) The warming drawer will keep hot, cooked Set" begins to blink. On the number pad, press 1 for Low, 2 for Medium or 3 for High. The display "1" changes Instructions Consumer Support Troubleshooting Tips 28 - GE PGB916SEMSS | Use and Care Manual - Page 29
Instructions Operating Instructions Installation Instructions setting and cover some of the cooked food items. ■ Do not use for more than two hours. To Crisp Stale Items ■ Place food in low-sided dishes or pans. ■ Preheat on 1 setting. ■ Check crispness Troubleshooting Tips Consumer Support 29 - GE PGB916SEMSS | Use and Care Manual - Page 30
10 minutes 350°F 20 minutes 425°F 30 minutes When Using the Lower Oven Drawer Warm Zone The WARM ZONE of the lower oven drawer will keep hot cooked foods at serving temperatures. Always start -position on the line) HI Meats Installation Instructions Consumer Support Troubleshooting Tips 30 - GE PGB916SEMSS | Use and Care Manual - Page 31
any range. Move birds to another well-ventilated room. NOTE: Use caution when opening the upper oven after the self-clean cycle has ended. The oven may still be hot. Installation Instructions Troubleshooting Tips Consumer Support How to Set the Upper Oven for Cleaning On models with Gas/Control - GE PGB916SEMSS | Use and Care Manual - Page 32
. To return to the clean countdown, touch the Cooking Time pad. ■ If the racks become hard to slide, apply a small amount of vegetable oil or cooking oil to a paper towel and wipe the edges of the oven racks with the paper towel. Installation Instructions Consumer Support Troubleshooting Tips 32 - GE PGB916SEMSS | Use and Care Manual - Page 33
Electrode Installation Instructions Troubleshooting Tips Consumer Support Burner cap Side grate Electrode Burner head Burner base Front right burner (on some models) Electrode Cooktop Sealed Burner Assemblies (on some models) Turn all controls OFF before removing the burner parts. The - GE PGB916SEMSS | Use and Care Manual - Page 34
. Front of range Slot Electrode Caps Replace the matching size caps onto the burner bases or heads. Medium cap Small cap Large cap Front of range Extra large cap Make sure that the heads (on some models) and caps are replaced in the correct locations. Consumer Support Troubleshooting Tips - GE PGB916SEMSS | Use and Care Manual - Page 35
Instructions Appearance may vary. The grates may be cleaned in a dishwasher. Left Front Center Right Front Burner Grates Your range has . NOTE: Do not clean the grates in a selfcleaning oven. Troubleshooting Tips Consumer Support Cooktop Surface To avoid damaging the porcelain-enamel surface of - GE PGB916SEMSS | Use and Care Manual - Page 36
of your oven control section in this manual. Clean up splatters with a damp cloth. You may also use a glass cleaner. Remove heavier soil with warm soapy water. Do not use abrasives of any kind. Unlock the touch pads after cleaning. Installation Instructions Consumer Support Troubleshooting Tips - GE PGB916SEMSS | Use and Care Manual - Page 37
oven cleaners, cleansing powders or harsh abrasives on the outside of the door. Installation Instructions Troubleshooting Tips Consumer Support Stainless Steel Surfaces (on some models instructions for any Stainless Steel surface on your range. DO NOT USE for Cooktop or Stainless Steel parts - GE PGB916SEMSS | Use and Care Manual - Page 38
the front of the drawer up and free of the range. To replace storage drawer: Set the stops on the back of the drawer over the stops in the range. Slide drawer evenly and straight back, so that the rails in the range are engaged. Installation Instructions Consumer Support Troubleshooting Tips 38 - GE PGB916SEMSS | Use and Care Manual - Page 39
pulling the drawer forward and free. Troubleshooting Tips Consumer Support Removable Lower Oven Drawer Pan NOTE: For models with an electric warming drawer or lower oven drawer, before performing any adjustments, cleaning or service, disconnect the range electrical power supply at the household - GE PGB916SEMSS | Use and Care Manual - Page 40
. • Note to Consumer - Keep this Owner's Manual and Installation Instructions for future reference. • Note - This appliance must be properly grounded. • Servicer - The electrical diagram is in an envelope attached to the back of the range. • Skill level - Installation of this appliance requires - GE PGB916SEMSS | Use and Care Manual - Page 41
and literature from oven before connecting gas and electrical supply to range. CAUTION - Do not attempt to operate the oven of this range during a power failure (Electric Ignition models only). ■ Have your range installed by a qualified installer. ■ Your range must be electrically grounded in - GE PGB916SEMSS | Use and Care Manual - Page 42
adequate clearances between the range and adjacent combustible surfaces. These dimensions must be met for safe use of your range. The location of the electrical outlet and pipe opening (see Gas Pipe and Electric Outlet Locations) may be adjusted to meet specific requirements. The range may be placed - GE PGB916SEMSS | Use and Care Manual - Page 43
, call 1.800.561.3344). For installation instructions of the bracket, visit GEAppliances.com (in Canada, GEAppliances.ca). ■ For your safety, never use your range for warming or heating the room. Your oven and cooktop are not designed to heat your kitchen. Top burners should not be operated without - GE PGB916SEMSS | Use and Care Manual - Page 44
Instructions 1 PROVIDE ADEQUATE GAS SUPPLY Your range is designed to operate at a pressure of 5″ of water column on natural gas or, if designed for LP gas (propane or butane), 10″ of water column. Make sure you are supplying your range with the type of gas for which it is designed. This range - GE PGB916SEMSS | Use and Care Manual - Page 45
Installation Instructions GAS PIPE AND ELECTRICAL OUTLET LOCATIONS For models JGB500, PGB900, PGB908 and PGB910 only. (See the below section for models JGB605, PGB916, PGB918 and PGB975.) Recommended area for 120V outlet on rear wall and area for throughthe-wall connection of pipe stub and shut-off - GE PGB916SEMSS | Use and Care Manual - Page 46
Instructions FLEXIBLE CONNECTOR HOOKUP Pressure regulator Adapter Installer: Inform the consumer of the location of the gas shut-off valve. 1/2″ or 3/4″ Gas pipe Gas Flow into Range Flex connector (6 ft. max.) Adapter Gas shut-off valve RIGID PIPE HOOKUP OPTIONS 45° Elbow Gas Flow into Range - GE PGB916SEMSS | Use and Care Manual - Page 47
in Canada) Align gas range receptacles. Ground Fault Circuit Interrupters (GFCIs) are devices that sense leakage of current in a circuit and automatically switch off power when a threshold leakage level is detected. These devices must be manually reset by the consumer. The National Electrical - GE PGB916SEMSS | Use and Care Manual - Page 48
, one large and one extra-large burner head. Large head Front of range (on some models) (on some models) Extra-large head D Grates Place the left, right and center grates on the cooktop. These grates are position specific. The undersides of the left and right grates are marked "LEFT FRONT - GE PGB916SEMSS | Use and Care Manual - Page 49
Installation Instructions 6 CHECK IGNITION OF SURFACE BURNERS Operation of all cooktop and oven burners should be checked after the range and gas supply lines have been carefully checked for leaks. Electric Ignition Models Select a top burner knob and simultaneously push in and turn to LITE - GE PGB916SEMSS | Use and Care Manual - Page 50
and then pull it up and out. 9 LEVELING THE RANGE A. Install the oven racks in the oven and position the range where it will be installed. Lower range Raise range Lower range Leg leveler Raise range (on some models) (on some models) B. Check for levelness by placing a spirit level or a cup - GE PGB916SEMSS | Use and Care Manual - Page 51
is unobstructed. CONVERTING TO LP GAS (or converting back to natural gas from LP) This range leaves the factory set for use with natural gas. If you want to convert to LP gas, the conversion must be performed by a qualified LP gas installer. The conversion instructions and LP orifices can be found - GE PGB916SEMSS | Use and Care Manual - Page 52
right corners. Look for the gas shut-off lever at the back of the range. Installation Instructions Consumer Support Troubleshooting Tips Lever is shown closed. PULL TO OPEN. Sealed burner models Thumb screws Lower oven drawer models Control signals after entering cooking time or start time Food - GE PGB916SEMSS | Use and Care Manual - Page 53
Installation Instructions Problem Burners do not light (cont.) Possible Causes A fuse in your home may be blown or the circuit breaker tripped. Burner parts not replaced correctly. What To Do • Replace the fuse or reset the circuit breaker. • See the Care and cleaning of the range section. Gas - GE PGB916SEMSS | Use and Care Manual - Page 54
call for service... Troubleshooting Tips Installation Instructions Problem Excessive smoking Oven door will not open after a clean cycle Oven not clean after a clean cycle "Door" appears in the display (on models with a door latch) Possible Causes Excessive soil. Oven too hot. Oven controls not - GE PGB916SEMSS | Use and Care Manual - Page 55
Strong odor An odor from the insulation around the inside of the oven is normal for the first few times the oven is used. • This is temporary. Fan noise (some models) The convection fan may turn on • This is normal. The convection fan will run until the and off automatically. function is over - GE PGB916SEMSS | Use and Care Manual - Page 56
Notes. 56 Consumer Support Troubleshooting Tips Installation Instructions Operating Instructions Safety Instructions - GE PGB916SEMSS | Use and Care Manual - Page 57
broiler pan within 30 days of purchasing your GE cooking product. Small Large* XL** U.S. Part # Canada Part # Dimensions WB48X10055 222D2097G001 8-3/4" W x 1-1/4" H x 13-1/2" D WB48X10056 222D2097G002 12-3/4" W x 1-1/4" H x 16-1/2" D WB48X10057 N/A 17" W x 1-1/4" H x 19-1/4" D Price US$10 - GE PGB916SEMSS | Use and Care Manual - Page 58
which vary from state to state. To know what your legal rights are, consult your local or state consumer affairs office or your state's Attorney General. Warrantor: General Electric Company. Louisville, KY 40225 Installation Instructions Consumer Support Troubleshooting Tips 58 - GE PGB916SEMSS | Use and Care Manual - Page 59
Operating Instructions GE Gas Range Warranty. (For customers in Canada) All warranty service provided by our Factory Service Centers or an authorized Customer Care® technician. For service, call 1.800.561.3344. Please have serial number and model number available when calling for service. Staple - GE PGB916SEMSS | Use and Care Manual - Page 60
business hours. Instructions contained in this manual cover procedures to be performed by any user. Other servicing generally should be referred to qualified service personnel. Caution must be exercised, since improper servicing may cause unsafe operation. Customers in Canada should consult the
-
 1
1 -
 2
2 -
 3
3 -
 4
4 -
 5
5 -
 6
6 -
 7
7 -
8
-
9
-
10
-
11
-
12
-
13
-
14
-
15
-
16
-
17
-
18
-
19
-
20
-
21
-
22
-
23
-
24
-
25
-
26
-
27
-
28
-
29
-
30
-
31
-
32
-
33
-
34
-
35
-
36
-
37
-
38
-
39
-
40
-
41
-
42
-
43
-
44
-
45
-
46
-
47
-
48
-
49
-
50
-
51
-
52
-
53
-
54
-
55
-
56
-
57
-
58
-
59
-
60
 |
 |

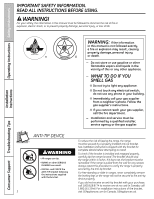
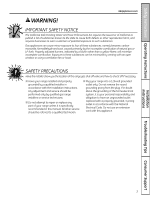
Safety Instructions
. . . .2–7
Operating Instructions
Aluminum Foil . . . . . . . . . . . . . . . . .14
Clock and Timer . . . . . . . . . . . . . . .15
Lower Oven Drawer . . . . . . . . . . .30
Oven . . . . . . . . . . . . . . . . . . . . . .11–32
Baking and Roasting . . . . . . . . .14
Control Lockout . . . . . . . . . . . . . .24
Convection
. . . . . . . . . . . . . .18–22
Gas/Control Lockout . . . . . . . . .24
Oven Control . . . . . . . . . . . . .11, 12
Power Outage . . . . . . . . . . . .13, 15
Preheating
. . . . . . . . . . . . . . . . . .14
Probe . . . . . . . . . . . . . . . . . . . . . . . .17
Racks
. . . . . . . . . . . . . . . . . . . . . . .13
Sabbath Feature . . . . . . . . .25, 26
Self-Cleaning . . . . . . . . . . . . .31, 32
Special Features
. . . . . . . . .23, 24
Thermostat Adjustment . . . . . .27
Timed Baking
and Roasting . . . . . . . . . . . . . . . .16
Timed Convection Baking . . . .22
Surface Cooking . . . . . . . . . . . .8–10
Griddle . . . . . . . . . . . . . . . . . . . . . .10
Warming Drawer . . . . . . . . . .28, 29
Care and Cleaning
Burner Assembly
. . . . . . . . . .33, 34
Burner Grates . . . . . . . . . . . . . . . . .35
Control Panel and Knobs
. . . . . .36
Cooktop
. . . . . . . . . . . . . . . . . . . . . .35
Door Removal . . . . . . . . . . . . . . . . .37
Griddle . . . . . . . . . . . . . . . . . . . . . . . .35
Oven Bottom . . . . . . . . . . . . . . . . . .36
Oven Light Replacement
. . . . . .38
Oven Vents
. . . . . . . . . . . . . . . . . . .36
Racks . . . . . . . . . . . . . . . . . . . . . . . . .38
Self-Cleaning . . . . . . . . . . . . . .31, 32
Stainless Steel Surfaces
. . . . . . .37
Drawer . . . . . . . . . . . . . . . . . . . .38, 39
Installation
Instructions
. . . . . . . . . . .40–51
Air Adjustment . . . . . . . . . . . . . . . .50
Anti-Tip Device
. . . . . . . . . . . .43, 51
Assemble Surface Burners . . . . .48
Checking Burner
Ignition . . . . . . . . . . . . . . . . . . . . . . .49
Connecting the Range
to Gas
. . . . . . . . . . . . . . . . . . . .44–46
Dimensions and Clearances . . .42
Electrical Connections
. . . . .47, 48
Leveling the Range . . . . . . . . . . . .50
LP . . . . . . . . . . . . . . . . . . . . . . . . . . . .51
Troubleshooting
Tips
. . . . . . . . . . . . . . . . . . . . . .52–55
Accessories
. . . . . . . . . . . . . . .57
Consumer Support
Consumer Support
. . .Back Cover
Warranty for Customers
in Canada . . . . . . . . . . . . . . . . . . . . .59
Warranty for Customers
in the U.S.A.
. . . . . . . . . . . . . . . . . .58
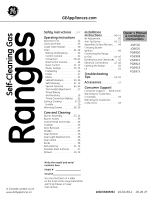
Ranges
183D5580P251
49-85169-1
06-09 JR
JGB500
JGB605
PGB900
PGB908
PGB910
PGB916
PGB918
PGB975
Owner’s Manual
& Installation
Instructions
GEAppliances.com
Self-Cleaning Gas
Write the model and serial
numbers here:
Model #
____________________
Serial #______________________
You can find them on a label
on the front of the range behind the
warming drawer or lower
oven drawer.
In Canada contact us at:
www.GEAppliances.ca