GE PSSS7RGXSS Owners Manual
GE PSSS7RGXSS - Profile 26.6 Cu. Ft. Refrigerator Manual
 |
UPC - 084691174608
View all GE PSSS7RGXSS manuals
Add to My Manuals
Save this manual to your list of manuals |
GE PSSS7RGXSS manual content summary:
- GE PSSS7RGXSS | Owners Manual - Page 1
Profile Refr igeraSidetobyrSides ge.com Safety Instructions 2-4 Operating Instructions Automatic Icemaker 14 Care and Cleaning 16, 17 Crispers and Pans 13 CustomCool 7, 8 Ice and Water Dispenser 15 Refrigerator Doors 12 Replacing the Light Bulbs 18 Shelves and Bins 10, 11 Temperature - GE PSSS7RGXSS | Owners Manual - Page 2
Consumer Support Troubleshooting Tips Installation Instructions Operating Instructions Safety Instructions IMPORTANT SAFETY INFORMATION. READ ALL INSTRUCTIONS BEFORE USING. WARNING! Use this appliance only for its intended purpose as described in this Owner's Manual. SAFETY PRECAUTIONS When using - GE PSSS7RGXSS | Owners Manual - Page 3
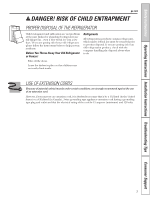
Safety Instructions Operating Instructions Installation Instructions Troubleshooting Tips Consumer Support ge.com DANGER! RISK OF CHILD ENTRAPMENT PROPER DISPOSAL OF THE REFRIGERATOR Child entrapment and suffocation are not problems of the past. Junked or abandoned refrigerators are still - GE PSSS7RGXSS | Owners Manual - Page 4
Support Troubleshooting Tips Installation Instructions Operating Instructions Safety Instructions IMPORTANT SAFETY INFORMATION. READ ALL INSTRUCTIONS BEFORE USING. WARNING! HOW TO CONNECT ELECTRICITY of electric shock hazard from this appliance. When moving the refrigerator away from the wall, - GE PSSS7RGXSS | Owners Manual - Page 5
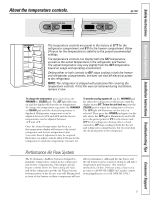
Safety Instructions Operating Instructions Installation Instructions Troubleshooting Tips Consumer Support About the temperature controls. ge.com The temperature controls are preset in the factory at 37°F for the refrigerator compartment and 0°F for the freezer compartment. Allow 24 hours for the - GE PSSS7RGXSS | Owners Manual - Page 6
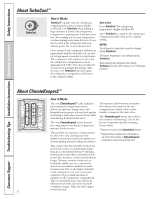
Consumer Support Troubleshooting Tips Installation Instructions Operating Instructions Safety Instructions About TurboCool.™ How it Works TurboCool™ rapidly cools the refrigerator compartment in order to more quickly cool foods. Use TurboCool when adding a large amount of food to the refrigerator - GE PSSS7RGXSS | Owners Manual - Page 7
Instructions Operating Instructions Installation Instructions Troubleshooting Tips Consumer Support About CustomCool.™ ge are located at the top of the refrigerator with the temperature controls. How to The display and SET light will come on. Tap the pad until the light appears next to the - GE PSSS7RGXSS | Owners Manual - Page 8
Consumer Support Troubleshooting Tips Installation Instructions Operating Instructions Safety Instructions About CustomCool.™ CustomCool™ Chart NOTE: Results Bin 8 How to Use Select the Beverage Center pad. The set light will come on and the feature will operate as required. To turn off the feature, - GE PSSS7RGXSS | Owners Manual - Page 9
Instructions Operating Instructions Installation Instructions Troubleshooting Tips Consumer Support About the water filter. (on some models) ge refrigerator compartment. When to Replace the Filter There is a replacement indicator light for the water filter cartridge on the dispenser. This light - GE PSSS7RGXSS | Owners Manual - Page 10
Consumer Support Troubleshooting Tips Installation Instructions Operating Instructions Safety Instructions About the shelves and bins. Not all features are on all models. Snugger Refrigerator bin Freezer tilt-out bin Refrigerator Door Bins and Freezer Door Tilt-Out Bins Large Bins The larger - GE PSSS7RGXSS | Owners Manual - Page 11
Safety Instructions Operating Instructions Installation Instructions Troubleshooting Tips Consumer Support ge.com Not all features are on all to the sides of the bin. Engage the back side of the bin in the molded supports on the door. Then push down on the front of the bin. The bin will lock - GE PSSS7RGXSS | Owners Manual - Page 12
Consumer Support Troubleshooting Tips Installation Instructions Operating Instructions Safety Instructions About the refrigerator doors. Refrigerator Doors The refrigerator doors may feel different than the ones you are used to. The special door opening/closing feature makes sure the doors close - GE PSSS7RGXSS | Owners Manual - Page 13
Safety Instructions Operating Instructions Installation Instructions Troubleshooting Tips Consumer Support OLDEST About the pan. Set the control to cold to convert the pan to normal refrigerator temperature and The variable temperature control regulates provide extra vegetable storage space. - GE PSSS7RGXSS | Owners Manual - Page 14
Consumer Support Troubleshooting Tips Installation Instructions Operating Instructions Safety Instructions About the automatic icemaker. A newly installed refrigerator may take 12 to 24 hours to begin making ice. On dispenser models, to access ice or reach the power switch: Lift the bin, then - GE PSSS7RGXSS | Owners Manual - Page 15
Instructions Operating Instructions Installation Instructions Troubleshooting Tips Consumer Support About the ice and water dispenser. (on some models) ge when the refrigerator is first installed light comes on. This alarm will sound if either door is open for more than 3 minutes. The light - GE PSSS7RGXSS | Owners Manual - Page 16
Support Troubleshooting Tips Installation Instructions Operating Instructions Safety Instructions Care and cleaning of the refrigerator. clean cloth lightly dampened with kitchen appliance wax or mild liquid dish detergent. Dry and polish with a clean, soft cloth. Do not wipe the refrigerator with - GE PSSS7RGXSS | Owners Manual - Page 17
Instructions Operating Instructions Installation Instructions Troubleshooting Tips Consumer Support ge.com Behind the Refrigerator Be careful when moving the refrigerator water supply to the refrigerator. If the temperature can drop below freezing, have a qualified servicer drain the water supply - GE PSSS7RGXSS | Owners Manual - Page 18
Consumer Support Troubleshooting Tips Installation Instructions Operating Instructions Safety Instructions COLD Replacing the light bulbs. Setting the controls to OFF does not remove power to the light circuit. Reveal® appliance bulbs are used on some models. They can be identified by their blue - GE PSSS7RGXSS | Owners Manual - Page 19
Safety Instructions Operating Instructions Installation Instructions Troubleshooting Tips Consumer Support Trim kits and decorator panels. For CustomStyle™ models Read these instructions completely and carefully. Before You Begin Some models are equipped with trim kits that allow you to install - GE PSSS7RGXSS | Owners Manual - Page 20
Consumer Support Troubleshooting Tips Installation Instructions Operating Instructions Safety Instructions Trim kits and decorator panels. 23' Dimensions for Custom Wood Panels The areas at the top of the panels need to be cut out of - GE PSSS7RGXSS | Owners Manual - Page 21
Instructions Operating Instructions Installation Instructions Troubleshooting Tips Consumer Support Inserting the door panels. Read these instructions Freezer and Fresh Food Doors. The Top Trim can be found inside the refrigerator compartment. With a T-20 Torxdriver, attach the Top Trim, using two - GE PSSS7RGXSS | Owners Manual - Page 22
Consumer Support Troubleshooting Tips Installation Instructions Operating Instructions Safety Instructions Inserting the door panels. Top Trim Side Trim Install the Side Trim. Side trim pieces are tucked inside the refrigerator door handle. Do not remove the protective film on the outside of the - GE PSSS7RGXSS | Owners Manual - Page 23
If the refrigerator has an icemaker, it will have to be connected to a cold water line. A GE water supply kit (containing tubing, shutoff valve, fittings and instructions) is available at extra cost from your dealer, by visiting our Website at ge.com (in Canada at geappliances.ca) or from Parts and - GE PSSS7RGXSS | Owners Manual - Page 24
Installation Instructions MOVING THE REFRIGERATOR 1 LOADING THE REFRIGERATOR ONTO A HAND TRUCK Leave all tape and door pads on doors until the refrigerator is in its final location. To move the refrigerator, use a padded hand truck. Center the refrigerator on the hand truck and secure the strap - GE PSSS7RGXSS | Owners Manual - Page 25
Installation Instructions 4 DISCONNECT THE POWER COUPLING (on some models) If the refrigerator has a water dispenser, there REFRIGERATOR DOORS Bottom freezer hinge 5 DISCONNECT THE ELECTRICAL CONNECTORS (on some models) If the refrigerator has a refreshment center, there are electrical connectors - GE PSSS7RGXSS | Owners Manual - Page 26
Instructions MOVING THE REFRIGERATOR (CONT.) 7 REMOVE THE FREEZER DOOR (cont.) D As one person slowly lifts the freezer door up and off the bottom hinge, the second person should carefully guide the water line and power line (harness) through the bottom hinge. 8 REMOVE THE REFRIGERATOR - GE PSSS7RGXSS | Owners Manual - Page 27
Installation Instructions 8 REMOVE THE REFRIGERATOR DOOR (cont.) D Lift the refrigerator door up and off the bottom hinge. If the refrigerator has a refreshment center, one person should slowly lift the door up and off the bottom hinge and the second person should carefully guide the electrical - GE PSSS7RGXSS | Owners Manual - Page 28
Installation Instructions INSTALLING THE REFRIGERATOR REFRIGERATOR LOCATION • Do not install the refrigerator where the temperature will go below 60°F (16°C) because it will not run often enough to maintain proper temperatures. • Do not install the refrigerator where the temperature will go above - GE PSSS7RGXSS | Owners Manual - Page 29
Installation Instructions 1 CONNECTING THE REFRIGERATOR TO THE HOUSE WATER LINE (icemaker and dispenser that could clog the screen of the refrigerator's water valve. Install it in the water line near the refrigerator. If using GE SmartConnect™ Refrigerator Tubing Kit, you will need an additional - GE PSSS7RGXSS | Owners Manual - Page 30
Installation Instructions INSTALLING THE REFRIGERATOR (CONT.) 4 PUT THE REFRIGERATOR IN PLACE Move the refrigerator to its final location. 5 LEVEL THE REFRIGERATOR The refrigerator can be leveled by adjusting the rollers located near the bottom hinges. 5 LEVEL THE REFRIGERATOR (cont.) To adjust - GE PSSS7RGXSS | Owners Manual - Page 31
Installation Instructions 7 SCREW DOWN SUPPORT LEG Screw down the support leg until it touches the floor. This will prevent door misalignment. 9 SET THE CONTROLS Set the controls to the recommended setting. 8 REPLACE THE BASE GRILLE - GE PSSS7RGXSS | Owners Manual - Page 32
or icemaker manufacturer. Follow these instructions carefully to minimize the risk of expensive water damage. Water hammer (water banging in the pipes) in house plumbing can cause damage to refrigerator parts and lead to water leakage or flooding. Call a qualified plumber to correct water - GE PSSS7RGXSS | Owners Manual - Page 33
Instructions WHAT YOU WILL NEED (CONT.) NOTE: The only GE approved plastic tubing is that supplied in GE SmartConnect™ Refrigerator . • A GE water supply kit (containing tubing, shutoff valve and fittings listed below) is available at extra cost from your dealer or from Parts and Accessories, 800 - GE PSSS7RGXSS | Owners Manual - Page 34
Installation Instructions INSTALLING THE WATER LINE (CONT.) 4 FASTEN THE SHUTOFF fully inserted into the valve. Tighten the compression nut securely. For plastic tubing from a GE SmartConnect™ Refrigerator Tubing kit, insert the molded end of the tubing into the shutoff valve and tighten compression - GE PSSS7RGXSS | Owners Manual - Page 35
Instructions Installation Instructions Troubleshooting Tips Consumer Support Normal operating sounds. Newer refrigerators sound different from older refrigerators. Modern refrigerators have more features and use newer technology. Do you hear what I hear? These sounds are normal. ge the light bulbs - GE PSSS7RGXSS | Owners Manual - Page 36
Consumer Support Troubleshooting Tips Installation Instructions Operating Instructions Safety Instructions Before you call for service... Troubleshooting Tips Save time and money! Review the charts on the following pages first and you may not need to call for service. Problem Refrigerator does not - GE PSSS7RGXSS | Owners Manual - Page 37
Safety Instructions Operating Instructions Installation Instructions Troubleshooting Tips Consumer Support ge.com Problem Frequent " one and a half gallons). Water in reservoir is frozen. • Call for service. Refrigerator control setting is too cold. • Set to a warmer setting. Supply line or - GE PSSS7RGXSS | Owners Manual - Page 38
Consumer Support Troubleshooting Tips Installation Instructions Operating Instructions Safety Instructions Before you call for service... Problem Orange glow in the freezer Refrigerator has odor Door not closing properly Moisture forms on outside of refrigerator Moisture collects inside (in humid - GE PSSS7RGXSS | Owners Manual - Page 39
Other Brands: One (1) Year GE Profile: Five (5) Years GE and All Other Brands: One (1) Year One (1) Year TERMS AND CONDITIONS: This warranty applies only for single family domestic use in Canada when the Refrigerator has been properly installed according to the instructions supplied by Mabe and is - GE PSSS7RGXSS | Owners Manual - Page 40
to obtain service under the warranty. For The Period Of: GE Will Replace: GE and GE PROFILE MODELS: One Year From the date of the original purchase Any part of the refrigerator which affairs office or your state's Attorney General. 40 Warrantor: General Electric Company. Louisville, KY 40225 - GE PSSS7RGXSS | Owners Manual - Page 41
General Installation/Operation/Maintenance Requirements ‡ Flush new cartridge at full flow for 3 minutes to purge out trapped air. ‡ Replace cartridge when flow becomes too slow. Special Notices ‡ Installation instructions, parts and service for: General Electric Company, Louisville, KY 40225 41 - GE PSSS7RGXSS | Owners Manual - Page 42
Department of Health Services Water Treatment Device Certificate Number 00 - 1434 Date Issued: May 30, 2000 Date Revised: February 9, 2001 GE Smart Water Filtration Systems - GWF06 GE Smart Water Filtration Systems - GWF Hotpoint Refrigerator Systems - HWF General Electric Appliances GWF06 GWF HWF - GE PSSS7RGXSS | Owners Manual - Page 43
you with excellent service in a professional and timely manner. Place your confidence in GE and call us in the U.S. toll-free at 1.800.626.2224 for more information. *Most brands covered up to 15 years old in the continental U.S. SPP is a trademark of General Electric Company. ✁ Cut here Please - GE PSSS7RGXSS | Owners Manual - Page 44
service. Our service number is 800.GE.CARES (800.432.2737). 3 Read your Owner's Manual carefully. It will help you operate your new appliance Day Year Phone _ _ Number GE Consumer & Industrial Appliances General Electric Company Louisville, KY 40225 ge.com * Please provide your e-mail - GE PSSS7RGXSS | Owners Manual - Page 45
Safety Instructions Operating Instructions Installation Instructions Troubleshooting Tips Consumer Support Notes. 45 - GE PSSS7RGXSS | Owners Manual - Page 46
Mesures de sécurité Fonctionnement Installation Mesures de sécurit 47, 48 Fonctionnement Clayettes et bacs 54, 55 CustomCool 51, 52 Enlèvement des contenants 57 Entretien et nettoyage du réfrigérateur 60, 61 Le distributeur d'eau et de glaçons . . . . . .59 Le filtre à eau 53 Les commandes - GE PSSS7RGXSS | Owners Manual - Page 47
Conseils de dépannage DANGER! RISQUES POUR LES ENFANTS COMMENT VOUS DÉBARRASSER CONVENABLEMENT DE VOTRE ANCIEN RÉFRIGÉRATEUR Les enfants pris au piège ou morts d'asphyxie sont toujours d'actualité. Les réfrigérateurs abandonnés sont toujours aussi dangereux, même si on n'attend que «quelques jours - GE PSSS7RGXSS | Owners Manual - Page 48
Mesures de sécurité Fonctionnement MESURES DE SÉCURITÉ IMPORTANTES. LISEZ D'ABORD TOUTES LES DIRECTIVES. AVERTISSEMENT! RACCORDEMENT ÉLECTRIQUE Ne coupez ni retirez en aucun cas la troisième broche (mise à la terre) de la fiche du cordon d'alimentation. Pour votre sécurité, cet appareil doit ê - GE PSSS7RGXSS | Owners Manual - Page 49
air, une telle opération affectera le rendement en ce qui concerne la température. (Pour recevoir les instructions de démontage de ces éléments en ligne 24 heures par jour, veuillez contacter GE sur le site Web electromenagersge.ca ou appelez le 1.800.561.3344.) 49 Conseils de dépannage Soutien au - GE PSSS7RGXSS | Owners Manual - Page 50
Mesures de sécurité Au sujet de TurboCool.™ Fonctionnement La commande TurboCool accélère le refroidissement du compartiment réfrigération afin de refroidir plus rapidement les aliments. Utilisez TurboCool quand vous ajoutez une grande quantité d'aliments dans le compartiment réfrigération, quand - GE PSSS7RGXSS | Owners Manual - Page 51
Mesures de sécurité Au sujet de CustomCool.™ electromenagersge.ca Fonctionnement Installation ExpressThaw™ ExpressChill™ Fonctionnement Le dispositif CustomCool™ consiste en un système de modérateurs, d'un ventilateur, d'une thermistance de température et d'un réchauffeur. En fonction du mode - GE PSSS7RGXSS | Owners Manual - Page 52
Mesures de sécurité Au sujet de CustomCool.™ Tableau CustomCool™ NOTE : les résultats peuvent varier en fonction de l'emballage, de la température initiale et les particularités des autres aliments. Fonctionnement Installation Conseils de dépannage 0,5 Lb. (4 heures) s Hamburger en galettes - GE PSSS7RGXSS | Owners Manual - Page 53
fleche sur la cartouche et le support de cartouche. Placez le haut de la nouvelle cartouche à l'intérieur du support. Ne l'enfoncez pas dans le aux États-Unis, visitez notre site Web à l'adresse ge.com, ou appelez le Service des pièces et accessoires GE au 800.626.2002. GWF Prix suggéré pour la - GE PSSS7RGXSS | Owners Manual - Page 54
rectangulaires de la porte. Puis faites glisser le bac vers le bas dans les supports pour le fixer en place. L'ergot aide à empêcher que de petits articles la glisser vers le bas dans la position désirée, alignez-la avec les supports et glissez-la en place. Prenez soin de pousser la clayette jusqu'au - GE PSSS7RGXSS | Owners Manual - Page 55
clayette : Soulevez le côté gauche de la clayette et faites-le glisser vers la gauche au centre des supports de la clayette. Soulevez le côté droit de la clayette puis sortez-le des supports de la clayette. NOTE CONCERNANT LES MODÈLES AVEC DISTRIBUTEUR : Afin de tirer pleinement avantage du tiroir - GE PSSS7RGXSS | Owners Manual - Page 56
réfrigérateur et vérifiez l'alignement des portes à la partie supérieure. Relevez Patte de support Avant de déplacer votre réfrigérateur, vous devez remonter la patte de support. Une fois l'appareil repositionné, vous devez l'abaisser de nouveau. Installation Conseils de dépannage Soutien - GE PSSS7RGXSS | Owners Manual - Page 57
des aliments frais d'arriver au contenant. Réglez la temperature à la position froid pour ramener le contenant à une temperature normale de refrigeration et Le réglage de temperature variable contrôle l'utiliser comme espace supplémentaire la circulation d'air en provenance du pour les legumes - GE PSSS7RGXSS | Owners Manual - Page 58
Mesures de sécurité Machine à glaçons automatique. Il faut prévoir entre 12 et 24 heures avant qu'un réfrigérateur nouvellement installé commence à produire des glaçons. Fonctionnement Dans le cas des modèles avec distributeur, pour atteindre la glace ou l'interrupteur : Soulevez le tiroir, puis - GE PSSS7RGXSS | Owners Manual - Page 59
Mesures de sécurité Fonctionnement Le distributeur d'eau et de glaçons. (sur certains modèles) electromenagersge.ca Bac de trop-plein Pour utiliser le distributeur Sélectionnez CUBED ICE (glaçons), CRUSHED ICE (glace concassée) ou WATER (eau). Appuyez doucement le verre contre le haut du bras - GE PSSS7RGXSS | Owners Manual - Page 60
Mesures de sécurité Fonctionnement Entretien et nettoyage du réfrigérateur. Zone de ramasse-gouttes du répartiteur. Nettoyage de l'extérieur Le bac de trop-plein du distributeur devrait être soigneusement essuyé. Vous pouvez éliminer les dépôts calcaires laissés par les taches d'eau en trempant - GE PSSS7RGXSS | Owners Manual - Page 61
place en le poussant, veillez à ne pas le faire rouler sur le cordon d'alimentation ou sur la conduite d'eau de la machine à glaçons. Départ en vacances Lorsque vous vous absentez pendant une période prolongée, videz et débranchez le réfrigérateur. Nettoyez l'intérieur avec une solution d'eau et de - GE PSSS7RGXSS | Owners Manual - Page 62
Mesures de sécurité Fonctionnement Remplacement des ampoules. Lorsque vous réglez les commandes sur OFF (Arrêt), l'alimentation électrique de l'ampoule n'est pas coupée. Les ampoules pour électroménagers Reveal® sont utilisées dans certains modèles. Elle sont identifiables par leur couleur bleue - GE PSSS7RGXSS | Owners Manual - Page 63
monter des panneaux de porte. Vous pouvez commander des panneaux de décoration pré-découpés des couleurs suivantes : noir, blanc, bisque ou acier inoxydable au service de Pièces et accessoires 1.800.661.1616, ou vous pouvez ajouter des panneaux de bois qui vont avec votre cuisine. Panneaux de moins - GE PSSS7RGXSS | Owners Manual - Page 64
Mesures de sécurité Ensembles de garnitures et de panneaux décoratifs. 23' Dimensions pour les panneaux de bois sur mesure Les parties supérieures des panneaux doivent être découpées dans les panneaux. Panneau du congélateur sans distributeur Panneaux du congélateur avec distributeur Panneau - GE PSSS7RGXSS | Owners Manual - Page 65
Mesures de sécurité Fonctionnement Installation Installation des panneaux de porte. Veuillez lire toutes les directives attentivement. Insérez les panneaux du congélateur et du réfrigérateur. Poussez délicatement sur le panneau supérieur du congélateur jusqu'à ce qu'il soit inséré dans la - GE PSSS7RGXSS | Owners Manual - Page 66
Mesures de sécurité Fonctionnement Installation des panneaux de porte. Garniture supérieure Garniture latérale Installez la garniture latérale. Les garnitures latérales rentrent à l'intérieur de la poignée de porte du réfrigérateur. Ne retirez pas la pellicule protectrice placée à l'extérieur de - GE PSSS7RGXSS | Owners Manual - Page 67
d'eau froide. Vous pouvez acheter une trousse d'alimentation d'eau GE (contenant la tuyauterie, le robinet d'arrêt, les joints et les instructions) chez votre revendeur ou en vous adressant à notre site Web à l'adresse electromenagersge.ca ou à notre service de Pièces et accessoires au numéro de - GE PSSS7RGXSS | Owners Manual - Page 68
Instructions d'installation DÉMÉNAGEMENT DU RÉFRIGÉRATEUR 1 CHARGEMENT DU RÉFRIGÉRATEUR réfrigération est doté d'un rafraîchisseur d'eau, alors il faut débrancher la conduite d'eau qui part de la carosserie et s'insère dans la charnière inférieure de la porte du compartiment congélation. - GE PSSS7RGXSS | Owners Manual - Page 69
Instructions d'installation 4 DÉBRANCHEZ LE RACCORD D'ALIMENTATION ÉLECTRIQUE (sur certains modèles) Si le compartiment réfrigération est doté d'un rafraîchisseur d'eau, alors il faut débrancher la conduite électrique (faisceau) qui part de la carosserie et s'insère dans la charnière inférieure de - GE PSSS7RGXSS | Owners Manual - Page 70
Instructions d'installation DÉMÉNAGEMENT DU RÉFRIGÉRATEUR (SUITE) 7 ENLEVEZ LA PORTE DU COMPARTIMENT CONGÉLATION (suite) D Pendant qu'une personne soulève lentement la porte du compartiment - GE PSSS7RGXSS | Owners Manual - Page 71
Instructions d'installation 8 ENLEVEZ LA PORTE DU COMPARTIMENT RÉFRIGÉRATION (suite) D Soulevez la porte la porte pour la dégager de la charnière inférieure, pendant qu'une deuxième personne guide minutieusement les conduites électriques (faisceaux) à travers la charnière inférieure. 9 REMISE EN - GE PSSS7RGXSS | Owners Manual - Page 72
Instructions d'installation INSTALLATION DU RÉFRIGÉRATEUR EMPLACEMENT DU RÉFRIGÉRATEUR • N'installez jamais votre réfrigérateur dans un emplacement où la température ambiante sera inférieure à 16° C ( - GE PSSS7RGXSS | Owners Manual - Page 73
Instructions d'installation 1 BRANCHEMENT DU RÉFRIGÉRATEUR À LA CONDUITE D'EAU DE LA Installez-le sur la conduite d'eau près du réfrigérateur. Si vous utilisez une trousse GE SmartConnect™ Refrigerator Tubing, vous aurez besoin d'un tuyau additionnel (WX08X10002) pour brancher le filtre. Ne coupez - GE PSSS7RGXSS | Owners Manual - Page 74
Instructions d'installation INSTALLATION DU RÉFRIGÉRATEUR (SUITE) 4 PLACEZ LE RÉFRIGÉRATEUR DANS SON EMPLACEMENT Transportez le réfrigérateur jusqu'à sa destination. 5 METTEZ LE RÉFRIGÉRATEUR DE - GE PSSS7RGXSS | Owners Manual - Page 75
Instructions d'installation 7 ABAISSEZ LA PATTE DE SUPPORT Abaissez la patte de support jusqu'à ce qu'elle touche le plancher. Vous préviendrez ainsi le désalignement de la porte. 9 RÉGLEZ LES COMMANDES Réglez les commandes selon les recommandations. 8 - GE PSSS7RGXSS | Owners Manual - Page 76
glaçons. Suivez soigneusement ces instructions pour minimiser le risque de dommages en cuivre ou trousse GE SmartConnect™ Refrigerator Tubing, diamètre GE (contenant un tuyau en cuivre, un robinet d'arrêt et les joints énumérés ci-dessous) chez votre distributeur local ou en le commandant au service - GE PSSS7RGXSS | Owners Manual - Page 77
Instructions d'installation CE DONT VOUS AUREZ BESOIN (SUITE) • Une alimentation d'eau utiliser un raccord à compression. Ne coupez jamais l'extrémité finie d'un tuyau de la trousse GE SmartConnect™ Refrigerator Tubing. 3 PERCEZ UN TROU POUR LE ROBINET Percez un trou de 1/4 po dans le tuyau d'eau - GE PSSS7RGXSS | Owners Manual - Page 78
Instructions d'installation INSTALLATION DE LA CONDUITE D'EAU (SUITE) 4 FIXEZ LE ROBINET D' le robinet. Serrez fort l'écrou de compression. Pour le tuyau en matière plastique d'une trousse GE SmartConnect™ Refrigerator Tubing, insérez l'extrémité moulée du tuyau dans le robinet d'arrêt et serrez - GE PSSS7RGXSS | Owners Manual - Page 79
Mesures de sécurité Fonctionnement Bruits normaux de fonctionnement. electromenagersge.ca Les réfrigérateurs plus récents font des bruits différents de ceux des anciens. Les réfrigérateurs modernes présentent plus de fonctions et sont plus avancés sur le plan technologique. Entendez-vous ce que - GE PSSS7RGXSS | Owners Manual - Page 80
Mesures de sécurité Avant d'appeler un réparateur... Conseils de dépannage-Économisez du temps et de l'argent! Consultez d'abord les tableaux qui suivent et vous pourrez peutêtre éviter de faire appel à un réparateur. Fonctionnement Installation Problème Le réfrigérateur ne fonctionne pas - GE PSSS7RGXSS | Owners Manual - Page 81
Mesures de sécurité Fonctionnement Installation electromenagersge.ca Problème La machine à glaçons ne fonctionne pas Bourdonnement fréquent Odeur/saveur anormale des glaçons Petits glaçons ou glaçons creux à l'intérieur Le distributeur de glaçons ne fonctionne pas L'eau versée dans le premier - GE PSSS7RGXSS | Owners Manual - Page 82
Mesures de sécurité Avant d'appeler un réparateur... Fonctionnement Installation Problème Le distributeur d'eau ne fonctionne pas L'eau jaillit du distributeur La machine à glaçons fonctionne, mais ne distribue pas d'eau La machine à glaçons ne distribue ni eau ni glaçons CUBED ICE (cubes de - GE PSSS7RGXSS | Owners Manual - Page 83
Mesures de sécurité Fonctionnement electromenagersge.ca Problème Le réfrigérateur ne s'arrête jamais mais les températures sont normales Le réfrigérateur émet un signal sonore Les aliments ne se dégèlent pas/ne se refroidissent pas La température présente n'est pas égale à celle affichée La - GE PSSS7RGXSS | Owners Manual - Page 84
GE Profile : Cinq (5) ans GE et toutes autre marques : Un (1) an Un (1) an Un (1) an Un (1) an TERMES ET CONDITIONS : La présente garantie ne s'applique qu'à l'utilisation domestique par une seule famille au Canada, lorsque le réfrigérateur a été installé conformément aux instructions service - GE PSSS7RGXSS | Owners Manual - Page 85
GWF/HWF du système de Filtration d'eau GE SmartWater Ce système a été essayé selon ciaux ‡ Les directives d'installation, la disponibilité de pièces et de service ainsi que la garantie standard sont expédiées avec le produit. ‡ ® Fabriquée pour : General Electric Company, Louisville, KY 40225 85 - GE PSSS7RGXSS | Owners Manual - Page 86
Notes. 86 Soutien au consommateur Conseils de dépannage Installation Fonctionnement Mesures de sécurité - GE PSSS7RGXSS | Owners Manual - Page 87
-nous par Internet au site electromenagersge.ca 24 heures par jour, tous les jours de l'année. Service de réparations Service de réparations GE est tout près de vous. Pour faire réparer votre électroménager GE, il suffit de nous téléphoner. 1.800.561.3344 Studio de conception réaliste Sur demande - GE PSSS7RGXSS | Owners Manual - Page 88
Anote aquí los números de modelo y de serie: No No Usted los verá en una etiqueta en el interior del compartimiento de refrigerador en la parte superior en el lado derecho. 88 Servicio al consumidor Solucionar problemas - GE PSSS7RGXSS | Owners Manual - Page 89
LAS INSTRUCCIONES. ge.com ¡ADVERTENCIA! Use este aparato sólo para los fines que se describen en este Manual del propietario. hielo, evite el contacto con las partes móviles del mecanismo de expulsión, o con el elemento calefactor localizado en la parte inferior del dispositivo para hacer hielo. - GE PSSS7RGXSS | Owners Manual - Page 90
Seguridad Operación INFORMACIONES IMPORTANTES DE SEGURIDAD. LEA PRIMERO TODA LAS INSTRUCCIONES. ¡ADVERTENCIA! COMO CONECTAR LA ELECTRICIDAD Bajo ninguna circunstancia debe cortar o quitar la tercera punta (tierra) de la clavija. Para su seguridad personal, este aparato deberá conectarse - GE PSSS7RGXSS | Owners Manual - Page 91
Los controles del refrigerador. ge.com Seguridad Operación Instalación Los controles de temperatura vienen preconfigurados de fábrica a 37° nea, 24 horas al día, póngase en contacto con nosotros visitándonos a ge.com llamándonos al 800.GE.CARES.) 91 Solucionar problemas Servicio al consumidor - GE PSSS7RGXSS | Owners Manual - Page 92
apagado a altas velocidades, según sea necesario por ocho horas. El compresor continuará funcionando hasta que el compartimiento del refrigerador se refrigere a aproximadamente 34º F (1º C), luego hará el ciclo de encendido y apagado para mantener este ajuste. Después de 8 horas, o si el TurboCool - GE PSSS7RGXSS | Owners Manual - Page 93
Acerca de CustomCool.™ ge.com Seguridad Operación Instalación ExpressThaw™ (Descongelación expresa) ExpressChill™ ( extra-fríos a la mano. Los controles para esta cacerola están ubicados en la parte superior del refrigerador con los controles de la temperatura. Cómo usar Vacíe la cacerola. - GE PSSS7RGXSS | Owners Manual - Page 94
de productos lácteos 94 Cómo retirar y reemplazar el Beverage Center Para retirar: Retire el compartimiento de productos lácteos primero. Sosteniendo la parte inferior del compartimiento de productos lácteos, levante el frente de forma recta, luego levante y saque. en los costados del centro de - GE PSSS7RGXSS | Owners Manual - Page 95
el tapón de derivación del filtro. Filtros de recambio: Para pedir cartuchos adicionales en los Estados Unidos, visite nuestro sitio Web, ge.com, o llame a GE para partes y accesorios al 800.626.2002. GWF Precio sugerido de venta al público $34.95 USD. Instalación Solucionar problemas Servicio al - GE PSSS7RGXSS | Owners Manual - Page 96
del entrepaño de la puerta se caigan o resbalen. Ponga un dedo en cada lado de la tapa Recipiente superior del congelador No bloquee PRECAUCIÓN: La parte debe estar en su lugar como se exhibe para un dispensado correcto del hielo. Los alimentos no se pueden almacenar en este lugar. Recipiente - GE PSSS7RGXSS | Owners Manual - Page 97
Seguridad ge.com No todos los modelos tienen todas las características. Cestas de congelador Para remover, empuje la canasta totalmente hacia la parte posterior del congelador. Levante hasta que los pasadores posteriores sean desenganchados. Levante la canasta completa hacia arriba y hacia afuera - GE PSSS7RGXSS | Owners Manual - Page 98
Seguridad Operación Puertas del refrigerador. La puerta se cerrará automáticamente sólo cuando está parcialmente abierta. Más allá de la posición de tope de parada, la puerta permanecerá abierta. Puertas del refrigerador Es posible que Ud. note una diferencia entre el manejo de las puertas de su - GE PSSS7RGXSS | Owners Manual - Page 99
deben ser secadas. En algunos modelos, la gaveta inferior tiene deslizadores de extensión total que permiten acceso total a la gaveta. ge.com Operación Instalación Solucionar problemas Servicio al consumidor Gavetas con humedad ajustable HI LO Deslice el control hasta llegar a la posici - GE PSSS7RGXSS | Owners Manual - Page 100
Seguridad Operación Instalación El dispositivo automático para hacer hielo. Un refrigerador recién instalado puede tardar hasta 12 a 24 horas antes de empezar a hacer hielo. En los modelos con dispensador, para lograr acceso al hielo o para alcanzar el interruptor: Levante el cubo, entonces tí - GE PSSS7RGXSS | Owners Manual - Page 101
hielo. (en algunos modelos) ge.com Seguridad Operación Recogedor Para , presione la misma tecla durante 3 segundos nuevamente. Dispenser Light (Luz del dispensador) Esta tecla enciende y apaga la normal y, por regla general, sucede cuando ha dispensado hielo picado repetidamente. La nieve se evaporará por - GE PSSS7RGXSS | Owners Manual - Page 102
que se quiebren. Maneje los entrepaños de vidrio con cuidado. Chocar vidrio templado puede hacer que se rompe en pedazos. No lave partes plásticas del refrigerador en el lavaplatos. La bandeja de Enfriar/Descongelar se puede lavar en el lavaplatos. Instalación Servicio al consumidor Solucionar - GE PSSS7RGXSS | Owners Manual - Page 103
Seguridad Operación ge.com Atrás del refrigerador Se deberá tener cuidado al retirar su lugar para evitar daños. Al usar una carretilla para mover el refrigerador, no haga descansar la parte frontal o trasera del refrigerador contra la carretilla. Esto podría dañar el refrigerador. Manéjelo sólo - GE PSSS7RGXSS | Owners Manual - Page 104
de la cubierta de luz. (El entrepaño será más fácil de quitar si se vacía primero.) En algunos modelos, tendrá que retirarse un tornillo de la parte superior de la cubierta de la luz. Para quitar la cubierta, presione en los lados y levántela hacia arriba y afuera. Reemplace la bombilla con una - GE PSSS7RGXSS | Owners Manual - Page 105
instalar paneles en las puertas. Puede usted ordenar los paneles decorativos precortados en negro, blanco, bisqué o de acero inoxidable en GE Parts and Accessories (partes y accesorios), 800.626.2002 o puede añadir paneles de madera para que hagan juego con los gabinetes de su cocina. Paneles - GE PSSS7RGXSS | Owners Manual - Page 106
Servicio al consumidor Solucionar problemas Instalación Operación Seguridad Molduras y paneles decorativos. 23' Dimensiones de los paneles precortados Las áreas superiores de los paneles necesitan recortarse. Panel del congelador sin dispensador Paneles del congelador con dispensador Corte - GE PSSS7RGXSS | Owners Manual - Page 107
. Con un Torxdriver T-20, sujete la moldura superior, usando dos tornillos en cada parte de la moldura superior, en la parte superior de cada puerta. Apriete solamente con las manos. Cerciórese de que la parte superior de cada panel ajusta cómodamente detrás de la tapa de la moldura superior - GE PSSS7RGXSS | Owners Manual - Page 108
vez introducido el reborde lateral bajo el reborde superior, asegúrese de que no haya holgura entre el reborde lateral y el superior desde la parte delantera del refrigerador. 2. Fije el reborde lateral contra la puerta lateral. Introduzca el reborde lateral en el reborde inferior en el sentido que - GE PSSS7RGXSS | Owners Manual - Page 109
válvula de cierre, accesorios e instrucciones) está disponible con un costo adicional a través de su proveedor, visitando nuestra página Web ge.com o bien a través de Partes y Accesorios, 800.626.2002. HERRAMIENTAS QUE USTED NECESITARÁ Cubo de 3/8″ y 5/16″ Llave de 1/2″ y 7/16″ Llave hexagonal de - GE PSSS7RGXSS | Owners Manual - Page 110
Instrucciones para la instalación CÓMO MOVER EL REFRIGERADOR 1 CÓMO CARGAR EL REFRIGERADOR EN UNA CARRETILLA DE MANO Deje toda la cinta adhesiva y las almohadillas hasta que el refrigerador llegue a su destino final. Para mover el refrigerador, use una carretilla de mano con almohadillas. Coloque - GE PSSS7RGXSS | Owners Manual - Page 111
Instrucciones para la instalación 4 DESCONECTE EL ACOPLAMIENTO ENERGÉTICO (en algunos modelos) Si el refrigerador tiene un dispensador de agua, hay una línea de suministro eléctrico (alambrado) desde el gabinete hacia la bisagra del fondo de la puerta del congelador que debe ser desconectado. Para - GE PSSS7RGXSS | Owners Manual - Page 112
liberarla del pasador de la bisagra. Cabeza hexagonal de 5/16″ ó 1/8″ 90° E Coloque la puerta en una superficie donde no se ralle con la parte interna hacia arriba. 8 REMUEVA LA PUERTA DEL REFRIGERADOR A Remueva la cubierta de la bisagra superior de la puerta del refrigerador (si viene equipado - GE PSSS7RGXSS | Owners Manual - Page 113
ximo indicado por la marca. 90° Modelos con centro para refrescar solamente E Coloque la puerta en una superficie donde no se ralle con la parte interna hacia arriba. Marca • No pellizque la tubería o el alambrado mientras se encuentre remplazando las puertas en las bisagras del fondo. • Cuando se - GE PSSS7RGXSS | Owners Manual - Page 114
cm) para un ajuste completo de las ruedas de movilidad. Si los gabinetes instalados por encima del refrigerador tienen puertas niveladas con la parte superior de la abertura para el refrigerador, entonces se requieren 1/8″ adicionales para permitir espacio para que las puertas del gabinete se abran - GE PSSS7RGXSS | Owners Manual - Page 115
agua, recomendamos que instale uno si su suministro de agua tiene arena o partículas que pudieran obstruir la pantalla de la válvula de agua del refrigerador tuberías de GE SmartConnect,™ inserte el extremo moldeado de la tubería en la conexión del refrigerador en la parte posterior del refrigerador - GE PSSS7RGXSS | Owners Manual - Page 116
de las agujas del reloj para bajarlo. 6 CÓMO NIVELAR LAS PUERTAS Ajuste la puerta del refrigerador para que las puertas estén niveladas en la parte superior. Para linear: A Usando una llave de 7/16,″ gire el tornillo ajustable de la puerta hacia la derecha para levantar la puerta, y a la izquierda - GE PSSS7RGXSS | Owners Manual - Page 117
Instrucciones para la instalación 7 DESENROSQUE LA PATA DE APOYO Desenrosque la pata de apoyo hacia abajo hasta que toque el piso. Esto evitará la mala alineación de la puerta. 9 AJUSTE LOS CONTROLES Ajuste los controles donde se recomienda. 8 REEMPLACE LA PARRILLA DE LA BASE Reemplace la - GE PSSS7RGXSS | Owners Manual - Page 118
daños en su casa debido al agua. • Un kit de suministro de agua de GE (contiene tubería, válvula de apagado y accesorios enumerados abajo) está disponible a un costo adicional en su tienda o por medio de Partes y Accesorios, 800.626.2002. • Un suministro de agua fría. La presión del agua debe estar - GE PSSS7RGXSS | Owners Manual - Page 119
Si está usando un kit de tubería para el refrigerador SmartConnect ™ de GE, los accesorios necesarios ya vienen preinstalados en la tubería. • Si su tuber de agua, haga la conexión en la parte superior o al lado, en vez de hacerlo en la parte de abajo, para evitar retirar cualquier sedimento de - GE PSSS7RGXSS | Owners Manual - Page 120
en la válvula. Apriete la tuerca de compresión firmemente. Para tubería de plástico de un kit de tubería para el refrigerador SmartConnect ™ de GE, inserte el extremo moldeado de la tubería en la válvula de apagado y apriete la tuerca de compresión hasta que esté firmemente apretada a mano, luego - GE PSSS7RGXSS | Owners Manual - Page 121
Seguridad Sonidos normales de operación. ge.com Los refrigeradores más nuevos producen sonidos diferentes a los modelos más volver a arrancar (esto puede tomar hasta 5 minutos). s El tablero de control electrónico puede causar un sonido de chasquido cuando se activa el relé para controlar los - GE PSSS7RGXSS | Owners Manual - Page 122
y enchúfelo otra vez. Vibraciones o sacudidas (una vibración ligera es normal) Los rodillos requieren un ajuste. •Vea Rodillos. El motor opera durante períodos prolongados o se arranca y se para con frecuencia. (Refrigeradores modernos con más espacio de almacenamiento y un congelador - GE PSSS7RGXSS | Owners Manual - Page 123
ge.com Seguridad Operación Instalación Problema Los cubos tienen mal olor/sabor Causas Posibles El recipiente para los cubos necesita limpieza. Alimentos transmitiendo olor/sabor a los - GE PSSS7RGXSS | Owners Manual - Page 124
refrigerador. Aire caliente a la base del refrigerador Brillo anaranjado en el congelador El interior requiere limpieza. El aire fluye para enfriar el motor. En el proceso de refrigeración es normal que salga calor de la base del refrigerador. Algunos recubrimientos de piso estan sensitivos y se - GE PSSS7RGXSS | Owners Manual - Page 125
ge.com Seguridad Operación Instalación Problema Humedad en el exterior del refrigerador Causas Posibles Normal en períodos con alto grado de humedad. Qué hacer •Seque - GE PSSS7RGXSS | Owners Manual - Page 126
Por el período de: GE reemplazará: MODELOS GE y GE PROFILE: Un año A partir de la fecha de la compra original Cualquier parte del refrigerador que falle debido a del consumidor local o la oficina del Attorney General en su localidad. 126 Garante: General Electric Company. Louisville, KY 40225 - GE PSSS7RGXSS | Owners Manual - Page 127
de Filtración GE SmartWater Cartucho GWF partículas, Clase I Estándar No. 53: Efectos sobre la salud Unidad de reducción química Reducción del plomo y Atrazine Reducción del Lindane y 2,4-D Unidad de filtrado mecánico Reducción de quistes Reducción de turbidez Hecho por General Electric, Appliance - GE PSSS7RGXSS | Owners Manual - Page 128
Para Compras Hechas en Iowa: Este formulario debe ser firmado y fechado por el comprador y el vendedor antes de la conclusión de esta venta. Este formulario debe ser conservado en archivo por el comprador por un mínimo de dos años. COMPRADOR: VENDEDOR: Nombre Nombre Dirección Dirección Ciudad - GE PSSS7RGXSS | Owners Manual - Page 129
Notas. 129 Seguridad Operación Instalación Solucionar problemas Servicio al consumidor - GE PSSS7RGXSS | Owners Manual - Page 130
Notas. 130 Servicio al consumidor Solucionar problemas Instalación Operación Seguridad - GE PSSS7RGXSS | Owners Manual - Page 131
normales de oficina. GE Consumer Home Services estará aún ahí cuando su garantía termine. Piezas y accesorios ge.com Aquellos individuos escríbanos a: General Manager, Customer Relations GE Appliances, Appliance Park Louisville, KY 40225 ge.com Registre su electrodoméstico ge.com ¡Registre - GE PSSS7RGXSS | Owners Manual - Page 132
Support. GE Appliances Website In the U.S.: ge.com Have a question or need assistance with your appliance? Try the GE Appliances Website 24 hours a day, any day of the year! For greater convenience and faster service, you can now download Owner's Manuals, order parts or even schedule service
-
 1
1 -
 2
2 -
 3
3 -
 4
4 -
 5
5 -
 6
6 -
 7
7 -
8
-
9
-
10
-
11
-
12
-
13
-
14
-
15
-
16
-
17
-
18
-
19
-
20
-
21
-
22
-
23
-
24
-
25
-
26
-
27
-
28
-
29
-
30
-
31
-
32
-
33
-
34
-
35
-
36
-
37
-
38
-
39
-
40
-
41
-
42
-
43
-
44
-
45
-
46
-
47
-
48
-
49
-
50
-
51
-
52
-
53
-
54
-
55
-
56
-
57
-
58
-
59
-
60
-
61
-
62
-
63
-
64
-
65
-
66
-
67
-
68
-
69
-
70
-
71
-
72
-
73
-
74
-
75
-
76
-
77
-
78
-
79
-
80
-
81
-
82
-
83
-
84
-
85
-
86
-
87
-
88
-
89
-
90
-
91
-
92
-
93
-
94
-
95
-
96
-
97
-
98
-
99
-
100
-
101
-
102
-
103
-
104
-
105
-
106
-
107
-
108
-
109
-
110
-
111
-
112
-
113
-
114
-
115
-
116
-
117
-
118
-
119
-
120
-
121
-
122
-
123
-
124
-
125
-
126
-
127
-
128
-
129
-
130
-
131
-
132
 |
 |
ge.com
Refrigerators
Profile
Side by Side
200D8074P006
49-60414-2
07-08 JR
La section française commence à la page 46
La sección en español empieza en la página 88
Safety Instructions
. . . . . . . . . . . .2–4
Operating Instructions
Automatic Icemaker . . . . . . . . . . . .14
Care and Cleaning . . . . . . . . . .16, 17
Crispers and Pans . . . . . . . . . . . . . .13
CustomCool
™
. . . . . . . . . . . . . . . .7, 8
Ice and Water Dispenser
. . . . . . . .15
Refrigerator Doors . . . . . . . . . . . . .12
Replacing the Light Bulbs . . . . . . .18
Shelves and Bins . . . . . . . . . . . .10, 11
Temperature Controls
. . . . . . . . . . .5
TurboCool
™
. . . . . . . . . . . . . . . . . . . .6
Water Filter . . . . . . . . . . . . . . . . . . . .9
Installation Instructions
Installing the Refrigerator . . . .28–31
Moving the Refrigerator . . . . . .24–27
Preparing to Install
the Refrigerator
. . . . . . . . . . . . . . .23
Trim Kits and Panels . . . . . . . . .19–22
Water Line Installation . . . . . . .32–34
Troubleshooting Tips
. . . . . . .36–38
Normal Operating Sounds . . . . . . .35
Consumer Support
Consumer Support
. . . . .Back Cover
Performance Data Sheet
. . . . . . . .41
Product Registration . . . . . . . . .43, 44
State of California Water
Treatment Device Certificate . . . . .42
Warranty (Canadian) . . . . . . . . . . .39
Warranty (U.S.) . . . . . . . . . . . . . . . .40
Réfrigérateurs
Profile
Côte à Côte
Refrigeradores
Profile
Lado a Lado
Models 23, 25, 26, 27 and 29
Write the model and serial numbers here:
Model #
__________________________
Serial #
__________________________
Find these numbers on a label inside
the refrigerator compartment at the
top on the right side.
Owner’s Manual
and Installation
Manuel d’utilisation
et d’installation
Manual del propietario
e instalación