GE PT916CMCC Owners Manual
GE PT916CMCC - 30 Inch Single Electric Wall Oven Manual
 |
UPC - 084691151098
View all GE PT916CMCC manuals
Add to My Manuals
Save this manual to your list of manuals |
GE PT916CMCC manual content summary:
- GE PT916CMCC | Owners Manual - Page 1
GEAppliances.com Electric Convection Built-In Oven Safety Instructions 2-4 Operating Instructions Clock and Light Bulb 22 Probe 23 Racks 24 Removing Packaging Tape . . . . .22 Stainless Steel Surfaces 24 Troubleshooting Tips . . . . .25-27 Accessories 28 Consumer Support Consumer Support - GE PT916CMCC | Owners Manual - Page 2
Consumer Support Troubleshooting Tips Care and Cleaning Operating Instructions Safety Instructions IMPORTANT SAFETY INFORMATION. READ ALL INSTRUCTIONS BEFORE USING. WARNING! For your safety, the information in this manual must be followed to minimize the risk of fire or explosion, electric shock, - GE PT916CMCC | Owners Manual - Page 3
Safety Instructions Operating Instructions Care and Cleaning Troubleshooting Tips Consumer Support GEAppliances.com WARNING! SAFETY PRECAUTIONS ■ Never wear loose-fitting or hanging garments while using the appliance. Be careful when reaching for items stored in cabinets over the oven. Flammable - GE PT916CMCC | Owners Manual - Page 4
Support Troubleshooting Tips Care and Cleaning Operating Instructions Safety Instructions IMPORTANT SAFETY INFORMATION. READ ALL INSTRUCTIONS in or around any part of the oven. Residue serviced by a qualified technician. READ AND FOLLOW THIS SAFETY INFORMATION CAREFULLY. SAVE THESE INSTRUCTIONS 4 - GE PT916CMCC | Owners Manual - Page 5
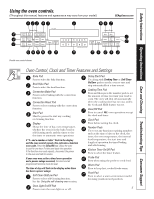
Instructions Operating Instructions Care and Cleaning Troubleshooting Tips Consumer Support Using the oven controls. (Throughout this manual disconnect the power to the oven and call for service. If your oven was set for a timed section. Oven Light On/Off Pad Press to turn the oven light on or off - GE PT916CMCC | Owners Manual - Page 6
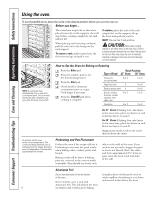
Support Troubleshooting Tips Care and Cleaning Operating Instructions Safety Instructions Using the oven. To avoid possible burns, place the racks in the desired position before you turn the oven on. Before you begin... The racks have stop-locks, so that when placed correctly on the supports parts - GE PT916CMCC | Owners Manual - Page 7
Safety Instructions Operating Instructions Care and Cleaning Troubleshooting Tips Consumer Support GEAppliances.com How to temperature and your preference for doneness will affect broiling times. This guide is based on meats at refrigerator temperature. Press the Broil Hi/Lo pad once for HI Broil - GE PT916CMCC | Owners Manual - Page 8
Consumer Support Troubleshooting Tips Care and Cleaning Operating Instructions Safety Instructions Using the clock, timer and control lockout. Make sure the clock is set to the correct time of day. To Set the Clock The clock - GE PT916CMCC | Owners Manual - Page 9
Safety Instructions Operating Instructions Care and Cleaning Troubleshooting Tips Consumer Support Using the timed baking and cooking. Room temperature promotes the growth of harmful bacteria. Be sure that the oven light is off because heat from the bulb will speed harmful bacteria growth. How to - GE PT916CMCC | Owners Manual - Page 10
Consumer Support Troubleshooting Tips Care and Cleaning Operating Instructions Safety Instructions Using the probe. For many gill into the meatiest area, parallel to the backbone. Insert the probe into the meatiest part of the inner thigh from below and parallel to the leg of a whole turkey. How - GE PT916CMCC | Owners Manual - Page 11
Safety Instructions Operating Instructions Care and Cleaning Troubleshooting Tips Consumer Support Using the proofing and warming the Proof pad twice. The display will read PrF (proof). The oven interior light turns on and remains on during proofing. The proofing feature automatically provides the - GE PT916CMCC | Owners Manual - Page 12
Consumer Support Troubleshooting Tips Care and Cleaning Operating Instructions Safety Instructions Using the convection oven. your oven control section. ■ Use pan size recommended. ■ Some package instructions for frozen casseroles or main dishes have been developed using commercial convection ovens - GE PT916CMCC | Owners Manual - Page 13
Safety Instructions Operating Instructions Care and Cleaning Troubleshooting Tips Consumer Support Grid Broiler pan When baking cookies, you will get the best results if you use a flat cookie sheet instead of a pan with low sides. OR - GE PT916CMCC | Owners Manual - Page 14
Support Troubleshooting Tips Care and Cleaning Operating Instructions Safety Instructions be shown in the display. Convection Roasting Guide When the internal temperature of the meat lbs.) 16-19 325°F 170°F * Stuffed birds generally require 30-45 minutes additional roasting time. Shield legs and - GE PT916CMCC | Owners Manual - Page 15
Safety Instructions Operating Instructions Care and Cleaning Troubleshooting Tips Consumer Support Using the timed features cooking. Room temperature promotes the growth of harmful bacteria. Be sure that the oven light is off because heat from the bulb will speed harmful bacteria growth. How to Set - GE PT916CMCC | Owners Manual - Page 16
Consumer Support Troubleshooting Tips Care and Cleaning Operating Instructions Safety Instructions Adjust the oven thermostat-Do it yourself! You may find that your new oven cooks differently than the one it replaced. Use your new oven - GE PT916CMCC | Owners Manual - Page 17
Safety Instructions Operating Instructions Care and Cleaning Troubleshooting Tips Consumer Support Using the self-cleaning oven door. ■ To stop a clean cycle, press the Clear/Off pad. When the LOCKED light goes off indicating the oven has cooled below the locking temperature, you will be able to - GE PT916CMCC | Owners Manual - Page 18
Consumer Support Troubleshooting Tips Care and Cleaning Operating Instructions Safety Instructions Using the self-cleaning oven oven door until the temperature drops below the lock temperature and the LOCKED light goes off. When the LOCKED light goes off, you will be able to open the door. NOTE: On - GE PT916CMCC | Owners Manual - Page 19
Safety Instructions Operating Instructions Care and Cleaning Troubleshooting Tips Consumer Support Special features of your oven control. GEAppliances.com Your new touch pad control has additional features that you may choose to use. The following are - GE PT916CMCC | Owners Manual - Page 20
Consumer Support Troubleshooting Tips Care and Cleaning Operating Instructions Safety Instructions Special features of your oven control. Tones at the End of a Timed Cycle + At the end of a timed cycle, 3 short beeps will Press the Kitchen - GE PT916CMCC | Owners Manual - Page 21
Safety Instructions Operating Instructions Care and Cleaning Troubleshooting Tips Consumer Support Using the Sabbath Feature. ( The bulb may be removed. See the Oven Light Replacement section. On models with a light switch on the control panel, the oven light may be turned on and left on. How to - GE PT916CMCC | Owners Manual - Page 22
Consumer Support Troubleshooting Tips Care and Cleaning Operating Instructions Safety Instructions Care and cleaning of the oven. Be sure electrical power is off and all surfaces are cool before cleaning any part of the oven. How to Remove Protective Shipping Film and Packaging Tape Carefully - GE PT916CMCC | Owners Manual - Page 23
Safety Instructions Operating Instructions Care and Cleaning Troubleshooting Tips Consumer Support GEAppliances.com Cleaning the Oven Door Do not rub or clean the door gasket- it has an extremely low resistance to abrasion. If you notice - GE PT916CMCC | Owners Manual - Page 24
Support Troubleshooting Tips Care and Cleaning Operating Instructions Safety Instructions to slide, wipe their side edges with a light coating of vegetable oil after cleaning them by hand instructions for cleaning the stainless steel surface. To inquire about purchasing stainless steel appliance - GE PT916CMCC | Owners Manual - Page 25
Instructions Operating Instructions Care and Cleaning Troubleshooting Tips Consumer Support Before You Call For Service... Troubleshooting Tips Save time and money! Review the charts on the following pages first and you may not need to call for service. GEAppliances.com Problem Broiling Guide. • - GE PT916CMCC | Owners Manual - Page 26
Support Troubleshooting Tips Care and Cleaning Operating Instructions Safety Instructions Before You Call For Service... Troubleshooting Tips Problem pad. Open the windows to rid the room of smoke. Wait until the LOCKED light goes off. Wipe up the excess soil and reset the clean cycle. Oven door - GE PT916CMCC | Owners Manual - Page 27
Instructions Operating Instructions Care and Cleaning Troubleshooting Tips Consumer Support GEAppliances.com Problem If the function error code repeats, call for service. A fuse in your home may be blown or The cooling fan will turn on to cool internal parts. It may run for up to 1-1/2 hours after - GE PT916CMCC | Owners Manual - Page 28
Support Troubleshooting Tips Care and Cleaning Operating Instructions Safety Instructions Oven Racks Oven Elements Light Bulbs Experience these other Appliance Polish Wipes Stainless Steel Appliance catches the excess fats and oils. • Genuine GE Part • Easy To Clean • One-Year Warranty Limited - GE PT916CMCC | Owners Manual - Page 29
Safety Instructions Operating Instructions Care and Cleaning Troubleshooting Tips Consumer Support Notes. 29 - GE PT916CMCC | Owners Manual - Page 30
Consumer Support Troubleshooting Tips Care and Cleaning Operating Instructions Safety Instructions Notes. 30 - GE PT916CMCC | Owners Manual - Page 31
Safety Instructions Operating Instructions Care and Cleaning Troubleshooting Tips Consumer Support GE Built-In Electric Oven Warranty. All warranty service provided by our Factory Service Centers, or an authorized Customer Care® technician. To schedule service, visit us on-line at GEAppliances.com - GE PT916CMCC | Owners Manual - Page 32
Support. GE Appliances Website GEAppliances.com Have a question or need assistance with your appliance? Try the GE Appliances Website 24 hours a day, any day of the year! For greater convenience and faster service, you can now download Owner's Manuals, order parts or even schedule service - GE PT916CMCC | Owners Manual - Page 33
Accesorios 28 Soporte al consumidor Garantía 31 Soporte al consumidor 32 Manual del propietario PK916-Horno simple de pared de 27″ PK956-Horno en una etiqueta en la parte delantera del horno, detrás de la puerta del horno en los modelos de horno simple, o en la parte delantera del horno inferior, - GE PT916CMCC | Owners Manual - Page 34
. ■ Siempre mantenga tapices, cortinas o paños ■ No intente reparar o reemplazar ninguna que puedan prenderse fuego a una distancia parte de su horno a menos que este manual segura del horno. lo recomiende de manera específica. Todos los demás servicios de mantenimiento deberán derivarse a un - GE PT916CMCC | Owners Manual - Page 35
próxima vez que utilice la bandeja. ■ Únicamente limpie las partes enlistadas en este Manual del propietario. ■ No utilice papel de aluminio para revestir la parte inferior del horno, a excepción de lo sugerido en este manual. La instalación incorrecta del papel de aluminio puede provocar un - GE PT916CMCC | Owners Manual - Page 36
mover el empaque. ■ No utilice limpiadores. Ningún limpiador comercial para hornos ni ninguna cubierta protectora para hornos debe utilizarse dentro o alrededor de las partes del horno. Los residuos de los limpiadores de hornos dañarán el interior del horno cuando se utilice el ciclo de autolimpieza - GE PT916CMCC | Owners Manual - Page 37
los controles del horno inferior. (A lo largo de este manual, las características y apariencia pueden variar con los de la función de autolimpieza. Consulte la sección Uso del horno autolimpieza. Botón Oven Light (Luz del horno) Presione para encender o apagar la luz del horno. Botón Delay - GE PT916CMCC | Owners Manual - Page 38
de daños o incendio en los gabinetes. NOTA: Es posible que se encienda automáticamente un ventilador de enfriamiento para refrigerar las partes internas. Esto es normal, y el ventilador puede continuar andando incluso después de apagar el horno. Para precalentar, configure el horno a la temperatura - GE PT916CMCC | Owners Manual - Page 39
lado con mantequilla derretida. Ase primero con la piel hacia abajo. Corte a través de la parte posterior del caparazón. Deje las colas bien separadas. Unte con mantequilla derretida antes de asar y venenosos podrían sobrevivir". (Fuente: Safe Food Book. Your Kitchen Guide. USDA Rev. Junio 1985.) 7 - GE PT916CMCC | Owners Manual - Page 40
Uso del reloj, el temporizador y el bloqueo de controles. Seguridad Operación Soporte al consumidor Solucionar problemas Cuidado y limpieza Asegúrese de que el reloj sea ajustado en la hora correcta del día. Para ajustar el reloj El reloj debe ser ajustado en la hora correcta del día para que - GE PT916CMCC | Owners Manual - Page 41
Seguridad Uso de las características cronometradas de horneado y asado del horno. (en algunos modelos) GEAppliances.com En modelos de horno doble, puede utilizar la función de horneado cronometrado en un horno mientras utiliza la limpieza automática en el otro; también puede usar el horneado - GE PT916CMCC | Owners Manual - Page 42
de la carne. La sonda no debe tocar el hueso, la grasa o el cartílago. Para bistecs sin hueso, inserte la sonda dentro de la parte carnosa del bistec. Para jamón o cordero con hueso, inserte la sonda dentro del centro del músculo grande más interno o la articulación. Inserte la sonda dentro del - GE PT916CMCC | Owners Manual - Page 43
temperatura dentro del horno se estabilice durante un tiempo adicional después de agregar alimentos. ■ Con cargas grandes, puede ser necesario cubrir parte de los alimentos cocinados. ■ Retire las cucharas para servir, etc., antes de colocar los recipientes en el horno. ■ No utilice recipientes - GE PT916CMCC | Owners Manual - Page 44
cantidad de tiempo requerida para el horneado de múltiples parrillas puede aumentar ligeramente para algunos alimentos, pero se ahorra el tiempo general ya que muchos alimentos se cocinan al mismo tiempo. Galletas, muffins, bizcochos y otros panecillos rápidos dan buenos resultados con el horneado - GE PT916CMCC | Owners Manual - Page 45
Seguridad Operación Cuidado y limpieza Solucionar problemas Soporte al consumidor Rejilla Bandeja para asar a la parrilla Al hornear galletas, obtendrá mejores resultados si utiliza una bandeja de horno plana en vez de una fuente con lados bajos. O GEAppliances.com Asado por convección ■ Bueno - GE PT916CMCC | Owners Manual - Page 46
cocida es popular, pero usted debe saber que cocinarla a solamente 140 °F significa que algunos organismos venenosos podrían sobrevivir". (Fuente: Safe Food Book.Your Kitchen Guide. USDA Rev. Junio 1985.) - GE PT916CMCC | Owners Manual - Page 47
Uso de las características cronometradas para cocinar por convección. GEAppliances.com Seguridad Operación En modelos de horno doble, puede utilizar la función de asado u horneado cronometrado en un horno mientras utiliza la limpieza automática en el otro; también puede usar el asado u horneado - GE PT916CMCC | Owners Manual - Page 48
. Los estándares federales exigen que los productos marcados como margarinas, contengan por lo menos un 80% de grasa por peso. Por otra parte, los productos tipo mantequilla bajos en grasa contienen menos grasa y más agua. El alto contenido de humedad de estos productos afecta la textura y el - GE PT916CMCC | Owners Manual - Page 49
y cualquier residuo de papel aluminio. Las parrillas del horno pueden autolimpiarse sin daño. No utilice abrasivos o limpiadores de hornos. Limpie la parte superior, lados y parte exterior de la puerta del horno con jabón y agua. Asegúrese de que esté puesta la cubierta de la bombilla eléctrica - GE PT916CMCC | Owners Manual - Page 50
Seguridad Operación Soporte al consumidor Solucionar problemas Cuidado y limpieza Uso del horno autolimpieza. La puerta del horno debe estar cerrada y todos los controles deben estar configurados correctamente para que el ciclo funcione apropiadamente. Cómo posponer el inicio de la limpieza - GE PT916CMCC | Owners Manual - Page 51
Seguridad Características especiales de control de su horno. GEAppliances.com Su nuevo control con botones sensibles tiene características adicionales que puede elegir utilizar. A continuación se describen las características y cómo puede activarlas. Los modos de característica especial sólo - GE PT916CMCC | Owners Manual - Page 52
Seguridad Operación Características especiales de control de su horno. Tonos al final de un ciclo cronometrado + Al final de un ciclo cronometrado, sonarán 3 pitidos Presione el botón Kitchen Timer On/Off. cortos seguidos por un pitido cada 6 segundos hasta que se presione el botón Clear/Off. - GE PT916CMCC | Owners Manual - Page 53
Seguridad Operación Uso de la característica Sabbath. (Diseñada para utilizarse en el Sabbath judío y días festivos). (en algunos modelos) GEAppliances.com La característica Sabbath puede utilizarse únicamente para horneado/asado. No puede utilizarse para convección, asado a la parrilla, - GE PT916CMCC | Owners Manual - Page 54
la aplicación de un detergente doméstico líquido para lavar platos. Aplique con un paño suave y moje. NOTA: Debe retirar el adhesivo de todas las partes. No puede retirarse si se quema. Portalámparas 31⁄2 pulg. Longitud máxima Bombilla Lengüeta Cubierta de vidrio Lámpara de luz del horno NOTA - GE PT916CMCC | Owners Manual - Page 55
durante el ciclo de limpieza automática, no es necesario que la limpie de manera manual. ■ El área fuera de la junta y el revestimiento interior de la puerta pueden en el brazo de la bisagra debe estar bien asentada en la parte inferior de la ranura. Abra la puerta por completo. Si la puerta - GE PT916CMCC | Owners Manual - Page 56
o un lustrador de acero inoxidable, o para encontrar la ubicación de su distribuidor más cercano, por favor llame a nuestro número gratuito: Centro Nacional de Refacciones (National Parts Center) 1.800.626.2002 GEAppliances.com Soporte al consumidor Solucionar problemas Cuidado y limpieza 24 - GE PT916CMCC | Owners Manual - Page 57
Seguridad Antes de llamar para solicitar un servicio de mantenimiento... ¡Los consejos para resolución de problemas ahorran tiempo y dinero! Revise primero las gráficas en las siguientes páginas y es posible que no tenga que llamar para solicitar servicio de mantenimiento. GEAppliances.com - GE PT916CMCC | Owners Manual - Page 58
Antes de llamar para solicitar un servicio de mantenimiento... ¡Los consejos para resolución de problemas ahorran tiempo y dinero! Seguridad Operación Soporte al consumidor Solucionar problemas Cuidado y limpieza Problema La temperatura del horno es demasiado alta o demasiado baja Causas - GE PT916CMCC | Owners Manual - Page 59
Un ventilador de enfriamiento • Esto es normal. El ventilador de enfriamiento o un ventilador de convección se encenderá para refrigerar las partes internas. (dependiendo de la función Puede funcionar durante 1-1/2 horas después que que esté utilizando) puede el horno esté apagado. El - GE PT916CMCC | Owners Manual - Page 60
de modelo Número de serie Marca Fecha de compra __________ Nombre Apellido Dirección _____ Ciudad Estado __________ Código Postal Teléfono Correo electrónico Check ______ Giro postal ______ Para consultar sobre los precios actuales llame al 800.626.2002. Todas las órdenes con tarjeta de - GE PT916CMCC | Owners Manual - Page 61
Notas. 29 Seguridad Operación Cuidado y limpieza Solucionar problemas Soporte al consumidor - GE PT916CMCC | Owners Manual - Page 62
Notas. 30 Soporte al consumidor Solucionar problemas Cuidado y limpieza Operación Seguridad - GE PT916CMCC | Owners Manual - Page 63
producto está situado en un área que no dispone de servicio por parte de un proveedor de servicio autorizado de GE, podría tener que hacerse Prucurador (Attorney General) en su localidad. Cuidado y limpieza Solucionar problemas Soporte al consumidor Garante: General Electric Company. Louisville, - GE PT916CMCC | Owners Manual - Page 64
Appliances 24 horas al día, cualquier día del año! Para mayor conveniencia y servicio más rápido, ya puede descargar los Manuales normales de oficina. GE Consumer Home Services estará aún ahí cuando su escríbanos a: General Manager, Customer Relations GE Appliances, Appliance Park Louisville, KY
-
 1
1 -
 2
2 -
 3
3 -
 4
4 -
 5
5 -
 6
6 -
 7
7 -
8
-
9
-
10
-
11
-
12
-
13
-
14
-
15
-
16
-
17
-
18
-
19
-
20
-
21
-
22
-
23
-
24
-
25
-
26
-
27
-
28
-
29
-
30
-
31
-
32
-
33
-
34
-
35
-
36
-
37
-
38
-
39
-
40
-
41
-
42
-
43
-
44
-
45
-
46
-
47
-
48
-
49
-
50
-
51
-
52
-
53
-
54
-
55
-
56
-
57
-
58
-
59
-
60
-
61
-
62
-
63
-
64
 |
 |

GEAppliances.com
49-80599
08-09 JR
PK916–27
″
Single Wall Oven
PK956–27
″
Double Wall Oven
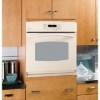
PT916–30
″
Single Wall Oven
PT956–30
″
Double Wall Oven
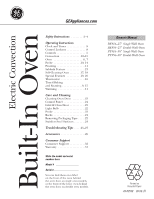
Owner’s Manual
Safety Instructions
. . . . . . . . .2–4
Operating Instructions
Clock and Timer . . . . . . . . . . . . . .8
Control Lockout . . . . . . . . . . . . . .8
Controls . . . . . . . . . . . . . . . . . . . . .5
Convection
. . . . . . . . . . . . . .12–15
Oven
. . . . . . . . . . . . . . . . . . . . .6, 7
Probe . . . . . . . . . . . . . . . . . . .10, 14
Proofing . . . . . . . . . . . . . . . . . . . .11
Sabbath Feature . . . . . . . . . . . . .21
Self-Cleaning Oven . . . . . . . .17, 18
Special Features
. . . . . . . . . .19, 20
Thermostat . . . . . . . . . . . . . . . . .16
Timed Baking
and Roasting . . . . . . . . . . . . . .9, 15
Warming . . . . . . . . . . . . . . . . . . .11
Care and Cleaning
Cleaning Oven Door
. . . . . . . . .23
Control Panel . . . . . . . . . . . . . . .24
Lift-Off Oven Door . . . . . . . . . . .23
Light Bulb . . . . . . . . . . . . . . . . . .22
Probe . . . . . . . . . . . . . . . . . . . . . .23
Racks . . . . . . . . . . . . . . . . . . . . . .24
Removing Packaging Tape . . . . .22
Stainless Steel Surfaces . . . . . . . .24
Troubleshooting Tips
. . . . .25–27
Accessories
. . . . . . . . . . . . . . . . .28
Consumer Support
Consumer Support . . . . . . . . . . .32
Warranty
. . . . . . . . . . . . . . . . . . .31
Write the model and serial
numbers here:
Model #
__________________
Serial #____________________
You can find them on a label
on the front of the oven behind
the oven door on single oven models,
or the front of the lower oven behind
the oven door on double oven models.
Built-In Oven
Electric Convection
Printed on
Recycled Paper