Gigabyte GH-WIU02 User Manual
Gigabyte GH-WIU02 Manual
 |
View all Gigabyte GH-WIU02 manuals
Add to My Manuals
Save this manual to your list of manuals |
Gigabyte GH-WIU02 manual content summary:
- Gigabyte GH-WIU02 | User Manual - Page 1
3D Galaxy II GH-WIU02 English User's Manual - Gigabyte GH-WIU02 | User Manual - Page 2
English 3D Galaxy II Liquid Cooling System Caution 1. Before pouring liquid coolant into the tank to test the liquid cooling system, please reconfirm all the tubes have been fastened and the tube clips are in the right position. 2. While the water in the tank is lower - Gigabyte GH-WIU02 | User Manual - Page 3
Control Box Installation 16 4-18 Heat Sink Installation 17 5 Liquid Cooling System Installation and Test 18 5-1 Liquid Cooling System Installation and Test 18 5-2 Radiator Installation 19 6 Liquid Cooling System Disassembly 20 7 4-way Splitter Valve Instruction and User Manual 22 3 - Gigabyte GH-WIU02 | User Manual - Page 4
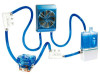
English 1.Accessories List (1) Radiator (2) Pump + Tank Assembly (3) MOSFET Air Cooling Fan (4) Waterblock X2 pcs (5) 4 - way Splitter Valve (6) 1 / 2 inch Tube X8 pcs (7) Tube Clips (8) Screws X4 (9) Intel® Pentium® 4 LGA775 Spring Screws (10) Intel®Pentium® 4 LGA775 Back - Gigabyte GH-WIU02 | User Manual - Page 5
X8 pcs (20)Heat Sink for Memory X2 pcs (21)Bend Proof Spring X4 pcs (22)Nylon Tie (23)Grease (24)Gigabyte Liquid Coolant X2 (25)Velcro (26)Quick Installtion Guide No.8 Screw: a - Secure PCI Rear Fan Speed Controller ( 1pc ) b - Secure Radiator ( 3pcs ) c - Pump + Tank Assembly ( 2pcs ) 5 - Gigabyte GH-WIU02 | User Manual - Page 6
English 2.Specification Instruction Mosfet cooling fan Pump Radiator Tank Valve Tube Coolant Fan size Fan speed Fan Connector Bearing Noise Dimensions Maximum Capacity Noise Bearing Life time Dimensions Material Fan size Fan - Gigabyte GH-WIU02 | User Manual - Page 7
AMD K8/AM2;Intel® Pentium® 4 LGA 775. 4.Liquid Cooling System Installation Please follow the instruction. 4-1 Installation Preparation Please make sure the power of PC has been turned off. Tool needed: scissors - Gigabyte GH-WIU02 | User Manual - Page 8
sizes as it shows below. To get the right length for each tube, strongly recommend to fit all the components in the right position. Liquid Cooling System complete installation diagram. Tube3: The inlet of radiator to 4-way splitter valve (1) Tube4: The outlet of radiator to the inlet of the tank - Gigabyte GH-WIU02 | User Manual - Page 9
flow (as the right Figure under). Besides, if needed, please use bend proof spring on the tube while bending it to avoid obstructing water flow efficiency. O O X 4-5 4-way Splitter Valve to the Tube on Waterblock Installation 4-5-1 Connect one side of tube 1 to 4-way splitter valve (1) A as - Gigabyte GH-WIU02 | User Manual - Page 10
used to support VGA, chipset liquid cooling system or other liquid cooling system. If the 2 splitters in the middle of 4-way splitter valve are available, please do not take off the cap and switch them to horizontal to avoid leakage. 4-6 4-6-1 Radiator to 4-way Splitter Valve Installation Thread - Gigabyte GH-WIU02 | User Manual - Page 11
4-7-2 Connect the other side of tube 4 to the inlet of the tank and fasten the tube clips. 4-8 4-way Splitter Valve to the Outlet of Water Pump 4-8-1 Connect one side of tube5 (as Figure shown) to 4-way splitter valve(2) and fasten the tube clips. 4-8-2 Connect the other side of tube5 to the - Gigabyte GH-WIU02 | User Manual - Page 12
direction. (as Figure b/c) Figure a Figure b Figure c 4-10 Intel® Pentium® 4 LGA775 Bracket Installation 4-10-1 Replace AMD K8 Bracket with Intel® Pentium® 4 LGA775 Bracket (accessory No. 11) ( Figure a ). Place the waterblock on the top of Intel® Pentium® 4 LGA775 CPU( Figure b ) and - Gigabyte GH-WIU02 | User Manual - Page 13
Intel® Pentium® 4 LGA775 motherboard with attached spring screws. 4-11 AMD K8 Clip Installation 4-11-1 Align the AMD K8 Clip to three raised points on the CPU. 4-11-2 Push down the bar to surely secure. 4-12 AMD AM2 Clip Installation 4-12-1 Align the AMD K8 clip to the raised point on the CPU - Gigabyte GH-WIU02 | User Manual - Page 14
4-13-1 Fasten 4-way Splitter Valve Using the nylon tie to fasten 4-way splitter valve on trestle of the chassis. If there is no trestle available, try to find an applicable place to fasten it. 4 -14 4-14-1 MOSFET Air Cooling Fan Installation Place MOSFET air cooling fan on the top of waterblock - Gigabyte GH-WIU02 | User Manual - Page 15
English 4-15 Pump Power Cord Installation 4-15-1 Prepare Pump Power Cord a : 6-pin connector A b : female 2-pin connector c : male 2-pin connector d : 4-pin connector 4-15-2 4-15-3 Connect the Power SW (female 2-pin connector) from the chassis's panel with the pump power cord male 2-pin - Gigabyte GH-WIU02 | User Manual - Page 16
and Power Cord Instruction Fan Speed Control Box Socket Fan Speed Control Box PCI Rear Fan Speed Control Box Connector Power Cord Connect the other side of power cord with fan 1 to 2 power cord Radiator Fan Speed Control Box Connector Socket 4-17 Fan Speed Control Box Installation Tool needed - Gigabyte GH-WIU02 | User Manual - Page 17
cord into the fan speed control box. 4-17-4 To accomplish installation, plug the power cord of fan speed control box into the available 1 to 2 socket (as Figure b). Figure a Figure b 4-18 Heat Sink Installation 4-18-1 Heat sink( 8 pcs) can be pasted on the small chips on the motherboard or VGA - Gigabyte GH-WIU02 | User Manual - Page 18
by warranty. (as figure showen) Use only GIGABYTE™ liquid coolant; any damage arising from using other liquid product is not covered by warranty. 5-1 Liquid Cooling System Installation and Test Tool needed: Coolant 5-1-1 Open the lid of the tank to pour in liquid coolant and close the lid. 18 - Gigabyte GH-WIU02 | User Manual - Page 19
exhaust air to ensure the liquid cooling system to function silently. Installing the radiator in accordance with the liquid cooling system leaks, please turn off the power immediately and drain out all coolant. Contact GIGABYTE™ dealers or GIGABYTE™ service center. 5-2 5-2-1 Radiator Installation - Gigabyte GH-WIU02 | User Manual - Page 20
GIGABYTE™ 3D Aurora, Triton, Poseidon series, water tank can be placed inside of the chassis. [use 2 screws (b), please refer to accessories list] Velcro could be used to place the tank while using the chassis other than 3D Aurora, Triton and Poseidon series. 6. Liquid Cooling System Disassembly - Gigabyte GH-WIU02 | User Manual - Page 21
the clip of waterblock from CPU. (Caution: Do not remove the tube at this point) 6-1-4 Cut and remove the nylon tie which is used to fasten 4-way splitter valve. 6-1-5 Remove pump + tank and 4-way splitter valve from the chassis; and set a pail on a lower position to fill the coming out coolant - Gigabyte GH-WIU02 | User Manual - Page 22
the coolant drifts out. 7. 4-way Splitter Valve Instruction and User Manual (Adding VGA waterblock and chipset waterblock without disassembly) Ex. GIGABYTE™ blue eye and chipset waterblock Please make sure to turn off PC power before installation. 7-1 Remove the caps and tube clips from 4-way - Gigabyte GH-WIU02 | User Manual - Page 23
(as shown on Figure a, Figure b and Figure c) and switch on the 4-way splitter valve. Figure a Figure c Figure b Figure d 7-7 To accomplish liquid cooling system, after turning on the power, appropriately pour coolant into the tank. While removing the tubes for disassembly, please make sure to - Gigabyte GH-WIU02 | User Manual - Page 24
English 24
-
 1
1 -
 2
2 -
 3
3 -
 4
4 -
 5
5 -
 6
6 -
 7
7 -
8
-
9
-
10
-
11
-
12
-
13
-
14
-
15
-
16
-
17
-
18
-
19
-
20
-
21
-
22
-
23
-
24
 |
 |

GH-WIU02
English
User’s Manual
3D Galaxy II