Gigabyte Z790 AORUS ELITE X RAID Setup Guide
Gigabyte Z790 AORUS ELITE X Manual
 |
View all Gigabyte Z790 AORUS ELITE X manuals
Add to My Manuals
Save this manual to your list of manuals |
Gigabyte Z790 AORUS ELITE X manual content summary:
- Gigabyte Z790 AORUS ELITE X | RAID Setup Guide - Page 1
Configuring a RAID Set (Intel® Z790/B760 Refresh Series) Preparing the Hard Drives and BIOS Settings 2 A. Installing hard drives...2 B. Configuring the BIOS settings 3 C. Configuring a RAID Array...3 Installing the RAID Driver and - Gigabyte Z790 AORUS ELITE X | RAID Setup Guide - Page 2
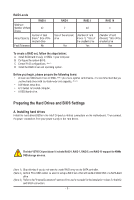
drives. The Intel® B760 Chipset doesn't include RAID 0, RAID 1, RAID 5, and RAID 10 support for NVMe SSD storage devices. (Note 1) Skip this step if you do not want to create the "Internal Connectors" section of the user's manuals for the installation notices for the M.2 and SATA connectors. - 2 - - Gigabyte Z790 AORUS ELITE X | RAID Setup Guide - Page 3
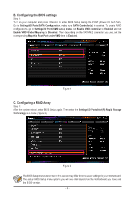
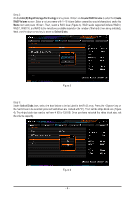
B. Configuring the BIOS settings Step 1: Turn on your computer and press to enter BIOS Setup during the POST (Power-On Self-Test). Go to Settings\IO Ports\SATA Configuration, make sure SATA Controller(s) is enabled. To create RAID configurations, go to Settings\IO Ports\VMD setup menu, set - Gigabyte Z790 AORUS ELITE X | RAID Setup Guide - Page 4
with 1~16 letters (letters cannot be special characters) under the Name item and press . Then, select a RAID level (Figure 3). RAID levels supported include RAID 0, RAID 1, RAID 10, and RAID 5 (the selections available depend on the number of the hard drives being installed). Next, use the - Gigabyte Z790 AORUS ELITE X | RAID Setup Guide - Page 5
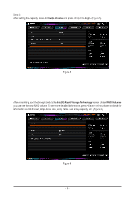
Step 4: After setting the capacity, move to Create Volume and press to begin. (Figure 5) Figure 5 After completing, you'll be brought back to the Intel(R) Rapid Storage Technology screen. Under RAID Volumes you can see the new RAID volume. To see more detailed information, press on - Gigabyte Z790 AORUS ELITE X | RAID Setup Guide - Page 6
Delete RAID Volume To delete a RAID array, press on the volume to be deleted on the Intel(R) Rapid Storage Technology screen. After entering the RAID VOLUME INFO screen, press on Delete to enter the Delete screen. Press on Yes (Figure 7). Figure 7 - 6 - - Gigabyte Z790 AORUS ELITE X | RAID Setup Guide - Page 7
to the steps below: Step 1: Go to GIGABYTE's website, browse to the motherboard model's web page, download the Intel SATA Preinstall driver file on the Support\Download\SATA RAID/AHCI page, unzip the file and copy the files to your USB thumb drive. Step 2: Boot from the Windows setup disc and - Gigabyte Z790 AORUS ELITE X | RAID Setup Guide - Page 8
select Intel® Rapid Storage Technology driver to install. Follow the on-screen instructions to continue. When completed, restart the system. A. Enabling an Intel Intel® Optane™ Memory can only be enabled on the M.2 connectors supported by the Chipset. 3. Only the system drive partition on the Intel - Gigabyte Z790 AORUS ELITE X | RAID Setup Guide - Page 9
B. Rebuilding an Array Rebuilding is the process of restoring data to a hard drive from other drives in the array. Rebuilding applies only to fault-tolerant arrays such as RAID 1, RAID 5 or RAID 10 arrays. The procedures below assume a new drive is added to replace a failed drive to rebuild a RAID 1
-
 1
1 -
 2
2 -
 3
3 -
 4
4 -
 5
5 -
 6
6 -
 7
7 -
8
-
9
 |
 |

- 1 -
Configuring a RAID Set
(Intel
®
Z790/B760 Refresh Series)
Preparing the Hard Drives and BIOS Settings
..................................................................
2
A. Installing hard drives
...............................................................................................................
2
B. Configuring the BIOS settings
................................................................................................
3
C. Configuring a RAID Array
.......................................................................................................
3
Installing the RAID Driver and Operating System
.............................................................
7
Installing Intel
®
Optane
™
Memory and Storage Management
...........................................
8
A. Enabling an Intel
®
Optane
™
Memory
.......................................................................................
8
B. Rebuilding an Array
................................................................................................................
9