Graco 8F24GIS3 Owners Manual
Graco 8F24GIS3 - SnugRide Infant Car Seat Manual
 |
UPC - 047406092383
View all Graco 8F24GIS3 manuals
Add to My Manuals
Save this manual to your list of manuals |
Graco 8F24GIS3 manual content summary:
- Graco 8F24GIS3 | Owners Manual - Page 1
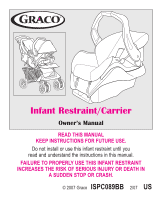
's Manual READ THIS MANUAL KEEP INSTRUCTIONS FOR FUTURE USE. Do not install or use this infant restraint until you read and understand the instructions in this manual. FAILURE TO PROPERLY USE THIS INFANT RESTRAINT INCREASES THE RISK OF SERIOUS INJURY OR DEATH IN A SUDDEN STOP OR CRASH. © 2007 Graco - Graco 8F24GIS3 | Owners Manual - Page 2
(certain models 14 3.6 Seat Pad Assembly (on certain models 15 3.7 Head Support (certain models 16 3.8 Cold Weather Boot (certain models 16 3.9 Harness Covers (certain models 17 4.0 Important Information 18-22 4.1 Warnings for Use as Infant Restraint 18 4.2 Warning for Use With a Stroller 20 - Graco 8F24GIS3 | Owners Manual - Page 3
Belt Systems 26 5.3 LATCH locations 28 6.0 Using Infant Restraint 29-42 6.1 Positioning Harness Straps 29 6.1.1 3-Point Harness 30 6.1.2 5-Point Harness 31 6.2 Securing Child in Infant Restraint 33 6.2.1 3-Point Harness 34 6.2.2 5-Point Harness 35 6.3 Installing Infant Restraint/Base Using - Graco 8F24GIS3 | Owners Manual - Page 4
is located in the back pocket of the infant restraint. You must also read your vehicle owner's manual. Your child's safety depends on: 1. Choosing a suitable location in your vehicle. Some seating positions, such as those equipped with air bags, may not be safe locations for this infant restraint - Graco 8F24GIS3 | Owners Manual - Page 5
or LATCH. 6. Properly reclining the infant restraint. 7. Properly securing the infant restraint in the vehicle using a seat belt designed to restrain an infant restraint or by using LATCH. Many seat belts are NOT safe to use with infant restraints, even though they can easily be threaded through the - Graco 8F24GIS3 | Owners Manual - Page 6
out the prepaid registration postcard attached to the seat cover and mail it today. Child restraints could be recalled for safety reasons. You must register this restraint to be reached in a recall. Send your name, address and model number to: Graco Children's Products Inc. 150 Oaklands Blvd. Exton - Graco 8F24GIS3 | Owners Manual - Page 7
2.3 If You Need Help In the U.S.A. or Canada, please contact our Customer Service Department with any questions you may have concerning parts, use, or maintenance. When you contact us, please have your product's model and serial numbers ready so that we may help you efficiently. These numbers can be - Graco 8F24GIS3 | Owners Manual - Page 8
Foot Base United States Federal Motor Vehicle Safety Standards have defined a new system for installing car seats in vehicles. The system is called LATCH. * LATCH may be used IN PLACE of vehicle belt ONLY if vehicle is equipped with LATCH anchor points. Please refer to vehicle owners manual for - Graco 8F24GIS3 | Owners Manual - Page 9
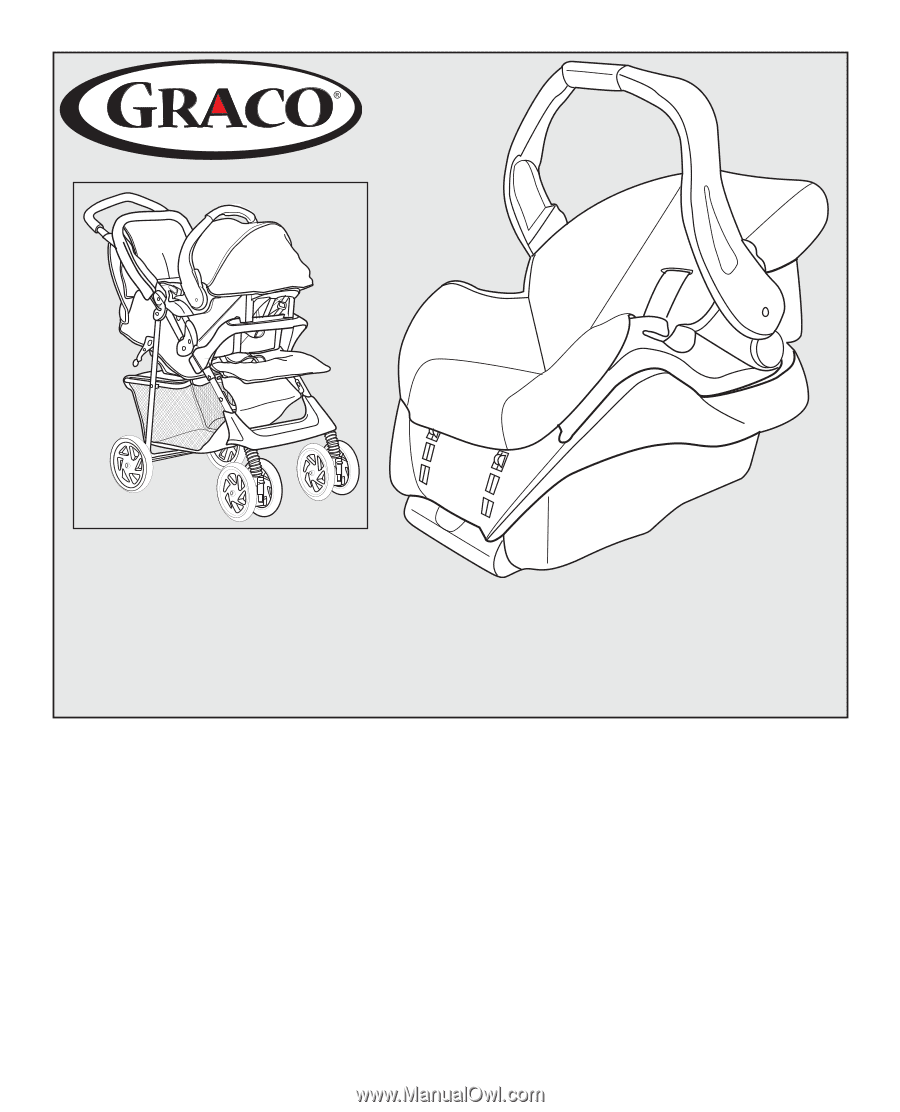
3.1 3-Point Harness Model Harness slots FRONT VIEW: 3-POINT HARNESS Handle Harness clip Handle adjustment button Harness buckle Vehicle belt hook Harness straps 9 - Graco 8F24GIS3 | Owners Manual - Page 10
Harness tightener REAR VIEW: 3-POINT HARNESS Canopy (on certain models) Release handle Level indicator* Owner's manual pocket *Level Indicator **Locking Clip Harness anchor buckle Harness slot Attachment latch Locking restraint. You will need to use it with certain types of vehicle seat belts. 10 - Graco 8F24GIS3 | Owners Manual - Page 11
3.2 5-Point Harness Model FRONT VIEW: 5-POINT HARNESS Harness slots Harness clip Harness buckle Harness adjustment button Handle Handle adjustment button Vehicle belt hook Harness buckle tongues Harness adjustment strap 11 - Graco 8F24GIS3 | Owners Manual - Page 12
REAR VIEW: 5-POINT HARNESS Canopy (on certain models) Release handle Level indicator* Owner's manual pocket Metal junction plate *Level Indicator **Locking Clip Harness slot Attachment latch Waist strap the infant restraint. You will need to use it with certain types of vehicle seat belts. 12 - Graco 8F24GIS3 | Owners Manual - Page 13
, squeeze handle at back of seat and lift infant restraint from base – as shown –. To put infant restraint in base, push infant restraint down until it clicks into base. Pull up on infant restraint to be sure it is latched firmly into base. 3.4 Adjusting Handle — 1. Press handle adjustment - Graco 8F24GIS3 | Owners Manual - Page 14
the straight end of the first support —. 3. On models with four canopy supports, repeat steps one and two for the other canopy tunnel. The canopy should appear as shown ˜. ˜ OR ™ 4. Attach canopy in the areas between the infant restraint and the handle base ™. To remove canopy, reverse the steps - Graco 8F24GIS3 | Owners Manual - Page 15
as shown. Step 2. — Wrap the top edge of the seat pad around the head end of the seat as shown. Step 3. ˜ On side of seat, wrap elastic strap around the handle as shown. Skip Steps 3 and 4 if your model does not include straps. Step 4. ™ Fasten strap to hook that is attached to the - Graco 8F24GIS3 | Owners Manual - Page 16
you may want œ to use a rolled towel or a blanket for support œ. MAKE SURE THAT NOTHING INTERFERES WITH THE HARNESS. It must still be flat and snug against your child's shoulders. 3.8 Cold Weather Boot (on certain models) Some models come with a cold weather boot. To use, wrap elastic - Graco 8F24GIS3 | Owners Manual - Page 17
3.9 Harness Covers (on certain models) To prevent ejection in sudden stop or crash: • Always make sure shoulder straps are threaded through slots and properly positioned on shoulders. • Make sure that harness covers do not interfere with placement of the chest clip at armpit level. 17 - Graco 8F24GIS3 | Owners Manual - Page 18
THE INSTRUCTIONS IN THIS MANUAL AND IN YOUR VEHICLE OWNER'S MANUAL. DO NOT let others install or use the infant restraint unless they understand how to use it. • FAILURE TO PROPERLY USE THIS INFANT RESTRAINT AND BASE INCREASES THE RISK OF SERIOUS INJURY OR DEATH IN A SUDDEN STOP OR CRASH. Your child - Graco 8F24GIS3 | Owners Manual - Page 19
, RATHER THAN FRONT SEATING POSITIONS. For a vehicle with a front passenger air bag, refer to your vehicle owner's manual as well as these instructions for infant restraint installation. • NEVER LEAVE YOUR CHILD UNATTENDED. • NEVER LEAVE AN INFANT RESTRAINT AND BASE UNSECURED IN YOUR VEHICLE - Graco 8F24GIS3 | Owners Manual - Page 20
also giving them this manual. • NEVER USE A SECOND-HAND INFANT RESTRAINT AND BASE or an infant restraint whose history you do not know. 4.2 Warning for Use With a Stroller • USE ONLY WITH STROLLERS THAT ARE PART OF THE GRACO TRAVEL SYSTEM. Refer to stroller instruction sheet for details about - Graco 8F24GIS3 | Owners Manual - Page 21
cords can cause strangulation. DO NOT place carrier near a window where cords from blinds or drapes can strangle a child. DO NOT hang strings on or over the carrier. DO NOT place items with a string around a child's neck, such as hood strings, pacifier cords, etc. DO NOT attach strings to toys. 21 - Graco 8F24GIS3 | Owners Manual - Page 22
4.4 Height and Weight Limits FAILURE TO USE INFANT RESTRAINT IN A MANNER APPROPRIATE FOR YOUR CHILD'S SIZE MAY INCREASE THE RISK OF SERIOUS INJURY OR DEATH. Your child MUST meet all requirements: • WEIGHT: 5-22 lbs (2.3-10 kg) • HEIGHT: 29 inches (73 cm) or less 22 - Graco 8F24GIS3 | Owners Manual - Page 23
your vehicle, consult your vehicle owner's manual or call Graco at 1-800-345-4109. • Whenever possible, secure the infant restraint in the center position of the – seat directly behind the front seats –. An adult should ride in the rear seat to watch the child. If the driver is the only adult - Graco 8F24GIS3 | Owners Manual - Page 24
BE DESIGNED TO HOLD THE INFANT RESTRAINT TIGHTLY AT ALL TIMES. Pay careful attention to these systems; some of the seat belts that are not safe to use look very much like seat belts that are safe to use. If you are unsure, consult your vehicle owner's manual or Graco at 1-800-345-4109. 24 - Graco 8F24GIS3 | Owners Manual - Page 25
to secure the infant restraint. LATCH can be used IN PLACE OF the vehicle belt system. Please refer to vehicle owners manual for LATCH locations. • Lap Belts with Emergency Locking Retractor (ELR) This lap belt surround the passenger when the door is closed. • Lap Belts Forward of Seat Crease 25 - Graco 8F24GIS3 | Owners Manual - Page 26
YOUR INFANT RESTRAINT, IF the seat location meets all other requirements of these instructions and those in your vehicle owner's manual. LATCH can be used in place of the vehicle belt system. Please refer to vehicle owners manual for LATCH locations. • Lap Belts - Manually Adjusted When buckled, the - Graco 8F24GIS3 | Owners Manual - Page 27
portion of the belt. You must use the locking clip provided with the infant restraint, unless your vehicle's seat belt can be converted in another way as described in your vehicle owner's manual. Locking clip To Install Locking Clip: 1. Tighten the buckled belt by pushing down hard on the infant - Graco 8F24GIS3 | Owners Manual - Page 28
vehicles may have one or more seating positions with LATCH anchorage systems. If vehicle is equipped with LATCH, the vehicle lower anchor points may be visible at the vehicle seat crease. If not visible, they may be marked with the symbol . See your vehicle owner's manual for exact locations, anchor - Graco 8F24GIS3 | Owners Manual - Page 29
OF SERIOUS INJURY OR DEATH IN THE EVENT OF A SHARP TURN, SUDDEN STOP OR CRASH. The harness straps must be properly adjusted to fit your child according to the following instructions. 1. Remove infant restraint from base and rotate handle down to sitting position. See "3.3 Removing and Attaching - Graco 8F24GIS3 | Owners Manual - Page 30
6.1.1 3-Point Harness 1. From back, push harness anchor buckle back through harness slot. If necessary, from front, use harness strap to pull buckle from slot –. Harness tightener 2. Reinsert harness anchor buckle in the appropriate slot —. – Harness anchor buckle — 3. From back, remove harness - Graco 8F24GIS3 | Owners Manual - Page 31
slots. Harness adjustment button 4. Behind seat, push both shoulder straps UNDER owner's manual pocket and out the bottom. 5. Reassemble the strap ends onto the › metal junction plate ›. Follow the appropriate instructions for a smaller or larger baby on the following page. 6. SAFETY - Graco 8F24GIS3 | Owners Manual - Page 32
FOR SMALLER BABY: Use the lower harness slots – (if they are even with or just below your child's shoulders) and the upper strap loops —. The ends of the straps must hang in front of the metal plate as shown in —, not as shown - Graco 8F24GIS3 | Owners Manual - Page 33
in Infant Restraint Failure to properly secure your child in the infant restraint/carrier increases the risk of serious clip by œ squeezing both sides and unbuckle as shown œ. OR 3. Place your child in the infant restraint as shown in , not ž. Pull the harness straps ž down over your - Graco 8F24GIS3 | Owners Manual - Page 34
restraint if the harness does not latch in place. – Call Graco at 1-800-345-4109. 6. From the back, pull strap through harness tightener to tighten the straps as shown –. CHECK that both straps are flat and tight on child's shoulders. 7. Snap harness clip pieces together —. Position harness clip - Graco 8F24GIS3 | Owners Manual - Page 35
buckle. DO NOT use the infant restraint if the harness does not latch in place. Call ™ Graco at 1-800-345-4109. 6. Snap harness clip pieces together ™. 7. Pull on harness adjustment sagging. It does not press on the child's › flesh or push the child's body into an unnatural position ›. 35 - Graco 8F24GIS3 | Owners Manual - Page 36
Base Using Vehicle Belt You must carefully follow the instructions provided by your vehicle manufacturer, in addition to the information in this manual passenger seat is used, slide the vehicle seat rearward as far as possible from the dashboard. If a rear seat is used, make sure the seat in front - Graco 8F24GIS3 | Owners Manual - Page 37
3. Thread the seat belt: Base with seat belt Belt MUST go under tongue Infant restraint with seat belt 4. Buckle the seat belt. Make sure the buckle tongue goes into the correct buckle ™. The seat belt should not be twisted or turned. ™ 37 - Graco 8F24GIS3 | Owners Manual - Page 38
the vehicle seat belt. Refer to your vehicle owners manual and the instructions in "5.2.2 SAFE Vehicle Belt Systems", p. 26-27, on tightening your vehicle belt. To create a very tight installation, push down hard with your knee or free hand in the middle of the infant restraint or base – and pull - Graco 8F24GIS3 | Owners Manual - Page 39
maximum length. 2. Position base in vehicle seat as shown. 3. Thread LATCH through base belt path normally used for vehicle seat belt. Make sure that LATCH is UNDER tongue on base ˜. Belt must lay flat position. If it does not stay tight, try another seating position or contact Customer Service. 39 - Graco 8F24GIS3 | Owners Manual - Page 40
recline the infant restraint/base on the vehicle seat. Failure to properly recline the infant restraint on the vehicle seat increases the risk of serious injury or death. If the infant restraint is too upright, a child's head may drop forward and cause breathing problems. If the infant restraint - Graco 8F24GIS3 | Owners Manual - Page 41
recline –. To raise the foot; set the base on a flat surface, push in on the fingers on the base and push down on the base to adjust the recline —. — If there ™ infant restraint is resting on the vehicle seat then place a rolled towel under the infant restraint until ONLY blue shows ™. Readjust - Graco 8F24GIS3 | Owners Manual - Page 42
not lengthen at all and that the vehicle belt or LATCH is fastened very tightly around the infant restraint/base –. — Holding the infant restraint near the vehicle belt path, TWIST AND PULL the seat forward and to both sides to make sure the vehicle belt or LATCH does not lengthen or loosen - Graco 8F24GIS3 | Owners Manual - Page 43
's instructions about infant restraint placement. Do not use this infant restraint if the airplane seat belt does not hold the infant restraint tightly. 7.2 Storing LATCH 1. For ease of storing, extend LATCH to its maximum length. 2. Locate the storage bars on bottom of infant restraint base - Graco 8F24GIS3 | Owners Manual - Page 44
LATCH storage should look like this when complete –. Underside of base 7.3 Cleaning and Maintenance — ! TO REMOVE AND WASH INFANT RESTRAINT PAD, follow instructions in "6.1 Positioning Harness Straps", p. 29-30. On 5-point harness models, push aside the small tab that holds the anchor buckles - Graco 8F24GIS3 | Owners Manual - Page 45
may weaken the harness straps. ! BUCKLE may be cleaned with a damp cloth. ! DO NOT LUBRICATE the buckle. ! DO NOT USE INFANT RESTRAINT without seat pad. ! CONTINUOUS USE OF INFANT RESTRAINT MAY CAUSE DAMAGE TO VEHICLE SEAT. Use an infant restraint mat, towel or thin blanket to protect upholstery. 45 - Graco 8F24GIS3 | Owners Manual - Page 46
Notes 46 - Graco 8F24GIS3 | Owners Manual - Page 47
Notes 47 - Graco 8F24GIS3 | Owners Manual - Page 48
Replacement Parts To purchase parts or accessories in the United States for your Graco product, please contact us at the following: www.gracobaby.com or 1-800-345-4109 48 - Graco 8F24GIS3 | Owners Manual - Page 49
INSTRUCCIONES PARA USO FUTURO. No instale ni use este sistema de seguridad para niños hasta que haya leído y entendido las instrucciones en este manual. NO USAR DEBIDAMENTE ESTE SISTEMA DE SEGURIDAD PARA NIÑOS AUMENTA EL RIESGO DE LESIONES SERIAS O FATALES EN UN ACCIDENTE O AL DETENERSE DE REPENTE - Graco 8F24GIS3 | Owners Manual - Page 50
2.3 Si necesita ayuda 7 3.0 Funciones y componentes 8-15 3.1 Modelo con arnés de 3 puntos 9 3.2 Modelo con arnés de 5 puntos 11 3.3 Sacar y conectar la base 13 3.4 Ajuste de la manija 13 3.5 Colocación de la capota (ciertos modelos 14 3.6 Armado de la almohadilla del asiento (ciertos modelos - Graco 8F24GIS3 | Owners Manual - Page 51
és de 5 puntos 35 6.3 Instalación del sistema de seguridad para niños/base usando el cinturón del vehículo 36 6.4 Uso del LATCH para instalar la base 39 6.5 Inclinación del sistema de seguridad para niños/base . . .40 7.0 Información adicional 43-46 7.1 Uso en aviones 43 7.2 Almacenamiento del - Graco 8F24GIS3 | Owners Manual - Page 52
este sistema de seguridad infantil le parece muy fácil, es muy importante que LEA EL MANUAL DEL PROPIETARIO. El manual se encuentra en el bolsillo trasero del sistema de seguridad infantil. También debe leer el manual del propietario de su vehículo. La seguridad de su niño depende de: 1. Elegir una - Graco 8F24GIS3 | Owners Manual - Page 53
3. Sujetar a su niño de manera adecuada en el sistema de seguridad infantil. 4. Colocar el sistema de seguridad infantil/base en una posición orientada hacia atrás. 5. Colocar el cinturón de seguridad del vehículo o LATCH de manera correcta. 6. Reclinar de manera correcta el sistema de - Graco 8F24GIS3 | Owners Manual - Page 54
problemas de seguridad. Debe registrar este sistema para que lo podamos contactar en dicho caso. Envíe su nombre y apellido, dirección y números de serie y de modelo a: Graco Children's Products Inc. 150 Oaklands Blvd. Exton, PA 19341 o llame al 1-800-345-4109 o www.gracobaby.com 6 - Graco 8F24GIS3 | Owners Manual - Page 55
línea telefónica sobre seguridad en automóviles del gobierno de EE.UU. al 1-888-327-4236 (TTY: 1-800-424-9153) o http://www.NHTSA.gov • Graco: 1-800-345-4109 o www.gracobaby.com 2.3 Si necesita ayuda En los EE.UU. o Canadá, por favor, comuníquese con el Departamento de Servicio al Cliente - Graco 8F24GIS3 | Owners Manual - Page 56
del LATCH* Barras de almacenamiento del LATCH Gancho del LATCH Apoyapiés ajustable Base Las Normas Federales para Seguridad de Automóviles de Estados Unidos han determinado . Por favor, consulte el manual del propietario del vehículo para obtener las ubicaciones donde debe instalarse el LATCH. 8 - Graco 8F24GIS3 | Owners Manual - Page 57
3.1 Modelo con arnés de 3 puntos VISTA DELANTERA: ARNÉS DE 3 PUNTOS Ranura para el arnés Manija Traba del arnés Botón de ajuste de la manija Hebilla del arnés Gancho del cinturón del vehículo Correas del arnés 9 - Graco 8F24GIS3 | Owners Manual - Page 58
VISTA TRASERA: ARNÉS DE 3 PUNTOS Capota (en ciertos modelos) Tensionador del arnés Manija de liberación Indicador del nivel* Bolsillo del manual del propietario *Indicador del nivel **Traba de seguridad Hebilla del anclaje del arnés Ranura para el arnés Traba de conexión Traba de seguridad** El - Graco 8F24GIS3 | Owners Manual - Page 59
3.2 Modelo con arnés de 5 puntos VISTA DELANTERA: ARNÉS DE 5 PUNTOS Manija Ranura para el arnés Traba del arnés Hebilla del arnés Botón de ajuste del arnés Botón de ajuste de la manija Gancho del cinturón del vehículo Lengüetas de la hebilla del arnés Correa de ajuste del arnés 11 - Graco 8F24GIS3 | Owners Manual - Page 60
VISTA TRASERA: ARNÉS DE 5 PUNTOS Capota (en ciertos modelos) Manija de liberación Indicador del nivel* Bolsillo del manual del propietario Placa de la unión de metal *Indicador del nivel **Traba de seguridad Ranura para el arnés Traba de conexión Hebilla del anclaje de - Graco 8F24GIS3 | Owners Manual - Page 61
sistema de seguridad para niños de la base como se indica –. Para poner el sistema de seguridad para niños en la base, empuje el sistema de seguridad para ni seguridad para niños para asegurarse que esté trabado firmemente en la base. 3.4 Ajuste de la manija — 1. Oprima los botones de ajuste - Graco 8F24GIS3 | Owners Manual - Page 62
túnel de la capota. La capota deberá tener este aspecto ˜. ˜ O ™ 4. Sujete la capota en los lugares entre el sistema de seguridad para niños y la base de la manija ™. Para quitar la capota, siga los pasos al revés. 14 - Graco 8F24GIS3 | Owners Manual - Page 63
3.6 Armado de la almohadilla del asiento (ciertos modelos) Paso 1. – Envuelva el borde inferior de la almohadilla del asiento alrededor del extremo del asiento donde van los pies como se indica. Paso 2. — Envuelva el borde superior de la almohadilla del asiento alrededor del extremo del - Graco 8F24GIS3 | Owners Manual - Page 64
3.7 Apoyacabezas (en ciertos modelos) Algunos bebés necesitan apoyo adicional para mantener la cabeza › y el cuerpo en una posición cómoda. Destrabe los costados y vuelva a trabarlos con las correas del arnés pasadas a través de las ranuras en el cojín ›. Si su modelo no incluye un œ - Graco 8F24GIS3 | Owners Manual - Page 65
3.9 Cubiertas de arnes (ciertos modelos) Para prevenir la eyección en un accidente o parada repentina: • Asegúrese siempre que las correas del hombro pasan por las ranuras y están debidamente instaladas en los hombros. • Asegúrese de que las cubiertas del arnés no interfieran con la colocación del - Graco 8F24GIS3 | Owners Manual - Page 66
para uso como sistema de seguridad para niños • NO INSTALE O USE ESTE SISTEMA DE SEGURIDAD PARA NIÑOS Y BASE HASTA QUE HAYA LEÍDO Y ENTIENDA LAS INSTRUCCIONES EN ESTE MANUAL Y EN EL MANUAL DEL PROPIETARIO DE SU VEHÍCULO. NO deje que otros instalen o usen el sistema de seguridad para niños - Graco 8F24GIS3 | Owners Manual - Page 67
vehículo con una bolsa de aire para el pasajero delantero, consulte el manual del propietario de su vehículo así como estas instrucciones para la instalación ños. • DEJE DE USAR EL SISTEMA DE SEGURIDAD PARA NIÑOS Y LA BASE Y TÍRELO después de la fecha indicada en el respaldo del sistema de seguridad - Graco 8F24GIS3 | Owners Manual - Page 68
persona sin entregarles este manual. • NUNCA USE UN SISTEMA DE SEGURIDAD PARA NIÑOS Y BASE USADOS o un sistema de seguridad para niños si no conoce su historia. 4.2 Advertencias para el uso con un cochecito • USAR SOLAMENTE CON COCHECITOS QUE SON PARTE DEL SISTEMA DE VIAJES GRACO. Consulte la hoja - Graco 8F24GIS3 | Owners Manual - Page 69
4.3 Advertencias adicionales para el uso como transportador • PELIGRO DE CAÍDA: Los movimientos del niño pueden mover el transportador. NUNCA ponga el transportador cerca de los bordes de mesadas, mesas u otras superficies altas. Manténgase siempre cerca cuando el transportador no esté en el piso/ - Graco 8F24GIS3 | Owners Manual - Page 70
4.4 Limitaciones de peso y estatura NO USAR EL SISTEMA DE SEGURIDAD PARA NIÑOS DE MANERA APROPIADA DE ACUERDO AL TAMAÑO DE SU NIÑO PODRÍA AUMENTAR EL RIESGO DE QUE SUFRA LESIONES SERIAS O FATALES. Su niño DEBE cumplir con todos los requisitos: • PESO: 5-22 libras (2.3-10 Kg) • ESTATURA: 29 pulgadas - Graco 8F24GIS3 | Owners Manual - Page 71
niños. Si no está seguro sobre dónde colocar el sistema de seguridad para niños en su vehículo, consulte el manual del propietario del vehículo o llame a Graco al 1-800-345-4109. • Cuando sea posible, sujete el sistema de seguridad para niños en la posición de asiento central directamente - Graco 8F24GIS3 | Owners Manual - Page 72
de los sistemas de cinturones de seguridad que no son seguros se parecen mucho a los que no presentan peligro. Si no está seguro, consulte el manual del propietario del vehículo o llame a Graco al 1-800-345-4109. 24 - Graco 8F24GIS3 | Owners Manual - Page 73
sistema de seguridad para niños. El LATCH se puede usar EN LUGAR DE el sistema de cinturon para vehículo. Por favor, consulte el manual del propietario del vehículo para obtener las ubicaciones donde debe instalarse el LATCH. • Cinturón de seguridad abdominal con retractor de traba de emergencia - Graco 8F24GIS3 | Owners Manual - Page 74
los otros requisitos de estas instrucciones y los que se incluyen en el manual del propietario de su vehículo. Se puede usar el LATCH en lugar el sistema de seguridad del vehículo. Por favor, consulte el manual del propietario del vehículo para identificar las ubicaciones donde debe instalarse - Graco 8F24GIS3 | Owners Manual - Page 75
menos que el Traba de seguridad cinturón de seguridad del asiento de su vehículo pueda convertirse de otra manera como se describe en el manual del propietario del vehículo. Para instalar la traba de seguridad: 1. Ajuste el cinturón empujando con fuerza el sistema de seguridad para niños hacia - Graco 8F24GIS3 | Owners Manual - Page 76
de anclaje inferiores en el pliegue del asiento del vehículo. Si no están visibles, pueden estar marcados con el símbolo que sigue . Vea el manual del propietario de su vehículo para informarse sobre las ubicaciones exactas, la identificación de los anclajes y los requisitos de uso con el sistema de - Graco 8F24GIS3 | Owners Manual - Page 77
su niño de acuerdo a las siguientes instrucciones. 1. Saque el sistema de seguridad para niños de la base y gire la manija hacia abajo en la posición de asiento. Vea la sección "3.3 Sacar y conectar la base" y 3.4 "Ajuste de la manija" en la página 13. 2. Coloca el niño en el asiento de seguridad - Graco 8F24GIS3 | Owners Manual - Page 78
6.1.1 Arnés de 3 puntos 1. Por atrás, empuje la hebilla del anclaje del arnés hacia atrás a través de la – ranura del arnés. De ser necesario, por delante, use la correa del arnés para tirar la hebilla de la ranura –. Tensionador del arnés Hebilla del anclaje del arnés 2. Vuelva a insertar - Graco 8F24GIS3 | Owners Manual - Page 79
del arnés vuelva a colocarlas a través de las ranuras apropiadas. 4. Detrás del asiento, pase las dos correas de los hombros por DEBAJO del bolsillo del manual del propietario para que › salgan de abajo. 5. Vuelva a armar los extremos de las correas sobre la placa de unión de metal ›. Siga las - Graco 8F24GIS3 | Owners Manual - Page 80
PARA UN BEBÉ PEQUEÑO: Use las ranuras inferiores del arnés – (si están a la par o apenas debajo de los hombros de su niño) y los nudos superiores del arnés —. Los extremos de las correas deben quedar al frente de la placa de metal como se indica en —, no como se indica en ˜. – — ˜ VERIFIQUE - Graco 8F24GIS3 | Owners Manual - Page 81
6.2 Cómo sujetar el niño en al sistema de seguridad para niños No ajustar debidamente a su niño en el sistema de seguridad para niños/transportador aumenta el riesgo de lesiones serias o fatales en una curva cerrada, parada repentina o accidente. Inclusive cuando lo usa solamente como transportador - Graco 8F24GIS3 | Owners Manual - Page 82
ño. Asegúrese de escuchar un "clic". NO use el sistema de seguridad para niños si el arnés no se traba en – su lugar. Llame a Graco al 1-800-345-4109. 6. Por atrás, pase la correa a través del tensionador del arnés para tensionar las correas como se indica –. ASEGÚRESE que ambas - Graco 8F24GIS3 | Owners Manual - Page 83
la lengüetas en la hebilla. NO use el sistema de seguridad para niños si el arnés no se traba en su lugar. ™ Llame a Graco al 1-800-345-4109. 6. Trabe la hebilla del arnés ™. 7. Tire de la correa de ajuste del arnés para ajustar las correas como se indica š. ASEG - Graco 8F24GIS3 | Owners Manual - Page 84
6.3 Instalación del sistema de seguridad para niños/base usando el cinturón del vehículo Debe seguir detenidamente las instrucciones provistas por el fabricante de su vehículo, además de la información de este manual. Antes de seguir, asegúrese que ha leído y entendido la sección 5, "Ubicación - Graco 8F24GIS3 | Owners Manual - Page 85
3. Pase el cinturón de seguridad: Base con cinturón de seguridad El cinturón DEBE pasar debajo de la lengüeta. Sistema de seguridad para niños con cinturón de seguridad 4. Trabe el - Graco 8F24GIS3 | Owners Manual - Page 86
5. Ajuste el cinturón de seguridad del vehículo. Consulte el manual del propietario del vehículo y las instrucciones en la sección rodilla o mano en el medio del sistema de seguridad para niños o base – y tire y apriete el cinturón de seguridad del vehículo. – 6. Empuje el sistema de seguridad - Graco 8F24GIS3 | Owners Manual - Page 87
culo. Asegúrese que el LATCH esté DEBAJO de la lengüeta de la base ˜. ™ El cinturón debe mantenerse en posición plana sin torcerse. 4. Enganche los ™. 5. Ajuste el LATCH empujando con fuerza š hacia abajo sobre la base y tirando el cinturón de ajuste š. 6. NUNCA ponga dos conectores LATCH - Graco 8F24GIS3 | Owners Manual - Page 88
costado de su sistema de seguridad para niños hay un indicador del nivel para ayudar a reclinar debidamente el sistema de seguridad para niños/base en el asiento del vehículo. No reclinar debidamente el sistema de seguridad para niños en el asiento del vehículo aumenta el riesgo - Graco 8F24GIS3 | Owners Manual - Page 89
pie hasta alcanzar el valor deseado para ajustar la inclinación –. Para levantar el pie; ponga la base en una superficie plana, empuje hacia adentro los dedos de la base y empuje hacia abajo la base para ajustar la inclinación —. — Si todavía aparece la zona de color naranja en el indicador - Graco 8F24GIS3 | Owners Manual - Page 90
seguridad para – niños para asegurarse que el cinturón del vehículo o LATCH no se estira y que esté sujetado apretadamente alrededor de la base/sistema de seguridad – . — GIRE Y TIRE el asiento hacia adelante agarrando el sistema de seguridad cerca del recorrido del cinturón del vehículo y en - Graco 8F24GIS3 | Owners Manual - Page 91
del LATCH 1. Para facilitar el almacenamiento, extienda el LATCH hasta el máximo. 2. Ubique las barras de almacenamiento en el fondo de la base del sistema de seguridad ˜. Barras de almacenamiento ˜ 3. Ajuste el extremo del LATCH (sin el cinturón de ajuste) sobre la barra de almacenamiento - Graco 8F24GIS3 | Owners Manual - Page 92
ón de ajuste para asegurarse que el LATCH esté debidamente ajustado. – 5. El almacenamiento del LATCH debería tener este aspecto cuando esté terminado –. Parte inferior de la base 44 - Graco 8F24GIS3 | Owners Manual - Page 93
7.3 Limpieza y mantenimiento ! PARA SACAR Y LAVAR LA ALMOHADILLA DE SEGURIDAD DEL NIÑO, siga las instrucciones en la sección "6.1 Colocación de las correas del arnés", páginas 29 y 32. — En los modelos con arnés de 5 puntos, separe la pequeña lengüeta que mantiene las hebillas del anclaje en - Graco 8F24GIS3 | Owners Manual - Page 94
! LAS PIEZAS DE METAL Y DE PLÁSTICO DEL SISTEMA DE SEGURIDAD PARA NIÑOS pueden limpiarse con una solución de jabón suave y agua. NO USE CLORO. El uso de cloro puede debilitar las piezas de plástico. ! LAS CORREAS DEL ARNÉS Y LAS CORREAS DEL LATCH pueden limpiarse a mano o cambiarse. NO SUMERJA LAS - Graco 8F24GIS3 | Owners Manual - Page 95
Notas 47 - Graco 8F24GIS3 | Owners Manual - Page 96
Piezas de repuesto Para comprar repuestos o accesorios en los Estados Unidos para su producto Graco, por favor comuníquese con nosotros en: www.gracobaby.com o 1-800-345-4109 48
-
 1
1 -
 2
2 -
 3
3 -
 4
4 -
 5
5 -
 6
6 -
 7
7 -
8
-
9
-
10
-
11
-
12
-
13
-
14
-
15
-
16
-
17
-
18
-
19
-
20
-
21
-
22
-
23
-
24
-
25
-
26
-
27
-
28
-
29
-
30
-
31
-
32
-
33
-
34
-
35
-
36
-
37
-
38
-
39
-
40
-
41
-
42
-
43
-
44
-
45
-
46
-
47
-
48
-
49
-
50
-
51
-
52
-
53
-
54
-
55
-
56
-
57
-
58
-
59
-
60
-
61
-
62
-
63
-
64
-
65
-
66
-
67
-
68
-
69
-
70
-
71
-
72
-
73
-
74
-
75
-
76
-
77
-
78
-
79
-
80
-
81
-
82
-
83
-
84
-
85
-
86
-
87
-
88
-
89
-
90
-
91
-
92
-
93
-
94
-
95
-
96
 |
 |
© 2007 Graco
ISPC089BB
2/07
US
READ THIS MANUAL
KEEP INSTRUCTIONS FOR FUTURE USE.
Do not install or use this infant restraint until you
read and understand the instructions in this manual.
FAILURE TO PROPERLY USE THIS INFANT RESTRAINT
INCREASES THE RISK OF SERIOUS INJURY OR DEATH IN
A SUDDEN STOP OR CRASH.
Infant Restraint/Carrier
Owner’s Manual