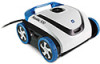
Hayward AquaVac 500 AquaVac 500 Quickstart Guide
Hayward AquaVac 500 Manual
 |
View all Hayward AquaVac 500 manuals
Add to My Manuals
Save this manual to your list of manuals |
Hayward AquaVac 500 manual content summary:
- Hayward AquaVac 500 | AquaVac 500 Quickstart Guide - Page 1
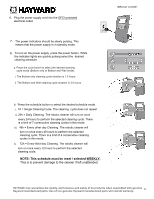
6. Plug the power supply cord into the GFCI protected electrical outlet. 7. The power indicators should be slowly pulsing. This means that the power supply is in standby mode. 8. To turn on the power supply, press the power button. While the indicator lights are quickly pulsing select the desired - Hayward AquaVac 500 | AquaVac 500 Quickstart Guide - Page 2
a cleaning cycle automatically when the power supply is plugged in. If the supply cord is damaged it must be replaced by the manufacturer, service agent, or similarly qualified persons in order to avoid a hazard. All electrical connections must be done by a qualified electrician according to local - Hayward AquaVac 500 | AquaVac 500 Quickstart Guide - Page 3
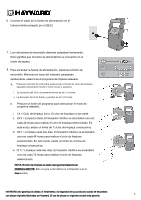
6. Conecte el cable de la fuente de alimentación en el tomacorriente protegido por el GFCI. 7. Los indicadores de encendido deberían parpadear lentamente. Esto significa que la fuente de alimentación se encuentra en el modo de espera. 8. Para encender la fuente de alimentación, presione el botón de - Hayward AquaVac 500 | AquaVac 500 Quickstart Guide - Page 4
9. El limpiador robótico iniciará automáticamente el modo de limpieza seleccionado cuando no se haya presionado ningún botón de la fuente de alimentación durante 10 segundos. Los indicadores de encendido, los indicadores del modo de limpieza seleccionado y el indicador del programa de limpieza
-
 1
1 -
 2
2 -
 3
3 -
 4
4
 |
 |

9
7
.
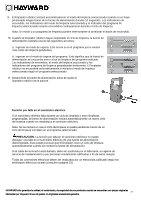
HAYWARD
only warranties the quality, performance and safety of its products when assembled with genuine
Hayward manufactured parts. Use of non-genuine Hayward manufactured parts will void all warranty.
The power indicators should be slowly pulsing. This
means that the power supply is in standby mode.
To turn on the power supply, press the power button. While
the indicator lights are quickly pulsing select the
desired
cleaning schedule.
8.
b
.
Press the schedule button to select the desired schedule mode.
i. 1X = Single Cleaning Cycle. The cleaning
cycle does not repeat
ii. 24h = Daily Cleaning. The robotic cleaner will turn on once
every 24 hours to perform the selected cleaning cycle. There
is a limit of 7 consecutive cleaning cycles in this mode.
iii.
48h = Every other day Cleaning. The robotic cleaner will
turn on once every 48 hours to perform the selected
cleaning cycle. There is a limit of 4 consecutive cleaning
cycles in this mode.
iv.
72h = Every third day Cleaning. The robotic cleaner will
turn on once every 72 hours to perform the selected
cleaning cycle.
Plug the power supply cord into the GFCI protected
electrical outlet.
6
.
NOTE: This schedule must be reset / selected WEEKLY.
This is to prevent damage to the cleaner if left unattended.
a.
Press the cycle button to select the desired cleaning
cycle
mode (
Bottom only
or
Bottom and Wall
mode).
i.
The
Bottom only
cleaning cycle duration is 1.5 hours
ii.
The
Bottom and Wall
cleaning cycle duration is 3.0 hours
ISRC3411U1INS1