HealthRider S200 English Manual
HealthRider S200 Manual
 |
View all HealthRider S200 manuals
Add to My Manuals
Save this manual to your list of manuals |
HealthRider S200 manual content summary:
- HealthRider S200 | English Manual - Page 1
the location shown below. Write the serial number in the space above for reference. Serial Number Decal CAUTION Read all precautions and instructions in this manual before using this equipment. Save this manual for future reference. USER'S MANUAL SEARS, ROEBUCK AND CO., HOFFMAN ESTATES, IL 60179 - HealthRider S200 | English Manual - Page 2
INSTRUCTIONS 7 CONSOLE OPERATION 8 HOW TO FOLD AND MOVE THE TREADMILL 14 TROUBLE-SHOOTING AND MAINTENANCE 16 CONDITIONING GUIDELINES 18 ORDERING REPLACEMENT PARTS Back Cover FULL 90-DAY WARRANTY Back Cover Note: An EXPLODED DRAWING and a PART LIST are attached in the center of this manual - HealthRider S200 | English Manual - Page 3
products are used or oxygen is administered. ing on the walking belt. 6. Keep children under the age of 12 and pets away from the treadmill at all times. 15. Always hold the handrails when walking or running on the treadmill. 7. The treadmill should not be used by persons weighing more than 250 - HealthRider S200 | English Manual - Page 4
de- scribed in this manual. Never remove the motor hood unless instructed to do so by an authorized service representative. Servicing other than the procedures in this manual should be performed by an authorized service representative only. 24. The treadmill is intended for in-home use only. Do - HealthRider S200 | English Manual - Page 5
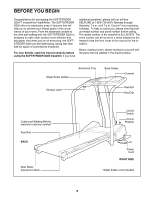
for purchasing the SOFTSTRIDER S200ª treadmill by HealthRider. The SOFTSTRIDER S200 offers an impressive array of features that will help you to achieve your fitness goals in the convenience of your home. From the advanced console to the ultra-soft walking belt, the SOFTSTRIDER S200 is designed to - HealthRider S200 | English Manual - Page 6
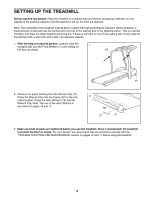
the treadmill is set up. No tools are required. Note: The underside of the treadmill walking belt is parts are tightened before you use the treadmill. Place a mat beneath the treadmill to protect the floor or carpet. For your benefit, we recommend that you familiarize yourself with the ÒTROUBLE - HealthRider S200 | English Manual - Page 7
OPERATION AND ADJUSTMENT THE PERFORMANT LUBETM WALKING BELT Your treadmill features a walking belt coated with PERFORMANT LUBETM, a high-performance lubricant. IMPORTANT: Never apply silicone spray or other substances to the walking belt or the walking platform. Such substances will deteriorate the - HealthRider S200 | English Manual - Page 8
precautions. ¥ Do not stand on the walking belt when turning on the power or starting the walking belt. ¥ Always wear the clip (see H above) while operating the treadmill. If the key is pulled from the console, the walking belt will stop. ¥ The treadmill is capable of high speeds; adjust the - HealthRider S200 | English Manual - Page 9
Make sure that the on/off switch, located on the front of the treadmill, is in the on position. On F. START ButtonÑThis button starts the walking belt. G. SPEED ButtonsÑThese buttons control the speed of the walking belt. Each time a button is pressed, the speed will change by 0.1 mph. The speed - HealthRider S200 | English Manual - Page 10
use the console, please read all steps. 2 Select the MANUAL mode. When the key is inserted, the MANUAL indicator will begin to flash. (Note: If a program speed of the walking belt. 6 Adjust the incline as desired. To vary the intensity of your exercise, the incline of the treadmill can be changed - HealthRider S200 | English Manual - Page 11
control the speed of the treadmill as they guide you through effective workouts; the Incline exercising, stop the walking belt and remove the key. Step onto the foot rails and press the PAUSE/STOP button. Next, change the incline of the treadmill to 3%. The incline must be at 3% when the treadmill - HealthRider S200 | English Manual - Page 12
will then be in the same state as if the key had just been inserted. If you selected the Incline 1 or Incline 2 program: A moment after the START button or the SPEED + button is pressed, the walking belt will begin to move and the treadmill will adjust to the first incline setting of the program - HealthRider S200 | English Manual - Page 13
To purchase one of the pulse sensors, refer to the card accompanying the treadmill. An optional hand pulse sensor mounts to the handlebar in front of the the total number of miles that the walking belt has moved. To exit the information mode, remove the key from the console. Note: The hand - HealthRider S200 | English Manual - Page 14
, unplug the power cord. Caution: You must be able to safely lift 45 pounds (20 kg) in order to raise, lower, or move the treadmill. 1. Hold the treadmill in the locations shown at the right. To decrease the possibility of injury, bend your legs and keep your back straight. As you raise - HealthRider S200 | English Manual - Page 15
right hand as shown. Using your left hand, push the storage latch to the left. Pivot the treadmill until the storage latch is past the catch. 2. Hold the treadmill firmly with both hands, and lower the treadmill to the floor. To decrease the possibility of injury, bend your legs and keep your back - HealthRider S200 | English Manual - Page 16
TROUBLE-SHOOTING AND MAINTENANCE Most treadmill problems can be solved by following the simple walking belt centered. Plug in the power cord, insert the key and run the treadmill for a few minutes. Repeat until the walking belt is properly tightened. c. If the walking belt still slows when walked - HealthRider S200 | English Manual - Page 17
a turn each. Be careful not to overtighten the walking belt. Plug in the power cord, insert the key and run the treadmill for a few minutes. Repeat until the walking belt is centered. c. If the walking belt slips when walked on, first remove the key and UNPLUG THE c POWER CORD. Using the allen - HealthRider S200 | English Manual - Page 18
heart rate drops quickly when you stop exercising.) If your heart rate is too high or too low, adjust the speed or incline of the treadmill accordingly. WORKOUT GUIDELINES Each workout should include three parts: (1) a warmup, (2) training zone exercise, and (3) a cool-down. Fat Burning Warming Up - HealthRider S200 | English Manual - Page 19
problems. To maintain or improve your condition, complete three workouts each week, with at least one day of rest between workouts. After a few months, you may complete up to five workouts each week if desired. The key to success is to make exercise a regular and enjoyable part of your everyday - HealthRider S200 | English Manual - Page 20
Hood Bracket Clip Handrail Walking Platform Frame Pivot Bolt Key Belt Guide 8Ó Black Ground Wire 4Ó Black Wire, 2 F 20Ó White Wire, 2 F 4Ó White Wire, M/F 8Ó Blue Wire, 2 Female 4Ó Blue Wire, 2 F 8Ó Red Wire, M/F 4Ó Green F/Ring UserÕs Manual * Includes all parts shown in the box. # These parts - HealthRider S200 | English Manual - Page 21
EXPLODED DRAWINGÑModel No. 831.297970 R0499A 3 8 14 8 87 13 85 108 68 12 32 110 11 2 10 98 9 113 1 94 97 32 95 70 8 32 97 3 15 2 8 8 2 6 99 115 99 101 105 9 113 92 93 8 66 95 8 8 59 96 8 4 3 50 51 30 3 4 8 44 42 16 19 52 47 8 8 54 53 8 106 55 102 46 8 4 - HealthRider S200 | English Manual - Page 22
information: ¥ The NAME OF THE PRODUCT (HealthRider¨ SOFTSTRIDER S200ª treadmill) ¥ The MODEL NUMBER OF THE PRODUCT (831.297970) ¥ The KEY NUMBER AND DESCRIPTION OF THE PART (see the EXPLODED DRAWING and PART LIST included in this manual) REPLACEMENT PARTS If parts become worn and need to be
-
 1
1 -
 2
2 -
 3
3 -
 4
4 -
 5
5 -
 6
6 -
 7
7 -
8
-
9
-
10
-
11
-
12
-
13
-
14
-
15
-
16
-
17
-
18
-
19
-
20
-
21
-
22
 |
 |

¤
USER’S MANUAL
Model No. 831.297970
Serial No.
CAUTION
Read all precautions and instruc-
tions in this manual before using
this equipment. Save this manual
for future reference.
Serial Number Decal
Find the serial number in the location
shown below. Write the serial number
in the space above for reference.
SEARS, ROEBUCK AND CO., HOFFMAN ESTATES, IL 60179