HP 1320 Service Manual
HP 1320 - LaserJet B/W Laser Printer Manual
 |
UPC - 829160406831
View all HP 1320 manuals
Add to My Manuals
Save this manual to your list of manuals |
HP 1320 manual content summary:
- HP 1320 | Service Manual - Page 1
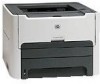
service hp LaserJet 1160 printer hp LaserJet 1320 series printer - HP 1320 | Service Manual - Page 2
- HP 1320 | Service Manual - Page 3
HP LaserJet 1160 printer and HP LaserJet 1320 Series printer Service Manual - HP 1320 | Service Manual - Page 4
Hewlett-Packard Development Company, L.P. Reproduction, adaptation, or translation without prior written permission is prohibited, except as allowed under the copyright laws. The information contained herein is subject to change without notice. The only warranties for HP products and services - HP 1320 | Service Manual - Page 5
...11 Supported media sizes ...11 Hewlett-Packard limited warranty statement 12 Hewlett-Packard software license agreement 13 Print cartridge limited warranty 14 HP LaserJet printing supplies 15 Declaration of Conformity statements 16 Country/region-specific safety statements 18 Laser safety - HP 1320 | Service Manual - Page 6
page ...37 Network Configuration page 37 Using the HP Toolbox ...38 Supported operating systems 38 Supported browsers ...38 To view the HP Toolbox on Windows systems 39 To view the HP Toolbox on Macintosh systems 39 HP Toolbox sections ...39 Other links ...39 Status tab ...39 Troubleshooting - HP 1320 | Service Manual - Page 7
Top cover...90 Control panel...93 Formatter...95 Laser/scanner...96 Memory-tag-reader assembly 97 Duplex-drive PCA...99 Fuser...101 Fan...101 Duplex-drive gears/face-down gears 103 Duplex solenoid (SL3) (HP LaserJet 1320 Series printers only 106 Fuser...107 Interlock assembly...117 ECU...119 Main - HP 1320 | Service Manual - Page 8
cartridge problems 161 Solving image-quality problems 162 Clearing jams ...170 Print-cartridge cartridge contacts 186 To check the high-voltage connector assembly 186 Wired network setup problemsolving 187 NVRAM initialization...188 Cold reset...189 Troubleshooting and software 198 - HP 1320 | Service Manual - Page 9
, HP LaserJet 1320n printer 8 Electrical specifications, HP LaserJet 1320nw printer 9 Acoustic emissions, HP LaserJet 1160 printer 10 Acoustic emissions, HP LaserJet 1320 Series printer 10 Environmental specifications 10 Available printer drivers 25 Light status legend 31 Control-panel-light - HP 1320 | Service Manual - Page 10
viii ENWW - HP 1320 | Service Manual - Page 11
of printer 67 Engine control system 70 Engine control system circuit diagram 71 Laser/scanner HP LaserJet 1320 Series printers 104 Face-down gears (HP LaserJet 1160 printers 105 Removing the duplex solenoid 106 Removing the fuser (1 of 10 107 Removing the fuser (2 of 10 108 Removing the fuser - HP 1320 | Service Manual - Page 12
fuser (4 of 10 110 Removing the fuser (5 of 10 111 Removing the fuser (6 of 10 112 Removing the fuser (7 of 10 113 Removing the fuser (8 of 10 114 Removing the fuser (9 of 10 115 Removing the fuser 182 Print cartridge high-voltage connection points (right side 186 Print cartridge high-voltage - HP 1320 | Service Manual - Page 13
...11 Supported media sizes ...11 Hewlett-Packard limited warranty statement 12 Hewlett-Packard software license agreement 13 Print cartridge limited warranty 14 HP LaserJet printing supplies 15 Declaration of Conformity statements 16 Country/region-specific safety statements 18 Laser safety - HP 1320 | Service Manual - Page 14
section to determine which features your model has. Table 1-1. Feature designations for HP LaserJet 1320 Series printers Printer Model HP LaserJet 1160 HP LaserJet 1320 HP LaserJet 1320n HP LaserJet 1320tn HP LaserJet 1320nw Description This is the base model. It includes an IEEE-1284B parallel - HP 1320 | Service Manual - Page 15
LaserJet 1160 and HP LaserJet 1320 Series printers base models Figure 1-1. Front/right-side view 1 Wireless light (HP LaserJet 1320nw printer only) 2 Toner light 3 Attention light 4 Ready light 5 GO button and light 6 CANCEL button 7 Output bin 8 Media support 9 Print-cartridge - HP 1320 | Service Manual - Page 16
(printer driver only), Windows XP 32bit, Windows XP 64-bit (printer driver only) ● Mac OS 9.2 (printer driver only) and OS X V10.1. ● Power switch ● HP Toolbox (provides printer status information, troubleshooting information, and printer configuration information) ● 26 HP PCL fonts HP LaserJet 1320 - HP 1320 | Service Manual - Page 17
status information, troubleshooting information, and configuration information) ● 46 HP PCL fonts ● 35 HP postscript fonts HP LaserJet 1320n printer ● The HP LaserJet 1320n printer includes all of the features of the HP LaserJet 1320 printer. ● The HP LaserJet 1320n printer substitutes an internal - HP 1320 | Service Manual - Page 18
Weight (2,500-page cartridge installed) HP LaserJet 1160 printer: 10.7 kg (23.6 lb) HP LaserJet 1320 Series printer: 11.3 kg (24.9 lb) Values are current as of April 1, 2004. Values are subject to change without notice. See http://www.hp.com/support/lj1160/ or http://www.hp.com/support/lj1320/ for - HP 1320 | Service Manual - Page 19
Network (HP LaserJet 1320n, HP LaserJet 1320tn, and HP LaserJet 1320nw printers only) RJ-45, Ethernet 10/100 Wireless (HP LaserJet 1320nw printer only) 802.11b/g Parallel ● IEEE-1284B receptacle (HP LaserJet 1160 and ● Set host computer to ECP HP LaserJet 1320 printers only) ENWW - HP 1320 | Service Manual - Page 20
Ready (Standby) and PowerSave (instant-on fuser technology) modes: 6 watts ● Off: - HP 1320 | Service Manual - Page 21
NOTE NOTE Table 1-9. Electrical specifications, HP LaserJet 1320nw printer Power requirements, 110-127 V models without notice. See http://www.hp.com/support/lj1160/ or http://www.hp.com/support/lj1320/ for current information. The fuser technology. The heat dissipation in Ready mode is 20 BTU - HP 1320 | Service Manual - Page 22
1, 2004. Values are subject to change without notice. See http://www.hp.com/support/lj1160/ or http://www.hp.com/support/lj1320/ for current information. The configuration that was tested to arrive at these values as an HP LaserJet 1320 printer (base model) with its standard tray, using A4 paper and - HP 1320 | Service Manual - Page 23
and in HP LaserJet Printer Family Media Guide. The guidelines can be downloaded from http://www.hp.com/support/ljpaperguide/. Always test media before you purchase a large quantity. Using media that does not meet Hewlett-Packard's specifications might cause problems for the printer, requiring repair - HP 1320 | Service Manual - Page 24
Hewlett-Packard limited warranty statement HP PRODUCT HP LaserJet 1160 and HP LaserJet 1320 Series printers DURATION OF LIMITED WARRANTY One year from date of purchase HP warrants to you, the end-user customer, that HP hardware and accessories will be free from defects in materials and - HP 1320 | Service Manual - Page 25
TERMS. HP SOFTWARE LICENSE TERMS The following License Terms govern your use of the accompanying Software unless you have a separate signed agreement with Hewlett-Packard. License Grant. Hewlett-Packard grants you a license to use one copy of the Software. "Use" means storing, loading, installing - HP 1320 | Service Manual - Page 26
specifications for the printer product or (c) exhibit wear from ordinary use. To obtain warranty service, please return the product to place of purchase (with a written description of the problem and the print samples) or contact HP customer support. At HP's option, HP will either replace - HP 1320 | Service Manual - Page 27
supplies return and recycling free of charge in the world market where HP LaserJet supplies are sold. Postage-paid and pre-addressed labels are included within the instruction guide in most HP LaserJet print cartridge boxes. Labels and bulk boxes are also available through the Web site at http - HP 1320 | Service Manual - Page 28
Guide 22 and EN 45014 Manufacturer's Name: Manufacturer's Address: Hewlett-Packard Company 11311 Chinden Boulevard, Boise, Idaho 83714-1021, USA declares that the product Product Name: Regulatory Model 3): Product Options: HP LaserJet 1160 printer typical configuration with Hewlett-Packard - HP 1320 | Service Manual - Page 29
's Address: Hewlett-Packard Company 11311 Chinden Boulevard, Boise, Idaho 83714-1021, USA declares that the product Product Name 4): Regulatory Model 3): Product Options: HP LaserJet 1320 Series printer, HP LaserJet 1320n printer, HP LaserJet 1320tn printer, HP LaserJet 1320nw printer BOISB-0402 - HP 1320 | Service Manual - Page 30
since August 1, 1976. Compliance is mandatory for products marketed in the United States. The printer is certified as a "Class 1" laser product under the U.S. Department of Health and Human Services (DHHS) Radiation Performance Standard according to the Radiation Control for Health and Safety Act of - HP 1320 | Service Manual - Page 31
statement for Finland LASERTURVALLISUUS LUOKAN 1 LASERLAITE KLASS 1 LASER APPARAT HP LaserJet 1160, HP LaserJet 1320, HP LaserJet 1320n, HP LaserJet 1320tn, HP LaserJet 1320nw -laserkirjoitin on käyttäjän kannalta turvallinen luokan 1 laserlaite. Normaalissa käytössä kirjoittimen suojakotelointi - HP 1320 | Service Manual - Page 32
20 Chapter 1 Product Information ENWW - HP 1320 | Service Manual - Page 33
2 Installation Chapter contents Chapter contents...21 Operating environment ...22 Printer connections ...22 Software...24 Supported operating systems 24 Software for Windows ...25 Software for Macintosh computers 27 ENWW Chapter contents 21 - HP 1320 | Service Manual - Page 34
(HP LaserJet 1160 printer and HP LaserJet 1320 Series printer) also support parallel connections. HP LaserJet 1320n, HP LaserJet 1320tn, and HP LaserJet 1320nw printers also support network connections. Figure 2-1. USB connection Figure 2-2. Parallel connection 22 Chapter 2 Installation ENWW - HP 1320 | Service Manual - Page 35
Figure 2-3. Network connection Figure 2-4. Wireless connection, infrastructure mode Figure 2-5. Wireless connection, ad hoc mode ENWW Printer connections 23 - HP 1320 | Service Manual - Page 36
that is provided with the HP LaserJet 1160 and HP LaserJet 1320 Series printers. NOTE Supported operating systems For easy printer setup and access to the full range of printer features, HP strongly recommends that you install the software provided. Not all software is available in all languages - HP 1320 | Service Manual - Page 37
driver you have selected. Available printer drivers The following printer drivers are included with the printer. Table 2-1. Available printer drivers HP LaserJet 1160 printer ● PCL 5e ● Host-based HP LaserJet 1320 Series printer ● PCL 5e ● PCL 6 ● HP postscript level 2 emulation ENWW Software - HP 1320 | Service Manual - Page 38
Check the printer status. ● Configure the printer settings. ● View troubleshooting information. ● View online documentation. See Using the HP Toolbox for more information. Embedded Web server This feature is available on the HP LaserJet 1320n, HP LaserJet 1320tn, and HP LaserJet 1320nw printers. The - HP 1320 | Service Manual - Page 39
computers that is available for the HP LaserJet 1160 and HP LaserJet 1320 Series printers. HP LaserJet 1160 printer The following sections describe how to gain access to the Macintosh software for the HP LaserJet 1160 printer. Gaining access to the printer driver (Mac OS 9.2 and later) 1. From the - HP 1320 | Service Manual - Page 40
Printer Description files (PPDs) PPDs, in combination with the Apple printer driver, provide access to the printer features and allow the computer to communicate with the printer. An installation program for the PPDs is provided on the HP LaserJet 1320 Series printer CD. 28 Chapter 2 Installation - HP 1320 | Service Manual - Page 41
-light patterns ...31 Printer information pages ...37 Demo page ...37 Configuration page ...37 Supplies Status page ...37 Network Configuration page 37 Using the HP Toolbox ...38 Supported operating systems 38 Supported browsers ...38 To view the HP Toolbox on Windows systems 39 To view the HP - HP 1320 | Service Manual - Page 42
light (HP LaserJet 1320nw printer only): When the Wireless light is on solid, a wireless connection has been established. When the Wireless light is off, wireless operation is disabled. When the Wireless light is flashing, the printer is trying to establish a wireless connection. 2 Toner light - HP 1320 | Service Manual - Page 43
Status-light patterns Table 3-1. Light status legend Symbol for "light off" Symbol for "light on" Symbol for "light blinking" Table 3-2. Control-panel-light message Light status State of the printer Action Initialization/Startup While in the Startup state, the Go, Ready, and Attention lights - HP 1320 | Service Manual - Page 44
is requested, such as a cold reset, the lights cycle as in the Initialization/Startup state. Action During the Reconfiguration process, pressing buttons has no effect. Ready The printer is ready with no job activity. To print a Configuration page, press and hold the GO button for 5 seconds - HP 1320 | Service Manual - Page 45
light message (continued) Light status State of the printer Job Cancel Action Pressing the GO button has no effect. After the cancellation process is complete, the printer returns to the Ready state. Manual unsuccessful, the printer returns to the ● Memory-configuration error Continuable Error - HP 1320 | Service Manual - Page 46
seconds, and turn on the printer. See Troubleshooting Accessory Error (HP LaserJet 1320 Series printer only) To see additional error information, press the GO button. The light pattern changes. For more information about the light pattern that appears, see Troubleshooting. When you release the GO - HP 1320 | Service Manual - Page 47
status State of the printer Toner Low The toner supply in the cartridge is running low. The Go, Ready, and Attention lights act independently of the Toner Low state. Action It is necessary to purchase a new print cartridge. Replace the print cartridge when the print on the page begins to fade - HP 1320 | Service Manual - Page 48
-panel-light message (continued) Light status State of the printer Wireless Disabled The Go, Ready, Attention, and Toner lights act independently of the Wireless light. Action No action is necessary. Attempting to Establish Wireless Connection No action is necessary. The Wireless light blinks - HP 1320 | Service Manual - Page 49
from the control panel. NOTE Network Configuration page The Network Configuration page is only available on the HP LaserJet 1320n, HP LaserJet 1320tn, and HP LaserJet 1320nw printers. A Network Configuration page prints whenever a printer configuration page is printed. You can also print a Network - HP 1320 | Service Manual - Page 50
. ● Configure the printer settings. ● View troubleshooting information. ● View online documentation. You can view the HP Toolbox when the printer is directly connected to your computer or when you are using a supported network connection. You must have performed a complete software installation to - HP 1320 | Service Manual - Page 51
The HP Toolbox software contains these sections: ● Status tab ● Troubleshooting tab ● Alerts tab ● Documentation tab ● Advanced Printer Settings window ● Network window (available only for the HP LaserJet 1320n, HP LaserJet 1320tn, and HP LaserJet 1320nw printers) Other links Each page in the HP - HP 1320 | Service Manual - Page 52
to printer troubleshooting information. For example, these pages provide information about how to clear a jam, how to resolve print-quality problems, how to interpret the control-panel lights, and how to resolve other problems with the printer. Alerts tab Use the Alerts tab to configure the printer - HP 1320 | Service Manual - Page 53
. Network window This option is only available for the HP LaserJet 1320n, HP LaserJet 1320tn, and HP LaserJet 1320nw printers. When you click the Network link on the Advanced Printer Settings page, a new window opens. Use this section to configure network settings. ENWW Using the HP Toolbox 41 - HP 1320 | Service Manual - Page 54
1320n, HP LaserJet 1320tn, and HP LaserJet 1320nw printers. The embedded Web server provides the same functions as the Advanced Printer Settings section of the HP Toolbox. Following are the main differences between using the embedded Web server and using the HP Toolbox: ● You do not have to install - HP 1320 | Service Manual - Page 55
timeout setting. ● Service. Complete service tasks in the printer, such as changing all the printer settings back to the factory default settings. Networking tab This option is only available for the HP LaserJet 1320n, HP LaserJet 1320tn, and HP LaserJet 1320nw printers. The network administrator - HP 1320 | Service Manual - Page 56
to the product registration page on the HP Web site. ● Order Supplies. Click this link to connect to the Sure Supply Web site and order genuine HP supplies from HP or a reseller of your choice. ● Product Support. Connects to the support site for the HP LaserJet 1320 Series printer. You can search - HP 1320 | Service Manual - Page 57
a safe, secure, and cost-effective alternative to traditional wired network connections. The HP LaserJet 1320nw printer has built-in wireless connectivity. IEEE 802.11b/g standard With wireless IEEE 802.11b/g compliant connectivity, the printers can be placed in the office or home and connected to - HP 1320 | Service Manual - Page 58
46 Chapter 3 Operation ENWW - HP 1320 | Service Manual - Page 59
4 Maintenance Chapter contents Chapter contents...47 Replacing the print cartridge...48 To replace the print cartridge 48 Cleaning the printer ...49 Cleaning the print-cartridge area 49 Cleaning the printer media path 51 Changing the pickup roller ...52 Cleaning the pickup roller ...58 Changing - HP 1320 | Service Manual - Page 60
the print cartridge Use the below instructions to remove or replace the print cartridge. To replace the print cartridge 1. Open the print-cartridge door, and remove the print cartridge. CAUTION To prevent damage, do not expose the print cartridge to light. Cover the print cartridge if necessary - HP 1320 | Service Manual - Page 61
use ammonia-based cleaners on or around the printer. Cleaning the print-cartridge area During the printing process, paper, toner, and dust particles can accumulate inside the printer. Over time, this buildup can cause print-quality problems, such as toner specks or smearing, and jams. To correct - HP 1320 | Service Manual - Page 62
2. Using a dry, lint-free cloth, wipe any residue from the media path area and the print cartridge cavity. 3. Replace the print cartridge, and close the print-cartridge door. 4. Plug the power cord into the printer and then turn on the printer. 50 Chapter 4 Maintenance ENWW - HP 1320 | Service Manual - Page 63
the following methods: ● Open the HP Toolbox. See Using the HP Toolbox for instructions. Click the Troubleshooting tab, and click Print Quality Tools. Select the cleaning page. ● On the printer control panel, press and hold the GO button until all three lights illuminate (about 10 seconds). When all - HP 1320 | Service Manual - Page 64
supplies to order a new pickup roller. Failure to complete this procedure might damage the printer. 1. Turn off the printer, unplug the power cord from the printer, and then allow the printer to cool. 2. Open the print-cartridge door, and remove the print cartridge. 52 Chapter 4 Maintenance ENWW - HP 1320 | Service Manual - Page 65
3. Remove tray 2. 4. Open the front automatic two-sided-printing path door (HP LaserJet 1320 Series printer only). 5. Place the printer on the work surface with the front of the printer facing up. ENWW Changing the pickup roller 53 - HP 1320 | Service Manual - Page 66
6. Pull the white tabs outward, and rotate the tabs up. 7. Slide the right tab to the right, and leave the tab in this position throughout the procedure. 54 Chapter 4 Maintenance ENWW - HP 1320 | Service Manual - Page 67
8. Slide the pickup roller assembly to the right, and remove the left end cap. 9. Remove the pickup roller. ENWW Changing the pickup roller 55 - HP 1320 | Service Manual - Page 68
, and rotate the tab downward into position. 13. Push the right tab to the left, and rotate the tab downward into position. 14. Place the printer on the work surface with the top of the - HP 1320 | Service Manual - Page 69
15. Close the front automatic two-sided-printing path door. 16. Reinstall the print cartridge, and close the print-cartridge door. 17. Plug the power cord into the printer and then turn on the printer. ENWW Changing the pickup roller 57 - HP 1320 | Service Manual - Page 70
If you want to clean the pickup roller rather than replace it, follow these instructions: 1. Remove the pickup roller as described in steps 1 through 9 of Changing the before you reinstall it in the printer (see steps 10 through 17 of Changing the pickup roller). 58 Chapter 4 Maintenance ENWW - HP 1320 | Service Manual - Page 71
pad Normal use with good media causes wear. The use of poor media might require more frequent replacement of the separation pad. If the printer regularly pulls multiple sheets of media at a time, you might need to change the separation pad. 1. Remove the main input tray (tray 2). 2. Locate the - HP 1320 | Service Manual - Page 72
3. Remove the screws. 60 Chapter 4 Maintenance ENWW - HP 1320 | Service Manual - Page 73
NOTE 4. Remove the separation pad. Before you proceed to step 4, examine the position of the separation pad in the tray. 5. Insert the new separation pad. ENWW Changing the printer separation pad 61 - HP 1320 | Service Manual - Page 74
6. Replace the screws. 62 Chapter 4 Maintenance ENWW - HP 1320 | Service Manual - Page 75
separation pad If you want to clean the separation pad rather than replace it, follow the instructions below. 1. Remove the separation pad as described in steps 1 through 4 of Changing the printer separation pad. 2. Dab a lint-free cloth in water, and scrub the separation pad. 3. Using a dry, lint - HP 1320 | Service Manual - Page 76
64 Chapter 4 Maintenance ENWW - HP 1320 | Service Manual - Page 77
5 Theory of operation Chapter contents Chapter contents...65 Introduction...66 Internal components...67 Timing...68 Engine control system...70 Laser/scanner system...72 Pickup/feed/delivery system...73 Image-formation system...75 ENWW Chapter contents 65 - HP 1320 | Service Manual - Page 78
presents an overview of the relationships between major components in the printer, and includes a detailed discussion of the image-formation system. The following systems are discussed: ● Engine control system ● Laser/scanner system ● Pickup/feed/delivery system ● Image-formation system Figure - HP 1320 | Service Manual - Page 79
the major internal components. Figure 5-2. ENWW Cross-section of printer 1 Top output bin delivery roller 2 Fuser film 3 Laser/scanner 4 Primary charging roller 5 Developing cylinder 6 Print cartridge 7 Feed roller 8 Separation pad 9 Pickup roller 10 Registration roller - HP 1320 | Service Manual - Page 80
presence of a print cartridge. Clears potential from photosensitive drum and transfers the toner image to the media. LSTR the last page of a print job. After LSTR, the printer either returns Fuser heater initial drive. The fuser heater reaches a surface temperature of 100 degrees C. 7 Laser - HP 1320 | Service Manual - Page 81
continued) Step Action 8 High-voltage control Detect presence of a print cartridge Clean the transfer roller after the primary charging ac bias is turned on 9 Failure/abnormality check: detect laser/scanner failure, fuser failure, and open covers 10 Communication with the memory tag ENWW - HP 1320 | Service Manual - Page 82
Engine control system The engine control system coordinates all printer functions, according to commands sent from the formatter. It drives the laser/scanner system, the image-formation system, and the pickup/feed/delivery system. The engine control system contains the following components: ● Dc - HP 1320 | Service Manual - Page 83
Figure 5-4. Engine control system circuit diagram ENWW Engine control system 71 - HP 1320 | Service Manual - Page 84
Laser/scanner system The laser/scanner system receives video signals from the dc controller and the formatter and converts the signals into latent images on the photosensitive drum. Figure 5-5. Laser/scanner system 72 Chapter 5 Theory of operation ENWW - HP 1320 | Service Manual - Page 85
rollers. Three media-detection sensors detect media as it passes through the printer. If media does not reach or pass each sensor within a tray 1pickup solenoid ● SL3, duplex solenoid (HPLJ 1320 only) ● PS911, tray 1 media sensor ● PS912, top-of-page sensor ● PS913, width-detection sensor ● PS914, - HP 1320 | Service Manual - Page 86
● PS915, fuser delivery sensor ● PS915, duplex sensor (HPLJ 1320 only) Figure 5-6. Pickup/feed/delivery system 74 Chapter 5 Theory of operation ENWW - HP 1320 | Service Manual - Page 87
Image-formation system Laser printing requires the interaction of several different technologies, including electronics, optics, and electrophotographics, to provide a printed page. Each process functions independently and must be coordinated with the other printer processes. Image formation - HP 1320 | Service Manual - Page 88
than the charges on the developing cylinder. Figure 5-9. Developing Toner acquires a negative charge through friction from the developing cylinder media comes in contact with the photosensitive drum, the toner is transferred to the print media. Figure 5-10. Transfer Step 5: Separation - HP 1320 | Service Manual - Page 89
any electrostatic adhesion. Figure 5-11. Separation Step 6: Fusing The dc negative bias applied to the fusing film strengthens the holding force of the toner on the print media and prevents the toner from scattering. Figure 5-12. Fusing Step 7: Drum cleaning ENWW Image-formation system 77 - HP 1320 | Service Manual - Page 90
The cleaning blade scrapes the residual toner off of the photosensitive drum and deposits it into the waste toner case. Figure 5-13. Drum cleaning 78 Chapter 5 Theory of operation ENWW - HP 1320 | Service Manual - Page 91
tools ...80 Before performing service ...81 Pre-service procedures ...81 Parts removal Laser/scanner...96 Memory-tag-reader assembly 97 Duplex-drive PCA...99 Fuser...101 Fan...101 Duplex-drive gears/face-down gears 103 Duplex solenoid (SL3) (HP LaserJet 1320 Series printers only 106 Fuser - HP 1320 | Service Manual - Page 92
replacing wire harnesses, always use the provided wire loops, lance points, or wireharness guides. CAUTION Electrostatic discharge The product contains parts that are sensitive to electrostatic discharge (ESD). Always service the product at an ESD-protected workstation, or use an ESD mat. Watch - HP 1320 | Service Manual - Page 93
static and ground the product chassis before servicing the product. 3. Remove the print cartridge, see Replacing the print cartridge. 4. Unplug the power cord and the interface cable. 5. Lift the printer (and optional tray 2) off of optional tray 3 (if it is installed). Parts removal order Use the - HP 1320 | Service Manual - Page 94
Left-side cover 1. Open the print-cartridge door. 2. Release two tabs (callout 1) to pry the cover away at the back of the printer approximately 38 mm (1.5 inches). A screwdriver is required to remove the left-side cover from an HP LaserJet 1160 printer. Figure 6-1. Removing the left-side cover - HP 1320 | Service Manual - Page 95
3. Slide the cover toward the front of the printer to clear the interlock tab (callout 2). Figure 6-2. Removing the left-side cover (2 of 2) 4. Lift the cover away from the printer. ENWW Covers 83 - HP 1320 | Service Manual - Page 96
Right-side cover 1. Open the print-cartridge door. 2. Lift the back of the printer off of the workspace and use a flat blade screwdriver to pry the cover from the tab (callout 1) at the bottom of the printer. Figure 6-3. Removing the right-side cover (1 of 2) 84 Chapter 6 Removal and replacement - HP 1320 | Service Manual - Page 97
3. Use a flat blade screwdriver to pry the cover at the back of the printer, releasing two internal tabs (callout 2). Figure 6-4. Removing the right-side cover (2 of 2) 4. Lift the cover away from the printer. ENWW Covers 85 - HP 1320 | Service Manual - Page 98
(see Left-side cover) and the right-side cover (see Right-side cover). 2. Remove four screws (callout 1). Figure 6-5. Removing the back cover (1 of 2) 3. Tip the printer so that it rests on its front. 4. Release the tab (callout 2) at the back of the - HP 1320 | Service Manual - Page 99
5. Slide the cover toward the right side of the printer to clear the tab (callout 3) on the duplex tray. Figure 6-6. Removing the back cover (2 of 2) 6. Lift the cover straight up and away from the printer. ENWW Covers 87 - HP 1320 | Service Manual - Page 100
Reinstallation tip Make sure that the flag (callout 1) and both of the fuser-release levers (callout 2) fit through the holes in the cover before attaching the cover. Figure 6-7. Reinstalling the back cover 88 Chapter 6 Removal and replacement ENWW - HP 1320 | Service Manual - Page 101
Back cover). 2. Pull the duplexer tray release-tab (callout 1) to release the duplexer tray magnets. 3. Slide the duplexer tray toward the right side of the printer to release the tab (callout 2) at the back, left side. Figure 6-8. Removing the duplexer tray ENWW Covers 89 - HP 1320 | Service Manual - Page 102
Right-side cover), the back cover (see Back cover), and the duplexer tray (see Duplexer tray). 2. Remove two screws (callout 1) at the back of the printer. Figure 6-9. Removing the top cover (1 of 3) 90 Chapter 6 Removal and replacement ENWW - HP 1320 | Service Manual - Page 103
3. Remove one screw (callout 3) at the left side of the printer and remove one screw (callout 4) from the front of the printer. Figure 6-10. Removing the top cover (2 of 3) ENWW Covers 91 - HP 1320 | Service Manual - Page 104
4. Lift up the left side of the top cover and release the control-panel cable (callout 5) at the right side. Figure 6-11. Removing the top cover (3 of 3) 5. Lift the top cover off of the printer. 92 Chapter 6 Removal and replacement ENWW - HP 1320 | Service Manual - Page 105
Control panel 1. Remove all covers (see Covers). 2. Press a flat blade screwdriver into the gap at the control panel, and then use the screwdriver to pry the control panel out of the top cover. Figure 6-12. Removing the control panel (1 of 2) ENWW Control panel 93 - HP 1320 | Service Manual - Page 106
3. Use a flat blade screwdriver to press the securing tab, and then slide the blade under the control-panel PCA to lift it out. Figure 6-13. Removing the control panel (2 of 2) 4. Slide the control-panel PCA toward the back of the top cover to clear the tab at the front, and then lift the control- - HP 1320 | Service Manual - Page 107
six screws (callout 4) from the formatter plate. Figure 6-14. Removing the formatter 6. Lift the I/O cover, the formatter, and the formatter plate off of the printer and place them on an ESD mat. 7. Lift the formatter plate off of the formatter. 8. Rotate the I/O cover to clear its tabs and remove - HP 1320 | Service Manual - Page 108
routing as you unthread the cables. 5. Remove four screws (callout 4). NOTE CAUTION 6. Lift the laser/scanner out of the printer. Examine the shutter switch as you lift the laser/scanner out of the printer. Do not fold flat, flexible cables. Also, do not straighten pre-folds in flat, flexible - HP 1320 | Service Manual - Page 109
Memory-tag-reader assembly 1. Remove all covers (see Covers). 2. Remove the fan from the printer chassis (see steps 3 and 4 of Fan). 3. Remove one cable (callout 1) from the cable-holder on top of the memory-tag-reader cover. 4. Disconnect one cable - HP 1320 | Service Manual - Page 110
-tag-reader assembly (2 of 2) 6. Lift up slightly the back of the memory-tag-reader assembly and then slide the assembly toward the back of the printer, to release it from the laser/scanner plate. Reinstallation tip Make sure that the tab at the bottom of the assembly fits in the - HP 1320 | Service Manual - Page 111
Duplex-drive PCA 1. Remove all covers (see Covers). 2. Disconnect the duplex-drive cable (callout 1) at the ECU and route the cable through the hole in the chassis. 1 Figure 6-17. Removing the duplex-drive PCA (1 of 2) 3. Disconnect one cable (callout 2) from the duplex-drive PCA. ENWW Duplex- - HP 1320 | Service Manual - Page 112
4. Remove one screw (callout 3) and then lift the duplex-drive PCA off of the printer. Figure 6-18. Removing the duplex-drive PCA (2 of 2) 100 Chapter 6 Removal and replacement ENWW - HP 1320 | Service Manual - Page 113
Several parts must be removed before you can remove the fuser. The following parts are included in this section about removing the fuser: ● Fan ● Duplex-drive gears/face-down gears ● Duplex solenoid ● Fuser Fan 1. Remove all covers (see Covers). 2. Disconnect the fan cable (callout 1) at the ECU - HP 1320 | Service Manual - Page 114
4. Unhook the fan clip (callout 3) and then lift the fan off of the printer. Reinstallation tip Use the fan clip to hold the fan in place before replacing the screws. 102 Chapter 6 Removal and replacement ENWW - HP 1320 | Service Manual - Page 115
HP LaserJet 1320 Series printers contain duplex-drive gears. HP LaserJet 1160 printers contain face-down gears. 1. Remove all covers (see Covers). 2. Remove the fan (see Fan). 3. Remove three screws (callout 1) and then lift the assembly away from the printer replace the gear plate. ENWW Fuser 103 - HP 1320 | Service Manual - Page 116
gears and face-down gears. For HP LaserJet 1320 Series printers, make sure that you replace the gears as shown in Figure 6-21. Duplex-drive gears (HP LaserJet 1320 Series printers). Figure 6-21. Duplex-drive gears (HP LaserJet 1320 Series printers) 104 Chapter 6 Removal and replacement ENWW - HP 1320 | Service Manual - Page 117
Figure 6-22. Face-down gears (HP LaserJet 1160 printers) ENWW Fuser 105 - HP 1320 | Service Manual - Page 118
Duplex solenoid (SL3) (HP LaserJet 1320 Series printers only) 1. Remove all covers (see Covers). 2. Remove the fan (see Fan). 3. Remove the duplex-drive gears (see Duplex-drive gears/face-down gears). 4. Disconnect one - HP 1320 | Service Manual - Page 119
Remove the formatter (see Formatter). 5. On the right side of the printer, press the tabs on two gears (callout 1) to release the gears, and then slide the gears off of the shafts. 6. Disconnect one cable (callout 2) on the right side of the printer. Figure 6-24. Removing the fuser (1 of 10) ENWW - HP 1320 | Service Manual - Page 120
, and then disconnect two more cables (callout 4) that were behind the first set. Figure 6-25. Removing the fuser (2 of 10) 8. Pull the tab on the cable holder (callout 5) at the left side of the printer and slide it toward the center to release it from the frame, and then unroute the cables - HP 1320 | Service Manual - Page 121
9. Pull the tab on the cable holder (callout 6) at the right side of the printer and slide it toward the center to release it from the frame, and then unroute the cables. Figure 6-26. Removing the fuser (3 of 10) ENWW Fuser 109 - HP 1320 | Service Manual - Page 122
10. Disconnect three cables (callout 7). Figure 6-27. Removing the fuser (4 of 10) 110 Chapter 6 Removal and replacement ENWW - HP 1320 | Service Manual - Page 123
11. Pull the cable holder (callout 8) straight back to remove it, and then unroute the cables. Figure 6-28. Removing the fuser (5 of 10) Reinstallation tip You might find it easier to reassemble the cables and the cable holder if you put the smaller cables back into place first. ENWW Fuser 111 - HP 1320 | Service Manual - Page 124
cable (callout 9) and then unroute the cable from the cable guide. Figure 6-29. NOTE Removing the fuser (6 of 10) Before you proceed to step 13, make sure that all cables disconnected in previous steps are free from any cable guides and cable holders. 112 Chapter 6 Removal and replacement ENWW - HP 1320 | Service Manual - Page 125
13. Remove three screws (callout 10) on the right side of the printer. Figure 6-30. Removing the fuser (7 of 10) ENWW Fuser 113 - HP 1320 | Service Manual - Page 126
14. Remove three screws (callout 11) from the left side of the printer. Figure 6-31. Removing the fuser (8 of 10) 114 Chapter 6 Removal and replacement ENWW - HP 1320 | Service Manual - Page 127
15. At the left side of the printer, pull the printer chassis from the top to spread the printer frame and release the fuser from the frame. Figure 6-32. Removing the fuser (9 of 10) ENWW Fuser 115 - HP 1320 | Service Manual - Page 128
16. Pull the fuser out of the printer at an angle so that the delivery roller shaft clears the hole (callout 12) in the chassis. Figure 6-33. Removing the fuser (10 of 10) 116 Chapter 6 Removal and replacement ENWW - HP 1320 | Service Manual - Page 129
assembly NOTE If a wireless communications card is installed in the printer, see Wireless communications card for information about Remove two screws (callout 1) that secure the assembly to the left side of the printer chassis. 3. Remove one screw (callout 2) at the top of the assembly. Figure 6- - HP 1320 | Service Manual - Page 130
5. Disconnect two cables (callout 3). 3 Figure 6-35. Removing the interlock assembly (2 of 2) 118 Chapter 6 Removal and replacement ENWW - HP 1320 | Service Manual - Page 131
Fan). 3. Remove the duplex-drive gears (see Duplex-drive gears/face-down gears). 4. Remove the formatter (see Formatter). 5. Remove the fuser (see Fuser). 6. Remove the interlock assembly (see Interlock assembly). 7. Remove cables from the cable clip under the feed plate (callout 1) and then remove - HP 1320 | Service Manual - Page 132
8. Disconnect three cables (callout 2). Figure 6-37. Removing the ECU (2 of 8) 120 Chapter 6 Removal and replacement ENWW - HP 1320 | Service Manual - Page 133
9. Unroute the cables at the right side of the printer, releasing them from the cable stays (callout 3). Figure 6-38. Removing the ECU (3 of 8) ENWW ECU 121 - HP 1320 | Service Manual - Page 134
10. Remove one screw (callout 4) from the right side of the printer. Figure 6-39. Removing the ECU (4 of 8) 122 Chapter 6 Removal and replacement ENWW - HP 1320 | Service Manual - Page 135
11. Remove two screws (callout 5) from the left side of the printer, and then push the interlock cables and the formatter cable (callout 6) through the hole in the chassis. Figure 6-40. Removing the ECU (5 of 8) ENWW ECU 123 - HP 1320 | Service Manual - Page 136
12. Spread the printer frame at the right side of the printer to release the internal tabs that secure the ECU to the chassis. Figure 6-41. Removing the ECU (6 of 8) 124 Chapter 6 Removal and replacement ENWW - HP 1320 | Service Manual - Page 137
at the left side of the printer to release the internal tabs, and then lower the ECU slightly and pull it straight back to replacing the ECU, you might find it easier to find the correct placement of the ECU pan in the printer if you tip the printer so that it rests on its front. ENWW ECU 125 - HP 1320 | Service Manual - Page 138
14. Remove four screws (callout 7) and then lift the ECU off of the ECU plate. Figure 6-43. Removing the ECU (8 of 8) 126 Chapter 6 Removal and replacement ENWW - HP 1320 | Service Manual - Page 139
). 3. Remove the duplex-drive gears (see Duplex-drive gears/face-down gears). 4. Remove the formatter (see Formatter). 5. Remove the fuser (see Fuser). 6. Remove the interlock assembly (see Interlock assembly). 7. Remove the ECU (see ECU). 8. Remove three screws (callout 1). Figure 6-44. Removing - HP 1320 | Service Manual - Page 140
9. Hold the motor while releasing the tabs (callout 2) on the cable guide, and then lift the motor and the cable guide out of the printer together. Figure 6-45. Removing the main motor (2 of 2) 128 Chapter 6 Removal and replacement ENWW - HP 1320 | Service Manual - Page 141
handling can cause additional damage. 1. Open the print-cartridge door and remove the print cartridge, see Replacing the print cartridge. 2. Use needlenose pliers to release the transfer roller tabs at the end of the roller, near the right side of the printer. Do not break the tabs and do not touch - HP 1320 | Service Manual - Page 142
Registration assembly 1. Remove five screws (callout 1). Figure 6-47. Removing the registration assembly 2. Lift the entire assembly out of the printer. 130 Chapter 6 Removal and replacement ENWW - HP 1320 | Service Manual - Page 143
of Fan). 3. Disconnect one cable (callout 1) at the ECU. Figure 6-48. Removing the main gear assembly (1 of 2) 4. Remove the duplex-drive PCA from the printer chassis (see steps 3 and 4 of Duplex- drive PCA). 5. Release the tab on the gear (callout 2) and slide the gear off of the shaft. 6. Remove - HP 1320 | Service Manual - Page 144
7. Remove four screws (callout 4). 4 2 3 Figure 6-49. Removing the main gear assembly (2 of 2) 8. Pull the main gear assembly straight away from the printer. 132 Chapter 6 Removal and replacement ENWW - HP 1320 | Service Manual - Page 145
9. To remove the tray 2 pickup solenoid, disconnect one cable (callout 5). 5 Figure 6-50. Removing the tray 2 pickup solenoid (1 of 2) ENWW Main gear assembly/tray 2 pickup solenoid 133 - HP 1320 | Service Manual - Page 146
10. Remove one screw, and then lift the solenoid off of the printer. 6 Figure 6-51. Removing the tray 2 pickup solenoid (2 of 2) 134 Chapter 6 Removal and replacement ENWW - HP 1320 | Service Manual - Page 147
Print-cartridge door CAUTION 1. Use a flat blade screwdriver to gently pry the cartridge-door arm off of the print-cartridge door. Be careful not to break the tabs. Figure 6-52. Removing the print-cartridge door (1 of 2) ENWW Print-cartridge door 135 - HP 1320 | Service Manual - Page 148
2. Remove two screws (callout 2). Figure 6-53. Removing the print-cartridge door (2 of 2) 3. Lift the cartridge-door assembly straight away from the printer. 136 Chapter 6 Removal and replacement ENWW - HP 1320 | Service Manual - Page 149
Wireless communications card 1. Remove the left-side cover (see Left-side cover). 2. Release two tabs (callout 1) that secure the wireless communications card to the interlock assembly. Figure 6-54. Removing the wireless communications card (1 of 2) ENWW Wireless communications card 137 - HP 1320 | Service Manual - Page 150
3. Turn the card over and then disconnect one connector (callout 2). Figure 6-55. Removing the wireless communications card (2 of 2) 138 Chapter 6 Removal and replacement ENWW - HP 1320 | Service Manual - Page 151
pages 148 Page format is different than on another printer 149 Graphics quality ...149 Status light patterns ...150 Fatal error secondary messages 156 Accessory error secondary messages 159 Troubleshooting postscript (PS) errors 160 Image troubleshooting...161 Print cartridge problems 161 - HP 1320 | Service Manual - Page 152
Wired network setup problemsolving 187 NVRAM initialization...188 Cold reset...189 Troubleshooting tools and reference diagrams 190 Repetitive image defects 190 General timing chart...191 Circuit diagram...192 Solenoids...194 Switches and sensors...195 Rollers and pads... - HP 1320 | Service Manual - Page 153
Basic troubleshooting Table 7-1. Basic troubleshooting The printer doesn't turn on. When the product is connected to a correctly grounded power source, the LEDs on the control panel do not light and the main motor does not rotate. Cause Solution No power to the printer. 1. Verify that the power - HP 1320 | Service Manual - Page 154
. The printer prints the engine test and the Demo page, but does not print jobs sent from a computer. Cause Solution The cable is not connected correctly. Reconnect the cable. An incorrect printer driver is selected. Select the correct printer driver. 142 Chapter 7 Troubleshooting ENWW - HP 1320 | Service Manual - Page 155
Basic troubleshooting (continued) The printer does not print from a computer. The printer prints the engine test and the Demo page, but does not print jobs sent from a computer. Cause Solution The printer driver is not installed correctly. Uninstall and then reinstall the printer software. Make - HP 1320 | Service Manual - Page 156
and Table 7-8. Solving print image- quality problems for more information. ● Adjust the media guides to the width and length of the media that you are using and try reprinting. More than one sheet of media feeds through the printer at one time ● The media input tray might be too full. ● Make - HP 1320 | Service Manual - Page 157
to 22 pages per minute for the HP LaserJet 1320 Series printer. Your print job might be very complex. Try the following: ● Reduce the complexity of your document (for example, reduce the number of multiple graphics). ● In the printer driver, set the media type to plain paper. This can cause toner to - HP 1320 | Service Manual - Page 158
against the media. Check for broken or missing guides and replace them as needed. The media's weight or surface finish does not meet HP's specifications. Make sure that the media meets specifications detailed in the HP LaserJet Printer Family Media Guide. 146 Chapter 7 Troubleshooting ENWW - HP 1320 | Service Manual - Page 159
bond weight paper (or fewer pages of heavier media, a stack no HP's specifications for print media. Make sure that the media meets specifications detailed in the HP LaserJet Printer Family Media Guide laser printer and is now being re-used. Do not re-use media. ENWW Paper-path troubleshooting 147 - HP 1320 | Service Manual - Page 160
text, or blank pages ● Page format is different than on another printer ● Graphics quality Garbled, incorrect, or incomplete text ● The wrong printer driver might have been selected when the software was installed. Make sure that the HP LaserJet 1160 or HP LaserJet 1320 printer driver is selected in - HP 1320 | Service Manual - Page 161
the page format might change when you try to print using your new printer driver or settings. To help eliminate this problem, try the following: ● Create documents and print them using the same printer driver (printer software) and printer Properties settings regardless of which HP LaserJet printer - HP 1320 | Service Manual - Page 162
panel light message Light status State of the printer Action Initialization/Startup While in the Startup state, the Go, Ready, and Attention lights cycle (at the rate of 500 ms) one after another. During the Initialization process, pressing buttons has no effect. 150 Chapter 7 Troubleshooting - HP 1320 | Service Manual - Page 163
the sequences is requested, such as a cold reset, the lights cycle as in the Initialization/Startup state. During the Reconfiguration process, pressing buttons has no effect. Ready The printer is ready with no job activity. To print a Configuration page, press and hold the GO button for 5 seconds - HP 1320 | Service Manual - Page 164
Out of paper for the specified tray ● General continuable error ● Memory configuration error ● Personality/Job related error To recover from the error and print whatever data is possible, press the GO button. The printer might print a partial page, or the quality might be lower than normal. If the - HP 1320 | Service Manual - Page 165
and consult the list of secondary messages. Accessory Error (HP LaserJet 1320 Series printer only) To display additional error information, press the GO button. The light pattern changes. For more information about the light pattern now displayed, see Accessory error secondary messages. When - HP 1320 | Service Manual - Page 166
cartridge. Toner Missing The print cartridge has been removed from the printer. Reinsert the print cartridge in the printer. Wireless Connection Established The Go, Ready, Attention, and Toner lights act independently of the Wireless light. No action is necessary. 154 Chapter 7 Troubleshooting - HP 1320 | Service Manual - Page 167
panel light message (continued) Light status State of the printer Wireless Disabled The Go, Ready, Attention, and Toner lights act independently of the Wireless light. Action No action is necessary. Attempting to Establish Wireless Connection No action is necessary. The Wireless light blinks - HP 1320 | Service Manual - Page 168
and engine are not communicating. Solution 1. Unplug the printer and then plug it back in. 2. Reseat the Laser/scanner error. The 1. Check the laser/scanner laser/scanner has a malfunction. cable connections. 2. If the error persists, replace the laser/scanner. 156 Chapter 7 Troubleshooting - HP 1320 | Service Manual - Page 169
the error persists, replace the laser/scanner. Motor error. 1. Check the motor cable connections. 2. If the error persists, replace the motor. Fuser error. The fuser has a malfunction. 1. Unplug the printer for at least ten minutes. 2. Verify that the fuser connector and thermistor connector are - HP 1320 | Service Manual - Page 170
error. Solution 1. Turn the printer off, and then turn the printer back on. 2. If the error persists, disconnect the I/O cable and print an engine test. If the self-test is successful, reconnect the I/O cable. 3. If the error persists, replace the formatter. 158 Chapter 7 Troubleshooting ENWW - HP 1320 | Service Manual - Page 171
Accessory error secondary messages If the printer has an accessory error (indicated by all lights blinking), press and hold the GO button to see the secondary error message. Table 7-6. Accessory error secondary messages Message Cause Internal Jetdirect error. Solution 1. Perform a - HP 1320 | Service Manual - Page 172
file to be sent to the printer. You might need to print your job at 600 dots per inch, reduce the complexity of the page, or install more memory. Select unlimited downloadable fonts from printer driver. Select unlimited downloadable fonts from printer driver. 160 Chapter 7 Troubleshooting ENWW - HP 1320 | Service Manual - Page 173
the result of problems in the print cartridge. If there is any doubt, always replace the print cartridge before troubleshooting image defects. Use the following checklist to make sure that the print cartridge is still operable. □ Make sure that the print cartridge is installed properly and the - HP 1320 | Service Manual - Page 174
cartridge. Replace the print cartridge. Make sure that media meets the specifications detailed in the HP LaserJet Printer Family Media Guide. Replace the cartridge. Clean the contacts. Replace the print cartridge. If the problem persists, replace the ECU (see ECU). 162 Chapter 7 Troubleshooting - HP 1320 | Service Manual - Page 175
damaged. The ECU is defective. Solution Make sure that the media meets specifications detailed in the HP LaserJet Printer Family Media Guide. Clean the printer (see Cleaning the printer). Replace the transfer roller (see Transfer roller). Replace the ECU (see ECU). ENWW Image troubleshooting 163 - HP 1320 | Service Manual - Page 176
ECU is defective. Replace the ECU (see ECU). Vertical black lines appear on the printed page. Cause The photosensitive drum inside the print cartridge is scratched. The fuser is defective. Solution Replace the print cartridge. Replace the fuser (see Fuser). 164 Chapter 7 Troubleshooting ENWW - HP 1320 | Service Manual - Page 177
HP LaserJet Printer Family Media Guide. Replace the print cartridge. Replace the fuser (see Fuser). Select Type is: in the Paper/Quality tab of the printer driver. Make sure that it is set for the appropriate media. If the problem persists, replace the fuser (see Fuser). ENWW Image troubleshooting - HP 1320 | Service Manual - Page 178
moist or too detailed in the HP LaserJet Printer Family Media rough.) Guide. The print cartridge needs to be replaced. Replace the print cartridge. The printer driver is not set for the correct media. Select the correct media through either the device configuration utility or under Type is: in - HP 1320 | Service Manual - Page 179
specifications detailed in the HP LaserJet Printer Family Media Guide. The printer driver is not set for the correct media. Select the correct media through either the device configuration utility or under Type is: in the Paper/Quality tab of the printer driver. Cables on the laser/scanner are not - HP 1320 | Service Manual - Page 180
stack no higher than 25 mm). Make sure that the media meets specifications detailed in the HP LaserJet Printer Family Media Guide. The printed page has curls or waves. Cause Solution The printer is operating in humidity or temperature conditions that are not within the recommended ranges. Move - HP 1320 | Service Manual - Page 181
print image-quality problems (continued) Large amounts of toner are scattered around the characters. Cause The media is resisting the toner. Solution 1. Use a different media. Make sure that the media meets specifications detailed in the HP LaserJet Printer Family Media Guide. 2. Turn the stack - HP 1320 | Service Manual - Page 182
particles from the paper path. See Cleaning the printer for instructions. There might be loose toner in the printer after a media jam. This toner clears up after a few sheets print. Media jams might result in loose toner on the page. If you get any toner on your clothes, wash them in cold water - HP 1320 | Service Manual - Page 183
output door. CAUTION 3. Rotate the green pressure release levers downward. Severe damage to the printer can result from failure to rotate the pressure release levers. Such damage is not covered under the printer warranty. 4. With both hands, grasp the side of the media that is most visible - HP 1320 | Service Manual - Page 184
5. Replace the print cartridge, and close the print-cartridge door. CAUTION Input trays To clear a jam in the input trays, perform the following steps: Do not use caused by sharp objects is not covered by the warranty. 1. Open the straight-through output door. 172 Chapter 7 Troubleshooting ENWW - HP 1320 | Service Manual - Page 185
can result from failure to rotate the pressure release levers. Such damage is not covered under the printer warranty. 3. Open the single-sheet priority input slot (tray 1) door. 4. With both hands, grasp the side of the media that is most visible (this includes - HP 1320 | Service Manual - Page 186
5. Close the single-sheet priority input slot (tray 1) door. 6. Open the main input tray (tray 2). 7. With both hands, grasp the side of the media that is most visible (this includes the middle), and carefully pull it free from the printer. 174 Chapter 7 Troubleshooting ENWW - HP 1320 | Service Manual - Page 187
8. If no media is visible, open the print-cartridge door, remove the print cartridge, and rotate the upper media guide. Carefully pull the media up and out of the printer. 9. Close the main input tray (tray 2). ENWW Clearing jams 175 - HP 1320 | Service Manual - Page 188
of the media that is most visible (this includes the middle), and carefully pull it free from the printer. CAUTION Straight-through output path To clear a jam in the straight-through output path, perform the warranty. 1. Open the straight-through output door. 176 Chapter 7 Troubleshooting ENWW - HP 1320 | Service Manual - Page 189
that is most visible (this includes the middle), and carefully pull it free from the printer. NOTE If you cannot grasp the media with your hands, perform the procedure in Print-cartridge area. 4. Close the straight-through output door. NOTE ENWW The pressure release levers automatically close - HP 1320 | Service Manual - Page 190
warranty. 1. Open the straight-through output door. CAUTION 2. Rotate the green pressure release levers downward. Severe damage to the printer can result from failure to rotate the pressure release levers. Such damage is not covered under the printer warranty. 178 Chapter 7 Troubleshooting ENWW - HP 1320 | Service Manual - Page 191
main input tray (tray 2). 4. Push down on the green lever on the automatic two-sided path door on the front of the printer. 5. With both hands, grasp the side of the media that is most visible (this includes the middle), and carefully pull it free from the printer. ENWW Clearing jams 179 - HP 1320 | Service Manual - Page 192
6. Close the automatic two-sided path door. 7. Reinsert the main input tray (tray 2). 8. Open the automatic two-sided path door on the back of the printer. 180 Chapter 7 Troubleshooting ENWW - HP 1320 | Service Manual - Page 193
9. With both hands, grasp the side of the media that is most visible (this includes the middle), and carefully pull it free from the printer. 10. Close the automatic two-sided path door. ENWW Clearing jams 181 - HP 1320 | Service Manual - Page 194
useful for isolating printer problems. The engine test prints horizontal lines down the entire printable area of a page and is also page prints. Printing a configuration page verifies that the formatter is working correctly. Figure 7-1. Location of engine-test switch 182 Chapter 7 Troubleshooting - HP 1320 | Service Manual - Page 195
of the half self-test check is to determine which process is malfunctioning. 1. Print a configuration page. 2. Open the print cartridge access door after the paper advances halfway through the printer (approximately five seconds after the motor begins rotating). The leading edge of the paper should - HP 1320 | Service Manual - Page 196
have been used. 1. Open the print-cartridge door. 2. Remove the print cartridge. 3. Mark the drive gear on the cartridge with a felt-tipped marker. Note the position of the mark. 4. Install the print cartridge and close the print-cartridge door. The startup sequence should rotate the drum enough - HP 1320 | Service Manual - Page 197
toner to the paper. 1. Unplug the printer for at least ten minutes. 2. Verify that the thermistor connector is seated into both the printer ohms for the 110 V printer and 80 ohms +/- 20 ohms for the 220 V printer. If no resistance is measured, replace the fuser. 4. Remove the thermistor connector - HP 1320 | Service Manual - Page 198
connection points (left side) To check the high-voltage connector assembly Visually inspect the cartridge connection points inside the printer to make sure that that they are not dirty or corroded. If the pins are dirty, clean them using isopropyl alcohol only. 186 Chapter 7 Troubleshooting ENWW - HP 1320 | Service Manual - Page 199
to discover the HP LaserJet 1320n, HP LaserJet 1320tn, or HP LaserJet 1320nw printer, perform the following printer. 3. To print a Network Configuration page, press the network Reset button located on the back of the printer. Figure 7-4. ENWW Network Reset button ● On the Network Configuration page - HP 1320 | Service Manual - Page 200
page counts, and factory paper settings To perform NVRAM initialization 1. Turn the printer off. 2. Press and hold down the GO button. 3. Turn the printer . The printer LEDs will begin cycling. The NVRAM-unit process runs until the printer is in the ready state. 188 Chapter 7 Troubleshooting ENWW - HP 1320 | Service Manual - Page 201
unlike NVRAM initialization, a cold reset does not reset the page count, the paper tray sizes, language, or formatter number. A cold reset also resets all the HP Jetdirect settings as well as the printer settings. To perform a cold reset 1. Turn the printer off. 2. Press and hold down the GO button - HP 1320 | Service Manual - Page 202
56.5 mm (2.22 inches) Fuser film Replace the transfer roller (see Transfer roller). Replace the fuser (see Fuser). 69.0 mm (2.72 inches) Pressure roller 75.4 mm (2.97 inches) Photosensitive drum Replace the fuser (see Fuser). Replace the print cartridge. 190 Chapter 7 Troubleshooting ENWW - HP 1320 | Service Manual - Page 203
General timing chart Figure 7-5. General timing chart ENWW Troubleshooting tools and reference diagrams 191 - HP 1320 | Service Manual - Page 204
Circuit diagram Figure 7-6. Circuit diagram (1 of 2) 192 Chapter 7 Troubleshooting ENWW - HP 1320 | Service Manual - Page 205
Figure 7-7. Circuit diagram (2 of 2) ENWW Troubleshooting tools and reference diagrams 193 - HP 1320 | Service Manual - Page 206
Solenoids Figure 7-8. Solenoids 1 Duplex solenoid 2 Tray 1 pickup solenoid 3 Tray 2 pickup solenoid 194 Chapter 7 Troubleshooting ENWW - HP 1320 | Service Manual - Page 207
Switches and sensors Figure 7-9. Switches and sensors 1 Interlock switch 2 Delivery sensor 3 Top-of-page sensor ENWW Troubleshooting tools and reference diagrams 195 - HP 1320 | Service Manual - Page 208
Rollers and pads Figure 7-10. Rollers and pads 1 Transfer roller 2 Pressure roller 3 Pickup roller 4 Separation pad 196 Chapter 7 Troubleshooting ENWW - HP 1320 | Service Manual - Page 209
8 Parts and diagrams Chapter contents Chapter contents...197 Ordering parts and supplies 198 Parts ...198 Related documentation and software 198 Supplies ...198 Consumables and accessories 199 Assembly locations...202 Covers...206 Internal assemblies...208 ENWW Chapter contents 197 - HP 1320 | Service Manual - Page 210
8-1. Technical support Web sites HP Customer Care Online Software drivers, support documentation, and answers to frequently asked questions HP Technical Training (North America) Classes and schedules www.hp.com/support education.itrc.hp.com/TrainerII/en-US/index.jsp Supplies Printer supplies are - HP 1320 | Service Manual - Page 211
print cartridge 2,500-page print cartridge for the HP LaserJet 1160 printer Q5949A UltraPrecise print cartridge 2,500-page print cartridge for the HP LaserJet 1320 Series printer Q5949A UltraPrecise print cartridge 6,000-page print cartridge for the HP LaserJet 1320 Series printer Q5949X - HP 1320 | Service Manual - Page 212
Product name HP Jetdirect ew2400 802.11b/g HP bt1300 Bluetooth Wireless Printer Adapter (both USB and parallel) Description Jetdirect print server Jetdirect print server Product number J7951A J6072A Part number J7951A J6072A 200 Chapter 8 Parts and diagrams ENWW - HP 1320 | Service Manual - Page 213
ENWW Consumables and accessories 201 - HP 1320 | Service Manual - Page 214
Assembly locations Figure 8-1. Assembly locations (1 of 2) 202 Chapter 8 Parts and diagrams ENWW - HP 1320 | Service Manual - Page 215
of 2) Ref Description Part number Qty 1 Fuser film (Contained in fuser.) N/A 2 Gear assembly, top output bin (HP LaserJet RM1-1305-000CN 1 1160 printers) 2 Duplex-drive assembly (HP LaserJet 1320 RM1-1302-000CN 1 Series printers) 3 Laser/scanner RM1-1470-000CN 1 4 Registration - HP 1320 | Service Manual - Page 216
Figure 8-2. Assembly locations (2 of 2) 204 Chapter 8 Parts and diagrams ENWW - HP 1320 | Service Manual - Page 217
Table 8-3. Assembly locations (2 of 2) Ref Description 5 Main gear assembly 6 Duplexer (HPLJ 1320) 7 Fuser, 110-127 V 7 Fuser, 220-240 V Part number Qty RM1-1299-000CN 1 RM1-1313-000CN 1 RM1-2325-000CN 1 RM1-2326-000CN 1 ENWW Assembly locations 205 - HP 1320 | Service Manual - Page 218
Covers Figure 8-3. Covers 206 Chapter 8 Parts and diagrams ENWW - HP 1320 | Service Manual - Page 219
-000CN 1 8 Tray 2 (HPLJ 1160) RM1-1322-000CN 1 8 Tray 2 (HPLJ 1320) RM1-1292-000CN 1 (not shown) Nameplate (HPLJ 1160) Q5933-67001 1 (not shown) Nameplate (HPLJ 1160 Le) Q5917-40001 1 (not shown) Nameplate (HP jewel) 7121-8043 1 (not shown) Label, control panel overlay Q5917 - HP 1320 | Service Manual - Page 220
Internal assemblies Figure 8-4. Internal components (1 of 4) 208 Chapter 8 Parts and diagrams ENWW - HP 1320 | Service Manual - Page 221
Formatter, HP LaserJet 1160 printer Q3698-67901 1 shown) (not Formatter, HP LaserJet 1320 (base) printer Q3696-67901 1 shown) (not Formatter, HP LaserJet 1320nw printer Q3990-67901 1 shown) (not Formatter, HP LaserJet 1320n and 1320tn Q3697-67901 1 shown) printers ENWW Internal - HP 1320 | Service Manual - Page 222
Figure 8-5. Internal components (2 of 4) 210 Chapter 8 Parts and diagrams ENWW - HP 1320 | Service Manual - Page 223
21 Screw, TP, m3x6 22 Screw, RS, m3x8 23 Duplex-drive PCA (HPLJ 1320) 24 Interlock assembly (HPLJ 1320) 24 Interlock assembly (HPLJ 1160) 25 Shutter link assembly (HPLJ 1320) 25 Shutter link assembly (HPLJ 1160) 26 Laser/scanner 27 ECU PCA 110v 27 ECU PCA, 220v 28 Duplexer (HPLJ - HP 1320 | Service Manual - Page 224
Figure 8-6. Internal components (3 of 4) 212 Chapter 8 Parts and diagrams ENWW - HP 1320 | Service Manual - Page 225
Table 8-7. Internal components (3 of 4) Ref Description 1 Registration assembly 2 Sensor assembly, top 3 Roller, transfer 501 Screw, tapping, truss head m4x10 Part number Qty RM1-1281-000CN 1 RM1-1283-000CN 1 RC1-3705-000CN 1 XB4-7401-005CN 1 ENWW Internal assemblies 213 - HP 1320 | Service Manual - Page 226
Figure 8-7. Internal components (4 of 4) 214 Chapter 8 Parts and diagrams ENWW - HP 1320 | Service Manual - Page 227
Table 8-8. Internal components (4 of 4) Ref Description 1 Motor, dc 2 Solenoid (SL1) tray 2 pickup 3 Power inlet/switch cable assembly Part number Qty RK2-0418-000CN 1 RK2-0424-000CN 1 RM1-1249-000CN 1 ENWW Internal assemblies 215 - HP 1320 | Service Manual - Page 228
Figure 8-8. ECU assembly 216 Chapter 8 Parts and diagrams ENWW - HP 1320 | Service Manual - Page 229
ECU PCA 110v ECU PCA, 220v 1 ECU assembly, 110v (HPLJ 1160) 1 ECU assembly, 220v (HPLJ 1160) 1 ECU assembly, 110v (HPLJ 1320) 1 ECU assembly, 220v (HPLJ 1320) Part number Qty RM1-1242-000CN 1 RM1-1243-000CN 1 RM1-1327-000CN 1 RM1-1463-000CN 1 RM1-1300-000CN 1 RM1-1462-000CN - HP 1320 | Service Manual - Page 230
Figure 8-9. Duplex-drive assembly 218 Chapter 8 Parts and diagrams ENWW - HP 1320 | Service Manual - Page 231
Table 8-10. Duplex-drive assembly Ref Description Part number Qty Duplex-drive assembly (HPLJ 1320) RM1-1302-000CN 1 1 Normal-rotation drive assembly (HPLJ 1320) RM1-1303-000CN 1 2 Reverse-rotation drive assembly (HPLJ 1320) RM1-1304-000CN 1 ENWW Internal assemblies 219 - HP 1320 | Service Manual - Page 232
Figure 8-10. Top output bin gear assembly 220 Chapter 8 Parts and diagrams ENWW - HP 1320 | Service Manual - Page 233
Table 8-11. Top output bin gear assembly Ref Description Part number Qty Gear assembly, top output bin (HPLJ 1160) RM1-1305-000CN 1 ENWW Internal assemblies 221 - HP 1320 | Service Manual - Page 234
Figure 8-11. Tray 2 assembly 222 Chapter 8 Parts and diagrams ENWW - HP 1320 | Service Manual - Page 235
2 cover assembly (HPLJ 1160) RM1-1323-000CN 1 1 Tray 2 cover assembly (HPLJ 1160), black RM1-2332-000CN 1 1 Tray 2 cover assembly (HPLJ 1320) RM1-1293-000CN 1 2 Tray 2 body assembly RM1-1294-000CN 1 6 Separation pad assembly RM1-1298-000CN 1 7 Screw, m4x8 XB4-7400-805CN 2 ENWW - HP 1320 | Service Manual - Page 236
Figure 8-12. Duplexer 224 Chapter 8 Parts and diagrams ENWW - HP 1320 | Service Manual - Page 237
Table 8-13. Duplexer Ref Description Duplexer (HPLJ 1320) 4 Size-change assembly Part number Qty RM1-1313-000CN 1 RM1-1318-000CN 1 ENWW Internal assemblies 225 - HP 1320 | Service Manual - Page 238
, top (HPLJ 1160), black Cover, top (HPLJ 1320) Duplex-drive assembly (HPLJ 1320) Duplex-drive assembly (HPLJ 1320) Duplex-drive assembly (HP LaserJet 1320 Series printers) Duplex-drive PCA (HPLJ 1320) Duplexer (HPLJ 1320) Duplexer (HPLJ 1320) Duplexer (HPLJ 1320) ECU assembly, 110v (HPLJ 1160) ECU - HP 1320 | Service Manual - Page 239
8-5 on page 209 Formatter, HP LaserJet 1160 printer Q3698-67901 Table 8-5 on page 209 Formatter, HP LaserJet 1320 (base) printer Q3696-67901 Table 8-5 on page 209 Formatter, HP LaserJet 1320n and 1320tn printers Q3697-67901 Table 8-5 on page 209 Formatter, HP LaserJet 1320nw printer Q3990 - HP 1320 | Service Manual - Page 240
HP 1320) page 215 Table 8-4 on page 207 Table 8-4 on page 207 Table 8-4 on page 207 Table 8-10 on page 219 Table 8-5 on page 209 Table 8-8 on page 215 Table 8-4 on page 207 Table 8-4 on page 207 Table 8-4 on page 207 Table 8-2 on page 203 Table 8-7 on page 213 Table 8-5 on page 209 Table 8-10 on page - HP 1320 | Service Manual - Page 241
assembly (HPLJ 1320) RM1-1293-000CN Wireless radio module, EMEA Wireless radio module, U.S. Q5929-67901 Q5929-67901 Table and page Table 8-12 on page 223 Table 8-6 on page 211 Table 8-6 on page 211 Table 8-13 on page 225 Table 8-8 on page 215 Table 8-5 on page 209 Table 8-5 on page 209 Table - HP 1320 | Service Manual - Page 242
(HP jewel) Formatter, HP LaserJet 1320 (base) printer Table 8-4 on page 207 Table 8-5 on page 209 Q3697-67901 Q3698-67901 Q3990-67901 Formatter, HP LaserJet 1320n and 1320tn printers Formatter, HP LaserJet 1160 printer Formatter, HP LaserJet 1320nw printer Table 8-5 on page 209 Table 8-5 on page - HP 1320 | Service Manual - Page 243
assembly (HP LaserJet 1320 Series printers) RM1-1302-000CN Duplex-drive assembly (HPLJ 1320) RM1-1302-000CN Duplex-drive assembly (HPLJ 1320) RM1-1303-000CN Normal-rotation drive assembly (HPLJ 1320) RM1-1304-000CN Reverse-rotation drive assembly (HPLJ 1320) Table and page Table 8-4 on page 207 - HP 1320 | Service Manual - Page 244
Table 8-15. Numerical parts list (continued) Part number Description RM1-1305-000CN Gear assembly, top output bin (HP LaserJet 1160 printers) RM1-1305-000CN Gear assembly, top output bin (HPLJ 1160) RM1-1305-000CN Gear assembly, top output bin (HPLJ 1160) RM1-1306-000CN Retaining assembly - HP 1320 | Service Manual - Page 245
on page 223 Table 8-5 on page 209 Table 8-5 on page 209 Table 8-5 on page 209 Table 8-6 on page 211 Table 8-5 on page 209 Table 8-5 on page 209 Table 8-6 on page 211 Table 8-5 on page 209 Table 8-6 on page 211 Table 8-6 on page 211 Table 8-12 on page 223 Table 8-5 on page 209 Table 8-6 on page 211 - HP 1320 | Service Manual - Page 246
234 Chapter 8 Parts and diagrams ENWW - HP 1320 | Service Manual - Page 247
path 51 pickup roller 58 print cartridge area 49 printer 49 separation pad 63 clearing jams 170 clipped pages, troubleshooting 163 cold reset 189 Configuration page 37 configurations 2 consumables ordering 44, 198 recycling 15 status page 37 control panel lights and buttons 30 removing 93 covers - HP 1320 | Service Manual - Page 248
and Recycling Program 15 HP Technical Training 198 HP Toolbox Advanced Printer Settings 41 Alerts tab 40 browsers supported 38 Documentation tab 40 Information tab 41 Network window 41 operating systems supported 26, 38 Other links 39 Settings tab 41 Status tab 39 Troubleshooting tab 40 viewing 38 - HP 1320 | Service Manual - Page 249
cards, part numbers 199 Network Configuration page 37 ENWW network setup, troubleshooting 187 Network window, HP Toolbox 41 Networking tab, embedded Web server 43 noise specifications 10 NVRAM initialization 188 O on/off switch 3 online support 198 operating environment specifications operating - HP 1320 | Service Manual - Page 250
199 recycling 15 replacing 48 Toner light 30, 35 warranty 14 print quality, troubleshooting 162 print-cartridge door, removing 135 printer drivers Macintosh 27 Windows 25 printer, specifications 7 product registration 44 Q quality, troubleshooting printed pages 162 repetitive image defects 190 - HP 1320 | Service Manual - Page 251
timing chart 191 toner cleaning print cartridge area 49 loose, troubleshooting 166 redistributing 162 scattered, troubleshooting 169 smears, troubleshooting 165 specks, troubleshooting 163, 169 Toner light 30, 35 Toolbox Advanced Printer Settings 41 Alerts tab 40 browsers supported 38 Documentation - HP 1320 | Service Manual - Page 252
wavy pages, troubleshooting 146 Web sites, ordering parts 198 Windows HP Toolbox 39 software for 24 wire harnesses, replacing 80 wired network setup, troubleshooting 187 wireless communications card, removing 137 Wireless light 30, 35 wireless printing 45 wrinkled pages, troubleshooting 146 240 - HP 1320 | Service Manual - Page 253
- HP 1320 | Service Manual - Page 254
© 2004 Copyright Hewlett-Packard Development Company, L.P. www.hp.com/support/lj1160 www.hp.com/support/lj1320 *Q5927-90965* *Q5927-90965* Q5927-90965
-
 1
1 -
 2
2 -
 3
3 -
 4
4 -
 5
5 -
 6
6 -
 7
7 -
8
-
9
-
10
-
11
-
12
-
13
-
14
-
15
-
16
-
17
-
18
-
19
-
20
-
21
-
22
-
23
-
24
-
25
-
26
-
27
-
28
-
29
-
30
-
31
-
32
-
33
-
34
-
35
-
36
-
37
-
38
-
39
-
40
-
41
-
42
-
43
-
44
-
45
-
46
-
47
-
48
-
49
-
50
-
51
-
52
-
53
-
54
-
55
-
56
-
57
-
58
-
59
-
60
-
61
-
62
-
63
-
64
-
65
-
66
-
67
-
68
-
69
-
70
-
71
-
72
-
73
-
74
-
75
-
76
-
77
-
78
-
79
-
80
-
81
-
82
-
83
-
84
-
85
-
86
-
87
-
88
-
89
-
90
-
91
-
92
-
93
-
94
-
95
-
96
-
97
-
98
-
99
-
100
-
101
-
102
-
103
-
104
-
105
-
106
-
107
-
108
-
109
-
110
-
111
-
112
-
113
-
114
-
115
-
116
-
117
-
118
-
119
-
120
-
121
-
122
-
123
-
124
-
125
-
126
-
127
-
128
-
129
-
130
-
131
-
132
-
133
-
134
-
135
-
136
-
137
-
138
-
139
-
140
-
141
-
142
-
143
-
144
-
145
-
146
-
147
-
148
-
149
-
150
-
151
-
152
-
153
-
154
-
155
-
156
-
157
-
158
-
159
-
160
-
161
-
162
-
163
-
164
-
165
-
166
-
167
-
168
-
169
-
170
-
171
-
172
-
173
-
174
-
175
-
176
-
177
-
178
-
179
-
180
-
181
-
182
-
183
-
184
-
185
-
186
-
187
-
188
-
189
-
190
-
191
-
192
-
193
-
194
-
195
-
196
-
197
-
198
-
199
-
200
-
201
-
202
-
203
-
204
-
205
-
206
-
207
-
208
-
209
-
210
-
211
-
212
-
213
-
214
-
215
-
216
-
217
-
218
-
219
-
220
-
221
-
222
-
223
-
224
-
225
-
226
-
227
-
228
-
229
-
230
-
231
-
232
-
233
-
234
-
235
-
236
-
237
-
238
-
239
-
240
-
241
-
242
-
243
-
244
-
245
-
246
-
247
-
248
-
249
-
250
-
251
-
252
-
253
-
254
 |
 |
service
hp
LaserJet 1160 printer
hp
LaserJet 1320 series printer