HP 2133 External Devices - Windows Vista and Windows XP
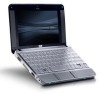
HP 2133 - Mini-Note - C7-M 1.6 GHz ULV Manual
 |
UPC - 884420156444
View all HP 2133 manuals
Add to My Manuals
Save this manual to your list of manuals |
HP 2133 manual content summary:
- HP 2133 | External Devices - Windows Vista and Windows XP - Page 1
External Devices User Guide - HP 2133 | External Devices - Windows Vista and Windows XP - Page 2
to change without notice. The only warranties for HP products and services are set forth in the express warranty statements accompanying such products and services. Nothing herein should be construed as constituting an additional warranty. HP shall not be liable for technical or editorial errors - HP 2133 | External Devices - Windows Vista and Windows XP - Page 3
Product notice This user guide describes features that are common to most models. Some features may not be available on your computer. iii - HP 2133 | External Devices - Windows Vista and Windows XP - Page 4
iv Product notice - HP 2133 | External Devices - Windows Vista and Windows XP - Page 5
and removing a USB device 2 Using USB legacy support ...2 2 Using external drives Using optional external devices ...4 Using an optional external MultiBay or external MultiBay II 4 3 Using an optional external optical drive (select models only) Inserting an optical disc (CD or DVD 6 Removing an - HP 2133 | External Devices - Windows Vista and Windows XP - Page 6
vi - HP 2133 | External Devices - Windows Vista and Windows XP - Page 7
1 Using a USB device Universal Serial Bus (USB) is a hardware interface that can be used to connect an optional external device, such as a USB keyboard, mouse, drive, printer, scanner, or hub. Some USB devices may require additional support software, which is usually included with the device. For - HP 2133 | External Devices - Windows Vista and Windows XP - Page 8
in the list. NOTE: If the USB device is not listed, you do not have to stop the device before you remove it. 3. Click Stop, and then click OK. 4. Remove the device. Using USB legacy support USB legacy support (enabled by default) permits the following actions: ● Using a USB keyboard, mouse, or hub - HP 2133 | External Devices - Windows Vista and Windows XP - Page 9
on the computer. NOTE: HP external USB optical drives should be connected to the powered USB port on the left side of the computer. USB drives include the following types: ● 1.44-megabyte diskette drive ● Hard drive module (a hard drive with an adapter attached) ● DVD-ROM Drive ● DVD/CD-RW Combo - HP 2133 | External Devices - Windows Vista and Windows XP - Page 10
software and drivers, or to learn which computer port to use, refer to the manufacturer's instructions. To connect an external device to the computer: CAUTION: To reduce the risk of damage to the equipment when connecting a powered device, be sure that the device is turned off and the AC power cord - HP 2133 | External Devices - Windows Vista and Windows XP - Page 11
provides power to the external optical drive when used with a powered USB cable. An external optical drive connected to the other USB port on the computer must be connected to AC power. An external optical drive, such as a DVD-ROM drive, supports optical discs (CDs and DVDs). These discs store or - HP 2133 | External Devices - Windows Vista and Windows XP - Page 12
CD or DVD) 1. Turn on the computer. 2. Press the release button (1) on the drive bezel to release the disc tray. 3. Pull out the tray (2). 4. Hold the disc by the edges to avoid touching the flat surfaces and position the disc label-side up over the tray spindle. NOTE the disc tray. NOTE: After you - HP 2133 | External Devices - Windows Vista and Windows XP - Page 13
a protective case. When the disc tray does not open 1. Insert the end of a paper clip (1) into the release access in the front bezel of the drive. 2. Press in gently on the paper clip until the tray is released, and then pull out the tray (2) until it stops. Removing an optical disc (CD or DVD - HP 2133 | External Devices - Windows Vista and Windows XP - Page 14
of the disc. Hold the disc by the edges and avoid touching the flat surfaces. NOTE: If the tray is not fully accessible, tilt the disc carefully as you remove it. 4. Close the disc tray and place the disc in a protective case. 8 Chapter 3 Using an optional external optical drive (select models only) - HP 2133 | External Devices - Windows Vista and Windows XP - Page 15
Index C cables USB 1 CD inserting 6 removing 7 CD drive 3, 5 D diskette drive 3 drives diskette 3 external 3 hard 3 MultiBay 4 optical 3, 5 DVD inserting 6 removing 7 DVD drive 3, 5 E external drive 3 external optical drive 5 H hard disk drive external 3 hard drive external 3 hubs 1 M MultiBay 4 O - HP 2133 | External Devices - Windows Vista and Windows XP - Page 16
-
 1
1 -
 2
2 -
 3
3 -
 4
4 -
 5
5 -
 6
6 -
 7
7 -
8
-
9
-
10
-
11
-
12
-
13
-
14
-
15
-
16
 |
 |

External Devices
User Guide