HP 24-e000 Graphics Card Replacement Instructions
HP 24-e000 Manual
 |
View all HP 24-e000 manuals
Add to My Manuals
Save this manual to your list of manuals |
HP 24-e000 manual content summary:
- HP 24-e000 | Graphics Card Replacement Instructions - Page 1
Graphics Card Replacement Instructions 936167-001 Before you begin Observe the following requirements before removing and replacing graphics cards. WARNING: To reduce the risk of serious injury or damage - HP 24-e000 | Graphics Card Replacement Instructions - Page 2
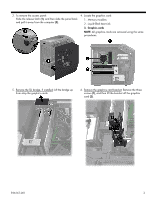
3. To remove the access panel: Slide the release latch (1), and then slide the panel back and pull it away from the computer (2). 4. Locate the graphics card: 1. Memory modules 2. Liquid-filled heat sink 3. Graphics cards NOTE: All graphics cards are removed using the same procedures. 5. Remove - HP 24-e000 | Graphics Card Replacement Instructions - Page 3
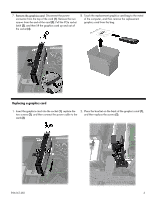
7. Remove the graphics card: Disconnect the power connector from the top of the card (1). Remove the two screws from the end of the card (2). Pull the PCIe socket latch (3), and then lift the graphics card up and out of the socket (4). 8. Touch the replacement graphics card bag to the metal of the - HP 24-e000 | Graphics Card Replacement Instructions - Page 4
button to turn on the computer. back of the computer. © Copyright 2017 HP Development Company, L.P. The information contained herein is subject to change without notice. The only warranties for HP products and services are set forth in the express warranty statements accompanying such products and
-
 1
1 -
 2
2 -
 3
3 -
 4
4
 |
 |
936167-001
1
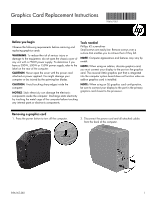
Graphics Card Replacement Instructions
Before you begin
Observe the following requirements before removing and
replacing graphics cards.
WARNING
: To reduce the risk of serious injury or
damage to the equipment, do not open the chassis cover of
any unit with a 750W power supply. To determine if you
have a 300W, 500W or 750W power supply, refer to the
label on the rear of the computer.
CAUTION
: Never open the cover with the power cord
attached or power applied. You might damage your
computer or be injured by the spinning fan blades.
CAUTION
: Avoid touching sharp edges inside the
computer.
NOTICE
: Static electricity can damage the electronic
components inside the computer. Discharge static electricity
by touching the metal cage of the computer before touching
any internal parts or electronic components.
Tools needed
Phillips #2 screwdriver
Small screws are easily lost. Remove screws over a
surface that enables you to retrieve them if they fall.
NOTE
: Computer appearance and features may vary by
model.
NOTE:
When using an add-on, discrete graphics card,
you must connect your display to the port on the graphics
card. The covered UMA graphics port that is integrated
into the computer system board does not function when an
add-on graphics card is installed.
NOTE:
When using an SLI graphics card configuration,
be sure to connect your display to the port in the primary
graphics card closest to the processor.
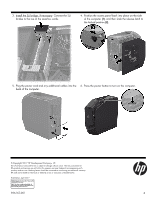
Removing a graphics card
1.
Press the power button to turn off the computer.
2.
Disconnect the power cord and all attached cables
from the back of the computer.
936167-001