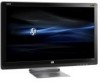
HP 2509m User's Guide 2309p, 2509p LCD Display
HP 2509m - 25" LCD Monitor Manual
 |
UPC - 884420934318
View all HP 2509m manuals
Add to My Manuals
Save this manual to your list of manuals |
HP 2509m manual content summary:
- HP 2509m | User's Guide 2309p, 2509p LCD Display - Page 1
User's Guide 2309P - HP 2509m | User's Guide 2309p, 2509p LCD Display - Page 2
HP products and services are set forth in the express warranty statements accompanying such products and services. Nothing herein should be construed as constituting an additional warranty. HP and used by Hewlett-Packard Company under license. HP supports lawful use of technology and does not endorse - HP 2509m | User's Guide 2309p, 2509p LCD Display - Page 3
Notational Conventions The following section describes notational conventions used in this document. Notes, Cautions, and Warnings Throughout this guide, blocks of text may be accompanied by an icon. These blocks are notes, cautions, and warnings, and they are used as follows: WARNING: Indicates - HP 2509m | User's Guide 2309p, 2509p LCD Display - Page 4
iv Features may vary by model. User's Guide - HP 2509m | User's Guide 2309p, 2509p LCD Display - Page 5
Function 4-2 Front-Panel Controls ...4-3 Using the On-screen Display (OSD) ...4-3 OSD Menu Selections ...4-4 Selecting Video Input Connectors ...4-7 Identifying Monitor Conditions ...4-7 Adjusting Screen Quality ...4-8 Optimizing Analog Video ...4-8 Power-Saver Feature ...4-8 User's Guide v - HP 2509m | User's Guide 2309p, 2509p LCD Display - Page 6
A Troubleshooting Solving Common Problems ...A-1 Getting Support from hp.com ...A-3 Preparing to Call Technical Support ...A-3 Locating the Rating Label...A-3 B Technical Specifications HP LCD Monitor ...B-1 Preset Video and High-Definition Modes B-2 LCD Monitor Quality and Pixel Policy...B-3 Power - HP 2509m | User's Guide 2309p, 2509p LCD Display - Page 7
HP LCD (liquid crystal display) monitors have an active matrix, thin-film transistor (TFT) screen. This guide discusses the following model: ■ 2309P LCD monitor Features ■ Large diagonal display ■ Optimum resolution: 1920 x 1080 @ 60Hz Plus full-screen support for lower resolutions ■ Video inputs - HP 2509m | User's Guide 2309p, 2509p LCD Display - Page 8
Product Features ■ CD included: ❏ Drivers ❏ Auto-adjustment software ❏ Documents ❏ Adobe® Acrobat® Reader ❏ Monitor pivot software 1-2 Features may vary by model. User's Guide - HP 2509m | User's Guide 2309p, 2509p LCD Display - Page 9
labeled as having this ability. Use a power strip whose manufacturer offers a damage replacement policy, so you can replace your equipment if surge protection fails. Safety Precautions ■ Use only a power source and connection compatible with this monitor, as indicated on the label/back plate - HP 2509m | User's Guide 2309p, 2509p LCD Display - Page 10
dealer, reseller, or service provider. ■ Adjust only those controls that are described in the operating instructions. ■ Turn your monitor off when not in use. You can substantially increase the life expectancy of the monitor by using a screen saver program and turning off the monitor when not in use - HP 2509m | User's Guide 2309p, 2509p LCD Display - Page 11
use CAUTION: The screen is fragile. Avoid touching or applying pressure to the LCD screen; doing so can cause damage. Unfold the monitor by lifting it from the top edge of the bezel. 1. Set the monitor screen face down on a flat, soft, protected surface. Monitor with folded base User's Guide 3-1 - HP 2509m | User's Guide 2309p, 2509p LCD Display - Page 12
Setting Up the Monitor 2. Grip the base near the bottom of the monitor with one hand and hold the top of the monitor with the other hand. Then lift the top part of the monitor until it is unfolded into the desired position. Lifting the monitor to the upright position 3. Lift the monitor to an - HP 2509m | User's Guide 2309p, 2509p LCD Display - Page 13
instructions supplied with the wall-mounting fixture and check that it is capable of supporting the monitor. 1. Disconnect the power cable and any other cables from the monitor. 2. Place the monitor face down on a flat, protected surface. 3. Remove the monitor base cover by inserting a screw driver - HP 2509m | User's Guide 2309p, 2509p LCD Display - Page 14
base. Lift the monitor base off the monitor. Removing the plate from the back of the monitor Four threaded holes are exposed. These holes are for screws to attach the swing arm or other mounting fixture to the back of the monitor. Threaded holes for attaching wall mount 6. Follow the instructions - HP 2509m | User's Guide 2309p, 2509p LCD Display - Page 15
card. Connectors are located on the back of the monitor. Be sure the computer and monitor are turned off and unplugged. Connecting the VGA or DVI-D monitor DVI-D connector and cable are included with select models only. NOTE: If you use a DVI-to-HDMI adapter, you must connect the green audio cable - HP 2509m | User's Guide 2309p, 2509p LCD Display - Page 16
Setting Up the Monitor Connecting the HDMI Cable (Select Models Only) Connect one end of the HDMI cable to the back of the monitor and the other end to a computer with an HDMI connector. Connecting the HDMI cable-connector locations may vary Audio and Video Cables and Adapters The following table - HP 2509m | User's Guide 2309p, 2509p LCD Display - Page 17
have an HDCP-enabled monitor, you may see a black screen or a lower resolution picture when playing high-definition protected content. Your computer graphic card and monitor must both support HDCP to display protected content. Connecting the Audio Cable Connect the built-in monitor speakers to the - HP 2509m | User's Guide 2309p, 2509p LCD Display - Page 18
Setting Up the Monitor Connecting the Power Cable 1. Read the warning below. WARNING: To reduce the risk of electric shock or damage to your equipment: ■ Do not disable the power cord grounding plug. The grounding plug is an important safety feature. Plug the power place anything on power cords or - HP 2509m | User's Guide 2309p, 2509p LCD Display - Page 19
Setting Up the Monitor Cable Management The HP LCD monitors have cable management. 1. Connect all necessary cables to the monitor. 2. Remove the cable management bracket from the base. 3. Gather the cables from both sides of the monitor and place them over the base. 4. Snap the cable management - HP 2509m | User's Guide 2309p, 2509p LCD Display - Page 20
Setting Up the Monitor Adjusting the Pivot The monitor may be pivoted to make it easy to plug in all the connections (select models only). 1. Face the front of the monitor and hold the base so that you do not topple the monitor while changing the pivot: Full pivot - the monitor pivots 90° to - HP 2509m | User's Guide 2309p, 2509p LCD Display - Page 21
Adjusting the monitor tilt Adjusting the Swivel The HP LCD monitor allows a usable range of motion with the swivel feature. Adjusting the monitor swivel CAUTION: To avoid breakage or other damage, avoid applying pressure to the LCD screen while swiveling it or changing the tilt. User's Guide 3-11 - HP 2509m | User's Guide 2309p, 2509p LCD Display - Page 22
Setting Up the Monitor Adjusting the Monitor Height The HP LCD monitor has a slider height adjustment mechanism with a locking feature. The range of the height adjustment is 4 inches (102 mm). 1. While holding the monitor base, push the monitor down to release the lock mechanism. 2. Move the monitor - HP 2509m | User's Guide 2309p, 2509p LCD Display - Page 23
to: http://www.hp.com/support 2. Select your country/region. 3. Select Download Drivers and Software. 4. Enter the model number of your monitor. The software-download pages for your monitor are displayed. 5. Download and install the driver and software files by using the instructions in the download - HP 2509m | User's Guide 2309p, 2509p LCD Display - Page 24
-in image damage may occur on monitors that display the same static image on screen for a prolonged period of time (12 consecutive hours of non-use). To avoid burn-in image damage on your monitor screen, you should always activate a screen saver application or turn off the monitor when it is not in - HP 2509m | User's Guide 2309p, 2509p LCD Display - Page 25
. Using the On-screen Display (OSD) An On-screen display is an image superimposed on a screen picture, commonly used by monitors, televisions, VCRs, and DVD players to display information such as volume, channel, and time. 1. If the monitor is not already on, press the Power button to turn on the - HP 2509m | User's Guide 2309p, 2509p LCD Display - Page 26
of the picture (VGA Input only). Clock Clock Phase Custom Scaling Sharpness Minimizes any vertical bars or strips visible on the screen background. Adjusting the clock will also change the horizontal screen image (VGA Input only). Adjusts the focus of the display. This adjustment allows you - HP 2509m | User's Guide 2309p, 2509p LCD Display - Page 27
View Volume Power Saver Mode Display Monitor Status Description (Continued) Selects the screen color. The factory default is 6500 K or Custom Color, depending on the model. Changes to slightly blueish white. Changes to slightly reddish white. Selects and adjusts your own color scales: R - Sets your - HP 2509m | User's Guide 2309p, 2509p LCD Display - Page 28
Monitor Icon Main Menu Options Management (continued) Source Control Information Factory Reset Submenu Options DDC/CI Support Bezel Power LED Sleep Timer DVI HDMI VGA Default Source Auto-Switch Source Current Settings Recommended Settings Serial Number FW Version Backlight Hours Service Support - HP 2509m | User's Guide 2309p, 2509p LCD Display - Page 29
input source may take several seconds. Identifying Monitor Conditions Special messages appear on the monitor screen for the following monitor conditions: ■ Input Signal Out of Range - Indicates the monitor does not support the video card's input signal because its resolution or refresh rate are set - HP 2509m | User's Guide 2309p, 2509p LCD Display - Page 30
" (Appendix B). The monitor also supports a power-saver mode that is controlled by the computer. When the monitor is in the reduced-power state, the monitor screen is blank, the backlight is off, and the Power light is amber. The monitor uses minimum power. When the monitor is "awakened," a brief - HP 2509m | User's Guide 2309p, 2509p LCD Display - Page 31
. Avoid applying pressure to the LCD screen; doing so can cause damage. Preparing the Monitor for Shipping 1. Disconnect the power, video, and audio cables from the monitor. 2. Set the monitor base on a soft, protected surface. Preparing the monitor for shipping 3. Hold the base with one hand, where - HP 2509m | User's Guide 2309p, 2509p LCD Display - Page 32
Preparing the Monitor for Shipping 5-2 Features may vary by model. User's Guide - HP 2509m | User's Guide 2309p, 2509p LCD Display - Page 33
. See "Setting Up the Monitor" for more information. Press a key on the keyboard or move the mouse to turn off the screen-blanking utility. Screen is black or displaying at a lower resolution while displaying high-definition (HD) content. Check if your monitor and computer support HDCP. Refer - HP 2509m | User's Guide 2309p, 2509p LCD Display - Page 34
. Refer to "Installing Drivers" in the Operating the Monitor chapter for more information. HP monitor drivers are also available at: http://www.hp.com/support Picture bounces, flickers, or wave pattern is present in the picture. Move electrical devices that may cause electrical interference as far - HP 2509m | User's Guide 2309p, 2509p LCD Display - Page 35
Troubleshooting Getting Support from hp.com Before you contact customer service, refer to HP Technical Support at: http://www.hp.com/support Select your country/region, and then follow the links to the support page for your monitor. Preparing to Call Technical Support If you cannot solve a problem - HP 2509m | User's Guide 2309p, 2509p LCD Display - Page 36
Troubleshooting A-4 Features may vary by model. User's Guide - HP 2509m | User's Guide 2309p, 2509p LCD Display - Page 37
may vary either higher or lower. HP LCD Monitor Face treatment: Glare polarizer with hard coating Input Terminals: ■ VGA connector (select models) ■ DVI-D 24-pin D-type connector (select models) ■ HDMI connector (select models) Specifications model 2309P Display Type: Viewable Image Size: Tilt - HP 2509m | User's Guide 2309p, 2509p LCD Display - Page 38
monitor automatically recognizes many preset video input modes that will appear properly sized and centered on the screen. Factory Preset Video Input Horizontal Frequency (kHz) 31.47 45.00 31.25 37.50 67.50 56.25 Vertical Frequency (Hz) 60 60 50 50 60 50 B-2 Features may vary by model. User - HP 2509m | User's Guide 2309p, 2509p LCD Display - Page 39
are made. For more information about your HP LCD Monitor, refer to the HP Web site at: http://www.hp.com/support Power Cord Set Requirements The monitor power supply is provided with Automatic Line Switching (ALS). This feature allows the monitor to operate on input voltages between 100-240Vv, 50/60 - HP 2509m | User's Guide 2309p, 2509p LCD Display - Page 40
Technical Specifications B-4 Features may vary by model. User's Guide - HP 2509m | User's Guide 2309p, 2509p LCD Display - Page 41
and used in accordance with the instructions, may cause harmful interference to radio radio or television reception, which can be determined by turning the equipment off and on, the user is encouraged Logo, United States Only This device complies with Part 15 of the FCC Rules. Operation is subject - HP 2509m | User's Guide 2309p, 2509p LCD Display - Page 42
This HP product contains mercury in the fluorescent lamp in the display LCD that might eiae.org). Chemical Substances HP is committed to providing our customers with information about the listed on the EU Declaration of Conformity issued by Hewlett-Packard for this product or product 's Guide - HP 2509m | User's Guide 2309p, 2509p LCD Display - Page 43
for the recycling of waste electrical and electronic equipment. The service or the shop where you purchased the product. Japanese Notice Japanese Power sale after July 1, 2006. To view the JIS-C-0950 material declaration for this product, visit www.hp.com/go/jisc0950 Korean Notice User's Guide - HP 2509m | User's Guide 2309p, 2509p LCD Display - Page 44
trademark owned by the U.S. government. HP Recycling Program HP offers product end-of-life return programs for HP and other manufacturers' hardware in several and local customer demand. For information on the HP recycling program, refer to the HP Web site at: http://www.hp.com/recycle Republic - HP 2509m | User's Guide 2309p, 2509p LCD Display - Page 45
biphenyls (PBB) Polybrominated diphenyl ethers (PBDE) Liquid Crystal Display X X O O O O Panel Chassis/Other X O O O O O O: Indicates that this toxic or hazardous substance contained in all of the homogeneous materials for this part is below the limit requirement in SJ/T11363-2006 - HP 2509m | User's Guide 2309p, 2509p LCD Display - Page 46
Agency Regulatory Notices C-6 Features may vary by model. User's Guide - HP 2509m | User's Guide 2309p, 2509p LCD Display - Page 47
B base unfolding 3-2 C cleaning 2-2 connecting audio cable 3-7 HDMI 3-6 power cable 3-8 VGA DVI-D 3-12 F features 1-1 front panel 4-3 H High-Bandwidth Digital Content Protection (HDCP) 3-7 I installing 3-1 - 3-12 K keyboard parking 3-12 M maintenance cleaning 2-2 guidelines 2-2 monitor conditions - HP 2509m | User's Guide 2309p, 2509p LCD Display - Page 48
Index T technical specifications B-1 - B-3 tilt adjustment 3-10 - 3-11 troubleshooting A-1 - A-3 U unpacking 3-1 V video and audio cables and adapters 3-6 video input connectors selecting 4-7 Part number: 537300-002 D-2 Features may vary by model. User's Guide
-
 1
1 -
 2
2 -
 3
3 -
 4
4 -
 5
5 -
 6
6 -
 7
7 -
8
-
9
-
10
-
11
-
12
-
13
-
14
-
15
-
16
-
17
-
18
-
19
-
20
-
21
-
22
-
23
-
24
-
25
-
26
-
27
-
28
-
29
-
30
-
31
-
32
-
33
-
34
-
35
-
36
-
37
-
38
-
39
-
40
-
41
-
42
-
43
-
44
-
45
-
46
-
47
-
48
 |
 |

User’s Guide
2309P