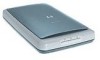
HP 3670 HP Scanjet 3670/3690 scanner - (English) Glass Cleaning Manual
HP 3670 - ScanJet - Flatbed Scanner Manual
 |
View all HP 3670 manuals
Add to My Manuals
Save this manual to your list of manuals |
HP 3670 manual content summary:
- HP 3670 | HP Scanjet 3670/3690 scanner - (English) Glass Cleaning Manual - Page 1
Glass Cleaning hp scanjet 3670/3690 scanner - HP 3670 | HP Scanjet 3670/3690 scanner - (English) Glass Cleaning Manual - Page 2
the glass requires you to disassemble the scanner. For instructions on cleaning the underside of your scanner glass, click on the name of your scanner model. Perform this procedure only if it is absolutely necessary. Disassemble the scanner in a clean, dust-free space. This module is organized into - HP 3670 | HP Scanjet 3670/3690 scanner - (English) Glass Cleaning Manual - Page 3
needed: • Phillips screwdriver Supplies needed: • Glass cleaner • Lint-free cloths 1 Disconnect the USB cable between the scanner and computer. 2 Disconnect the power supply from the scanner. Wait at least 15 minutes (after disconnecting power) before dissembling the scanner and cleaning the glass - HP 3670 | HP Scanjet 3670/3690 scanner - (English) Glass Cleaning Manual - Page 4
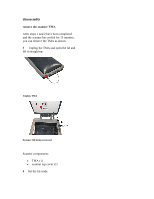
disassembly remove the scanner TMA After steps 1 and 2 have been completed and the scanner has cooled for 15 minutes, you can remove the TMA as shown. 3 Unplug the TMA and open the lid and lift it straight up. Unplug TMA Scanner lid being removed Scanner components: • TMA (1) • scanner top cover (2) - HP 3670 | HP Scanjet 3670/3690 scanner - (English) Glass Cleaning Manual - Page 5
the calibration strip ( the white strip under the glass) and render your scanner useless. If the cleaner gets in the calibration strip area, the scanner must be sent to hp for repair. 5 Apply glass cleaner to a soft lint-free cloth. Clean the plastic first. 6 Apply the glass cleaner sparingly to - HP 3670 | HP Scanjet 3670/3690 scanner - (English) Glass Cleaning Manual - Page 6
-fasten the top cover Begin disassembly only after completing steps 1 through 6 You are about to expose the interior of the scanner to the dust of the outside environment. the scanner is very sensitive to dust; any dust particles that get into the carriage head can cause streaks in the scanned image - HP 3670 | HP Scanjet 3670/3690 scanner - (English) Glass Cleaning Manual - Page 7
). Turn the top cover upside down and set it on a clean surface Dust will immediately begin accumulating in your scanner now that the top cover is off. Minimize the time the scanner base is exposed. Read all directions and have the necessary tools ready before removing the top cover. While the top - HP 3670 | HP Scanjet 3670/3690 scanner - (English) Glass Cleaning Manual - Page 8
scanner useless. If the cleaner gets in the calibration strip area, the scanner must be sent to hp for repair. 10 Apply glass cleaner sparingly to a soft, lint-free the scanner and slide the front of the top cover into bezel first and then lower the back into place. top cover being installed onto - HP 3670 | HP Scanjet 3670/3690 scanner - (English) Glass Cleaning Manual - Page 9
insert the screws 13 Re-insert and tighten the four screws with a Phillips screwdriver. Step #7 Insert the screws location of screws 14 Turn the unit over so that the glass side is facing up. - HP 3670 | HP Scanjet 3670/3690 scanner - (English) Glass Cleaning Manual - Page 10
the top cover and slide them in. scanner TMA being re-inserted in scanner Scanner components: • TMA (1) • scanner top cover (2) 16 Close the scanner TMA. reconnect your scanner You can now reconnect the USB cable and the power supply to the scanner. For instructions on connecting the cables see the
-
 1
1 -
 2
2 -
 3
3 -
 4
4 -
 5
5 -
 6
6 -
 7
7 -
8
-
9
-
10
 |
 |

Glass Cleaning hp scanjet 3670/3690 scanner