HP 8270 Getting Started - Enhanced for Accessibility
HP 8270 - ScanJet - Document Scanner Manual
 |
UPC - 882780135147
View all HP 8270 manuals
Add to My Manuals
Save this manual to your list of manuals |
HP 8270 manual content summary:
- HP 8270 | Getting Started - Enhanced for Accessibility - Page 1
Getting Started HP Compaq Business Notebook Series Document Part Number: 376311-001 November 2004 This guide explains how to set up your notebook hardware and software and begin using your notebook. Enhanced for Accessibility. - HP 8270 | Getting Started - Enhanced for Accessibility - Page 2
and services. Nothing herein should be construed as constituting an additional warranty. HP shall not be liable for technical or editorial errors or omissions contained herein. Getting Started HP Compaq Business Notebook Series First Edition November 2004 Reference Number: nx9600 Document Part - HP 8270 | Getting Started - Enhanced for Accessibility - Page 3
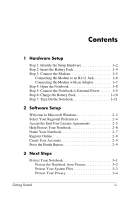
an Adapter 1-7 Step 4: Open the Notebook 1-8 Step 5: Connect the Notebook to External Power 1-9 Step 6: Charge the Battery Pack 1-10 Step 7: Turn On the Notebook 1-11 2 Software Setup Welcome to Microsoft Windows 2-2 Select Your Regional Preferences 2-4 Accept the End-User License Agreements - HP 8270 | Getting Started - Enhanced for Accessibility - Page 4
Up Internet Service 3-10 Preview the Help and Support Guide 3-12 4 Notebook Tour Top Components 4-2 TouchPad 4-2 Keys 4-4 Power Control 4-5 Components 4-17 Cables and Cord 4-18 Adapters and Battery Pack 4-19 Labels 4-20 Restoration and Documentation Discs 4-21 Index iv Getting Started - HP 8270 | Getting Started - Enhanced for Accessibility - Page 5
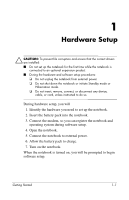
■ During the hardware and software setup procedures: ❏ Do not unplug the notebook from external power. ❏ Do not shut down the notebook or initiate Standby mode or Hibernation mode. ❏ Do not insert, remove, connect, or disconnect any device, cable, or cord, unless instructed to do so. During hardware - HP 8270 | Getting Started - Enhanced for Accessibility - Page 6
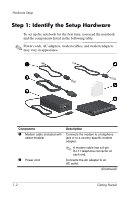
in the following table. ✎ Power cords, AC adapters, modem cables, and modem adapters may vary in appearance. Component 1 Modem cable (included with select models) 2 Power cord Description Connects the modem to a telephone jack or to a country-specific modem adapter. ✎ A modem cable has a 6-pin - HP 8270 | Getting Started - Enhanced for Accessibility - Page 7
Network cable (not included) Description Converts AC power to DC power. Connects the notebook to a network jack. 5 Country-specific modem adapter (included by region as required) 6 Battery pack ✎ A network cable has an 8-pin RJ-45 network connector at each end. Adapts the modem cable to a non-RJ - HP 8270 | Getting Started - Enhanced for Accessibility - Page 8
battery pack is firmly seated. Ä CAUTION: To ensure that the correct drivers load and to prevent file corruption or damage to components, do not remove the battery pack until the notebook has been connected to external power. To insert the battery pack: 1. Turn the notebook upside down - HP 8270 | Getting Started - Enhanced for Accessibility - Page 9
information about DSL, cable, and network connections, select Start > Help and Support. The Help and Support utility provides hardware and software information, instructions, tutorials, and wizards that can help you set up or troubleshoot a variety of connections. ✎ It may be easier to connect your - HP 8270 | Getting Started - Enhanced for Accessibility - Page 10
Hardware Setup Connecting the Modem to an RJ-11 Jack To connect the modem to an analog telephone line that has an RJ-11 telephone jack: 1. Turn the notebook display-side up on a flat surface near an RJ-11 telephone wall jack. 2. If your modem cable has noise suppression circuitry 1, which prevents - HP 8270 | Getting Started - Enhanced for Accessibility - Page 11
on the notebook 2. 4. Plug the other end of the modem cable into the country-specific modem adapter 3. 5. Plug the country-specific modem adapter into the telephone wall jack 4. ✎ Telephone wall jacks, modem adapters, and modem cables vary in appearance by region and country. Getting Started 1-7 - HP 8270 | Getting Started - Enhanced for Accessibility - Page 12
Hardware Setup Step 4: Open the Notebook To open the notebook: 1. Place the notebook display-side up on a flat surface near an electrical outlet. 2. Press the display release button 1, and then lift the display 2. 1-8 Getting Started - HP 8270 | Getting Started - Enhanced for Accessibility - Page 13
Hardware Setup Step 5: Connect the Notebook to External Power To connect the notebook to external power: 1. Plug the AC adapter cable into the power connector 1. 2. Plug the power cord into the AC adapter 2, and then into an electrical outlet 3. The battery light is turned on and the battery pack - HP 8270 | Getting Started - Enhanced for Accessibility - Page 14
begins to charge as soon as the notebook is connected to external power. Charge status is indicated by the battery light, which remains on is charging. It is recommended that you leave the notebook connected to external power until the battery pack is fully charged and the battery light is turned - HP 8270 | Getting Started - Enhanced for Accessibility - Page 15
notebook 2 are turned on and you are prompted to begin software setup. ✎ The power/standby button light and the power/standby light display the same information. The power/standby button light is visible only when the notebook is open; the power/standby light is visible when the notebook is open or - HP 8270 | Getting Started - Enhanced for Accessibility - Page 16
Hardware Setup If the notebook does not power up: ■ Make sure the AC adapter is securely plugged into the notebook and an electrical outlet. ■ Make sure the electrical outlet is providing power. (To confirm that the outlet is providing power, plug another device into the outlet.) ■ If you have - HP 8270 | Getting Started - Enhanced for Accessibility - Page 17
. You can also change or add any settings you select or skip during the setup process. For instructions, refer to Chapter 2, "Managing Your Software," in the Help and Support Guide included with your notebook. Although you can register and set preferences later, it is usually easier and faster - HP 8270 | Getting Started - Enhanced for Accessibility - Page 18
are indicated by an hourglass icon. Welcome to Microsoft Windows The first window in software setup is Welcome to Microsoft Windows. This window welcomes you to your Microsoft® Windows® operating system and introduces you to software setup navigation: ■ To display additional information about the - HP 8270 | Getting Started - Enhanced for Accessibility - Page 19
Software Setup ■ To return to the previous window: Select the Back button in the lower-left corner of the window. (This button is unavailable on the first window, Welcome to Microsoft Windows.) ■ To skip a window without entering a preference: Select the Skip button in the lower-right corner of the - HP 8270 | Getting Started - Enhanced for Accessibility - Page 20
Software Setup Select Your Regional Preferences The next 2 windows prompt you to confirm or select regional preferences. Regional preferences are preset for the country in which you purchased the notebook. ■ Dates and currency window-The operating system will format dates and currency according to - HP 8270 | Getting Started - Enhanced for Accessibility - Page 21
Setup Accept the End-User License Agreements In the End-User License Agreement window, you must accept both the Microsoft End-User License Agreement and the HP Software Product License Agreement to continue with software setup. ■ To accept both agreements: Select Yes, I accept them, and then - HP 8270 | Getting Started - Enhanced for Accessibility - Page 22
Software Setup Help Protect Your Notebook In the Help protect your PC window, you can choose to have your notebook automatically download and install Windows updates as they become available. The Automatic Updates feature helps protect your notebook by providing important security enhancements. It - HP 8270 | Getting Started - Enhanced for Accessibility - Page 23
Software Setup Name Your Notebook If you plan to include your notebook on a home network, your notebook must have a unique name. In the What's your computer's name? window, you can retain the default name shown in the Computer name text field or choose another name. For example, you may want to base - HP 8270 | Getting Started - Enhanced for Accessibility - Page 24
Software Setup Register Online In the Register Online with Hewlett-Packard window, you can ■ Register your notebook-Complete to the Internet by another method, the Connecting to online registration window is displayed. This window describes the progress of your registration. If you are unable to - HP 8270 | Getting Started - Enhanced for Accessibility - Page 25
then select Finish. (Your notebook saves your preferences, and then restarts in Windows.) 2. Select your user account. (You are ready to begin using your notebook.) ✎ To protect your notebook and gain Internet access to software updates and online assistance, it is recommended that you follow the - HP 8270 | Getting Started - Enhanced for Accessibility - Page 26
- HP 8270 | Getting Started - Enhanced for Accessibility - Page 27
Steps ✎ All software instructions in your notebook documentation describe Microsoft® Windows® XP procedures based on the default Windows XP category view. For information about switching between Windows XP classic view and Windows XP category view, select Start > Help and Support > Customizing your - HP 8270 | Getting Started - Enhanced for Accessibility - Page 28
your operating system, applications, or utilities or cause them to function abnormally. Antivirus software can detect most viruses, destroy software: » Select Start > All Programs > Norton AntiVirus >Help and Support. For more information about computer viruses: 1. Select Start > Help and Support - HP 8270 | Getting Started - Enhanced for Accessibility - Page 29
not affect documents or e-mails that you saved after that time. All System Restore procedures are reversible. Setting a Restore Point To set a system restore point manually: 1. Select Start > Help and Support > System Restore. 2. Select Create a restore point, and then follow the instructions on the - HP 8270 | Getting Started - Enhanced for Accessibility - Page 30
point: 1. Make sure the notebook is connected to reliable external power through the AC adapter. 2. Select Start > Help and Support > System Restore. 3. Select Restore my computer to an earlier time, and then follow the instructions on the screen. Protect Your Privacy When you use the notebook - HP 8270 | Getting Started - Enhanced for Accessibility - Page 31
their Web site. To update your system using the Critical Security Updates for Windows XP disc: 1. Insert the disc into the drive. (The disc automatically runs the installation application.) 2. Follow the on-screen instructions to install all updates. (This may take a few minutes.) 3. Remove the disc - HP 8270 | Getting Started - Enhanced for Accessibility - Page 32
the firewall. To permanently resolve the problem, reconfigure the firewall. Protect the Notebook from Power Surges To protect the notebook from the power surges that may be caused by an uncertain power supply or an electrical storm: ■ Plug the notebook power cord into an optional, high-quality - HP 8270 | Getting Started - Enhanced for Accessibility - Page 33
, health, and work habits for computer users. The Safety and Comfort Guide also provides important electrical and mechanical safety information. This guide is located on the Web at http://www.hp.com/ergo, on the notebook hard drive, and on the Notebook Documentation CD that is included with the - HP 8270 | Getting Started - Enhanced for Accessibility - Page 34
Windows power/standby button for at least 4 seconds. ■ Unplug the notebook from external power by unplugging the power cord from the electrical outlet. Then remove the battery pack. For instructions on removing the battery pack, refer to the Hardware and Software Guide on the Notebook Documentation - HP 8270 | Getting Started - Enhanced for Accessibility - Page 35
about modem, wireless, cable, DSL and network connections, select Start > Help and Support. The Help and Support utility provides hardware and software information, instructions, tutorials, and wizards that can help you set up or troubleshoot a variety of connections. Getting Started 3-9 - HP 8270 | Getting Started - Enhanced for Accessibility - Page 36
by using the Easy Internet Sign-up utility or an ISP-provided icon on your desktop. In all locations, you can set up Internet service by using the Windows Internet Connection wizard. Using Easy Internet Sign-Up If the Easy Internet Sign-Up utility is supported in the country in which you purchased - HP 8270 | Getting Started - Enhanced for Accessibility - Page 37
ISP and the ISP has provided you with such information as a specific IP address, and POP3 and SMTP settings. To access the Internet Connection wizard and instructions for using the wizard: 1. Select Start > Help and Support. 2. In the Search text field, type Make an Internet connection. 3. Select - HP 8270 | Getting Started - Enhanced for Accessibility - Page 38
setup, and setting additional preferences. ■ Instructions for installing additional software. ■ Tips for quick troubleshooting. ■ Procedures for repairing or reinstalling your drivers, operating system, and other preinstalled software. By previewing the Help and Support Guide now, you will know how - HP 8270 | Getting Started - Enhanced for Accessibility - Page 39
out how to use a feature, such as hotkeys, or to find out about a general topic, such as Standby or Hibernation, refer to the Hardware and Software Guide on the Notebook Documentation CD. Getting Started 4-1 - HP 8270 | Getting Started - Enhanced for Accessibility - Page 40
Notebook Tour Top Components TouchPad Component 1 TouchPad light 2 TouchPad* 3 Left and right TouchPad buttons (2)* 4 TouchPad left/right scroll zone* Description On: TouchPad is enabled. Moves the pointer and selects or activates items on the screen. Function like the left and right buttons on an - HP 8270 | Getting Started - Enhanced for Accessibility - Page 41
. 6 TouchPad button Enables/disables the TouchPad. *This table describes default settings. For information about changing the functions of TouchPad features, refer to the Hardware and Software Guide on the Notebook Documentation CD. Getting Started 4-3 - HP 8270 | Getting Started - Enhanced for Accessibility - Page 42
. For more information, refer to the Hardware and Software Guide on the Notebook Documentation CD. Combines with other keys to perform system tasks, and activates hotkeys. For example, pressing fn+f8 increases screen brightness. Displays the Windows Start menu. Displays a shortcut menu for items - HP 8270 | Getting Started - Enhanced for Accessibility - Page 43
and hold the power/standby button for at least 4 seconds to turn off the notebook. *This table describes default settings. For information about changing the function of the power/standby button or display switch, refer to the Hardware and Software Guide on the Notebook Documentation CD. Getting - HP 8270 | Getting Started - Enhanced for Accessibility - Page 44
Notebook Tour Lights Component 1 Caps lock light 2 Num lock light 3 Wireless light Description On: Caps lock is on. On: Num lock or the numeric keypad is on. On: An integrated wireless device has been enabled (select models only). 4-6 Getting Started - HP 8270 | Getting Started - Enhanced for Accessibility - Page 45
Buttons Notebook Tour Component 1 Volume down button 2 Volume up button 3 Volume mute button 4 Wireless button Description Decreases system volume. Increases system volume. Mutes or restores system volume. Turns the wireless network device on and off (select models only). Getting Started 4-7 - HP 8270 | Getting Started - Enhanced for Accessibility - Page 46
Notebook Tour Front Components Component 1 Display release button 2 Stereo speakers (2) 3 Wireless light 4 Power/standby light 5 IDE (Integrated Drive Electronics) drive light 6 Battery light Description Opens the notebook. Produce stereo sound. On: An integrated wireless device has been enabled ( - HP 8270 | Getting Started - Enhanced for Accessibility - Page 47
Rear Components Connectors, Jacks and Ports Notebook Tour Component 1 Power connector 2 USB port 3 S-Video-out jack 4 External monitor port 5 Security cable slot Description Connects an AC adapter. Connects an optional 1.1- or 2.0-compliant USB device. Connects an optional S-Video device, such as - HP 8270 | Getting Started - Enhanced for Accessibility - Page 48
Vent Component Exhaust vent Description Provides airflow to cool internal components. Ä To prevent overheating, do not obstruct vents. Do not allow a hard surface, such as a printer, or a soft surface, such as a pillow, blanket, rug, or thick clothing, to block airflow. 4-10 Getting Started - HP 8270 | Getting Started - Enhanced for Accessibility - Page 49
2.0-compliant USB device. Connects an optional monaural microphone. Connects optional headphones or powered stereo speakers. Also connects the audio function of an audio/video device such as a television or VCR. Supports an optical disc. 5 Optical drive release button Opens the optical drive. *The - HP 8270 | Getting Started - Enhanced for Accessibility - Page 50
Vent Component Exhaust vent Description Provides airflow to cool internal components. Ä To prevent overheating, do not obstruct vents. Do not allow a hard surface, such as a printer, or a soft surface, such as a pillow, blanket, rug, or thick clothing, to block airflow. 4-12 Getting Started - HP 8270 | Getting Started - Enhanced for Accessibility - Page 51
Pro, MultiMediaCard, xD-Picture Card, and SmartMedia card. Ejects an optional PC Card from the PC Card slot. Supports an optional Type I or Type II 32-bit (CardBus) or 16-bit PC Card. Supports an optional ExpressCard. Supports an optional HP USB Digital Drive. (Continued) Getting Started 4-13 - HP 8270 | Getting Started - Enhanced for Accessibility - Page 52
Tour Component Description 6 Digital drive eject button Ejects an optional HP USB Digital Drive from the digital drive bay. 7 USB expansion product. For more information, refer to the Hardware and Software Guide on the Notebook Documentation CD. *The notebook has only one expansion port. The - HP 8270 | Getting Started - Enhanced for Accessibility - Page 53
Notebook Tour Bottom Components Bays and Memory Compartment Component 1 Memory compartment 2 Battery pack release latch 3 Battery bay 4 Hard drive bay Description Contains 2 memory slots. Depending on the model, when the notebook is shipped, either one or both memory slots are filled with a - HP 8270 | Getting Started - Enhanced for Accessibility - Page 54
Tour Vents Component Vents (8) Description Provide airflow to cool internal components. Ä To prevent overheating, do not obstruct vents. Do not allow a hard surface, such as a printer, or a soft surface, such as a pillow, blanket, rug, or thick clothing, to block airflow. 4-16 Getting Started - HP 8270 | Getting Started - Enhanced for Accessibility - Page 55
Notebook Tour Additional Standard Components The components included with the notebook vary by region, country, notebook model, and the optional hardware ordered. The following sections identify the standard external accessories and components included with most notebook models. Getting Started 4- - HP 8270 | Getting Started - Enhanced for Accessibility - Page 56
with select models) Description Connects the notebook to a telephone jack or to a country-specific modem adapter. ✎ A modem cable has a 6-pin RJ-11 telephone connector at each end. 2 Power cord* Connects the AC adapter to an AC outlet. 3 Network cable (not included) Connects the notebook to - HP 8270 | Getting Started - Enhanced for Accessibility - Page 57
appearance may vary. Notebook Tour Component 1 AC adapter 2 Country-specific modem adapter (included by region as required) 3 Battery pack Description Converts AC power to DC power. Adapts the modem cable to a non-RJ-11 telephone jack. Provides power to the notebook when the notebook is not - HP 8270 | Getting Started - Enhanced for Accessibility - Page 58
Key number. You may need this number to update or troubleshoot problems with the operating system. ■ The system label provides support. ■ The modem approvals label, which is located inside the hard drive cover, provides regulatory information. ■ Wireless certification labels, which are specific - HP 8270 | Getting Started - Enhanced for Accessibility - Page 59
about the notebook, refer to the Notebook Documentation CD, which includes this guide and the following guides: ❏ Maintenance, Shipping and Travel ❏ Troubleshooting ❏ Modem and Networking ❏ Regulatory and Safety Notices ❏ Safety and Comfort Guide ❏ Help and Support Guide Getting Started 4-21 - HP 8270 | Getting Started - Enhanced for Accessibility - Page 60
- HP 8270 | Getting Started - Enhanced for Accessibility - Page 61
category view, Windows XP 3-1 charging battery pack 1-10 classic view, Windows XP 3-1 communication hardware, enabling 3-9 compartment, memory 4-15 connecting to power 1-9 connecting to the Internet 3-9 connector, power 1-9 country-specific modem adapter 1-3, 4-19 creating user accounts 2-9 Critical - HP 8270 | Getting Started - Enhanced for Accessibility - Page 62
Support Guide 3-12, 4-21 Help and Support utility 1-5, 3-9, 3-12 help, documentation 4-21 Hibernation initiating 4-5 restoring 4-5 hotkeys 4-4 HP Software Product License Agreement 2-5 I IDE drive light 4-8 intake vents 4-16 Internet Connection wizard 3-11 Internet service, setting up 3-10 Internet - HP 8270 | Getting Started - Enhanced for Accessibility - Page 63
10, 4-8 caps lock 4-6 IDE drive 4-8 num lock 4-6 power/standby 4-8 TouchPad 4-2 wireless 4-6 locked system 3-8, 4-5 M Maintenance, Shipping and Travel guide End-User License Agreement 2-5 modem connecting 1-5 enabling 3-9 modem adapter connecting 1-7 identifying 1-3, 4-19 Modem and Networking guide - HP 8270 | Getting Started - Enhanced for Accessibility - Page 64
drive release button 4-11 optical drives 4-11 P PC Card eject button 4-13 PC Card slot 4-13 ports 1394 4-14 expansion port 2 4-14 external monitor 4-9 USB 4-9, 4-11, 4-14 See also jacks power connecting 1-9 safety 3-7 power connector 1-9, 4-9 power cord connecting 1-9 identifying 1-2, 4-18 See also - HP 8270 | Getting Started - Enhanced for Accessibility - Page 65
1-12 Troubleshooting guide 4-21 turning off notebook 3-8 turning on notebook 1-11 U USB ports 4-9, 4-11, 4-14 user accounts 2-9 V vents bottom 4-16 left-side 4-12 rear 4-10 virus protection 3-2 volume buttons 4-7 W Welcome to Microsoft Windows window 2-2 Windows applications key 4-4 Windows logo key - HP 8270 | Getting Started - Enhanced for Accessibility - Page 66
Index Windows XP category view 3-1 classic view 3-1 wireless button 4-7 wireless certification labels 4-20 wireless devices, enabling 3-9 wireless light 4-6 X xD-Picture Card 4-13 Index-6 Getting Started
-
 1
1 -
 2
2 -
 3
3 -
 4
4 -
 5
5 -
 6
6 -
 7
7 -
8
-
9
-
10
-
11
-
12
-
13
-
14
-
15
-
16
-
17
-
18
-
19
-
20
-
21
-
22
-
23
-
24
-
25
-
26
-
27
-
28
-
29
-
30
-
31
-
32
-
33
-
34
-
35
-
36
-
37
-
38
-
39
-
40
-
41
-
42
-
43
-
44
-
45
-
46
-
47
-
48
-
49
-
50
-
51
-
52
-
53
-
54
-
55
-
56
-
57
-
58
-
59
-
60
-
61
-
62
-
63
-
64
-
65
-
66
 |
 |

Getting Started
HP Compaq Business Notebook Series
Document Part Number: 376311-001
November 2004
This guide explains how to set up your notebook hardware and
software and begin using your notebook.
Enhanced for Accessibility.