HP CH336A HP Designjet 510 Printer series - Quick Reference Guide
HP CH336A - DesignJet 510 Color Inkjet Printer Manual
 |
UPC - 884420476306
View all HP CH336A manuals
Add to My Manuals
Save this manual to your list of manuals |
HP CH336A manual content summary:
- HP CH336A | HP Designjet 510 Printer series - Quick Reference Guide - Page 1
HP Designjet 5xx Printer series Pocket Guide Contents • Basic operations........... 3 • Troubleshooting.......... 17 • Maintenance 22 • Legal information........ 27 - HP CH336A | HP Designjet 510 Printer series - Quick Reference Guide - Page 2
instructions, for additional information on how to use your printer, please refer to the User's Reference Guide, which is on the Using Your Printer CD You may also find other information about HP Designjet printers, associated software, troubleshooting and support at this HP Web site: http://www.hp - HP CH336A | HP Designjet 510 Printer series - Quick Reference Guide - Page 3
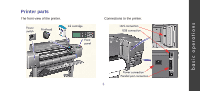
basic operations Printer parts The front view of the printer. Power switch Printhead Ink cartridge Front panel Connections to the printer. LAN connection USB connection Power connection Parallel port connection 3 - HP CH336A | HP Designjet 510 Printer series - Quick Reference Guide - Page 4
Switch on / switch off • The printer is turned on as soon as it is connected to the A/C supply with the power cord Switch off the printer 1 Press the power switch on the front of the printer. 2 Disconnect the power cord from the A/C supply. 4 - HP CH336A | HP Designjet 510 Printer series - Quick Reference Guide - Page 5
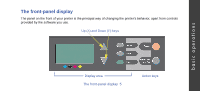
The front-panel display The panel on the front of your printer is the principal way of changing the printer's behavior, apart from controls provided by the software you use. Up (Δ) and Down (∇) keys basic operations Display area The front-panel display 5 Action keys - HP CH336A | HP Designjet 510 Printer series - Quick Reference Guide - Page 6
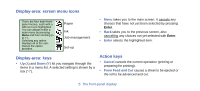
a menu list. A selected setting is shown by a tick ("√"). Action keys • Cancel cancels the current operation (printing or preparing for printing). • Form Feed and Cut causes a sheet to be ejected or the roll to be advanced and cut. 6 The front-panel display - HP CH336A | HP Designjet 510 Printer series - Quick Reference Guide - Page 7
basic operations Installing a new roll on the printer 1 At the back of the printer, remove the empty spindle by pulling firmly on each end as Remove the blue colored stop from the end of the spindle, and stand the spindle vertically, with the fixed stop on the floor. Installing a new roll on the - HP CH336A | HP Designjet 510 Printer series - Quick Reference Guide - Page 8
colored roll stop on the right (as seen from the back of the printer), slide the spindle into the Loading a roll of paper 1 Select the Paper of paper and press Enter. The front panel displays Lift blue lever. 2 1 printer left (1) and then right (2), as shown by the arrows. The paper should be - HP CH336A | HP Designjet 510 Printer series - Quick Reference Guide - Page 9
or wear cotton gloves. Skin oils can interact with the ink and cause it to smear. The front panel displays: 8 At the front of the printer, align the paper against the blue line as shown here: 9 Lower the blue paper-load lever. Try to avoid touching the paper in the middle - HP CH336A | HP Designjet 510 Printer series - Quick Reference Guide - Page 10
panel displays help instructions. 11 The printer trims the edge of the roll... 12 ...and then displays: 13 When the front panel displays the following, the printer is ready to print. If the print is large, open the paper bin. For paper load problems, please refer to the User's Reference Guide. 10 - HP CH336A | HP Designjet 510 Printer series - Quick Reference Guide - Page 11
time to dry could get damaged. To unload a roll from the printer: select Unload roll from the front-panel Paper menu; lift the blue rollers. 7 The front panel displays: Loading a sheet of paper 1 Select the Paper menu and press Enter. 2 Select Load sheet and press Enter: 3 Select paper type and - HP CH336A | HP Designjet 510 Printer series - Quick Reference Guide - Page 12
under the rollers. The front and right edges should be aligned with the blue lines on the platen. Air suction holds the paper onto the printer throughout the next few steps. Blue reference lines 12 Loading - HP CH336A | HP Designjet 510 Printer series - Quick Reference Guide - Page 13
paper. Please wait. The printer now: • loads the sheet • checks the alignment of the paper. If the sheet is correctly aligned, the printer accepts the single sheet and gives a "beep". If it is not correctly aligned, the sheet is ejected; the front panel displays help instructions. 11 When the front - HP CH336A | HP Designjet 510 Printer series - Quick Reference Guide - Page 14
other files. Ink cartridges and printheads Note: Setup printheads are special non-printing components required only before installing the printer. Ink Cartridges: Your printer uses HP No. 10 Black and HP No. 82 Cyan, Magenta and Yellow Printheads: Your printer uses HP No. 11 Black, Cyan, Magenta - HP CH336A | HP Designjet 510 Printer series - Quick Reference Guide - Page 15
basic operations Replacing ink cartridges If the printer detects that an ink cartridge needs replacing, you will see a message with four icons (explained below), referring from left to right to the Cyan, Black, - HP CH336A | HP Designjet 510 Printer series - Quick Reference Guide - Page 16
point towards the front of the printer. 4 When all cartridges are successfully installed the icons stop flashing; press Enter on the front panel (or await the time-out). 5 Close the ink cartridge cover. You will see the frontpanel message "HP ink cartridges successfully installed" You can - HP CH336A | HP Designjet 510 Printer series - Quick Reference Guide - Page 17
error messages you could encounter while using the printer. For more detailed troubleshooting information of all kinds, please see the User's Reference Guide on CD. Message Error Select Replace Printheads Explanation and action One or more of the printheads is missing or has an error, as indicated - HP CH336A | HP Designjet 510 Printer series - Quick Reference Guide - Page 18
and Yellow cartridges. Open the window and check the printhead cover. Note: This message may also appear following a paper jam, as the printer cannot detect the exact reason for the problem. In this case you may have to power off the printer and even remove the power cable from the machine, in - HP CH336A | HP Designjet 510 Printer series - Quick Reference Guide - Page 19
menu) to Fast or Normal instead of Best. If the problem persists, you may have to add more memory to the formatter card that is installed in the back of the printer. The printer ran out of paper while printing the calibration pattern. Load a sheet or roll that is at least 65 cm (25 inches) long - HP CH336A | HP Designjet 510 Printer series - Quick Reference Guide - Page 20
was unable to clean the printheads fully. You should use the Troubleshooting routine to correct any image quality problems that may be apparent; alternatively, you should replace the printheads (see page 23). Roll edge not found During the loading of a roll, the printer cannot detect the side - HP CH336A | HP Designjet 510 Printer series - Quick Reference Guide - Page 21
troubleshooting Message Warning! Machine calibrations need to be performed. Refer to guide for instructions. Warning: printheads not aligned Explanation and action The color calibrations for the paper that is loaded have been lost. Repeat color and advance calibrations. The printer has detected - HP CH336A | HP Designjet 510 Printer series - Quick Reference Guide - Page 22
advised". When this message is displayed, contact HP to purchase the Maintenance service for continued troublefree use of your printer. If no maintenance is performed, your printer will continue to function, but operational or print-quality problems may occur. Color calibration 1 From the main - HP CH336A | HP Designjet 510 Printer series - Quick Reference Guide - Page 23
menu, select Ink System ( ) and press Enter. 2 Select Replace Printheads and press Enter. 3 Wait for the front panel to display "Open window to replace printheads". Then open the window and locate the carriage assembly. 4 Release the latch on the printhead cover. You may need to hold this latch up - HP CH336A | HP Designjet 510 Printer series - Quick Reference Guide - Page 24
the carriage assembly. 7 Remove the tape from the new printheads. 8 Insert a new printhead, ensuring that the colored label on the printhead corresponds to that on the printhead slot. 9 When you have replaced all printheads that need replacing, pull the printhead cover down over the printheads. 24 - HP CH336A | HP Designjet 510 Printer series - Quick Reference Guide - Page 25
printheads, the printer checks that they are all functioning correctly; this may take several minutes. You will see the front-panel message "HP No. 11 printheads successfully installed". Then the printhead takes about 11 minutes and can correct problems that occur with alignment across the width - HP CH336A | HP Designjet 510 Printer series - Quick Reference Guide - Page 26
size, loaded in landscape mode. Two separate prints are made. Not all paper types are supported for alignment; the printer will tell you if you load the wrong type. Among those supported are: Bright White Inkjet Paper, Coated Paper, Heavy Coated Paper and Plain paper. 26 Aligning printheads - HP CH336A | HP Designjet 510 Printer series - Quick Reference Guide - Page 27
HP's limited warranty applies only to a failure to execute programming instructions. HP does parts, or supplies not provided or supported by HP; or c Operation outside the product's specifications. 4 For HP printer products, the use of a refilled or non-original HP consumable product (ink, printhead - HP CH336A | HP Designjet 510 Printer series - Quick Reference Guide - Page 28
warranty services, such as on-site service, may be available for any authorized HP service facility where the listed HP product is distributed by HP or WHETHER EXPRESS OR IMPLIED, WITH RESPECT TO THE HP PRODUCTS, AND SPECIFICALLY DISCLAIM THE IMPLIED WARRANTIES OR CONDITIONS OF MERCHANTABILITY, - HP CH336A | HP Designjet 510 Printer series - Quick Reference Guide - Page 29
not be confused with the marketing name (such as HP Designjet 4500) or product numbers (such as Z####X where local city office, your household waste disposal service or the shop where you purchased the Use of shielded data cables is required to comply with the Class B limits of Part 15 of the - HP CH336A | HP Designjet 510 Printer series - Quick Reference Guide - Page 30
Class B digital device, pursuant to part 15 of the FCC Rules. in accordance with the instructions, may cause harmful interference Identify and Resolve Radio-TV Interference Problems. This booklet is available from the status of this product, see http://www.hp.com/go/energystar/. ENERGY STAR and the - HP CH336A | HP Designjet 510 Printer series - Quick Reference Guide - Page 31
China Chinese EMI statement Class B Korea Korean EMI statement Taiwan Taiwanese EMI statement Address Hewlett-Packard Company Manager of Corporate Product Regulations 3000 Hanover Street Palo Alto, CA 94304 650/857-1501 Regulatory Notices 31 legal information - HP CH336A | HP Designjet 510 Printer series - Quick Reference Guide - Page 32
Family: BCLAA-0603 HP Designjet 5xx series Inkjet Printers Product Options: All conforms to the following Product Specifications: Safety: IEC tested in a typical configuration with HP Personal Computer Systems and peripherals. 2 This device complies with Part 15 of the FCC Rules. Operation - HP CH336A | HP Designjet 510 Printer series - Quick Reference Guide - Page 33
3 The product is assigned a Regulatory Model Number which stays with the regulatory aspects of the design. The Regulatory Model Number is the main product identifier in the regulatory documentation and test reports; this number should not be confused with the marketing name or the product numbers.
-
 1
1 -
 2
2 -
 3
3 -
 4
4 -
 5
5 -
 6
6 -
 7
7 -
8
-
9
-
10
-
11
-
12
-
13
-
14
-
15
-
16
-
17
-
18
-
19
-
20
-
21
-
22
-
23
-
24
-
25
-
26
-
27
-
28
-
29
-
30
-
31
-
32
-
33
 |
 |

HP Designjet 5xx Printer series
Pocket Guide
Contents
•
Basic operations
...........
3
•
Troubleshooting
..........
17
•
Maintenance
................
22
•
Legal information
........
27