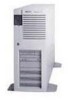
HP D5970A HP Netserver LC 2000 Pedestal-to-Rack Guide
HP D5970A - NetServer - LCII Manual
 |
View all HP D5970A manuals
Add to My Manuals
Save this manual to your list of manuals |
HP D5970A manual content summary:
- HP D5970A | HP Netserver LC 2000 Pedestal-to-Rack Guide - Page 1
HP NetServer LC 2000 Pedestal to Rack Guide HP Part Number 5969-2110 Printed November 1999 - HP D5970A | HP Netserver LC 2000 Pedestal-to-Rack Guide - Page 2
95014 USA © Copyright 1999, Hewlett-Packard Company. Audience Assumptions The guide is for the person who installs, administers, and troubleshoots LAN servers. Hewlett-Packard Company assumes you are qualified in the servicing of computer equipment and trained in recognizing hazards in products with - HP D5970A | HP Netserver LC 2000 Pedestal-to-Rack Guide - Page 3
Nuts 10 Attaching the Column Adapters and Slides 13 Attach the Hinge Assembly and Catch Assembly 16 Attach the Mounting Handles 17 Placing the HP NetServer in the Rack 18 Attaching the Cable Management Arm 22 Attaching the Front Bezel 24 Continuing with the Rack Installation Process 25 Index - HP D5970A | HP Netserver LC 2000 Pedestal-to-Rack Guide - Page 4
- HP D5970A | HP Netserver LC 2000 Pedestal-to-Rack Guide - Page 5
how to remove the top cover and the pedestal from the HP NetServer LC. WARNING Before removing the top cover, shut down to a shock hazard from telephone ringing voltages. Tools Required l An anti-static service kit (3M 8501/8502/8503 or equivalent). This kit includes a static-dissipating work - HP D5970A | HP Netserver LC 2000 Pedestal-to-Rack Guide - Page 6
disks, which must be replaced or the opening covered immediately (within 2 minutes). 1. If the HP NetServer is operating, log off all users and if necessary back-up files. 2. Follow instructions in your network operating system (NOS) documentation to gracefully shut down all networking software and - HP D5970A | HP Netserver LC 2000 Pedestal-to-Rack Guide - Page 7
of the chassis and two metal tabs, which fit into two slots on the bottom front of the chassis. Figure 1-1. Removing the HP NetServer LC 2000 Bezel CAUTION To prevent damage to the covers, support the cover as you remove it from the HP NetServer. The NetServer's covers can be easily damaged. 3 - HP D5970A | HP Netserver LC 2000 Pedestal-to-Rack Guide - Page 8
Chapter 1 Preparing the HP NetServer for Rack-Mounting Removing the Top Cover 1. Remove the single screw that secures the top cover to the front of the NetServer. 2. Slide the - HP D5970A | HP Netserver LC 2000 Pedestal-to-Rack Guide - Page 9
NetServer for Rack-Mounting Removing the Pedestal The pedestal version of the HP NetServer LC 2000 mounts to an anti-tip pedestal, which can be easily removed, if necessary. NOTE The front bezel is shown removed, but the - HP D5970A | HP Netserver LC 2000 Pedestal-to-Rack Guide - Page 10
- HP D5970A | HP Netserver LC 2000 Pedestal-to-Rack Guide - Page 11
of the System/E and System/U racks. If you have the older HP Systems rack, see the HP NetServer LC 2000 Installation Guide for instructions. (If you are mounting the NetServer in a non-HP rack, refer to the separate rack-mounting guide for third-party racks. It is packed in the accessories tray in - HP D5970A | HP Netserver LC 2000 Pedestal-to-Rack Guide - Page 12
you want to put your NetServer into a third-party rack not mentioned in the guide, you may be able to find relevant documentation on HP's web site at the following URL: http://www.hp.com/netserver/support The HP NetServer rack mount kit requires five EIA units of space in the rack. Before mounting - HP D5970A | HP Netserver LC 2000 Pedestal-to-Rack Guide - Page 13
keep the following safety and environmental issues in mind, especially if you install the HP NetServer in a non-HP rack environment: l Optimum Operating Environment - The optimum operating conditions for the HP NetServer is in an environmental controlled computer room with a temperature range of 20 - HP D5970A | HP Netserver LC 2000 Pedestal-to-Rack Guide - Page 14
components are to be mounted in the rack below the HP NetServer, install those components before starting to mount the NetServer. NOTE Use the HP Rack Configuration Tools to determine where in the rack to mount the HP NetServer. The tools are available at: http: //www.hp.com/netserver/support 10 - HP D5970A | HP Netserver LC 2000 Pedestal-to-Rack Guide - Page 15
template covers a span of 5 EIA units, which is the height requirement of the HP NetServer. 4. Use the marking pen to mark the 2nd and 14th holes on represents the EIA unit numbers on the rack columns. Front of Rack Left Right 2nd Hole From Bottom # Bottom of # HP NetServer Mark this face - HP D5970A | HP Netserver LC 2000 Pedestal-to-Rack Guide - Page 16
Chapter 2 Rack Mounting the HP NetServer 5. Turn the template over and use it to mount template, Figure 2-4 shows rack nut placement for the two rear rack columns. Left Right "#" represents the EIA unit numbers on the rack columns. # # # # # Rear of Rack Attach nuts to this face of the rear - HP D5970A | HP Netserver LC 2000 Pedestal-to-Rack Guide - Page 17
Slides 1. Pull the anti-tip foot forward out of the bottom of the rack. See Figure 2-6 for the anti-tip foot location. 2. Align the left HP column adapter to the left front column as shown in Figure 2-5. 3. Match the column adapter holes (2nd & 14th) to the marks on the front column - HP D5970A | HP Netserver LC 2000 Pedestal-to-Rack Guide - Page 18
Chapter 2 Rack Mounting the HP NetServer 6. Hold a slide in position inside the two left-hand rack columns and observing the following items. a. The mounting flange on each end of the - HP D5970A | HP Netserver LC 2000 Pedestal-to-Rack Guide - Page 19
Chapter 2 Rack Mounting the HP NetServer 7. With the slide pushed firmly into position, insert two screws through the slide's front bracket into the captive nuts on the left column adapter. a. - HP D5970A | HP Netserver LC 2000 Pedestal-to-Rack Guide - Page 20
Chapter 2 Rack Mounting the HP NetServer Attach the Hinge Assembly and Catch Assembly Use this procedure to attach the hinge assembly and catch assembly to the LC 2000 pedestal. 1. Remove - HP D5970A | HP Netserver LC 2000 Pedestal-to-Rack Guide - Page 21
Chapter 2 Rack Mounting the HP NetServer Attach the Mounting Handles Attach the four sheet metal mounting handles to the sides of the server. Each handle requires two Phillips head screws. See Figure 2-8. Figure 2-8. Attaching the Mounting Handles 17 - HP D5970A | HP Netserver LC 2000 Pedestal-to-Rack Guide - Page 22
rear of the NetServer. WARNING To prevent rack instability while mounting the HP NetServer pull the rack's anti-tip foot forward out of the bottom and equipment damage. To prevent the rack from rolling while you mount the HP NetServer, ensure the leveler screws on the rack's lower four corners are - HP D5970A | HP Netserver LC 2000 Pedestal-to-Rack Guide - Page 23
into the rack, unless the release latches are pressed as shown in Figure 2-12. 4. With the help of at least one other person, lift the HP NetServer by its four handles off the floor. 5. Move the rear of the NetServer just beyond the extended slide members. 6. Position the NetServer's channels on - HP D5970A | HP Netserver LC 2000 Pedestal-to-Rack Guide - Page 24
Chapter 2 Rack Mounting the HP NetServer 7. Lower the NetServer onto the slide members. See Figure 2-10. The handles will temporarily support the NetServer on the slides. 8. Adjust the slides. 10. Use a T-15 Torx driver to remove the screws holding the handles to the NetServer. See Figure 2-11. 20 - HP D5970A | HP Netserver LC 2000 Pedestal-to-Rack Guide - Page 25
Chapter 2 Rack Mounting the HP NetServer 11. Take the handles off the NetServer and store the handles and screws in a convenient place. See Figure 2- into the rack, before continuing with the procedures. 14. Go to "Attaching the Cable Management Arm" before securing the HP NetServer in the rack. 21 - HP D5970A | HP Netserver LC 2000 Pedestal-to-Rack Guide - Page 26
2-13. Left Rear of Rack "# " represents the EIA unit numbers on the rack columns. Attach nuts to this face of the left rear column. 14th Hole from Bottom 12th Hole from Bottom 9th Hole from Bottom 7th Hole from Bottom Bottom of HP NetServer Figure 2-13. Attaching the Rack Nuts to the - HP D5970A | HP Netserver LC 2000 Pedestal-to-Rack Guide - Page 27
out of the rack to ensure the Cable Management Arm moves along with the chassis without binding. NOTE Refer to the HP NetServer LC 2000r Rack Cabling Reference Guide, for information about cable dressing and routing. 8. If the Cable Management Arm moves with the chassis and the rack installation - HP D5970A | HP Netserver LC 2000 Pedestal-to-Rack Guide - Page 28
Attaching the Front Bezel The front bezel attaches to the HP NetServer by a hinge on the left and a catch rack, which is done before mounting the rack slides. 1. Position the Bezel in front of the HP NetServer LC 2000r as shown in Figure 2-15. Blue Tab Slide Securing Screws(2) Hinge Pins (3) - HP D5970A | HP Netserver LC 2000 Pedestal-to-Rack Guide - Page 29
the blue Bezel Release Tab shown in Figure 2-16. Figure 2-16. Attaching the Bezel to the NetServer 3. Press the bezel onto the front of the HP NetServer and release the Blue Tab to engage the hinge pins. See Figures 2-15 and 2-16. 4. Swing the open bezel to the right to engage - HP D5970A | HP Netserver LC 2000 Pedestal-to-Rack Guide - Page 30
- HP D5970A | HP Netserver LC 2000 Pedestal-to-Rack Guide - Page 31
bezel damage, 3 column adapter mounting, 13 external SCSI Connector, 23 front bezel installation, 24 height requirement 5 EIA units, 11 hinge pins, 25 HP NetServer rack installation, 7 rack mount kit, 10 rack mount kit parts list, 10 rack, installing NetServer in required tools and parts, 8 slide
-
 1
1 -
 2
2 -
 3
3 -
 4
4 -
 5
5 -
 6
6 -
 7
7 -
8
-
9
-
10
-
11
-
12
-
13
-
14
-
15
-
16
-
17
-
18
-
19
-
20
-
21
-
22
-
23
-
24
-
25
-
26
-
27
-
28
-
29
-
30
-
31
 |
 |

HP NetServer LC 2000
Pedestal to Rack Guide
HP Part Number 5969-2110
Printed November 1999