HP D5970A HP Netserver LPr SCSI Cable Kit Guide
HP D5970A - NetServer - LCII Manual
 |
View all HP D5970A manuals
Add to My Manuals
Save this manual to your list of manuals |
HP D5970A manual content summary:
- HP D5970A | HP Netserver LPr SCSI Cable Kit Guide - Page 1
Guide SCSI Cable Kit Install this new SCSI cable before installing an HP NetRAID series adapter if you want the NetServer's embedded SCSI controller to support instructions in this guide, in the HP NetServer LPr Installation Guide, your rack documentation, and the documentation supplied with the HP - HP D5970A | HP Netserver LPr SCSI Cable Kit Guide - Page 2
documentation to remove the NetServer from the rack enclosure. 2. Refer to Chapter 3 of the HP NetServer LPr Installation Guide to remove the top cover. 3. Refer to Chapter 7 of the HP NetServer LPr Installation Guide to remove the PCI access cover. 4. If any PCI accessory boards block access to the - HP D5970A | HP Netserver LPr SCSI Cable Kit Guide - Page 3
HP NetServer LPr SCSI Cable Kit Guide Disconnect the Embedded SCSI Controller 6. The embedded SCSI controller on the MUST be terminated if it is disconnected. I/O Board (Riser Board) Cable Guide Embedded SCSI Controller Connector Remove Terminator Plug Figure 5. Remove Terminator Plug from - HP D5970A | HP Netserver LPr SCSI Cable Kit Guide - Page 4
HP NetServer LPr SCSI Cable Kit Guide Install the New SCSI Cable 7. On the new SCSI cable, into place. 8. Thread the connector on the new SCSI cable labeled "To Riser Board" through the cable guide, and connect it to the embedded SCSI controller on the I/O board (riser board), as shown in Figure - HP D5970A | HP Netserver LPr SCSI Cable Kit Guide - Page 5
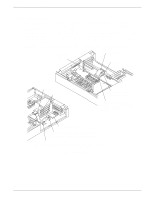
adapter in a PCI slot, as shown in Figure 7. Also refer to Chapter 7 of the HP NetServer LPr Installation Guide and the documentation supplied with the HP NetRAID adapter for more detailed instructions. NOTE PCI slot #3 shares the same interrupt line as the embedded SCSI controller. Use other PCI - HP D5970A | HP Netserver LPr SCSI Cable Kit Guide - Page 6
Warranty and Service/Support Booklet supplied with your HP NetServer system documentation for instructions on how to obtain HP repair and telephone support. Regulatory Information For regulatory information pertaining to this HP accessory, please refer to the regulatory section of the user guide for
-
 1
1 -
 2
2 -
 3
3 -
 4
4 -
 5
5 -
 6
6
 |
 |

HP Part Number 5967-6633
’"&#$(##°°’
Printed in October 1998
HP NetServer LPr SCSI Cable Kit Guide
SCSI Cable Kit
Install this new SCSI cable before installing an HP NetRAID series adapter if you want the NetServer’s embedded
SCSI controller to support an external SCSI channel.
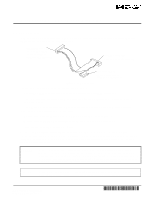
"To EXT SCSI Port"
Goes to SCSI Repeater Card
Terminator Block
Adhesive Secures It
to Bottom of NetServer
"To Riser Board"
Goes to Embedded
SCSI Controller on
I/O Board (Riser Board)
Figure 1. New SCSI Cable
The new SCSI cable has two connectors and one terminator block:
•
The "To EXT SCSI Port" connector on one end of the cable goes to the SCSI repeater card.
•
The "To Riser Board" connector in the middle of the cable goes to the embedded SCSI controller on the I/O
board (riser board).
•
The terminator block on the other end of the cable has adhesive to secure it to the bottom of the NetServer.
Install the SCSI Cable Conversion Kit in this order:
•
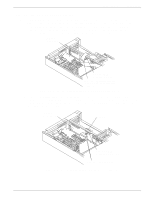
Disconnect the original SCSI cable from the
SCSI repeater card
, as shown in Figure 2.
•
Disconnect the
embedded SCSI controller
on the I/O board, as shown in Figures 4 and 5.
•
Install the
new SCSI cable
, as shown in Figure 6.
•
Install the
HP NetRAID series adapter
, and connect the original SCSI cable to it, as shown in Figure 7.
Follow the instructions in this guide, in the
HP NetServer LPr Installation Guide
, your rack documentation, and the
documentation supplied with the HP NetRAID adapter and any other accessory boards. Observe all cautions and
warnings in these documents.
WARNING
Before removing the cover, always disconnect the power cord and unplug telephone cables.
Disconnect the power cord to avoid exposure to high energy levels that may cause burns when
parts are short-circuited by metal objects, such as tools or jewelry. Disconnect telephone cables to
avoid exposure to shock hazard from telephone ringing devices. Note that the power switch does
not turn off the standby power. Disconnect the power cord to turn off standby power.
CAUTION
Wear a wrist strap and use a static-dissipating work surface connected to the chassis when
handling components. Ensure that the metal of the wrist strap contacts your skin.