HP D5970A HP Netserver LXr Pro8
HP D5970A - NetServer - LCII Manual
 |
View all HP D5970A manuals
Add to My Manuals
Save this manual to your list of manuals |
HP D5970A manual content summary:
- HP D5970A | HP Netserver LXr Pro8 - Page 1
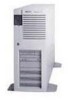
HP NetServer LXr Pro8 200 MHz/1 MB Processor Board Upgrade Guide HP Part Number 5967-2101 Printed in January 1998 - HP D5970A | HP Netserver LXr Pro8 - Page 2
8059 USA © Copyright 1998, Hewlett-Packard Company. Audience Assumptions This guide is for the person who installs, administers, and troubleshoots LAN servers. Hewlett-Packard Company assumes you are qualified in the servicing of computer equipment and trained in recognizing hazards in products with - HP D5970A | HP Netserver LXr Pro8 - Page 3
Guide 1 Additional Information 1 Verify Contents 1 Tools Required 3 2 Plan the Upgrade 5 Determine Where to Place the Processor Board 5 3 Perform the Upgrade 7 Power Down the HP 15 A Warranty and Support 19 Hardware Warranty 19 HP Repair and Telephone Support 19 B Regulatory Information - HP D5970A | HP Netserver LXr Pro8 - Page 4
- HP D5970A | HP Netserver LXr Pro8 - Page 5
processor board installed. In addition to the installation instructions, this guide contains regulatory information. Additional Information For other information about your HP NetServer LXr Pro8, refer to the HP NetServer LXr Pro8 User Guide. Verify Contents CAUTION Do not remove the processor - HP D5970A | HP Netserver LXr Pro8 - Page 6
sealed until you are ready to install the board. 2. HP NetServer LXr Pro8 200 MHz/1 MB Processor Board Upgrade Guide (this guide). 3. Update Return Kit that explains how to return unused terminator boards to HP for environmentally safe disposal. 4. HP Navigator CD-ROM. You are not required to use - HP D5970A | HP Netserver LXr Pro8 - Page 7
Chapter 1 Overview Tools Required • An antistatic service kit (3MTM 8501/8502/8503 or equivalent). This kit includes a static-dissipating work surface, a chassis clip lead, and a wrist strap. • Number 2 Phillips head screwdriver. 3 - HP D5970A | HP Netserver LXr Pro8 - Page 8
- HP D5970A | HP Netserver LXr Pro8 - Page 9
heat pipes, or VRMs. Each terminator board contains just the components necessary to terminate the bus. During start up, the control panel of the HP NetServer LXr Pro8 displays how many CPUs the system detects. Determine Where to Place the Processor Board The system comes standard with one processor - HP D5970A | HP Netserver LXr Pro8 - Page 10
Chapter 2 Plan the Upgrade Table 2-1. Processor Board Configurations Total Number of CPU Chips in System 2 CPUs 4 CPUs 6 CPUs 8 CPUs Board in Slot A1 Processor board you will remove a terminator board to install a 200 MHz/1 MB processor board. Figure 2-1. System Board of HP NetServer LXr Pro8 6 - HP D5970A | HP Netserver LXr Pro8 - Page 11
the Upgrade The installation steps are as follows: 1. Power down the HP NetServer. 2. Slide out the satellite chassis. 3. Lift and remove , touch a grounded, unpainted metal surface on the HP NetServer to discharge static electricity. Power Down the HP NetServer 1. Log off all users and shut down - HP D5970A | HP Netserver LXr Pro8 - Page 12
the Upgrade Figure 3-1. HP NetServer Control Panel 3. Unlock the power interlock switch at the back of the HP NetServer by turning it clockwise as shown in Figure 3-2. This turns off DC power to the satellite and unlatches the satellite chassis. Figure 3-2. HP NetServer Power Interlock Switch - HP D5970A | HP Netserver LXr Pro8 - Page 13
Chapter 3 NOTE Perform the Upgrade After you unlock the power interlock switch, there is no power present at any internal or externally accessible area of the satellite chassis. However, five volts of power are present at the power supply pins on the base chassis where the satellite attaches. To - HP D5970A | HP Netserver LXr Pro8 - Page 14
Chapter 3 Perform the Upgrade Figure 3-3. Location of the Retention Bracket 4. Stand behind the HP NetServer and grasp the two ejector handles on the rear panel. Pull both handles down firmly, and then pull the satellite chassis toward you. Pull - HP D5970A | HP Netserver LXr Pro8 - Page 15
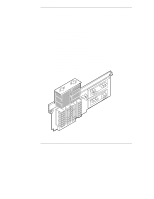
Chapter 3 Perform the Upgrade Figure 3-4. Slide Out Satellite Chassis Lift and Remove Top Cover of Satellite Chassis 1. Find the fingerholds on the cover of the satellite chassis. 2. Place a finger in each of the two fingerholds and push both fingerholds toward each other. 3. Maintain pressure - HP D5970A | HP Netserver LXr Pro8 - Page 16
Chapter 3 Perform the Upgrade Figure 3-5. Satellite Chassis with Open Cover 5. Pull back one of the spring-loaded hinge pins on the underside of the cover and lift the cover off. 6. Set the cover aside. Looking down into the satellite chassis, you can see the processor and terminator boards on the - HP D5970A | HP Netserver LXr Pro8 - Page 17
Chapter 3 Perform the Upgrade Figure 3-6. Processor and Terminator Boards on the System Board 2. Using a Phillips head screwdriver, unscrew the two mounting screws that secure the terminator board in place. 3. Grasp the board you are removing, and lift firmly. Place it on the antistatic mat. 4. If - HP D5970A | HP Netserver LXr Pro8 - Page 18
Chapter 3 Perform the Upgrade Figure 3-7. Remove the Terminator Board 5. You may return the terminator boards you removed to Hewlett-Packard for environmentally safe disposal. To return used boards, see the Update Return Kit. 14 - HP D5970A | HP Netserver LXr Pro8 - Page 19
Navigator CD-ROM to ensure that you have the latest drivers and information. Slide the Satellite Chassis Back Into Place 1. Replace the cover of the satellite chassis. 2. When you finish servicing the HP NetServer, move to the front of the server and unlatch all four power supplies. (If the front - HP D5970A | HP Netserver LXr Pro8 - Page 20
counterclockwise as shown in Figure 3-9. 9. At the front, relatch the power supplies. Ensure the indicator lights come up correctly. See "Power Supply Indicators" in the HP NetServer LXr Pro8 User Guide. 16 - HP D5970A | HP Netserver LXr Pro8 - Page 21
Chapter 3 Perform the Upgrade Figure 3-9. Lock the Power Interlock Switch 17 - HP D5970A | HP Netserver LXr Pro8 - Page 22
- HP D5970A | HP Netserver LXr Pro8 - Page 23
system documentation for the warranty limitations, customer responsibilities, and other terms and conditions. HP Repair and Telephone Support Refer to the "Service and Support" section of your HP NetServer system documentation for instructions on how to obtain HP repair and telephone support. 19 - HP D5970A | HP Netserver LXr Pro8 - Page 24
- HP D5970A | HP Netserver LXr Pro8 - Page 25
. This equipment generates, uses, and can radiate radio frequency energy and, if not installed and used in accordance with the instruction manual, may cause harmful interference to radio communications. Operation of this equipment in a residential area is likely to cause harmful interference - HP D5970A | HP Netserver LXr Pro8 - Page 26
Guide 22 and EN 45014 Manufacturer's Name: Hewlett-Packard Company Manufacturer's Address: 5301 Stevens Creek Blvd. Santa Clara, CA 95052 USA declares, that the product Product Name: HP NetServer LXr Pro8 Processor Board Upgrade Kit Model Number -Packard Sales and Service Office or Hewlett- - HP D5970A | HP Netserver LXr Pro8 - Page 27
Index A Antistatic service kit, 3, 9 C Contents of package, 1 CPU buses A and B, 5 H Hardware warranty, 19 HP Navigator CD-ROM, 2, 15 P Power down procedure, 7 Power interlock switch, 8, 17 Processor board, 2, 5, 6, 13, 15 R Regulatory information, 21 S Satellite chassis removing top cover, 11
-
 1
1 -
 2
2 -
 3
3 -
 4
4 -
 5
5 -
 6
6 -
 7
7 -
8
-
9
-
10
-
11
-
12
-
13
-
14
-
15
-
16
-
17
-
18
-
19
-
20
-
21
-
22
-
23
-
24
-
25
-
26
-
27
 |
 |

HP NetServer LXr Pro8
200 MHz/1 MB Processor
Board
Upgrade Guide
HP Part Number 5967-2101
Printed in January 1998