HP D7560 Setup Poster
HP D7560 - PhotoSmart Color Inkjet Printer Manual
 |
UPC - 883585923687
View all HP D7560 manuals
Add to My Manuals
Save this manual to your list of manuals |
HP D7560 manual content summary:
- HP D7560 | Setup Poster - Page 1
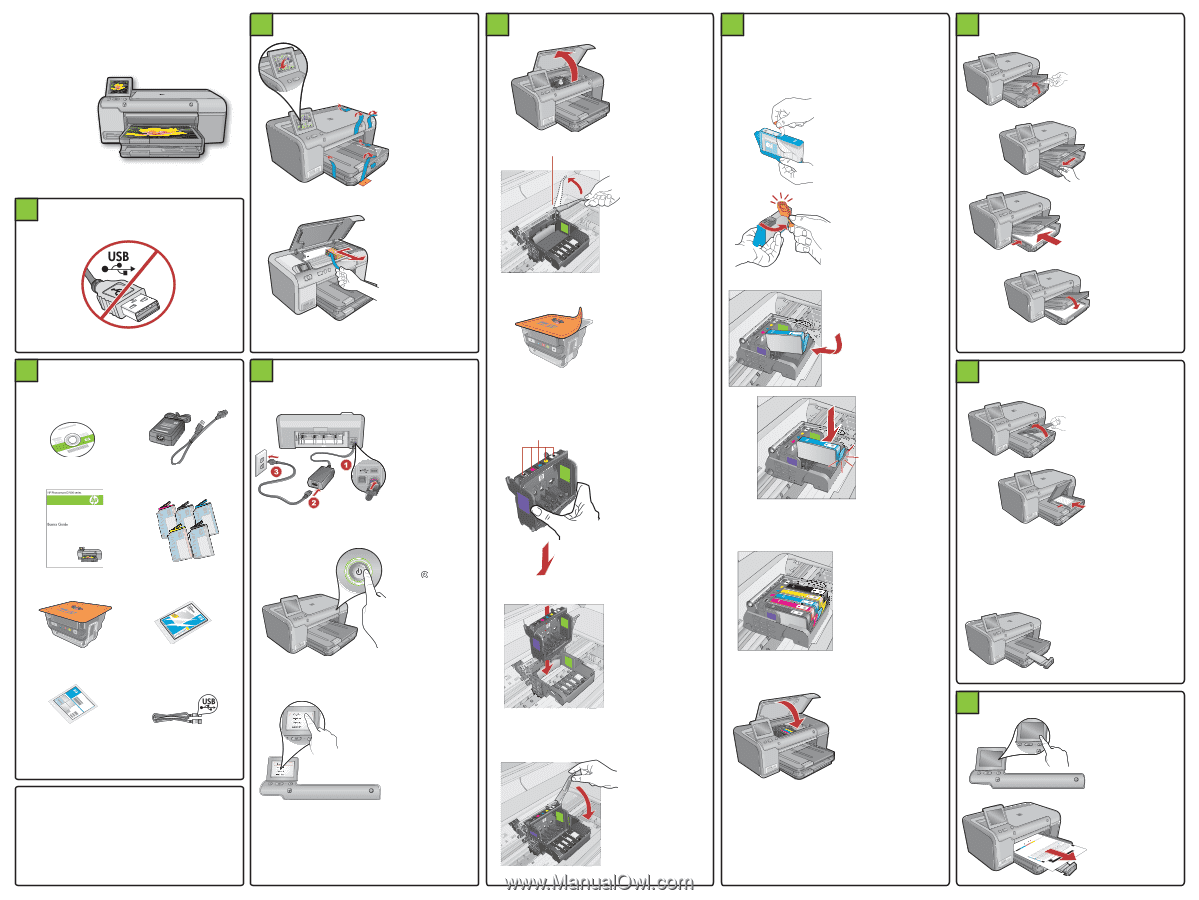
and touch OK. 7 Load photo paper a. Lift the photo tray lid. Installation CD Power Cable Basics Guide Color Cartridges Printhead 4 X 6 photo paper* Printable CD * USB Cable * *May be included *Q8440-90030* *Q8440-90030* Q8440-90030 b. Press to turn on the HP Printer. c. If prompted, select - HP D7560 | Setup Poster - Page 2
Now that your HP Photosmart software program is installed on your computer, you can try out one of the features on the HP Printer. Troubleshooting Use HP software Print a photo from a memory card a. If you have not already done so, load photo paper in the photo tray. Problem: (Windows) The
-
 1
1 -
 2
2
 |
 |
2
3
4
5a
5b
6
7
8
*Q8440-90030*
*Q8440-90030*
Q8440-90030
1
*
*
*
Carriage latch
Colored icons
Start Here
HP Photosmart D7500 series
Do not connect the USB cable
until prompted in step 9
Installation
CD
Power Cable
Basics Guide
4 X 6 photo paper
Printable CD
USB Cable
*May be included
Color Cartridges
Printhead
Remove all tape
from the device.
Remove the
protective film from
the display.
a.
Remove packaging
Open the device
and remove all
the packaging
materials from
inside the device.
b.
Connect the power
cord and adapter.
a.
Press
to turn on
the HP Printer.
b.
If prompted, select
your language and
country/region.
c.
Connect power
Open the ink
cartridge access
door.
a.
Install the printhead
Firmly raise the
gray latch, as
shown.
b.
Remove the
printhead from the
packaging.
Do not touch
the
copper colored
contacts.
Do not scratch
the
contacts on the
printer or other
surface.
c.
Hold the printhead
upright, as shown.
d.
Lower the printhead
into the device
so that the purple
and green blocks
on the printhead
are aligned with
the purple and
green blocks on the
device.
e.
Slowly lower the
latch.
f.
Install the ink cartridges
Remove the plastic
wrap by pulling the
orange tab.
a.
Twist the orange
cap to snap it off.
b.
Turn the ink
cartridge over,
slide it into the
appropriate slot,
then press down
until it clicks into
place.
c.
Close the ink
cartridge access
door.
The initialization
process begins,
which takes several
minutes. You will
hear the device
making noises.
e.
While the initialization process continues, proceed to the
next step to load paper.
Repeat steps a, b,
and c for all ink
cartridges.
d.
IMPORTANT:
You must complete step 5a before installing
ink cartridges.
Lift the output tray.
a.
Load paper
Slide the paper-
width guide to the
left.
b.
Insert
plain white
paper
into the
main tray and slide
the paper guides
against the paper.
c.
Lower the output
tray and touch
OK
.
d.
Load photo paper
Lift the photo tray
lid.
a.
Load photo paper
with the
glossy
side down
in the
photo tray. Slide
the paper guides
against the photo
paper.
b.
Lower the photo
tray lid until it is
fully closed.
c.
Pull out the tray
extender and lift up
the paper catch.
d.
Print the alignment page
After you have
loaded paper,
touch the
OK
button, then wait a
few minutes while
the alignment page
is printed.
a.
After the alignment
page is printed,
alignment is
complete. Touch the
OK
button.
b.
Box Contents