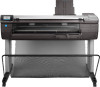
HP DesignJet T830 Assembly instructions 1
HP DesignJet T830 Manual
 |
View all HP DesignJet T830 manuals
Add to My Manuals
Save this manual to your list of manuals |
HP DesignJet T830 manual content summary:
- HP DesignJet T830 | Assembly instructions 1 - Page 1
HP DesignJet rugged case Assembly instructions FR Boîtier robuste HP DesignJet Instructions d'assemblage DE HP DesignJet Baustellen-Kit Anleitung zur Aufstellung und Installation IT Custodia protettiva per HP DesignJet Istruzioni per l'assemblaggio ES Carcasa reforzada HP DesignJet and service - HP DesignJet T830 | Assembly instructions 1 - Page 2
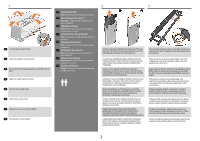
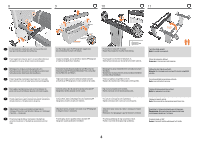
a caixa. RU PL Przetnij paski i otwórz pudełko. EN Stand assembly Note: If printer already installed, go to page 22 FR Assemblage du support Remarque : Si l'imprimante est déjà installée, allez à la page 22 DE Ständermontage Hinweis: Wenn der Drucker bereits eingebaut ist, gehen Sie zu Seite 22 - HP DesignJet T830 | Assembly instructions 1 - Page 3
4 5 6 7 EN Slot a leg onto the crossbrace to install the leg. FR Insérez une patte dans la traverse pour installer la patte. DE Schieben Sie zur Montage des Beins ein Bein auf die Querverstrebung. IT Inserire una gamba nel sostegno trasversale per installarla. ES Encaje una pata en el anclaje - HP DesignJet T830 | Assembly instructions 1 - Page 4
2 at the outside face of the leg. Cut the straps, open the HP DesignJet rugged case box and localize the feet with wheels. X4 Fix one foot to face extérieure de la patte. Coupez les sangles, ouvrez le boîtier robuste HP DesignJet et repérez les pieds avec roulettes. Fixez le pied à un montant à - HP DesignJet T830 | Assembly instructions 1 - Page 5
di utilizzo della stampante senza accessorio. Localice los 2 topes de metal que se muestran arriba. Nota: No son necesarios con la carcasa reforzada HP DesignJet, pero guárdelos en caso de uso de la impresora sin accesorio. Localize os dois limitadores de metal mostrados acima. Nota: Essa instru - HP DesignJet T830 | Assembly instructions 1 - Page 6
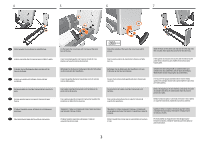
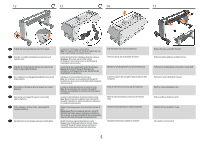
16 17 18 EN Open the printer box FR Ouvrez la boîte de l'imprimante DE Öffnen der Kiste mit dem Drucker IT Aprire la scatola della stampante ES Abra la caja de la impresora PT Abra a caixa da impressora RU PL Otwórz pudełko z drukarką EN Insert the basket frame into the fabric. Check the picture - HP DesignJet T830 | Assembly instructions 1 - Page 7
19 20 21 EN Remove the tapes from the endcaps, and remove the packing pieces. If there is tape, remove it, then remove the endcaps. FR Retirez les bandes adhésives des embouts de protection et retirez les morceaux d'emballage. Le cas échéant, retirez toutes les bandes adhésives, puis retirez - HP DesignJet T830 | Assembly instructions 1 - Page 8
corretta per l'assemblaggio. 23 24 Locate the printer support from HP DesignJet rugged case box. Install the rugged case support onto the yellow parts. Make sure the basket is open. Localisez le support de l'imprimante du boîtier robuste HP DesignJet. Installez le support du boîtier robuste - HP DesignJet T830 | Assembly instructions 1 - Page 9
cym. Place the printer onto the rugged case printer support. Placez l'imprimante sur le support d'imprimante de boîtier robuste. Stellen Sie den accessorio. Localice las 4 perillas atornillables en la caja de la carcasa reforzada HP DesignJet. Nota: Guárdelas en la caja de la impresora en caso de - HP DesignJet T830 | Assembly instructions 1 - Page 10
todas las cintas transparentes de la impresora. Retire todas as fitas transparentes da impressora Usuń z drukarki wszystkie przezroczyste taśmy. Open the roll cover. Ouvrez le capot du rouleau. Öffnen Sie die Rollenabdeckung. Aprire il coperchio del rotolo. Abra la cubierta del rollo. Abra a tampa - HP DesignJet T830 | Assembly instructions 1 - Page 11
ochronne. Ważne: Nie dotykaj głowicy drukującej ani niebieskiego zatrzasku. Instalacja głowicy drukującej nie jest w tym momencie konieczna. Close the printhead door. Fermez le capot de la tête d'impression. Schließen Sie die Zugangsklappe zum Druckkopf. Chiudere lo sportello della testa di stampa - HP DesignJet T830 | Assembly instructions 1 - Page 12
Solo HP DesignJet T830 MFP: Abra la ventana delantera. Somente para impressora HP DesignJet T730: Gire e remova os dois pinos. Somente para impressora HP DesignJet T730: Remova a espuma protetora. Somente para MFP HP DesignJet T830: Abra a janela frontal. HP DesignJet T720 2 HP DesignJet - HP DesignJet T830 | Assembly instructions 1 - Page 13
MFP HP DesignJet T830 uniquement : Retirez la mousse de protection. Nur HP DesignJet T830 MFP: Entfernen Sie den Schaumstoffschutz. Solo stampante multifunzione HP DesignJet T830: rimuovere la schiuma protettiva. Solo HP DesignJet T830 MFP: Retire la espuma protectora. Somente para MFP HP DesignJet - HP DesignJet T830 | Assembly instructions 1 - Page 14
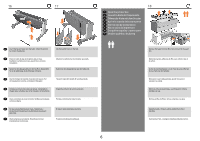
LAN. If not you can connect using WiFi later following the front panel instructions. FR Branchez l'imprimante avec le câble Ethernet si vous prévoyez une do góry, aby je ustalić w pozycji. Install the HP DesignJet rugged case lateral supports, press them firmly into place on the printer and fix - HP DesignJet T830 | Assembly instructions 1 - Page 15
Case is intended to be assembled once only, it is not designed for disassembly and reassembly (except in the case of maintenance and service operations). Fixez le tissu aux supports à l'aide des vis fournies. Assurez-vous que toutes les vis ont une rondelle. Vissez jusqu'à ce que vous ressentiez une - HP DesignJet T830 | Assembly instructions 1 - Page 16
Drukarka powinna wyglądać jak na powyższym zdjęciu. Jeżeli twoja drukarka to HP DesignJet T730, przejdź do kroku 56. Jeżeli twoja drukarka to HP DesignJet T830, PL przejdź do następnego kroku. HP DesignJet T830 MFP only: Locate the mark on the scanner's input platen, and use it as a reference - HP DesignJet T830 | Assembly instructions 1 - Page 17
seu país/região e o confirme. Wybierz kraj/region i potwierdź. A message will appear on the front panel asking you to add the ink cartridges. Open the ink cartridge cover. Un message sur le panneau de commande vous invite à ajouter les cartouches. Ouvrez la trappe d'accès aux cartouches d'encre - HP DesignJet T830 | Assembly instructions 1 - Page 18
60 61 62 63 EN Insert the 4 ink cartridges clicking them into place. Once the 4 ink cartridges are installed, close the cover. The printer will ask you to align the printhead. Extend the input and output trays. FR Insérez les 4 cartouches d'encre en appuyant dessus pour les enclencher. DE - HP DesignJet T830 | Assembly instructions 1 - Page 19
the multisheet tray: load sheet (1); adjust the tray (2); press OK. Printhead alignment will be initialized. FR Il vous sera demandé de charger une performed automatically. If you want to connect by WiFi, follow the instructions on the front panel to select a network and enter the required - HP DesignJet T830 | Assembly instructions 1 - Page 20
HP All-in-One Printer Remote App. Enable email printing 1. Make sure that your printer is correctly connected to the Internet. 2.Enable Web Services during initial setup of the printer, or later by pressing on the home screen and following the instructions HP Mobile Printing Solutions PDF HP - HP DesignJet T830 | Assembly instructions 1 - Page 21
guide you on printer setup. Follow the instructions. FR À présent, le panneau de commande vous aidera à configurer l'imprimante. Suivez les instructions • No Android, instale o "HP Print Service" pelo Google Play. • Para digitalizar no iOS/Android, faça download do "HP All-in-One Printer Remote", - HP DesignJet T830 | Assembly instructions 1 - Page 22
Si vous n'avez pas activé l'impression par courrier électronique, suivez les étapes suivantes : 1. Recherchez l'icône HP ePrint . / 2. Pour activer le service, suivez les instructions. / 3. Récupérez l'adresse électronique de votre imprimante. Pour plus d'informations, consultez le site Web suivant - HP DesignJet T830 | Assembly instructions 1 - Page 23
personnaliser l'adresse électronique de votre imprimante, ou gérer la sécurité Printer. DE Optional: Verwalten der Printer-Sicherheit im HP Connected. Wenn Sie die Web-Services aktivieren, ist der Drucker entsperrt, d. h. jeder, der die E-Mail-Adresse des Druckers kennt, kann etwas drucken. Wenn Sie - HP DesignJet T830 | Assembly instructions 1 - Page 24
Drucker aus dem Ständer. Rimuovere la stampante dal piedistallo. Retire la impresora de la base. Remova a impressora do suporte Zdejmij drukarkę ze stojaka. 24 Important: Move the printer and place it in a safe place and make sure you do not turn it upside down. Important : Déplacez l'imprimante - HP DesignJet T830 | Assembly instructions 1 - Page 25
Solte os pés das pernas Zdejmij obie podstawki z nóg. X4 Go to step 9 and follow the rugged case assembly instructions marked with the above icon. Allez à l'étape 9 et suivez les instructions d'assemblage du boîtier robuste indiquées avec l'icône ci-dessus. Gehen Sie zu Schritt 9 und befolgen Sie - HP DesignJet T830 | Assembly instructions 1 - Page 26
eixo RU PL Zakładanie papieru na trzpień obrotowy EN Load the paper roll onto the spindle. FR Chargez le rouleau de papier sur la bobine. na impressora Włóż trzpień obrotowy do drukarki. 26 3 Insert the edge of the paper into the printer until the printer detects it. Insérez le bord du papier - HP DesignJet T830 | Assembly instructions 1 - Page 27
- HP DesignJet T830 | Assembly instructions 1 - Page 28
renseignements contenus dans ce document peuvent être modifiés sans préavis. Les seules garanties offertes en ce qui concerne les produits et les services de HP sont celles expressément énoncées dans les déclarations de garantie. Rien dans le présent document ne peut être considéré comme constituant
-
 1
1 -
 2
2 -
 3
3 -
 4
4 -
 5
5 -
 6
6 -
 7
7 -
8
-
9
-
10
-
11
-
12
-
13
-
14
-
15
-
16
-
17
-
18
-
19
-
20
-
21
-
22
-
23
-
24
-
25
-
26
-
27
-
28
 |
 |
1
© Copyright 2015 HP Development Company, L.P.
Large Format Division
Camí de Can Graells 1-21 · 08174
Sant Cugat del Vallès
Barcelona · Spain
All rights reserved
Printed in XXX
70’
EN
FR
DE
IT
ES
PT
RU
PL
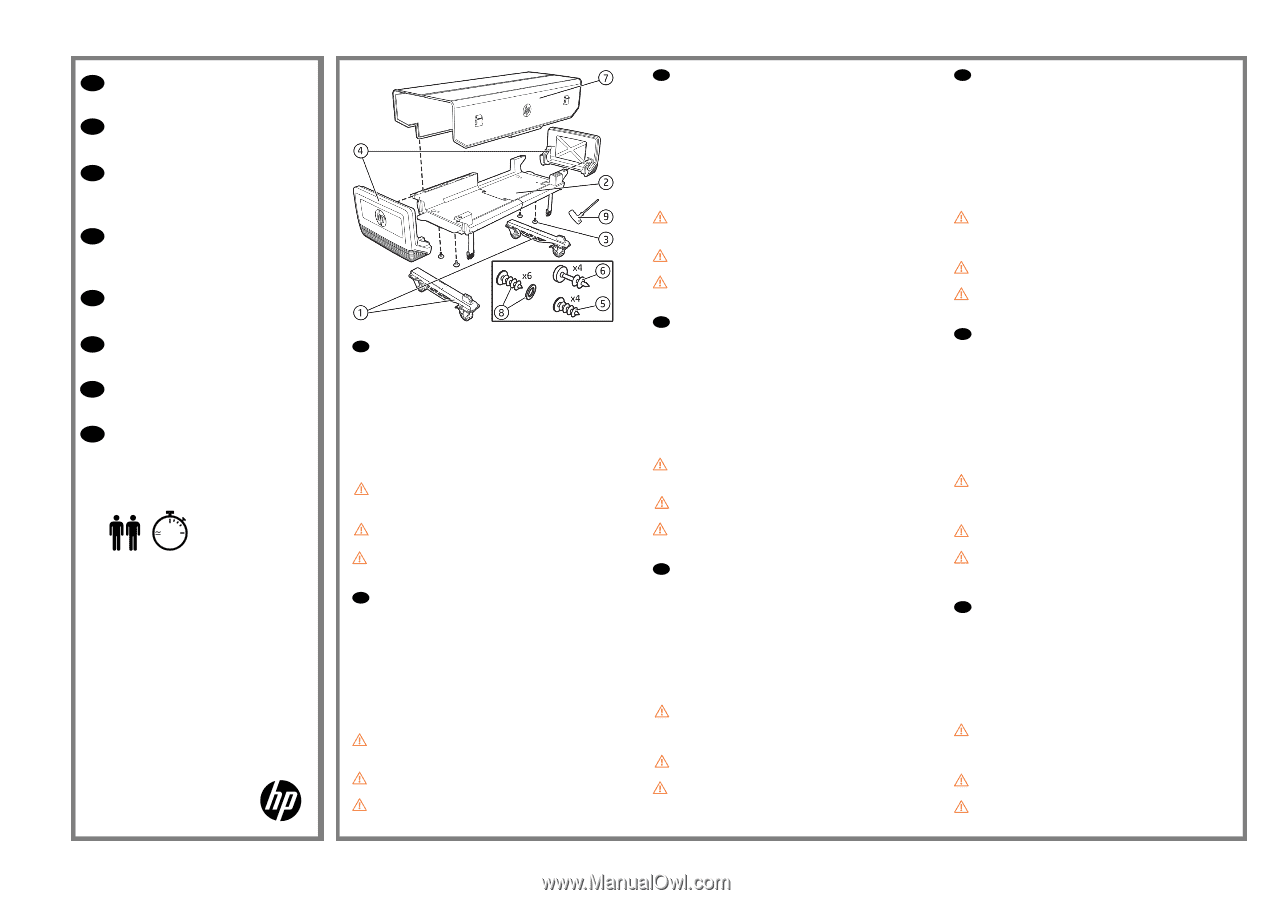
HP DesignJet rugged case
Assembly instructions
Boîtier robuste HP DesignJet
Instructions d’assemblage
HP DesignJet Baustellen-Kit
Anleitung zur Aufstellung und
Installation
Custodia protettiva per HP
DesignJet
Istruzioni per l’assemblaggio
Carcasa reforzada HP DesignJet
Instrucciones de montaje
Caixa resistente HP DesignJet
Instruções de montagem
Жесткий чехол HP DesignJet
Инструкции по сборке
Osłona na drukarkę HP DesignJet
Instrukcje montażu
*N9M07-90001*
N9M07-90001
EN
Box content
1.
W
heeled foot x 2
2.
Rugged Case printer support
3.
4 screw-in knobs
4.
Rugged Case lateral support x 2
5.
4 Torx 25 screw (35mm long)
6.
4 Torx 30 screw (45mm long)
7.
Rugged Case fabric cover
8.
6 screws and washers
9.
Screwdriver
IMPORTANT:
The Rugged Case is intended to be assembled
once only, it is not designed for disassembly and reassembly (except
in the case of maintenance and service operations).
IMPORTANT:
If the printer has already been set up, do not turn
it upside down.
WARNING!
Handling this product requires two or more people,
according to your local law.
FR
Contenu de la boîte
1. Pied sur roulette x 2
2. Support d’imprimante avec boîtier robuste
3. 4 molettes à visser
4. Support latéral du boîtier robuste x 2
5. 4 vis Torx 25 (35 mm de long)
6. 4 vis Torx 30 (45 mm de long)
7. Recouvrement en tissu du boîtier robuste
8. 6 vis et rondelles
9. Tournevis
IMPORTANT :
Le boîtier robuste est conçu pour être assemblé
une seule fois. Il ne doit être ni désassemblé, ni réassemblé (sauf
lors des opérations de maintenance et d’entretien).
IMPORTANT :
Si l’imprimante est déjà installée, ne la retournez
pas.
AVERTISSEMENT !
Deux personnes minimum sont requises pour
manipuler ce produit, selon les lois locales en vigueur.
DE
Inhalt Verpackung
1. 2 Standfüße mit Rädern
2. Baustellen-Kit-Druckerhalterung
3. 4 Einschraubknöpfe
4. 2 seitliche Stützen für das Baustellen-Kit
5. 4 Torx-25-Schrauben (35 mm lang)
6. 4 Torx-30-Schrauben (45 mm lang)
7. Baustellen-Kit-Stoffabdeckung
8. 6 Schrauben und Unterlegscheiben
9. Schraubendreher
WICHTIG:
Das Baustellen-Kit ist nur für den einmaligen Zusam-
menbau vorgesehen; es ist nicht für den Aus- und anschließenden
Einbau konzipiert (außer für Wartungs- und Service-Maßnahmen).
WICHTIG:
Wenn der Drucker bereits eingesetzt wurde, stellen
Sie ihn nicht auf den Kopf.
WARNUNG!
Ihrem lokalen Gesetz entsprechend werden für die
Handhabung dieses Produkts mindestens zwei Personen benötigt.
IT
Contenuto della confezione
1. Piede con rotella x 2
2. Supporto per stampante della custodia protettiva
3. 4 manopole a vite
4. Supporto laterale della custodia protettiva x 2
5. 4 viti Torx 25 (lunghezza 35 mm)
6. 4 viti Torx 30 (lunghezza 45 mm)
7. Copertura in tessuto della custodia protettiva
8. 6 viti e rondelle
9. Cacciavite
IMPORTANTE:
La custodia protettiva è progettata per essere
assemblata una sola volta e non per essere smontata e rimontata
(salvo operazioni di assistenza e manutenzione).
IMPORTANTE:
Se la stampante è già stata impostata, non
capovolgerla.
AVVERTENZA.
Per maneggiare questo prodotto sono richieste
due o più persone, conformemente alle normative locali.
ES
Contenido de la caja
1. 2 pies con ruedas
2. Soporte de impresora con carcasa reforzada
3. 4 perillas atornillables
4. 2 soportes laterales para carcasa reforzada
5. 4 tornillos Torx 25 (35 mm de longitud)
6. 4 tornillos Torx 30 (45 mm de longitud)
7. Cubierta de tela para carcasa reforzada
8. 6 tornillos y arandelas
9. Destornillador
IMPORTANTE:
La carcasa reforzada está pensada para ser
ensamblada una única vez, no está diseñada para desmontarse y
volver a montarse continuamente (excepto en caso de operaciones
de mantenimiento y servicio).
IMPORTANTE:
Si ya se ha configurado la impresora, no la
coloque boca abajo.
ADVERTENCIA:
La manipulación de este producto requiere dos
o más personas según la legislación local.
PT
Conteúdo da caixa
1. Pés com rodízios x 2
2. Base da caixa resistente da impressora
3. 4 botões de rosca
4. Lateral da caixa resistente x 2
5. 4 parafusos Torx 25 (35 mm de comprimento)
6. 4 parafusos Torx 30 (45 mm de comprimento)
7. Cobertura de tecido da caixa resistente
8. 6 parafusos e arruelas
9. Chave de fenda
IMPORTANTE:
A caixa resistente foi projetada para ser mon-
tada apenas uma vez; ela não foi projetada para desmontagem
e remontagem (exceto no caso de operações de manutenção e
serviço).
IMPORTANTE:
Se a impressora já tiver sido usada, não vire-a
de cabeça para baixo.
ALERTA:
São necessárias duas ou mais pessoas para montar
este produto, de acordo com as suas leis locais.
RU
Комплект поставки
1. Ножка с колесиком (2 шт.)
2. Опора жесткого чехла для принтера
3. 4 вкручиваемые рукоятки
4. Боковые опоры жесткого чехла (2 шт.)
5. 4 винта со звездообразным углублением Torx 25 (длина: 35
мм)
6. 4 винта со звездообразным углублением Torx 30 (длина: 45
мм)
7. Тканевое покрытие жесткого чехла
8. 6 винтов и шайб
9. Отвертка
ВАЖНО!
Жесткий чехол устанавливается только один
раз, после этого его не требуется демонтировать и снова
устанавливать на место (кроме операций по техобслуживанию
и ремонту).
ВАЖНО!
Если принтер уже установлен, не переворачивайте
его.
ПРЕДУПРЕЖДЕНИЕ!
Согласно местному законодательству,
для работы с данным продуктом необходимо привлекать двух
человек.
PL
Zawartość pudełka
1. podstawka na kółkach x 2
2. Dolna podpora osłony na drukarkę
3. 4 wkręcane gałki
4. Boczna podpora osłony x 2
5. 4 śruby TORX T25 (35 mm dł.)
6. 4 śruby TORX T30 (45 mm dł.)
7. Materiałowa pokrywa osłony
8. 6 śrub i podkładek
9. Śrubokręt
WAŻNE:
Osłonę na drukarkę montuje się tylko raz. Nie jest ona
przeznaczona do wielokrotnego demontażu i ponownego montażu
(z wyjątkiem konieczności przeprowadzenia konserwacji i czynności
serwisowych).
WAŻNE:
Jeżeli drukarka została podłączona, nie należy
przekręcać jej do góry nogami.
OSTRZEŻENIE!
Produkt powinny przenosić dwie osoby lub
więcej, zgodnie z lokalnymi przepisami.