HP Designjet 5000 HP DesignJet 5000 Series Printer - Setup Poster
HP Designjet 5000 Manual
 |
View all HP Designjet 5000 manuals
Add to My Manuals
Save this manual to your list of manuals |
HP Designjet 5000 manual content summary:
- HP Designjet 5000 | HP DesignJet 5000 Series Printer - Setup Poster - Page 1
Setup Instructions HP DesignJet 5000PS & HP DesignJet 5000 HP DesignJet Printer 60 inch (1.57 m) st501 HP DesignJet Printer 42 inch (1.07 m) st501a Read these instructions carefully... What You Will Need For This Procedure: n Because some of the components of the printer are bulky, you may - HP Designjet 5000 | HP DesignJet 5000 Series Printer - Setup Poster - Page 2
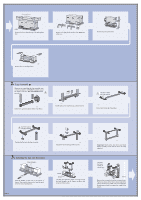
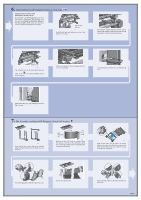
assembly. Check that all screws are fully tightened. Orientate the boxes exactly as shown here. st523a Remove the accessories from the accessory boxes. Put the two boxes on the floor as shown and tilt the printer onto the boxes. Note: The boxes must have the polystyrene inside to support the weight - HP Designjet 5000 | HP DesignJet 5000 Series Printer - Setup Poster - Page 3
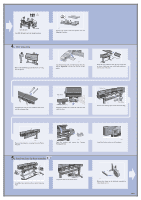
floor. Packing Strap Desiccant Bag st527 Remove the Packing Tape and the Desiccant Bag. st528 Remove the protective covering from the Printer Window. st529 Open the window and remove the Carriage Packing Material. 5. Install the Take-Up Reel Assembly st569 Install the Pocket on the rear of the - HP Designjet 5000 | HP DesignJet 5000 Series Printer - Setup Poster - Page 4
shown above. Sensor clamp Right leg st540 Slide the sensor clamp hard up against the leg and then secure the sensor clamp with a core instead of the plastic core supplied, adaptors are available with your printer. Page 4 st593 Install the adapters on to the media guides as shown. Note: These are - HP Designjet 5000 | HP DesignJet 5000 Series Printer - Setup Poster - Page 5
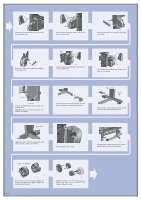
. st550 Attach end caps to the bar and supports with the two screws provided. st543 Connect the power cord into the rear of the take-up reel. Turn on the take-up reel by turning the switch to On at the rear. 7. Bin Assembly installation (HP DesignJet 42 inch/1.07 m only) st579 Insert the four - HP Designjet 5000 | HP DesignJet 5000 Series Printer - Setup Poster - Page 6
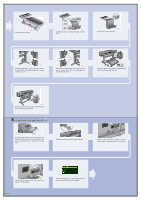
tabs. Install the extensions onto the media deflectors. 2 1 st557 Plug the power cord into the socket next to the power switch, and then into the AC power outlet. 2 1 st558 Turn the power isolator switch at the rear of the printer to the on position. Page 6 st557 Select the language you want for - HP Designjet 5000 | HP DesignJet 5000 Series Printer - Setup Poster - Page 7
Lift window to replace SETUP printheads When the printer has primed the ink system, the front panel displays the above message. Carriage Assembly st056a Open the window and locate the printhead carriage. Insert printheads REPLACE (XX04) REPLACE (XX04) REPLACE (XX04) REPLACE (XX04) REPLACE (XX04 - HP Designjet 5000 | HP DesignJet 5000 Series Printer - Setup Poster - Page 8
it clicks into place. st073 When you have inserted the all printhead cleaners into the printhead service station, close the door. INK STARTUP Checking printhead CLEANERS The front panel displays the above. The printer will now start the printhead test. If it is successful, the front panel will - HP Designjet 5000 | HP DesignJet 5000 Series Printer - Setup Poster - Page 9
of the roll, lower the media load lever. st039a Lower the window of the printer. If you have a Take-Up Reel installed, the front panel will In this case it will probably be Hewlett-Packard. For more information on this function, see the User's Reference Guide. The front panel displays the above. - HP Designjet 5000 | HP DesignJet 5000 Series Printer - Setup Poster - Page 10
WebAccess users: To use the HP DesignJet WebAccess feature, you will need to configure your printer on an IP network. If you have a PC running Windows, use the HP DesignJet Printers Software Setup CD (see the next page). Otherwise see the JetDirect Administrator's Guide. st565 If you are using - HP Designjet 5000 | HP DesignJet 5000 Series Printer - Setup Poster - Page 11
Page 11 - HP Designjet 5000 | HP DesignJet 5000 Series Printer - Setup Poster - Page 12
access, you can also get the software from HP's Web Site, the HP Download Service, Compuserve or AOL. You will find more through the driver software installation instructions, and a description of all supported installation methods on our web site, www.hp.com/go/designjet. For detailed information
-
 1
1 -
 2
2 -
 3
3 -
 4
4 -
 5
5 -
 6
6 -
 7
7 -
8
-
9
-
10
-
11
-
12
 |
 |

Page 1
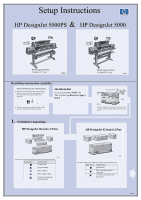
Read these instructions carefully...
What You Will Need For This Procedure:
n
Because some of the components of the printer are
bulky, you may need two or three people to lift
them. When this is necessary this symbol is
displayed:
n
The time required to assemble the printer is about
two hours, depending on the printer model.
The Take-Up Reel
If you are installing
ONLY
the
Take-Up Reel,
go directly to page 3,
Step 5.
Cut the strap from around the Accessory boxes
carefully, as the boxes may fall as soon as the strap
is cut.
M4
st506a
Main printer
box
Strap
Accessory boxes
1.
Preliminary unpacking
The shapes on the boxes identify the contents, refer to the table below:
The shapes on the boxes identify the contents, refer to the table below
.
Mark on box
Content of box
Printer body
Legs Assembly
Take-Up Reel
Take-Up Reel Tubes
Assorted consumables
and documents
st572
HP DesignJet 60 inch (1.57m)
Mark on box
Content of box
Printer body
Legs Assembly and Bin
Assembly
Assorted consumables and
documents
st573
HP DesignJet 42 inch (1.07m)
Setup Instructions
HP DesignJet 5000PS
&
HP DesignJet 5000
st501a
HP DesignJet Printer
42 inch (1.07 m)
HP DesignJet Printer
60 inch (1.57 m)
st501
st570