HP EliteBook 8000 Installing SATA Drivers on HP EliteBook Notebook PCs
HP EliteBook 8000 Manual
 |
View all HP EliteBook 8000 manuals
Add to My Manuals
Save this manual to your list of manuals |
HP EliteBook 8000 manual content summary:
- HP EliteBook 8000 | Installing SATA Drivers on HP EliteBook Notebook PCs - Page 1
Installing SATA Drivers on HP EliteBook Notebook PCs Introduction...2 Purpose ...2 Audience ...2 Benefits of SATA ...2 System these guidelines are applicable 3 Steps to add SATA support to the original image 3 Adding SATA drivers to RIS Installation Points 5 Where these guidelines are - HP EliteBook 8000 | Installing SATA Drivers on HP EliteBook Notebook PCs - Page 2
Purpose This white paper provides instructions on how to successfully incorporate SATA drivers into a Windows XP installation on HP EliteBook Notebook PC models. The following guidelines provide procedures for adding SATA drivers to RIS (Remote Installation Service) installation points; adding SATA - HP EliteBook 8000 | Installing SATA Drivers on HP EliteBook Notebook PCs - Page 3
support will display a blue screen and reboot very quickly in an infinite loop. Adding SATA drivers to the image will allow XP to access the disk and finish booting. Note: PCI IDs for current HP the default path set at build time. o -s instructs the package to unpack in silent mode skipping the - HP EliteBook 8000 | Installing SATA Drivers on HP EliteBook Notebook PCs - Page 4
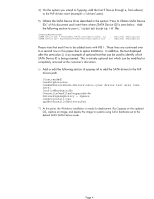
4) On the system you intend to Sysprep, add the first 5 files (a through e, from above) to the PnP drivers store (example: c:\drivers\sata). 5) Obtain the SATA Device ID as described in the section "How to Obtain SATA Device IDs" of this document and insert them where [SATA - HP EliteBook 8000 | Installing SATA Drivers on HP EliteBook Notebook PCs - Page 5
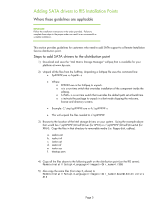
instructions in the order provided. Failure to complete these steps in the proper order can result in an unsuccessful or unstable installation. This section provides guidelines for customers who need to add SATA support to a Remote Installation Service distribution point. Steps to add SATA drivers - HP EliteBook 8000 | Installing SATA Drivers on HP EliteBook Notebook PCs - Page 6
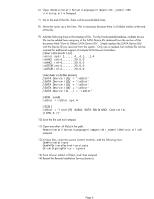
is needed, but multiple IDs can be inserted for additional support of multiple SATA Device Controllers. [SourceDisksFiles] iastor.sys= 1,,,,,,4_ section [Unattended], add the following lines: OemPreinstall=yes OemPnPDriversPath=drivers\sata DriverSigningPolicy = Ignore 13) Save all your edited .sif - HP EliteBook 8000 | Installing SATA Drivers on HP EliteBook Notebook PCs - Page 7
need to add SATA support by creating a custom Windows XP Service Pack 2 Installation CD. Steps to add SATA drivers to the CD 1) Copy time switch that overrides the default path set at build time. o -s instructs the package to unpack in silent mode skipping the welcome, license and directory screens - HP EliteBook 8000 | Installing SATA Drivers on HP EliteBook Notebook PCs - Page 8
,6,7)" 12) Save the file and exit notepad. 13) Extract the files from c:\xpcd\support\tools\deploy.cab to c:\deploytools 14) Create a new winnt.sif: a. Execute setupmgr.exe lines: OemPreinstall=yes OemPnPDriversPath=drivers\sata DriverSigningPolicy = Ignore 17) Save winnt.sif and close notepad Page - HP EliteBook 8000 | Installing SATA Drivers on HP EliteBook Notebook PCs - Page 9
18) Burn the custom XPCD from the c:\xpcd folder. a. Note that the volume label of the CD must be the same as from the original XP CD b. The custom XPCD must be bootable (with the Microsoft bootblock). There are various 3rd party utilities which can accomplish this. Utilities from Microsoft are - HP EliteBook 8000 | Installing SATA Drivers on HP EliteBook Notebook PCs - Page 10
the installation instructions in the order provided. Failure to complete these steps in the proper order can result in an unsuccessful or unstable installation. This section provides guidelines for customers who need to add SATA support to a WinPE ISO or DOK. Steps to add SATA drivers to WinPE - HP EliteBook 8000 | Installing SATA Drivers on HP EliteBook Notebook PCs - Page 11
the Device ID you received from the system. Only one is needed, but multiple IDs can be inserted for additional support of multiple SATA Device Controllers. [SourceDisksFiles] iastor.sys= 1,,,,,,4_,4,1,,,1,4 iaAHCI.cat=1,,,,,,,20,0,0 iaAHCI.inf=1,,,,,,,20,0,0 iaSTOR.cat=1,,,,,,,20,0,0 iaSTOR.inf - HP EliteBook 8000 | Installing SATA Drivers on HP EliteBook Notebook PCs - Page 12
for disabling SATA native mode in F10 setup, building the image, adding the drivers for SATA AHCI to the image, and re-enabling SATA native mode in F10 setup. Steps to modify a Windows XP image to support SATA Native Mode 1) Enter F10 Setup, and go to System Configuration/Device Configurations - HP EliteBook 8000 | Installing SATA Drivers on HP EliteBook Notebook PCs - Page 13
Utility for ICH9 for Microsoft Windows 2000 and XP" for your models from www.hp.com. 7) In Device Manager, right-click the IDE ATA/ATAPI controllers/Intel ® ICH9M Serial ATA Storage Controller and select 'Update Driver'. If more than one Intel ICH9M Serial ATA Storage Controller is listed this - HP EliteBook 8000 | Installing SATA Drivers on HP EliteBook Notebook PCs - Page 14
SATA Device IDs Where these guidelines are applicable This section provides guidelines for customers who need the SATA Device ID from an HP system to enable SATA AHCI support in custom images. Steps are provided for both Windows XP and Windows Vista. Steps to obtain the SATA Device ID from a Windows - HP EliteBook 8000 | Installing SATA Drivers on HP EliteBook Notebook PCs - Page 15
4) When the Device Manager Console opens, scroll down to locate & expand the category for IDE ATA/ATAPI controllers as seen in the screenshot below: 5) Double click on the listed SATA AHCI Controller to bring up the device's property window. Page 15 - HP EliteBook 8000 | Installing SATA Drivers on HP EliteBook Notebook PCs - Page 16
6) In the device property window, select the Details tab and choose "Hardware Ids" from the drop-down menu as seen in the screenshot below. The Device ID needed from the list is the one with the simple Class Code Hardware ID (identified with a "CC" string in the name). In the example below, the - HP EliteBook 8000 | Installing SATA Drivers on HP EliteBook Notebook PCs - Page 17
Steps to obtain the SATA Device ID from a Windows Vista image 1) Begin by taking a Windows Vista system with the HP image already on it. Turn on the system and boot into the Operating System. 2) Once the Operating System is loaded, select the Start Button and - HP EliteBook 8000 | Installing SATA Drivers on HP EliteBook Notebook PCs - Page 18
3) When the Device Manager Console opens, scroll down to locate & expand the category for IDE ATA/ATAPI controllers as seen in the screenshot below: 4) Double click on the listed SATA AHCI Controller to bring up the device's property window. Page 18 - HP EliteBook 8000 | Installing SATA Drivers on HP EliteBook Notebook PCs - Page 19
5) In the device property window, select the Details tab and choose "Hardware Ids" from the drop-down menu as seen in the screenshot below. The Device ID needed from the list is the one with the simple Class Code Hardware ID (identified with a "CC" string in the name). In the example below, the - HP EliteBook 8000 | Installing SATA Drivers on HP EliteBook Notebook PCs - Page 20
to change without notice. The only warranties for HP products and services are set forth in the express warranty statements accompanying such products and services. Nothing herein should be construed as constituting an additional warranty. HP shall not be liable for technical or editorial errors
-
 1
1 -
 2
2 -
 3
3 -
 4
4 -
 5
5 -
 6
6 -
 7
7 -
8
-
9
-
10
-
11
-
12
-
13
-
14
-
15
-
16
-
17
-
18
-
19
-
20
 |
 |

Installing SATA Drivers on HP EliteBook Notebook PCs
Introduction
.........................................................................................................................................
2
Purpose
..........................................................................................................................................
2
Audience
........................................................................................................................................
2
Benefits of SATA
..............................................................................................................................
2
System Requirements and Prerequisites
...................................................................................................
2
System requirements
.........................................................................................................................
2
System prerequisites
.........................................................................................................................
2
Transitioning a Sysprep image from IDE to SATA
.....................................................................................
3
Where these guidelines are applicable
...............................................................................................
3
Steps to add SATA support to the original image
.................................................................................
3
Adding SATA drivers to RIS Installation Points
.........................................................................................
5
Where these guidelines are applicable
...............................................................................................
5
Steps to add SATA drivers to the distribution point
...............................................................................
5
Adding SATA Drivers to an Installation CD
.............................................................................................
7
Where these guidelines are applicable
...............................................................................................
7
Steps to add SATA drivers to the CD
..................................................................................................
7
Using OSCDIMG (or CDIMAGE) and CDBURN (command line utilities from Microsoft)
............................
9
Adding SATA Drivers to WinPE 2005
..................................................................................................
10
Where these guidelines are applicable
.............................................................................................
10
Steps to add SATA drivers to WinPE 2005
.......................................................................................
10
Modifying a Windows XP installation to support SATA Native Mode
.......................................................
12
Where these guidelines are applicable
.............................................................................................
12
Steps to modify a Windows XP image to support SATA Native Mode
..................................................
12
How to Obtain SATA Device IDs
.........................................................................................................
14
Where these guidelines are applicable
.............................................................................................
14
Steps to obtain the SATA Device ID from a Windows XP image
...........................................................
14
Steps to obtain the SATA Device ID from a Windows Vista image
.......................................................
17
For more information
..........................................................................................................................
20