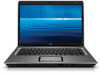
HP G6000 Notebook Tour - Windows Vista
HP G6000 - Notebook PC Manual
 |
View all HP G6000 manuals
Add to My Manuals
Save this manual to your list of manuals |
HP G6000 manual content summary:
- HP G6000 | Notebook Tour - Windows Vista - Page 1
Notebook Tour User Guide - HP G6000 | Notebook Tour - Windows Vista - Page 2
Development Company, L.P. Microsoft and Windows are U.S. registered trademarks of services. Nothing herein should be construed as constituting an additional warranty. HP shall not be liable for technical or editorial errors or omissions contained herein. First Edition: November 2007 Document Part - HP G6000 | Notebook Tour - Windows Vista - Page 3
the computer, do not place the computer directly on your lap or obstruct the computer air vents. Use the computer only on a hard, flat surface. Do not allow another hard surface, such as an adjoining optional printer, or a soft surface, such as pillows or rugs or clothing, to block airflow. Also, do - HP G6000 | Notebook Tour - Windows Vista - Page 4
iv Safety warning notice - HP G6000 | Notebook Tour - Windows Vista - Page 5
...3 Lights ...4 Buttons and speakers ...5 Keys ...6 Front components ...7 Rear components ...8 Right-side components ...9 Left-side components ...10 Bottom components ...11 Display components ...12 Wireless antennae (select models only 13 Additional hardware components ...14 3 Labels Index ...16 v - HP G6000 | Notebook Tour - Windows Vista - Page 6
vi - HP G6000 | Notebook Tour - Windows Vista - Page 7
> System properties. 2. In the left pane, click Device Manager. You can also add hardware or modify device configurations using Device Manager. NOTE: Windows® includes the User Account Control feature to improve the security of your computer. You may be prompted for your permission or password for - HP G6000 | Notebook Tour - Windows Vista - Page 8
2 Components 2 Chapter 2 Components - HP G6000 | Notebook Tour - Windows Vista - Page 9
This user guide describes features * Moves the pointer and selects or activates items on the screen. (3) TouchPad horizontal scroll zone* Scrolls left or right. right button on an external mouse. *This table describes factory settings. To view and change pointing device preferences, select - HP G6000 | Notebook Tour - Windows Vista - Page 10
computer is off or in Hibernation. (2) Caps lock light On: Caps lock is on. *The 2 power lights display the same information. The light on the power button is visible only when the computer is open. The power light on the front of the computer is visible whether the computer is open or closed - HP G6000 | Notebook Tour - Windows Vista - Page 11
briefly to exit Hibernation. If the computer has stopped responding and Windows® shutdown procedures are ineffective, press and hold the power button for at least 5 seconds to turn off the computer. To learn more about your power settings, select Start > Control Panel > System and Maintenance - HP G6000 | Notebook Tour - Windows Vista - Page 12
combination with the fn key. Executes frequently used system functions when pressed in combination with a function key or the esc key. Displays the Windows Start menu. Can be used like the keys on an external numeric keypad. Displays a shortcut menu for items beneath the pointer. Execute frequently - HP G6000 | Notebook Tour - Windows Vista - Page 13
charged. If the computer is not plugged into an external power source, the light stays off until the battery reaches a low battery level. (3) Drive light Blinking: The hard drive or optical drive is being accessed. (4) Wireless switch Turns the wireless feature on or off, but does not create - HP G6000 | Notebook Tour - Windows Vista - Page 14
Rear components Component Vents (2) Description Enable airflow to cool internal components. NOTE: The computer fan starts up automatically to cool internal components and prevent overheating. It is normal for the internal fan to cycle on and off during routine operation. 8 Chapter 2 Components - HP G6000 | Notebook Tour - Windows Vista - Page 15
Right-side components Component (1) Optical drive (2) USB port (3) Power connector (4) Security cable slot Description Reads optical discs and, on select models, also writes to optical discs. Connects an optional USB device. Connects an AC adapter. Attaches an optional security cable to the - HP G6000 | Notebook Tour - Windows Vista - Page 16
video capture card. Connects an external VGA monitor or projector. Connects a network cable. Connects a modem cable. Connect optional USB devices. On: A digital card is being accessed. Supports the following optional digital card formats: Secure Digital (SD) Memory Card, MultiMediaCard (MMC), Memory - HP G6000 | Notebook Tour - Windows Vista - Page 17
Bottom components Component (1) Battery bay (2) Battery release latch (3) Vents (5) (4) Memory module compartment (5) Hard drive bay Description Holds the battery. Releases the battery from the battery bay. Enable airflow to cool internal components. NOTE: The computer fan starts up automatically - HP G6000 | Notebook Tour - Windows Vista - Page 18
models only) Description Turns off the display if the display is closed while the computer is turned on. Record sound. NOTE: If there is a microphone icon next to each microphone opening, your computer has internal microphones. On: The webcam is in use. Records video and captures still photographs - HP G6000 | Notebook Tour - Windows Vista - Page 19
at least 2 antennae send and receive signals from one or more wireless devices. These antennae are not visible from the outside of the computer keep the areas immediately around the antennae free from obstructions. To see wireless regulatory notices, refer to the section of the Regulatory, Safety and - HP G6000 | Notebook Tour - Windows Vista - Page 20
hardware components Component Description (1) Power cord* Connects an AC adapter to an AC outlet. (2) AC adapter Converts AC power to DC power. (3) Battery* Powers the computer when the computer is not plugged into external power. *Batteries and power cords vary in appearance by region - HP G6000 | Notebook Tour - Windows Vista - Page 21
this information available when you contact technical support. The service tag label is affixed to the bottom of the computer. ● Microsoft® Certificate of Authenticity-Contains the Windows® Product Key. You may need the Product Key to update or troubleshoot the operating system. This certificate is - HP G6000 | Notebook Tour - Windows Vista - Page 22
6 Windows logo 6 L labels Bluetooth 15 Microsoft Certificate of Authenticity 15 modem approval 15 regulatory 15 service tag 15 wireless certification 15 WLAN 15 latch, battery release 11 lights battery 7 caps lock 4 Digital Media Slot 10 drive 7 power 4, 7 TouchPad 3 webcam 12 wireless 7 M memory - HP G6000 | Notebook Tour - Windows Vista - Page 23
label 15 Product Key 15 optical drive, identifying 9 U USB ports 10 USB ports, identifying 9 V vents, identifying 8, 11 P ports external monitor 10 USB 9, 10 power button, identifying 5 power connector, identifying 9 power cord, identifying 14 power lights, identifying 4, 7 Product Key 15 - HP G6000 | Notebook Tour - Windows Vista - Page 24
-
 1
1 -
 2
2 -
 3
3 -
 4
4 -
 5
5 -
 6
6 -
 7
7 -
8
-
9
-
10
-
11
-
12
-
13
-
14
-
15
-
16
-
17
-
18
-
19
-
20
-
21
-
22
-
23
-
24
 |
 |

Notebook Tour
User Guide