HP IQ524 Getting Started Guide
HP IQ524 - TouchSmart - 4 GB RAM Manual
 |
UPC - 884420541554
View all HP IQ524 manuals
Add to My Manuals
Save this manual to your list of manuals |
HP IQ524 manual content summary:
- HP IQ524 | Getting Started Guide - Page 1
Welcome to the next generation of computers. - HP IQ524 | Getting Started Guide - Page 2
that is not furnished by HP. This document contains proprietary information that is protected by copyright. No part of this document may be Windows logo and Windows Vista are trademarks or registered trademarks of Microsoft Corporation in the United States and/or other countries/regions. HP supports - HP IQ524 | Getting Started Guide - Page 3
the HP TouchSmart PC 1 Front and right side of the HP TouchSmart PC 2 Left side of the HP TouchSmart PC 4 Removing the Connector Cover 5 Back of the HP TouchSmart PC 5 Activity LED indicator lights...7 Connecting the Power Source ...8 Cable Management...8 Adjust the Angle of the Computer Stand - HP IQ524 | Getting Started Guide - Page 4
...26 Cleaning the HP TouchSmart PC Screen 27 Using the Computer with Safety and Comfort 28 Recycling Your Old Computer Hardware 28 Using the HP TouchSmart Software 29 What is HP TouchSmart software 29 Opening the HP TouchSmart software 29 Navigating in HP TouchSmart 30 Using the onscreen - HP IQ524 | Getting Started Guide - Page 5
Clock ...53 Displaying the time for up to three places 53 HP TouchSmart RSS Reader ...54 Setting up RSS feeds ...54 Importing a list of RSS feeds ...54 HP TouchSmart Browser ...55 Selecting Items on the Windows Desktop and in Other Software 57 Software Quick Reference Table 58 Index ...61 - HP IQ524 | Getting Started Guide - Page 6
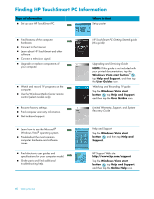
for your computer model. Order parts and find additional troubleshooting help. HP TouchSmart PC Getting Started guide (this guide) Upgrading and Servicing Guide NOTE: If this guide is not included with your printed documentation, tap the Windows Vista start button™ , tap Help and Support, and then - HP IQ524 | Getting Started Guide - Page 7
PC Features of the HP TouchSmart PC The HP TouchSmart PC is a fun and engaging touch-enabled high performance computer built into a high-definition* 22" diagonal widescreen display. The slim and stylish computer offers an engaging touch experience, along with exciting built-in features like webcam - HP IQ524 | Getting Started Guide - Page 8
The HP TouchSmart PC integrates a state-of-the-art 56-cm diagonal widescreen for Touch high-definition display with HP BrightView technology.* The HP BrightView Webcam Create videos and snapshots that you can view, send by e-mail, and upload to video sharing sites. Use the built-in webcam - HP IQ524 | Getting Started Guide - Page 9
left and right, not visible externally). The wireless LAN supports IEEE 802.11 b/g/n (pre-n). F Power/Sleep button Press the Power/Sleep button to turn on your HP TouchSmart PC, or put it in Sleep mode. To turn off your computer, tap the Windows Vista start button , tap the Arrow button next to - HP IQ524 | Getting Started Guide - Page 10
Refer to the Watching and Recording TV guide. Tap the Windows Vista start button , tap Help and Support, and then tap User Guides. Sleek wireless keyboard and mouse fit under the HP TouchSmart PC. Use the built-in, high-quality stereo speakers for a powerful media experience when listening to music - HP IQ524 | Getting Started Guide - Page 11
on the computer, and then pressing it until it snaps into place. Back of the HP TouchSmart PC Features and configurations vary by model A B I C D E J F G K H L M Connector Function A USB 2.0 Connect USB devices (USB 2.0) such as printers, external hard disk drives, digital cameras - HP IQ524 | Getting Started Guide - Page 12
with select models only. I Computer stand Slide stand for stability and best viewing angle. The stand supports an adjustable tilt angle between 10 and 40 degrees from the vertical. To assure that the computer is in a stable position on your desktop, pull the computer stand open until you hear - HP IQ524 | Getting Started Guide - Page 13
Indicates webcam activity. C Power Indicates the power state; blue indicates power on, and amber indicates Sleep mode. D Hard disk drive Indicates hard disk drive activity. E Memory card reader Indicates memory card reader activity. When the LED is flashing, do not remove your memory card - HP IQ524 | Getting Started Guide - Page 14
stand, and then plug the power cord into an AC power source through a surge protector/uninterruptible power supply (UPS). Cable Management The HP TouchSmart PC includes a cable-management feature that is located behind the back connector cover. To use the cable routing clip feature: 1 To remove - HP IQ524 | Getting Started Guide - Page 15
the back of the computer. A 3 Replace the connector cover by aligning the hooks on the right edge of the cover with the slots on the computer, and then pressing it until it snaps into place. Then, route the cables through the notch (B) in the computer stand. B Getting to Know the HP TouchSmart PC 9 - HP IQ524 | Getting Started Guide - Page 16
Adjust the Angle of the Computer Stand The HP TouchSmart PC is shipped with the computer stand collapsed against the back of the computer. To assure that the computer is in a stable position on your desktop, pull the computer stand open until it snaps into place. Then, if you want to change the - HP IQ524 | Getting Started Guide - Page 17
rear of the HP TouchSmart PC will illuminate when the synchronization command has been received and will go off when synchronization is complete. A BC If this does not work, remove and then re-insert the wireless keyboard and mouse receiver from the back of the computer and then synchronize - HP IQ524 | Getting Started Guide - Page 18
on the HP TouchSmart PC After you finish setting up your HP TouchSmart PC, press the Power/Sleep button (A) on the top-right side of the computer to turn it on. Complete the initial setup by following the onscreen instructions. Please be patient while the setup process completes, it may take several - HP IQ524 | Getting Started Guide - Page 19
settings, and then tap Save Changes. 7 You can also select Change advanced power settings, select your options, and then tap OK. Connecting to the Internet Your HP TouchSmart PC is designed to support a wireless or wired LAN that connects your computer to other devices, such as printers and other - HP IQ524 | Getting Started Guide - Page 20
's instructions. 4 Connect your computer to the network. NOTE: A DSL wall connection is shown here. If you have a cable modem, the connection from the wall to the modem will be with a coaxial cable. Internet Wall plug Broadband modem (DSL/cable) Wireless router 5 Configure the HP TouchSmart PC - HP IQ524 | Getting Started Guide - Page 21
through the cable router clip on the back of the PC (shown), then route the cable through the notch in the back stand (not shown), then close the back connector cover. Wired router Internet Wall plug Broadband modem (DSL/cable) Configurations vary by model Getting to Know the HP TouchSmart PC 15 - HP IQ524 | Getting Started Guide - Page 22
instructions. 3 If your Bluetooth device is a printer, click the Windows Vista start button , Control Panel, and then click Hardware and Sound. Click Printers. Click Add a printer. Adjusting the Ambient Light The HP TouchSmart Ambient Light casts a cool white glow from the base of the computer - HP IQ524 | Getting Started Guide - Page 23
Upgrading your HP TouchSmart PC hardware To find detailed instructions on removing and replacing the memory and the hard disk drive for your HP TouchSmart PC, refer to the Upgrading and Servicing Guide that came with your computer. Updating your HP TouchSmart software Check www.hp.com/go/touchsmart - HP IQ524 | Getting Started Guide - Page 24
Please read "Additional Safety Information" in the Limited Warranty, Support, and System Recovery Guide before installing and connecting your HP TouchSmart PC to the electrical power system. To connect a TV signal to the computer, your computer needs a TV tuner, which is included with select models - HP IQ524 | Getting Started Guide - Page 25
To connect the TV signal source to your HP TouchSmart PC: 1 Connect the coaxial cable from your TV antenna or TV cable provider to the TV tuner adapter and then connect this to the TV In (PAL/DVB-T) (A) connector located on the back of the computer behind the connector cover. Or Connect an S-Video - HP IQ524 | Getting Started Guide - Page 26
Center from HP TouchSmart, open HP TouchSmart, and tap the Windows Media Center tile. 2 Scroll to the Tasks menu, and select settings, General, and then select Windows Media Center Setup. 3 Follow the onscreen instructions to set up your TV tuner and Windows Media Center TV program guide. For more - HP IQ524 | Getting Started Guide - Page 27
the Power/Sleep button on the remote control turns on the HP TouchSmart PC or puts it into Sleep mode. For more information about how to watch and record TV programs, refer to the Watching and Recording TV guide that came with your computer. Tap the Windows Vista start button , tap Help and Support - HP IQ524 | Getting Started Guide - Page 28
HP TouchSmart PC supports the following speaker options: Built-in analog stereo speakers Analog 2.0 or 2.1 powered speakers Digital 3.1, 4.1, or 5.1 powered speakers Audio receiver NOTES: The HP TouchSmart PC supports powered speaker systems only. Powered speakers require a separate power supply - HP IQ524 | Getting Started Guide - Page 29
on the back of the computer behind the connector cover, and then use the following procedure to enable the speakers or audio receiver. If necessary, refer to the instructions that came with your speakers Experience, Recording Experience, and Advanced buttons. Getting to Know the HP TouchSmart PC 23 - HP IQ524 | Getting Started Guide - Page 30
on the right side of the computer. 2 Use the Microsoft Volume icon on the taskbar: a Press and hold (or with the mouse, right-click) the Volume icon, and then select Open Volume Mixer. The Volume Mixer settings window opens. b To adjust the volume for HP TouchSmart programs (Notes, Music, and Video - HP IQ524 | Getting Started Guide - Page 31
-in microphone array near the webcam on the front of the computer. The array is designed to filter out ambient noise in your environment to provide a cleaner sound. You can use the microphone from a distance of up to one-half meter from the HP TouchSmart PC. To adjust the volume: 1 Tap the SoundMAX - HP IQ524 | Getting Started Guide - Page 32
HP TouchSmart PC does not support printers that require a parallel printer connector. Installing a Security Lock A security lock (sold separately) enables you to secure your computer from theft and unwanted changes. A security lock is a key lock device that has a wire cable attached. You attach one - HP IQ524 | Getting Started Guide - Page 33
the Arrow button next to the Lock icon, and then tap Shut Down. 2 Disconnect the power cord from the wall. 3 Spray a small amount of a mild glass cleaner onto the cleaning cloth that came with your HP TouchSmart PC. You can also use a soft cloth or paper towel dampened with a typical household glass - HP IQ524 | Getting Started Guide - Page 34
: Tap the Windows Vista start button , tap Help and Support, User Guides, and then tap Safety & Comfort Guide. Or Type http://www.hp.com/ergo into the Web browser address box, and then press the Enter key on the keyboard. Recycling Your Old Computer Hardware HP offers computer equipment recycling - HP IQ524 | Getting Started Guide - Page 35
the HP TouchSmart software A To open the HP TouchSmart software, just press the HP TouchSmart button (A) on the lower-right side of the HP TouchSmart PC. You can also double-tap the HP TouchSmart shortcut icon on the desktop to open the HP TouchSmart software. Using the HP TouchSmart Software - HP IQ524 | Getting Started Guide - Page 36
Scroll browsing Tile View browsing Tap the music controls at the top right of the window. Tap the Windows Vista icon in the upper-left corner to minimize HP TouchSmart and go to the Microsoft Windows desktop. To quickly scroll left and right, or up and down, you can touch and drag your finger - HP IQ524 | Getting Started Guide - Page 37
inside a text window and the onscreen keyboard appears. Use it to enter text by using touch. Because this touch technology is sensitive, HP recommends that you handle the touch screen with care. Please review the following cautions: CAUTION: Because the HP TouchSmart touch screen uses a sensitive - HP IQ524 | Getting Started Guide - Page 38
handwriting, touch, and text input tool. If the Touch Input Panel is not available or if you want to adjust your touch settings, tap the Windows Vista start button , tap Control Panel, Mobile PC, and then tap Pen and Input Devices. Select the setting to enable the Touch Input Panel. You can also - HP IQ524 | Getting Started Guide - Page 39
by pressing a tile and dragging it to a new location in the window. The tile appears as a transparent image while you are moving it. dropping it in a new location. Adding a software program shortcut to HP TouchSmart 1 Open HP TouchSmart, and tap the Personalize button. 2 Select Add a tile. 3 - HP IQ524 | Getting Started Guide - Page 40
one is not available. You can choose an icon from those displayed below the check box instead. Otherwise, it will display a sample Web page. Your Web site link appears as a small tile on the bottom of the HP TouchSmart homepage. 6 Tap OK to return to the HP TouchSmart HP TouchSmart - HP IQ524 | Getting Started Guide - Page 41
you want. NOTE: The Snapfish Web site is not available in some countries/regions. HP TouchSmart Photo supports the .jpg file format. You can view your photos in Tile View, or you can select the Fan icon at the bottom of the window to view your photos in Fan View. Using the HP TouchSmart Software 35 - HP IQ524 | Getting Started Guide - Page 42
transfer photos from your digital camera to the computer. HP TouchSmart can also display photos from the memory card reader. Download photos from the Web to your hard disk drive. Insert a CD or removable storage drive, and then move photos to the Windows Explorer Picture folder, or any other folder - HP IQ524 | Getting Started Guide - Page 43
in some countries/regions. 1 Open HP TouchSmart, and select the Photo tile. 2 Tap the Upload Photos button at the bottom of the window. 3 Tap the green circle computer. 5 Select your print options, and then tap Print. 6 Follow any onscreen printing instructions. Using the HP TouchSmart Software 37 - HP IQ524 | Getting Started Guide - Page 44
You can make changes to your photos in HP TouchSmart Photo. Some of the editing features include removing red-eye, cropping, auto-correcting, and Crop button to apply your change. 6 Tap Return to exit the editing window. 7 You can select the Revert to Original button at a later time if you - HP IQ524 | Getting Started Guide - Page 45
you can edit and save to play later. Browse your albums in Tile View or Fan View by pressing and sliding your finger across the album images, and then tapping an album to select it. HP TouchSmart Music supports the following music file formats: .mp3, .wma, .wav, .aac, .m4p, and .m4a. NOTE: You must - HP IQ524 | Getting Started Guide - Page 46
to your music CDs in HP TouchSmart Music: 1 Insert your CD into the CD drive by pushing the disc directly into the slot drive, with the label facing the front of the computer. 2 Open HP TouchSmart, and select the Music tile. Your CD appears at the top of the Music window, as Audio CD. 3 Select Audio - HP IQ524 | Getting Started Guide - Page 47
, right-click) the Speaker icon in the Windows taskbar. Select Open Volume Mixer, and adjust the HP TouchSmart Music volume slider. (To view the Speaker icon in the Windows taskbar, minimize HP TouchSmart and go to the Windows desktop by tapping the HP TouchSmart House icon on the upper left corner - HP IQ524 | Getting Started Guide - Page 48
playlist by simply dragging your songs to the Playlist window. 1 Open HP TouchSmart, and select the Music tile. 2 Select one or more items in Playlist before adding new songs. Or, you could just save that playlist, and start another. Playing your playlist To play your playlist: 1 Open HP TouchSmart - HP IQ524 | Getting Started Guide - Page 49
tap the Windows Vista start button , tap All Programs, tap Windows Media Player, and then tap the Help icon. * HP supports the lawful use of technology and does not endorse or encourage the use of our products for purposes other than those permitted by copyright law. Using the HP TouchSmart Software - HP IQ524 | Getting Started Guide - Page 50
in Fan View. HP TouchSmart Video supports the following video file formats: .mpg, .mpeg, dvr-ms, .wmv, .asf, and .avi. Adding your videos to the computer 1 Connect your video camera to the computer by using a USB or FireWire (IEEE 1394) connector, and follow the onscreen instructions to transfer - HP IQ524 | Getting Started Guide - Page 51
, and adjust both the Speaker volume slider and the HP TouchSmart Video volume slider (scroll to the right in the Applications area to view HP TouchSmart Video). (To view the Speaker icon in the Windows taskbar, minimize HP TouchSmart and go to the Windows desktop by tapping the HP TouchSmart House - HP IQ524 | Getting Started Guide - Page 52
and password of an existing YouTube account. 6 Follow the onscreen instructions to finish uploading your video to YouTube. Capturing, editing, and recording how to capture, edit, and record your videos to disc, tap the Windows Vista start button , tap All Programs, muvee Home Movies made easy!, the - HP IQ524 | Getting Started Guide - Page 53
Player. 3 Use the media controls in the DVD playing program to play your DVD. Webcam and Microphone Your HP TouchSmart PC comes with a built-in webcam (A) and array microphone (B) located at the top of your computer. You can use them to capture videos and have video chats and conference calls by - HP IQ524 | Getting Started Guide - Page 54
and snapshots You can use HP TouchSmart to take snapshots and record video. See "Creating videos with the webcam" on page 45 and "Capturing, editing, and recording videos" on page 46. You can also use CyberLink YouCam to capture webcam video and snapshots, add fun effects to your videos, e-mail - HP IQ524 | Getting Started Guide - Page 55
if the calendar icon is located in the upper row. The HP TouchSmart homepage displays up to four appointments. It updates periodically by removing past events and listing upcoming appointments for that day. HP TouchSmart Calendar shows the appointment start time of the event when it displays - HP IQ524 | Getting Started Guide - Page 56
the event. Synchronizing your HP TouchSmart Calendar with your Microsoft Windows Vista Calendar Open HP TouchSmart, and tap the Calendar tile. The HP TouchSmart Calendar automatically synchronizes with the Windows Vista calendar. HP TouchSmart Notes With HP TouchSmart Notes, you can create text - HP IQ524 | Getting Started Guide - Page 57
note Written notes can be typed, handwritten by touch, or drawn with a stylus (purchased separately). 1 Open HP TouchSmart, and select the Notes tile. 2 Select the Notepad icon at the bottom of the window. 3 Select a paper color by selecting the Paper icon on the left, and then select a font color - HP IQ524 | Getting Started Guide - Page 58
, right-click) the Speaker icon in the Windows taskbar. Select Open Volume Mixer, and adjust the HP TouchSmart Notes volume slider. (To view the Speaker icon in the Windows taskbar, minimize HP TouchSmart and go to the Windows desktop by tapping the HP TouchSmart House icon on the upper left corner - HP IQ524 | Getting Started Guide - Page 59
view the main clock in the smaller Clock tile. Displaying the time for up to three places 1 Open HP TouchSmart, and select the Clock tile. 2 Tap the Clock area in the center of the window to edit the time. 3 Tap in the Name box, and type in a city name. 4 Press the drop-down - HP IQ524 | Getting Started Guide - Page 60
or updates that you can view later. Setting up RSS feeds To subscribe to an RSS feed in Internet Explorer: 1 Tap the Windows Vista window. If you tap the arrow button on the feed window, it opens in Internet Explorer outside of HP TouchSmart. When you close the feed, the HP TouchSmart RSS feed window - HP IQ524 | Getting Started Guide - Page 61
34 for instructions on adding a tile. Navigation controls in the HP TouchSmart Browser: Button What it does The Back arrow button displays the previous page or window. The Forward arrow displays a Web page or window you had opened earlier. The Home icon takes you to the HP TouchSmart PC Web page - HP IQ524 | Getting Started Guide - Page 62
searching, you may want to keep your favorite Internet search site as a link in one of your tiles. See "Adding a Web site link to HP TouchSmart" for instructions. Pop-ups: HP TouchSmart Browser does not allow any secondary windows or pop-ups to display in front of the primary page. If a link from - HP IQ524 | Getting Started Guide - Page 63
Selecting Items on the Windows Desktop and in Other Software With the HP TouchSmart PC, you always have the flexibility to use various ways to navigate the desktop, search the Web, and work with various programs on your computer. You can use the touch screen, keyboard, mouse, stylus (purchased - HP IQ524 | Getting Started Guide - Page 64
list of all the software included with your computer. To open any of these programs, tap the Windows Vista start button , tap All Programs, select the program folder (for example, DVD Play), and then tap the program name to open the software. With this program: HP TouchSmart DVD Play You can: View - HP IQ524 | Getting Started Guide - Page 65
HP software and driver updates. Get important messages from HP. Access PC Health and Security and PC Help tools. Import audio, video, and other media files from videotape, audiotape, webcams such as .jpg or .gif. Create .avi and .wmv (Windows Media Video) files. Using the HP TouchSmart Software 59 - HP IQ524 | Getting Started Guide - Page 66
60 Getting Started - HP IQ524 | Getting Started Guide - Page 67
6 calendar using HP TouchSmart Calendar 49 camera using the webcam 47 carpal tunnel syndrome 28 CD creating music CD 43 playing 40 using the CD/DVD drive 17 cleaning touch screen 27 computer connecting the IR emitter 20 recycling old hardware 28 turning on 12 computer stand 6 adjusting the angle 10 - HP IQ524 | Getting Started Guide - Page 68
35 R receiver, wireless keyboard and mouse 7 recycling old computer hardware 28 remote control features 3 IR receiver LED 7 Power/Sleep button 21 sensor 21 using with HP TouchSmart 21 repetitive strain injury (RSI), see Safety & Comfort Guide router installation 14, 15 RSS feeds importing a list 54 - HP IQ524 | Getting Started Guide - Page 69
S Safety & Comfort Guide 28 safety warnings 28 security lock slot 6 set-top box connecting to computer 20 remote emitter cable for 20 using with HP TouchSmart PC 20 slideshow, viewing 36 software updating 17 software programs CyberLink DVD Suite 58 CyberLink LabelPrint 59 CyberLink Power2Go 58 - HP IQ524 | Getting Started Guide - Page 70
- HP IQ524 | Getting Started Guide - Page 71
Bienvenue dans le monde des ordinateurs de prochaine génération. - HP IQ524 | Getting Started Guide - Page 72
et services. Aucun élément de ce document ne saurait être considéré comme une garantie supplémentaire. La société HP ne au 28 août 2008. Microsoft et Windows Vista sont des marques déposées de Microsoft Corporation aux États-Unis. Le logo Windows et Windows Vista sont des marques de commerce ou - HP IQ524 | Getting Started Guide - Page 73
l'ordinateur HP TouchSmart 19 Connexion de la source de signal TV à l'ordinateur 19 Configuration de l'ordinateur HP TouchSmart avec un boîtier décodeur 21 Exécution de l'assistant de configuration de Windows Media Center 22 Utilisation de la télécommande avec Windows Media Center 22 Table des - HP IQ524 | Getting Started Guide - Page 74
pour Windows Media Center 26 Utilisation d'un casque d'écoute 26 Utilisation du microphone array 26 Utilisation d'un casque d'écoute 26 Branchement d'un lecteur MP3 26 Branchement d'une imprimante 27 Installation d'un verrou de sécurit 27 Nettoyage de l'écran de l'ordinateur HP TouchSmart 28 - HP IQ524 | Getting Started Guide - Page 75
Webcam et microphone 49 Capture de vidéos et d'instantanés avec la webcam 50 Conversation vidéo ou visioconférence 50 Calendrier HP TouchSmart 51 du calendrier 52 Synchronisation du Calendrier HP TouchSmart avec le Calendrier de Microsoft Windows Vista 52 HP TouchSmart Notes 52 Création d'une - HP IQ524 | Getting Started Guide - Page 76
marrage rapide Manuel de démarrage rapide de l'ordinateur HP TouchSmart (ce manuel) Manuel de mise à niveau et d'entretien REMARQUE : si ce guide n'est pas inclus avec la documentation imprimée, effleurez le bouton Démarrer de Windows Vista , appuyez sur Aide et Support, puis sur l'icône Manuels de - HP IQ524 | Getting Started Guide - Page 77
ordinateur HP TouchSmart Le HP TouchSmart est un ordinateur haute performance convivial et amusant intégré dans un magnifique écran large haute définition* de 56 centimètres. D'une finesse et d'une élégance sans pareille, il possède des caractéristiques inhérentes passionnantes, comme une webcam, un - HP IQ524 | Getting Started Guide - Page 78
est parfaitement réceptif. Simplifiez la gestion de votre vie numérique grâce à la technologie tactile du logiciel HP TouchSmart. B Bluetooth (certains modèles uniquement) C Webcam * Un contenu haute définition (HD) est indispensable pour visualiser des images HD. La plupart des DVD n'offrent - HP IQ524 | Getting Started Guide - Page 79
HP TouchSmart ou le mettre en veille. Pour éteindre l'ordinateur, effleurez le bouton Démarrer de Windows lecture et d'écriture sur des disques aux formats DVD-RAM, CD-R/RW et DVD+/-R/RW. Possibilité de lecture Capacity (SDHC), MultiMediaCard (MMC), Memory Stick (MS) et Memory Stick Pro (MS-Pro). - HP IQ524 | Getting Started Guide - Page 80
le bouton Démarrer de Windows Vista , appuyez sur Aide et support, puis sur Manuels de l'utilisateur. N Clavier et souris sans fil Le clavier et la souris sans fil aux lignes pures sont parfaitement adaptés pour un rangement sous l'ordinateur HP TouchSmart. O Haut-parleurs internes Écoutez - HP IQ524 | Getting Started Guide - Page 81
és et les configurations varient en fonction du modèle A B C D Connecteur Fonction A Bouton de réglage La lumière ambiante de l'ordinateur HP TouchSmart diffuse une lueur d'un blanc de la lumière cru depuis la base de l'ordinateur. ambiante B USB 2.0 Connectez vos périphériques USB - HP IQ524 | Getting Started Guide - Page 82
sur le bord droit sur les fentes de l'ordinateur, puis en appuyant jusqu'à leur enclenchement. Arrière de l'ordinateur HP TouchSmart Les fonctionnalités et les configurations varient en fonction du modèle A B I C D E J F G K H L M Connecteur Fonction A USB 2.0 Connectez vos périph - HP IQ524 | Getting Started Guide - Page 83
dans le collier, fermez le capot des connecteurs, puis guidez les câbles au travers de l'ouverture dans le socle de l'ordinateur. Présentation de l'ordinateur HP TouchSmart 7 - HP IQ524 | Getting Started Guide - Page 84
des diodes électroluminescentes (DEL) qui témoignent d'une activité sur l'ordinateur HP TouchSmart. Témoin Rôle A Événement Indique qu'un rappel d'événement a été pour naviguer dans Windows, enregistrer des émissions télévisées et exécuter d'autres fonctions au sein de Windows Media Center. - HP IQ524 | Getting Started Guide - Page 85
le cordon d'alimentation au travers de l'ouverture dans le support de l'ordinateur, puis raccordez-le à une source d'alimentation secteur via un parasurtenseur/ onduleur UPS (alimentation sans interruption). Gestion des câbles L'ordinateur HP TouchSmart bénéficie d'une fonction de gestion des câbles - HP IQ524 | Getting Started Guide - Page 86
2 Guidez vos câbles au travers du collier d'acheminement (A), et faites-les sortir à l'arrière de l'ordinateur. A 3 Remettez le capot en alignant les ergots qui figurent sur le bord droit sur les fentes de l'ordinateur, puis en appuyant jusqu'à leur enclenchement. Ensuite, faites passer les câbles - HP IQ524 | Getting Started Guide - Page 87
garantir l'aplomb de l'ordinateur sur votre bureau, écartez le socle en tirant jusqu'à son enclenchement. Ensuite, si vous voulez modifier l'angle du HP TouchSmart, empoignez l'ordinateur de chaque côté, et faites-le basculer vers l'arrière à un angle entre 10 et 40 degrés par rapport à la verticale - HP IQ524 | Getting Started Guide - Page 88
du clavier et de la souris peut être nécessaire. Pour les synchroniser : Assurez-vous que le clavier et la souris sont à proximité de l'ordinateur HP TouchSmart, à savoir à moins de 30 cm, et qu'aucun autre périphérique ne crée une interférence. Clavier : appuyez sur le bouton de connexion sous - HP IQ524 | Getting Started Guide - Page 89
l'allumer. Effectuez la procédure d'installation initiale en suivant les instructions données à l'écran. Soyez patient ; la procédure d'installation initiale peut durer plusieurs minutes. A B Vous pouvez aussi allumer l'ordinateur HP TouchSmart ou le mettre en veille en appuyant sur le bouton de - HP IQ524 | Getting Started Guide - Page 90
, comme par exemple des imprimantes et d'autres PC. La connexion réseau à Internet se fait d'ordinaire par le biais d'un modem à large bande (DSL ou câble), qui nécessite un abonnement distinct. Pour un réseau local sans fil, l'ordinateur HP TouchSmart comporte une antenne de réseau local sans fil - HP IQ524 | Getting Started Guide - Page 91
: 1 Souscrivez à un service d'accès Internet haut débit instructions qui s'affichent à l'écran. c Testez le réseau sans fil ; pour cela, ouvrez votre navigateur Web et accédez à un site Web. 6 Ajoutez des périphériques sans fil au réseau (facultatif). Présentation de l'ordinateur HP TouchSmart - HP IQ524 | Getting Started Guide - Page 92
vous acquitter des tâches suivantes : 1 Souscrivez à un service d'accès Internet haut débit auprès d'un fournisseur d' varient en fonction du fabricant. Conformez-vous aux instructions du fabricant. 4 Connectez le câble DSL ( . Le port Ethernet de l'ordinateur HP TouchSmart est situé à l'arrière - HP IQ524 | Getting Started Guide - Page 93
large bande et le routeur de l'alimentation, puis éteignez l'ordinateur HP TouchSmart et les PC que vous voulez ajouter au réseau. b Pour chaque ordinateur câ autres. Pour activer un périphérique Bluetooth : 1 Reportez-vous aux instructions du périphérique Bluetooth pour des détails sur la façon dont - HP IQ524 | Getting Started Guide - Page 94
Mise à niveau du matériel HP TouchSmart Pour des instructions détaillées sur la façon de supprimer et Guide de garantie limitée, de support et de récupération système pour obtenir le numéro de téléphone où contacter le service d'assistance technique HP. * Certaines fonctionnalités de Windows - HP IQ524 | Getting Started Guide - Page 95
de configurer la carte TV et le guide des programmes. Voir Exécution de l'assistant de configuration de Windows Media Center, page 22. 4 Avec la télécommande, visez le récepteur infrarouge en bas à droite de l'ordinateur HP TouchSmart pour lancer Windows Media Center, et parcourez ce programme pour - HP IQ524 | Getting Started Guide - Page 96
Pour connecter la source de signal TV à l'ordinateur HP TouchSmart : 1 Branchez le câble coaxial de l'antenne TV ou le câble TV fourni à l'adaptateur pour carte TV, puis raccordez l'ensemble au connecteur d'entrée TV (PAL/DVB-T) (A) - HP IQ524 | Getting Started Guide - Page 97
et couvre le télécapteur sur un boîtier décodeur. Cela permet à la télécommande livrée avec votre ordinateur HP TouchSmart de contrôler votre boîtier décodeur lorsque vous utilisez le programme Windows Media Center pour sélectionner les chaînes de télévision. Pour utiliser un boîtier décodeur avec - HP IQ524 | Getting Started Guide - Page 98
Windows Media Center depuis HP TouchSmart, lancez HP TouchSmart, et appuyez sur le module Windows Media Center. 2 Dans le menu Tâches, sélectionnez Paramètres, Général, puis Installation de Windows Media Center. 3 Suivez les instructions données à l'écran pour configurer la carte TV et le guide - HP IQ524 | Getting Started Guide - Page 99
analogiques intégrés Haut-parleurs analogiques alimentés 2.0 ou 2.1 Haut-parleurs numériques alimentés 3.1, 4.1 ou 5.1 Récepteur audio REMARQUES : L'ordinateur HP TouchSmart prend uniquement en charge les haut-parleurs alimentés. Il importe de brancher les haut-parleurs à une alimentation secteur - HP IQ524 | Getting Started Guide - Page 100
, puis conformez-vous à la procédure suivante afin d'activer les haut-parleurs ou le récepteur audio. Le cas échéant, reportez-vous aux instructions fournies avec les haut-parleurs ou le récepteur audio. REMARQUE : quand le connecteur SPDIF est connecté, vous pouvez basculer vers les haut-parleurs - HP IQ524 | Getting Started Guide - Page 101
(Notes, Musique et Vidéo), veillez à régler à la fois le volume des haut-parleurs et le volume des programmes HP TouchSmart. Faites défiler la barre vers la droite dans la zone Applications pour tous les afficher. c Une fois satisfait du niveau sonore, effleurez le bouton Fermer ( - HP IQ524 | Getting Started Guide - Page 102
de configurer la sortie audio pour Windows Media Center : 1 Effleurez le bouton Démarrer de Windows Vista . 2 Appuyez sur Windows Media Center. 3 Dans le menu du microphone array L'ordinateur HP TouchSmart est livré avec un microphone array intégré qui se trouve à proximité de la webcam, à l'avant de - HP IQ524 | Getting Started Guide - Page 103
arrière de l'ordinateur HP TouchSmart, ou bien avoir recours à une imprimante sans fil. REMARQUE : l'ordinateur HP TouchSmart ne prend pas en charge de sécurité dans la fente réservée à cet effet en vous conformant aux instructions du fabricant. 4 Écartez le socle légèrement au-delà de 90 degrés et - HP IQ524 | Getting Started Guide - Page 104
bouton Démarrer de Windows Vista , appuyez sur la Flèche à côté de l'icône du cadenas, puis appuyez sur Arrêter. 2 Débranchez le cordon d'alimentation de la prise secteur. 3 Vaporisez une petite quantité de nettoyant pour verre doux sur le chiffon fourni avec l'ordinateur HP TouchSmart. Vous pouvez - HP IQ524 | Getting Started Guide - Page 105
Vous y trouverez des conseils importants. Effleurez le bouton Démarrer de Windows Vista , appuyez sur Aide et support, sur Manuels de l'utilisateur, puis sur Guide de sécurité et ergonomie du poste de travail. -Ou- Entrez http://www.hp.com/ergo dans la barre d'adresse du navigateur, puis appuyez sur - HP IQ524 | Getting Started Guide - Page 106
30 Démarrage rapide - HP IQ524 | Getting Started Guide - Page 107
la musique ou effectuer une recherche sur Internet. Lancement du logiciel HP TouchSmart A Pour lancer le logiciel HP TouchSmart, il suffit d'appuyer sur le bouton HP TouchSmart (A) en bas à droite de l'ordinateur HP TouchSmart. Vous pouvez également procéder à un double-effleurement (taper deux fois - HP IQ524 | Getting Started Guide - Page 108
être. Effleurez l'icône de Windows Vista en haut à gauche afin de réduire HP TouchSmart et d'afficher le bureau Microsoft Windows. Pour effectuer un défilement rapide à gauche et à droite, ou vers le haut et le bas, vous pouvez toucher et faire glisser votre doigt de part et d'autre de l'écran dans - HP IQ524 | Getting Started Guide - Page 109
, pour le déplacer dans la fenêtre HP TouchSmart. Appuyez sur un élément et faites-le glisser Windows Effleurez l'intérieur d'une fenêtre de texte pour afficher le clavier à l'écran. Utilisez ce clavier pour entrer du texte. Compte tenu de l'extrême sensibilité de cette technologie au toucher, HP - HP IQ524 | Getting Started Guide - Page 110
é du panneau de saisie tactile ou si vous souhaitez régler les paramètres tactiles, effleurez le bouton Démarrer de Windows Vista , appuyez sur Panneau de configuration, sur PC mobile, puis sur Stylet et périphériques d'entrée. Sélectionnez le paramètre pour activer le panneau de saisie tactile - HP IQ524 | Getting Started Guide - Page 111
en les faisant glisser hors d'une rangée, puis en les déposant au nouvel emplacement. Ajout d'un raccourci de logiciel à HP TouchSmart 1 Lancez HP TouchSmart et effleurez le bouton Personnaliser. 2 Sélectionnez Ajouter un module. 3 Sélectionnez Programme, puis appuyez sur Suivant. 4 Entrez l'adresse - HP IQ524 | Getting Started Guide - Page 112
forme de petit module au bas de la page d'accueil HP TouchSmart. 6 Effleurez le bouton OK pour retourner à la page d'accueil HP TouchSmart. 7 Vous pouvez le faire glisser pour le transférer (certains modèles uniquement), Aide et support, Didacticiel, Jeux et Internet Explorer. 36 Démarrage rapide - HP IQ524 | Getting Started Guide - Page 113
faisant, vous ne supprimez pas le programme mais uniquement le raccourci dans la vue des modules de HP TouchSmart. Ouverture plus rapide de HP TouchSmart Si vous utilisez souvent le programme HP TouchSmart, il peut s'avérer judicieux de le configurer de sorte à ce qu'il s'ouvre plus rapidement. Pour - HP IQ524 | Getting Started Guide - Page 114
disque dur. Introduisez un CD ou un support de stockage amovible, puis déplacez les photos dans le dossier Mes images de l'Explorateur Windows ou tout autre dossier sur le disque dur. Branchez un appareil photo numérique ou un caméscope à l'ordinateur HP TouchSmart au moyen du câble de transfert - HP IQ524 | Getting Started Guide - Page 115
est réduit et le site Web de Snapfish s'ouvre (http://www.snapfish.com). Suivez les instructions données à l'écran afin de créer un compte, puis ouvrez HP TouchSmart. Entrez votre adresse électronique (Nom) et le mot de passe de votre compte Snapfish, puis appuyez sur Connexion. 5 Sélectionnez - HP IQ524 | Getting Started Guide - Page 116
une photo, vous avez toujours la possibilité de revenir à l'image initiale ultérieurement, le cas échéant. Pour recadrer une photo : 1 Ouvrez HP TouchSmart et sélectionnez le module Photo. 2 Tapez n'importe où sur une photo pour l'ouvrir. Quand vous ouvrez une photo, la fenêtre contenant les options - HP IQ524 | Getting Started Guide - Page 117
contenant vos photos Pour obtenir des instructions sur la création de CD et de DVD de photos, effleurez le bouton Démarrer de Windows Vista , appuyez sur Tous les afficher des instructions sur l'enregistrement d'un CD ou d'un DVD de photos. HP TouchSmart Musique Avec HP TouchSmart Musique, vous - HP IQ524 | Getting Started Guide - Page 118
puis appuyez sur Enregistrer. Pour obtenir des instructions sur l'ajout de fichiers aux bibliothèques musicales, reportez-vous au menu Aide dans les programmes iTunes et Lecteur Windows Media. Lecture de CD Pour écouter vos CD musicaux dans HP TouchSmart Musique : 1 Introduisez le CD dans le lecteur - HP IQ524 | Getting Started Guide - Page 119
. Sélectionnez « Ouvrir le mixeur de volume » et réglez le volume de HP TouchSmart Musique avec le curseur. (Pour voir l'icône de haut-parleur dans la barre des tâches de Windows, réduisez HP TouchSmart et allez sur le bureau Windows ; pour cela, appuyez sur l'icône de Maison située en haut à gauche - HP IQ524 | Getting Started Guide - Page 120
enregistrer la liste de lecture, puis en commencer une autre. Lecture de la liste de lecture Pour lire la liste de lecture : 1 Ouvrez HP TouchSmart et sélectionnez le module Musique. 2 Sélectionnez Liste de lecture en haut de la fenêtre. 3 Sélectionnez la nouvelle liste de lecture. 4 Effleurez le - HP IQ524 | Getting Started Guide - Page 121
Tous les programmes, sur Lecteur Windows Media, puis sur l'icône Aide. * HP est en faveur d'une utilisation licite des technologies et n'appuie ni n'encourage l'utilisation de produits à d'autres fins que celles autorisées par la loi sur les droits d'auteur. Utilisation du logiciel HP TouchSmart 45 - HP IQ524 | Getting Started Guide - Page 122
une vue en éventail. HP TouchSmart Vidéo prend en charge les formats suivants : .mpg, .mpeg, dvr-ms, .wmv, .asf et .avi. Ajout de vidéos sur l'ordinateur 1 Branchez le caméscope à l'ordinateur en utilisant un connecteur USB ou FireWire (IEEE 1394), et suivez les instructions affichées à l'écran pour - HP IQ524 | Getting Started Guide - Page 123
ne de Maison située en haut à gauche de HP TouchSmart afin de revenir à la page d'accueil HP TouchSmart, et appuyez sur l'icône de Windows en haut à gauche.) Création de vidéos avec la webcam 1 Ouvrez HP TouchSmart et sélectionnez le module Vidéo. 2 Appuyez sur Webcam en bas de la fenêtre. 3 Appuyez - HP IQ524 | Getting Started Guide - Page 124
entrez le nom et le mot de passe de votre compte YouTube. 6 Suivez les instructions affichées à l'écran pour procéder au chargement de la vidéo sur YouTube un disque au moyen de CyberLink DVD. Effleurez le bouton Démarrer de Windows Vista , appuyez sur Tous les programmes, sur CyberLink DVD Suite, sé - HP IQ524 | Getting Started Guide - Page 125
de lecture de DVD, comme par exemple DVD Play ou Lecteur Windows Media. 3 Utilisez les commandes multimédias du programme de lecture de DVD pour lire le DVD. Webcam et microphone L'ordinateur HP TouchSmart est équipé d'une webcam (A) et d'un microphone array (B) intégrés situés en haut de - HP IQ524 | Getting Started Guide - Page 126
os au moyen de HP TouchSmart. Voir Création de vidéos avec la webcam à la page 47 pas fourni avec HP TouchSmart et peut nécessiter un abonnement à part. Avant de instructions du programme logiciel. Pour lancer une conversation vidéo dans CyberLink YouCam : 1 Effleurez le bouton Démarrer de Windows - HP IQ524 | Getting Started Guide - Page 127
dans le calendrier et paramétrage d'un rappel Les événements apparaissent sur la page d'accueil HP TouchSmart si l'icône du calendrier figure dans la rangée du haut. La page d'accueil HP TouchSmart peut afficher un maximum de quatre rendez-vous. Elle s'actualise périodiquement au fur et à mesure - HP IQ524 | Getting Started Guide - Page 128
du Calendrier HP TouchSmart avec le Calendrier de Microsoft Windows Vista Ouvrez HP TouchSmart et appuyez sur le module Calendrier. Le Calendrier HP TouchSmart se synchronise automatiquement avec le Calendrier de Microsoft Windows Vista. HP TouchSmart Notes Avec HP TouchSmart Notes, vous - HP IQ524 | Getting Started Guide - Page 129
ou tapée Vous pouvez taper une note, la rédiger à la main par simple toucher ou la dessiner au moyen d'un stylet (vendu séparément). 1 Ouvrez HP TouchSmart et sélectionnez le module Notes. 2 Sélectionnez l'icône de Bloc-notes au bas de la fenêtre. 3 Choisissez la couleur du papier et celle de - HP IQ524 | Getting Started Guide - Page 130
dans la barre des tâches de Windows, réduisez HP TouchSmart et allez sur le bureau Windows ; pour cela, appuyez sur l'icône de Maison située en haut à gauche de HP TouchSmart afin de revenir à la page d'accueil HP TouchSmart, et appuyez sur l'icône de Windows en haut à gauche.) Suppression de notes - HP IQ524 | Getting Started Guide - Page 131
horloges dans le grand module Horloge, ou bien l'horloge principale dans le petit module. Affichage de l'heure de trois endroits différents 1 Ouvrez HP TouchSmart et sélectionnez le module Horloge. 2 Effleurez la zone Horloge au centre de la fenêtre pour modifier l'heure. 3 Appuyez dans le champ Nom - HP IQ524 | Getting Started Guide - Page 132
. Quand vous fermez le flux, la fenêtre des flux RSS HP TouchSmart s'ouvre. Importation d'une liste de flux RSS Pour importer une liste de flux RSS d'un autre programme dans Internet Explorer : 1 Effleurez le bouton Démarrer de Windows Vista et appuyez sur Internet Explorer. 2 Appuyez sur le bouton - HP IQ524 | Getting Started Guide - Page 133
que le contenu change tout au long de la journée. Pour obtenir des instructions sur l'ajout d'un module, voir Ajout d'un lien vers un site Web à HP TouchSmart à la page 36. Commandes de navigation dans le navigateur HP TouchSmart : Bouton Action Le bouton fléché Précédent permet de revenir à la - HP IQ524 | Getting Started Guide - Page 134
le haut (c'est l'opération contraire du comportement des barres de défilement Windows). Accès aux liens ou ouverture d'éléments : il suffit de toucher le . Pour des instructions, voir Ajout d'un lien vers un site Web à HP TouchSmart. Incrustations : le navigateur HP TouchSmart n'autorise pas - HP IQ524 | Getting Started Guide - Page 135
, l'usage de l'écran tactile est varié. Dans le programme HP TouchSmart, vous pouvez sélectionner et ouvrir des éléments d'un simple effleurement sur l'écran. Sur le bureau Windows et dans certains programmes logiciels, vous devez taper deux fois pour ouvrir des raccourcis, des programmes et - HP IQ524 | Getting Started Guide - Page 136
ouvrir un programme, effleurez le bouton Démarrer de Windows Vista , appuyez sur Tous les programmes, sélectionnez le dossier du programme (par exemple, DVD Play), et appuyez sur le nom du programme pour lancer le logiciel. Programme : HP TouchSmart DVD Play Opération(s) possible(s) : Visualiser - HP IQ524 | Getting Started Guide - Page 137
(s) : (suite) Capturer et éditer des vidéos et des instantanés pris avec la webcam. Charger des vidéos sur YouTube. Mener une conversation vidéo. Envoyer des vidéos à des images (notamment .jpg ou .gif). Créer des fichiers .avi et .wmv (Windows Media Video). Utilisation du logiciel HP TouchSmart 61 - HP IQ524 | Getting Started Guide - Page 138
62 Démarrage rapide - HP IQ524 | Getting Started Guide - Page 139
suppression d'un événement 52 synchronisation avec le Calendrier de Microsoft Windows Vista 52 visualisation des événements 52 calendrier HP TouchSmart utilisation 51 caméra utilisation de la webcam 49 caméscope numérique, utilisation de HP TouchSmart Photo 38 casque d'écoute 5 CD création d'un CD - HP IQ524 | Getting Started Guide - Page 140
Lecteur RSS HP TouchSmart configuration des flux RSS 56 utilisation 56 Lecteur Windows Media, utilisation avec HP TouchSmart 42 liste de webcam 49 microtraumatismes répétés, voir le Guide de sécurité et ergonomie du poste de travail muvee autoProducer caractéristiques 60 N Navigateur HP TouchSmart - HP IQ524 | Getting Started Guide - Page 141
DVD Play 60 HP Total Care Advisor 61 HP TouchSmart 31 muvee autoProducer 60 Windows Movie Maker 61 HP TouchSmart 22 télévision, regarder et enregistrer des émissions télévisées 19 V verrou de sécurité 7 vidéos chargement sur YouTube 47 configuration d'une conversation vidéo 50 création avec la webcam - HP IQ524 | Getting Started Guide - Page 142
- HP IQ524 | Getting Started Guide - Page 143
Welkom bij de volgende generatie computers. - HP IQ524 | Getting Started Guide - Page 144
Verenigde Staten gedeponeerde handelsmerken van Microsoft Corporation. Het Windows-logo en Windows Vista zijn in de Verenigde Staten en/of andere landen/regio's gedeponeerde handelsmerken of handelsmerken van Microsoft Corporation. HP ondersteunt het legale gebruik van technologie en verleent geen - HP IQ524 | Getting Started Guide - Page 145
op de HP TouchSmart PC ...........18 De bron van het tv-signaal aansluiten op de computer 18 De HP TouchSmart PC instellen met een settopbox 20 De installatiewizard van Windows Media Center Setup uitvoeren 20 De afstandsbediening gebruiken met Windows Media Center 21 Geluidsopties...22 Analoge - HP IQ524 | Getting Started Guide - Page 146
scherm van de HP TouchSmart PC reinigen 27 De computer veilig en comfortabel gebruiken 28 Hergebruik van uw oude computerhardware 28 De HP TouchSmart-software gebruiken 29 Wat is HP TouchSmart-software 29 De HP TouchSmart-software openen 29 Navigeren in HP TouchSmart 30 Het schermtoetsenbord - HP IQ524 | Getting Started Guide - Page 147
Klok ...53 De tijd voor maximaal drie plaatsen weergeven 53 HP TouchSmart RSS-lezer ...54 RSS-feeds instellen ...54 Een lijst met RSS-feeds importeren 54 HP TouchSmart Browser ...55 Items selecteren op het bureaublad van Windows en in overige software 57 Tabel met beknopte softwareoverzichten 58 - HP IQ524 | Getting Started Guide - Page 148
op de computer oplossen. Elektronische gebruikershandleidingen en specificaties voor uw computermodel. Onderdelen bestellen en extra ondersteuning bij het oplossen van problemen. vi Aan de slag HP TouchSmart PC Aan de slag (deze handleiding) Handleiding voor upgrades en service OPMERKING: Als - HP IQ524 | Getting Started Guide - Page 149
PC De HP TouchSmart PC is een handige en aantrekkelijke computer, uitgerust met aanraakfuncties en geïntegreerd in een high-definition* 22 inch breedbeeldscherm. Deze slanke, stijlvolle computer biedt een prettige aanraakervaring en is voorzien van handige geïntegreerde functies, zoals webcam - HP IQ524 | Getting Started Guide - Page 150
en configuraties kunnen per model verschillen E DCD E B F A O G H I J K L N M Onderdeel Beschrijving A LCD-scherm De HP TouchSmart PC integreert een state-of-the-art high-definition geoptimaliseerd voor breedbeeldscherm met een diagonale doorsnede van 56-cm, uitgerust met aanraken - HP IQ524 | Getting Started Guide - Page 151
de geïntegreerde webcam- en microfoonopstelling voor HP TouchSmart-knop Hiermee schakelt u uw HP TouchSmart PC in en opent u uw HP TouchSmart-software. Als de computer al is ingeschakeld, drukt u op deze knop om de HP TouchSmart MultiMediaCard (MMC), Memory Stick (MS) en Memory Stick Pro (MS - HP IQ524 | Getting Started Guide - Page 152
van de HP TouchSmart PC Functies en configuraties kunnen per model verschillen A B C D Connector A Knop voor omgevingslicht B USB 2.0 C Audio-ingang D Hoofdtelefoon Functie Het omgevingslicht van de HP TouchSmart zorgt voor een zachte, witte gloed aan de onderkant van de computer. Sluit - HP IQ524 | Getting Started Guide - Page 153
de haken op de rand van het paneel uit te lijnen met de openingen op de computer en het paneel vast te drukken. Achterkant van de HP TouchSmart PC Functies en configuraties kunnen per model verschillen A B I C D E J F G K H L M Connector A USB 2.0 B Gigabit Ethernet LAN (10/100/1G - HP IQ524 | Getting Started Guide - Page 154
en de beste kijkhoek. De standaard kan worden ingesteld op een draaihoek tussen de 10 en 40 graden verticaal. Zorg ervoor dat de computer stabiel op het bureaublad staat door de standaard open te trekken totdat u hoort dat deze vastklikt. J Sleuf voor veiligheidsslot Plaats een veiligheidsslot - HP IQ524 | Getting Started Guide - Page 155
een gebeurtenis is uitlsuitend beschikbaar in bepaalde softwaretoepassingen. B Webcam Geeft webcamactiviteit aan. C Voeding Geeft de status van achterzijde van de computer. H Activiteit optische schijf Geeft aan dat de optische schijf in gebruik is. Introductie van de HP TouchSmart PC 7 - HP IQ524 | Getting Started Guide - Page 156
aan op de achterzijde van de computer. Geleid het netsnoer door de uitsparing in de computerstandaard en sluit het netsnoer aan op het stopcontact via een overspanningsbeveiliging/UPS (Uninterruptible Power Supply). Kabelbeheer De HP TouchSmart PC is uitgerust met een voorziening voor - HP IQ524 | Getting Started Guide - Page 157
achterzijde van de computer. A 3 Plaats het connectorpaneel terug door de haken op de rand van het paneel uit te lijnen met de openingen op de computer en het paneel vast te drukken. Geleid de kabels vervolgens door de uitsparing (B) in de computerstandaard. B Introductie van de HP TouchSmart PC 9 - HP IQ524 | Getting Started Guide - Page 158
stabiel op het bureaublad staat door de standaard open te trekken totdat deze vastklikt. Als u vervolgens de hoek van de HP TouchSmart PC wilt wijzigen, houdt u de computer aan beide zijden vast en plaatst u deze in een hoek tussen de 10 en 40 graden verticaal. 10° min. 40° max LET OP: Zorg - HP IQ524 | Getting Started Guide - Page 159
is voltooid. A BC Als dit niet werkt, verwijdert u de ontvanger voor het draadloze toetsenbord en de draadloze muis van de achterkant van de computer, plaatst u deze terug en voert u de synchronisatie van het toetsenbord en de muis opnieuw uit. Handdoek Introductie van de HP TouchSmart PC 11 - HP IQ524 | Getting Started Guide - Page 160
De HP TouchSmart PC in- en uitschakelen De HP TouchSmart PC inschakelen Nadat u de HP TouchSmart PC hebt geïnstalleerd, drukt u op de voedingsknop/slaapstandknop (A) rechtsboven op de computer om de computer aan te zetten. Voltooi de initiële installatie door de instructies op het scherm op te - HP IQ524 | Getting Started Guide - Page 161
van de computer wordt geactiveerd als de computer gedurende bepaalde tijd niet is gebruikt. In Microsoft Windows Vista wordt de Stand-bystand nu HP TouchSmart PC is ontworpen om een draadloos of vast LAN te ondersteunen dat de computer verbindt met andere apparaten, zoals printers en andere computers - HP IQ524 | Getting Started Guide - Page 162
van de fabrikant. Volg de instructies van de fabrikant. 4 Sluit de computer aan op het netwerk. OPMERKING: De afbeelding toont een wandaansluiting voor DSL Configureer de HP TouchSmart PC voor verbinding met het draadloze netwerk. a Schakel de HP TouchSmart PC in. b Sluit de HP TouchSmart PC aan op - HP IQ524 | Getting Started Guide - Page 163
in de wand werkt, gebruikt u een Ethernet-kabel om de Ethernet-poort van de computer aan te sluiten op de Ethernetwandconnector. De Ethernet-poort op de HP TouchSmart PC bevindt zich aan de achterkant van de computer, achter het connectorpaneel. Voor een goed beheer van de kabels, kunt u de kabel - HP IQ524 | Getting Started Guide - Page 164
stopcontact en schakel de HP TouchSmart PC en de overige computers die u aan het netwerk wilt toevoegen, uit. b Voor elke computer met draadverbinding sluit u ) maken om een verbinding tot stand te brengen met andere Bluetooth-apparaten, zoals computers, telefoons, printers, headsets, luidsprekers - HP IQ524 | Getting Started Guide - Page 165
vervangen van het geheugen en de vaste schijf van uw HP TouchSmart PC vindt u in de handleiding Upgrade en service die bij uw computer werd meegeleverd. Uw HP TouchSmart-software bijwerken Controleer op www.hp.com/go/touchsmart of bijgewerkte software en nieuwe softwarefuncties beschikbaar zijn. Het - HP IQ524 | Getting Started Guide - Page 166
voordat u de HP TouchSmart PC installeert en aansluit op de stroomvoorziening. Als u de bron van tv-signalen op de computer wilt aansluiten, moet de computer zijn uitgerust met een tvtuner. Deze is slechts op bepaalde modellen beschikbaar. Sommige kabels moet u mogelijk apart aanschaffen. Voor de - HP IQ524 | Getting Started Guide - Page 167
van het tv-signaal aansluiten op de HP TouchSmart PC: 1 Verbind de coaxkabel van de tv-antenne of de tv-kabelaanbieder met de adapter voor de tv-tuner en sluit de adapter aan op de tv-ingang (PAL/DVB-T) (A) aan de achterzijde van de computer, achter het connectorpaneel. Of Sluit een S-videokabel - HP IQ524 | Getting Started Guide - Page 168
is een extern sensorapparaat dat op de computer wordt aangesloten en werkt met de afstandssensor op een settopbox. Hiermee kan de afstandsbediening die bij de HP TouchSmart PC werd geleverd, met de settopbox werken wanneer u Windows Media Center gebruikt om tv-kanalen te selecteren - HP IQ524 | Getting Started Guide - Page 169
drukt u op een knop op de afstandsbediening. Door op de voedingsknop/slaapstandknop op de afstandsbediening te drukken, wordt de HP TouchSmart PC ingeschakeld of in de slaapstand geplaatst. Raadpleeg de gids Tv kijken en opnemen voor meer informatie over het kijken en opnemen van tv-programma's. Tik - HP IQ524 | Getting Started Guide - Page 170
OPMERKING: De HP TouchSmart PC ondersteunt alleen luidsprekerssystemen met eigen voeding. Hiervoor is een aparte stroomvoorziening nodig. aan op de audio-uitgang aan de achterkant van de computer, achter het connectorpaneel. Voor 2.1 luidsprekers met eigen voeding uitgeschakeld. 22 Aan de slag - HP IQ524 | Getting Started Guide - Page 171
digitale luidsprekers of een audio-receiver wilt inschakelen, moet u de SoundMax-software gebruiken die bij de computer werd geleverd. 1 Tik op het pictogram SoundMAX op de taakbalk. 2 Tik op de knop Volume , Opname-ervaring en Geavanceerd van SoundMAX. Introductie van de HP TouchSmart PC 23 - HP IQ524 | Getting Started Guide - Page 172
Luidsprekervolume aanpassen U kunt op de HP TouchSmart PC op verschillende manieren het volume van de luidsprekers aanpassen. U kunt de volumeregelaars aan de zijkant van de computer gebruiken, of het volumepictogram op de taakbalk van Microsoft. Als u digitale luidsprekers gebruikt, kunt u het - HP IQ524 | Getting Started Guide - Page 173
, worden de interne luidsprekers en de lijnuitgang gedempt. De microfoonopstelling gebruiken De HP TouchSmart PC is uitgerust met een geïntegreerde microfoonopstelling vlakbij de webcam aan de voorkant van de computer. De microfoon is ontworpen om omgevingsgeluid te filteren voor grotere zuiverheid - HP IQ524 | Getting Started Guide - Page 174
van de HP TouchSmart PC, of u kunt een draadloze printer gebruiken. OPMERKING: De HP TouchSmart PC ondersteunt geen printers waarvoor een paralelle printerconnector vereist is. Een veiligheidsslot installeren Met een veiligheidsslot (afzonderlijk verkrijgbaar) kunt u de computer beveiligen tegen - HP IQ524 | Getting Started Guide - Page 175
Het scherm van de HP TouchSmart PC reinigen Voordat u het touchscreen reinigt, moet u het scherm uitschakelen door de computer uit te schakelen. Als de computer niet wordt uitgeschakeld, blijft het touchscreen ingeschakeld, hetgeen kan leiden tot gegevensverlies als u het scherm reinigt. Voor - HP IQ524 | Getting Started Guide - Page 176
Windows Vista, tik op Help en ondersteuning en tik vervolgens op Gebruikershandleidingen en tik op Handleiding voor veiligheid en comfort. Of Typ http://www.hp. hp.com/recycle en selecteer uw land/regio in de vervolgkeuzelijst. Voor sommige landen geldt tevens een programma voor inruil van computers, - HP IQ524 | Getting Started Guide - Page 177
De HP TouchSmart-software openen A U kunt de HP TouchSmart-software openen door op de HP TouchSmart-knop (A) rechtsonder op de HP TouchSmart PC te drukken. U kunt ook dubbeltikken op het snelkoppelingspictogram HP TouchSmart op het bureaublad om de HP TouchSmart-software te openen. De HP TouchSmart - HP IQ524 | Getting Started Guide - Page 178
Bladeren in de tegelweergave Tik op de muziekregelaars boven aan het venster. Tik op het pictogram Windows Vista in de linkerbovenhoek om HP TouchSmart te minimaliseren en naar het bureaublad van Microsoft Windows te gaan. Als u snel naar links en rechts of omhoog en omlaag wilt bladeren, beweegt - HP IQ524 | Getting Started Guide - Page 179
. Plaats twee vingers op de zijden van de tegel en sleep. Een HP TouchSmart-tegel naar een nieuwe locatie verplaatsen Sleep nummers en zet ze neer om een Net zoals alle andere elektronische producten moet u de HP TouchSmart PC uit de buurt houden van vloeistoffen en een omgeving die buitensporig stoffig, - HP IQ524 | Getting Started Guide - Page 180
niet beschikbaar is of als u de instellingen voor aanraken wilt aanpassen, tikt u achtereenvolgens op de knop Start van Windows Vista, op Configuratiescherm, op Draagbare computer en op Pen en invoerapparaten. Selecteer de instelling om het invoerpaneel voor aanraken in te schakelen. U kunt ook - HP IQ524 | Getting Started Guide - Page 181
tegel uit een rij te slepen en op een nieuwe locatie neer te zetten. Een snelkoppeling naar een softwareprogramma toevoegen aan HP TouchSmart 1 Open HP TouchSmart en tik op de knop Aanpassen. 2 Selecteer Tegel toevoegen. 3 Selecteer Programma en tik op Volgende. 4 Voer het doeladres in of selecteer - HP IQ524 | Getting Started Guide - Page 182
het pictogram en de naam van de tegel grijs weergegeven. 3 Tik op OK om uw wijzigingen op te slaan en terug te keren naar de HP TouchSmart-startpagina. OPMERKING: Er moeten minimaal 5 grote tegels aanwezig zijn om door de bovenste lijst te kunnen bladeren, en minimaal 13 kleine tegels om door de - HP IQ524 | Getting Started Guide - Page 183
starten en de optie Snel starten in. Met Automatisch starten worden de HP TouchSmart-programma's gestart wanneer u de computer opstart en met Snel starten blijven de programma's actief totdat u HP TouchSmart sluit. Als u computerbronnen wilt vrijmaken voor ander gebruik, schakelt u deze opties weer - HP IQ524 | Getting Started Guide - Page 184
digitale camera naar de computer over te brengen. HP TouchSmart kan ook foto's weergeven vanaf de geheugenkaartlezer. Foto's van internet downloaden naar uw vaste schijf. Een cd of verwisselbaar opslagapparaat plaatsen en foto's verplaatsen naar de map Afbeeldingen in Windows Verkenner of een andere - HP IQ524 | Getting Started Guide - Page 185
. Als de knop Foto's afdrukken grijs wordt weergegeven, moet u de printer aansluiten en instellen om met de computer te werken. 5 Selecteer de gewenste opties om af te drukken en tik op Afdrukken. 6 Volg eventuele instructies op het scherm om af te drukken. De HP TouchSmart-software gebruiken 37 - HP IQ524 | Getting Started Guide - Page 186
Wanneer u een foto bewerkt, hebt u altijd de optie om op een later tijdstip de originele foto weer te herstellen. Een foto bijsnijden: 1 Open HP TouchSmart en selecteer de tegel Foto. 2 Tik op een foto om deze te openen. Wanneer u een foto opent, wordt het fotobewerkingsvenster geopend. 3 Selecteer - HP IQ524 | Getting Started Guide - Page 187
en dvd's van uw foto's, tikt u achtereenvolgens op de knop Start van Windows Vista, op Alle programma's en op CyberLink DVD Suite. Selecteer het pictogram om het openen van een cd of dvd met uw foto's. HP TouchSmart Muziek Met HP TouchSmart Muziek kunt u de aanraaktechniek gebruiken om snel door uw - HP IQ524 | Getting Started Guide - Page 188
Help van iTunes en Windows Media Player voor meer informatie over het toevoegen van muziekbestanden aan uw muziekbibliotheken. Uw cd's afspelen Uw muziek-cd's afspelen in HP TouchSmart Muziek: 1 Plaats de cd in het cd-station door de schijf met het label naar de voorkant van de computer in de sleuf - HP IQ524 | Getting Started Guide - Page 189
terug te spoelen. U kunt het volume voor muziek in HP TouchSmart Muziek aanpassen met de volumeregelaars aan de rechterzijde van de HP TouchSmart PC, of met het toetsenbord. Daarnaast kunt u het volume voor het programma HP TouchSmart Muziek aanpassen door het Luidspreker-pictogram op de taakbalk - HP IQ524 | Getting Started Guide - Page 190
nummers toe te voegen. U kunt de afspeellijst ook opslaan en een nieuwe lijst starten. De afspeellijst afspelen Uw afspeellijst afspelen: 1 Open HP TouchSmart en selecteer de tegel Muziek. 2 Selecteer Afspeellijst boven aan het venster. 3 Selecteer de nieuwe afspeellijst. 4 Tik op de knop Afspelen - HP IQ524 | Getting Started Guide - Page 191
's en op Windows Media Player en selecteert u het pictogram Help. * HP ondersteunt het legale gebruik van technologie en verleent geen goedkeuring of aanmoediging voor het gebruik van onze producten voor andere doeleinden dan deze toegestaan door het auteursrecht. De HP TouchSmart-software gebruiken - HP IQ524 | Getting Started Guide - Page 192
HP TouchSmart Video Met HP TouchSmart Video kunt u videobeelden vastleggen met de geïntegreerde webcam, de video's afspelen en ze met Nadat u video's hebt toegevoegd aan de computer, kunt u ze afspelen in HP TouchSmart. Uw video's bekijken 1 Open HP TouchSmart en selecteer de tegel Video. 2 Selecteer - HP IQ524 | Getting Started Guide - Page 193
pictogram Huis in de linkerbovenhoek van HP TouchSmart om terug te keren naar de HP TouchSmart-startpagina. Tik vervolgens op het pictogram Windows in de linkerbovenhoek.) Video's maken met de webcam 1 Open HP TouchSmart en selecteer de tegel Video. 2 Selecteer Webcam onder aan het venster. 3 Tik op - HP IQ524 | Getting Started Guide - Page 194
op muvee autoProducer gebruiken. U kunt ook CyberLink DVD gebruiken voor het opnemen van uw video's op schijf. Tik achtereenvolgens op de knop Start van Windows Vista, op Alle programma's en op CyberLink DVD Suite. Selecteer het pictogram Video om het opnameprogramma te starten, tik op het menu Help - HP IQ524 | Getting Started Guide - Page 195
Gebruik de afspeeltoetsen in het dvd-programma om de dvd af te spelen. Webcam en microfoon Uw HP TouchSmart PC is uitgerust met een geïntegreerde webcam (A) en microfoonopstelling (B) boven aan de computer. Deze kunt u gebruiken om video's vast te leggen, en videochats en conferentiegesprekken te - HP IQ524 | Getting Started Guide - Page 196
U kunt de HP TouchSmart gebruiken om momentopnamen te maken en video op te nemen. Zie "Video's maken met de webcam" op pagina 45 naar YouTube. CyberLink YouCam gebruiken: Tik achtereenvolgens op de knop Start van Windows Vista, op Alle programma's en op CyberLink YouCam. Tik vervolgens op CyberLink - HP IQ524 | Getting Started Guide - Page 197
om evenementen in het verleden te verwijderen en afspraken voor die dag te vermelden. HP TouchSmart Agenda toont de begintijd van het evenement wanneer deze op de startpagina wordt weergegeven. 1 Open HP TouchSmart en selecteer de tegel Agenda. 2 Tik op Evenement toevoegen. 3 Tik op Evenement om een - HP IQ524 | Getting Started Guide - Page 198
te verwijderen. De HP TouchSmart Agenda synchroniseren met uw Microsoft Windows Vista-agenda Open HP TouchSmart en selecteer de tegel Agenda. De HP TouchSmart Agenda wordt automatisch gesynchroniseerd met de Windows Vista-agenda. HP TouchSmart Notities Met HP TouchSmart Notities kunt u tekst - HP IQ524 | Getting Started Guide - Page 199
notitie maken Geschreven notities kunt u typen, schrijven met uw vinger of tekenen met een digitale pen (afzonderlijk verkrijgbaar). 1 Open HP TouchSmart en selecteer de tegel Notities. 2 Selecteer het pictogram Kladblok onderaan in het venster. 3 Selecteer een papierkleur door het Papier-pictogram - HP IQ524 | Getting Started Guide - Page 200
te klikken met de rechtermuisknop). Selecteer Volumemixer openen en pas de volumeregelaar voor HP TouchSmart Notities aan. (Als u het luidsprekerpictogram op de taakbalk van Windows wilt weergeven, verkleint u HP TouchSmart en gaat u naar het Windowsbureaublad door te tikken op het pictogram Huis in - HP IQ524 | Getting Started Guide - Page 201
klokken weergeven in de grote Klok-tegel, of kunt u de hoofdklok weergeven in de kleine Klok-tegel. De tijd voor maximaal drie plaatsen weergeven 1 Open HP TouchSmart en selecteer de tegel Klok. 2 Tik op het gebied Klok midden in het venster om de tijd te bewerken. 3 Tik in het vak Naam en - HP IQ524 | Getting Started Guide - Page 202
inhoud, zoals afbeeldingen, audiobestanden, video's of updates die u later kunt weergeven. RSS-feeds instellen HP TouchSmart RSS-kanaal geopend. Een lijst met RSS-feeds importeren Een lijst met RSS-feeds uit een ander programma naar Internet Explorer importeren: 1 Tik op de knop Start van Windows - HP IQ524 | Getting Started Guide - Page 203
venster. De pijl Vooruit opent een webpagina of venster dat u eerder hebt geopend. Het pictogram Home brengt u naar de webpagina voor de HP TouchSmart PC. Als u een nieuwe websitetegel hebt gemaakt, gaat u met deze knop naar het oorspronkelijke webadres dat u voor deze tegel hebt ingevoerd. Het - HP IQ524 | Getting Started Guide - Page 204
gemarkeerd. Als u de inhoud van deze pop-ups wilt weergeven, moet u HP TouchSmart minimaliseren. De pop-up bevindt zich dan op het bureaublad van Windows. Als u HP TouchSmart wilt minimaliseren, gaat u naar de HP TouchSmart-startpagina (tik op het pictogram Huis in de linkerbovenhoek) en tikt u op - HP IQ524 | Getting Started Guide - Page 205
selecteren op het bureaublad van Windows en in overige software Met de HP TouchSmart PC beschikt u altijd over de flexibiliteit om op verschillende manieren op het bureaublad te navigeren, op internet te zoeken en te werken met verschillende programma's op uw computer. U kunt het touchscreen, het - HP IQ524 | Getting Started Guide - Page 206
Windows Vista, tikt u op Alle programma's, selecteert u de programmamap (bijvoorbeeld DVD Play) en tikt u op de programmanaam om de software te starten. Met dit programma: Kunt u het volgende doen: HP TouchSmart gegevens-cd opnemen voor gebruik op de computer. Aangepaste muziek-cd's maken van cd's - HP IQ524 | Getting Started Guide - Page 207
Updates op software en stuurprogramma's van HP ophalen. Belangrijke berichten van HP ophalen. Toegang krijgen tot de PC Health en andere hulpmiddelen voor de beveiliging van de computer als JPG en GIF. AVI- en MWV (Windows Media Video)-bestanden maken. De HP TouchSmart-software gebruiken 59 - HP IQ524 | Getting Started Guide - Page 208
60 Aan de slag - HP IQ524 | Getting Started Guide - Page 209
28 computer aanzetten 12 Index computerstandaard 6 hoek aanpassen 10 connector voor voedingsadapter 6 CyberLink LabelPrint, functies 59 Power2Go, functies 58 PowerDirector, functies 59 YouCam, functies 59 D diavoorstelling, weergeven 36 digitale audioconnector 6 digitale camera, HP TouchSmart Foto - HP IQ524 | Getting Started Guide - Page 210
besturing 3 HP TouchSmart 3 omgevingslicht 4 voeding/slaapstand computer 3 L LAN (Local Area Network) 13 kenmerken antenne 3 verbinding maken met internet 5 Local Area Network (LAN) 13 luidsprekers 4 functies 4 volume aanpassen 24 M microfoonopstelling 25 bereik 25 functies 3 gebruiken met webcam 47 - HP IQ524 | Getting Started Guide - Page 211
, gebruiken 32 settopbox aansluiten op computer 20 afstandszenderkabel voor 20 gebruiken met HP TouchSmart PC 20 sleuf voor veiligheidsslot 6 Snel beveiliging 6 video's bewerken 46 kijken 44 maken met de webcam 45 uploaden naar YouTube 45 videochatsessie instellen 48 voedingsknop/slaapstandknop 3 - HP IQ524 | Getting Started Guide - Page 212
Part number: 497249-AJ1
-
 1
1 -
 2
2 -
 3
3 -
 4
4 -
 5
5 -
 6
6 -
 7
7 -
8
-
9
-
10
-
11
-
12
-
13
-
14
-
15
-
16
-
17
-
18
-
19
-
20
-
21
-
22
-
23
-
24
-
25
-
26
-
27
-
28
-
29
-
30
-
31
-
32
-
33
-
34
-
35
-
36
-
37
-
38
-
39
-
40
-
41
-
42
-
43
-
44
-
45
-
46
-
47
-
48
-
49
-
50
-
51
-
52
-
53
-
54
-
55
-
56
-
57
-
58
-
59
-
60
-
61
-
62
-
63
-
64
-
65
-
66
-
67
-
68
-
69
-
70
-
71
-
72
-
73
-
74
-
75
-
76
-
77
-
78
-
79
-
80
-
81
-
82
-
83
-
84
-
85
-
86
-
87
-
88
-
89
-
90
-
91
-
92
-
93
-
94
-
95
-
96
-
97
-
98
-
99
-
100
-
101
-
102
-
103
-
104
-
105
-
106
-
107
-
108
-
109
-
110
-
111
-
112
-
113
-
114
-
115
-
116
-
117
-
118
-
119
-
120
-
121
-
122
-
123
-
124
-
125
-
126
-
127
-
128
-
129
-
130
-
131
-
132
-
133
-
134
-
135
-
136
-
137
-
138
-
139
-
140
-
141
-
142
-
143
-
144
-
145
-
146
-
147
-
148
-
149
-
150
-
151
-
152
-
153
-
154
-
155
-
156
-
157
-
158
-
159
-
160
-
161
-
162
-
163
-
164
-
165
-
166
-
167
-
168
-
169
-
170
-
171
-
172
-
173
-
174
-
175
-
176
-
177
-
178
-
179
-
180
-
181
-
182
-
183
-
184
-
185
-
186
-
187
-
188
-
189
-
190
-
191
-
192
-
193
-
194
-
195
-
196
-
197
-
198
-
199
-
200
-
201
-
202
-
203
-
204
-
205
-
206
-
207
-
208
-
209
-
210
-
211
-
212
 |
 |

Welcome to the next generation of computers.