HP KVM CAT5 0x2x16 HP IP Console Switchwith Virtual Media Installation Instruc
HP KVM CAT5 0x2x16 Manual
 |
View all HP KVM CAT5 0x2x16 manuals
Add to My Manuals
Save this manual to your list of manuals |
HP KVM CAT5 0x2x16 manual content summary:
- HP KVM CAT5 0x2x16 | HP IP Console Switchwith Virtual Media Installation Instruc - Page 1
HP IP Console Switch with Virtual Media Installation Instructions Installation overview The console switch ships with rack-mounting brackets for easy integration into the rack. Before installing the console switch and other components in the rack cabinet (if they are not already installed), - HP KVM CAT5 0x2x16 | HP IP Console Switchwith Virtual Media Installation Instruc - Page 2
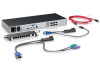
components were received. Console switch kit contents • Console switch • Power cords • server or device. • USB 2.0 with Virtual Media • PS2 with Virtual Media • USB (not Virtual Media capable) • PS2 (not Virtual Media capable) • Serial • HP Bladesystem CAT5 KVM (not Virtual Media capable) • UTP CAT5 - HP KVM CAT5 0x2x16 | HP IP Console Switchwith Virtual Media Installation Instruc - Page 3
on each side of the rack. 3. Slide the side-mounting bracket tabs into the U locations on each side of the rack. 4. Secure the console switch to the rails using four selftapping screws, two on each side. 4. Install four cage nuts into the side-mounting bracket U locations. 5. Secure the - HP KVM CAT5 0x2x16 | HP IP Console Switchwith Virtual Media Installation Instruc - Page 4
a standard-mount installation 1. Remove the four screws, two on each side, from the console switch. 2. Attach the 1U brackets to the console switch using the four screws that you removed. 5. Secure the console switch to the rails using two M-6 screws, one on each side. 3. Install a cage nut - HP KVM CAT5 0x2x16 | HP IP Console Switchwith Virtual Media Installation Instruc - Page 5
screws that you removed. Performing a cantilever-mount type B installation 1. Remove the four screws, two on each side, from the console switch. 2. Attach the 1U brackets to the console switch using the four screws that you removed. 3. Install up to six clip nuts. 3. Install up to six cage nuts
-
 1
1 -
 2
2 -
 3
3 -
 4
4 -
 5
5
 |
 |

HP IP Console Switch
with Virtual Media
Installation Instructions
© Copyright 2006 Hewlett-Packard Development Company, L.P.
The information contained herein is subject to change without notice. The
only warranties for HP products and services are set forth in the express
warranty statements accompanying such products and services. Nothing
herein should be construed as constituting an additional warranty. HP shall
not be liable for technical or editorial errors or omissions contained herein.
March 2006 (First Edition)
Part Number 409056-001
Installation overview
The console switch ships with rack-mounting brackets for
easy integration into the rack. Before installing the console
switch and other components in the rack cabinet (if they are
not already installed), stabilize the rack in a permanent
location. Begin installing the equipment at the bottom of the
rack cabinet, and then work to the top. Avoid uneven
loading or overloading of the rack cabinets.
Rack-mount safety instructions
When rack-mounting a console switch, consider the
following factors:
•
Elevated operating ambient temperature—If the
equipment is installed in a closed or multi-unit rack
assembly, the operating ambient temperature of the
rack environment might be greater than room ambient
temperature. Install the equipment in an environment
compatible with the operating temperature.
•
Reduced air flow—In the rack, the rate of air flow
required for safe operation of the equipment must not
be compromised.
•
Mechanical loading—Avoid a potentially hazardous
condition caused by uneven mechanical loading by
carefully mounting the equipment in the rack.
•
Circuit overloading—When connecting the equipment
to the supply circuit, consider the effect that
overloading of the circuits might have on overcurrent
protection and supply wiring. Consider the equipment
nameplate ratings when addressing this concern.
•
Reliable earthing—Maintain reliable earthing of rack-
mounted equipment. Pay particular attention to supply
connections other than direct connections to the branch
circuit, such as the use of power strips.