HP LH4r HP Netserver LX & LXe 30/FC Installation Guide
HP LH4r - NetServer - 256 MB RAM Manual
 |
View all HP LH4r manuals
Add to My Manuals
Save this manual to your list of manuals |
HP LH4r manual content summary:
- HP LH4r | HP Netserver LX & LXe 30/FC Installation Guide - Page 1
information specific to your cluster configuration that you will need during the installation of your cluster. • HP NetServer Microsoft Cluster Installation Guide - This is the first of two documents used to install the cluster. It covers the installation of all cluster supported HP NetServers and - HP LH4r | HP Netserver LX & LXe 30/FC Installation Guide - Page 2
November 1998 Version History Updated the pdf to include the latest version of the HP NetServer Microsoft Cluster Installation Guide. This later version incorporates technical, grammatical and format changes along with adding installation instructions for additional HP NetServers. Package released - HP LH4r | HP Netserver LX & LXe 30/FC Installation Guide - Page 3
the supported HP NetServer LX Pro, LXe Pro and A3661B High Availability Disk Array Model 30/FC (LX, LXe/Model 30-FC) configurations for Microsoft Cluster Server. These configurations minimize single points of failure, provide maximum availability, and have been certified by Hewlett-Packard and - HP LH4r | HP Netserver LX & LXe 30/FC Installation Guide - Page 4
BIOS version CPU cache RAM No. of power supplies Hot swap cages Local storage I/O slots: LANs LAN connection NIC: Model Driver No. of NICs SPU I\O slot Local Storage Physical drive location Disk drives Controller SCSI bus HP NetServer LX Pro Model 1 or HP NetServer LXe Pro Model 1 166 or 200 MHz - HP LH4r | HP Netserver LX & LXe 30/FC Installation Guide - Page 5
Host Bus Adapter: Model No. of HBA Driver SPU I/O slot Disk Array Controller: Model No. of controllers Microcode Disk Array Storage: Model No. of cabinets Controller Disk capacities: ArrayGUIde RAID levels Logical units Hot spares Power Supply RAID arrays A5246A HP Fibre Channel Adapter Kit for NT - HP LH4r | HP Netserver LX & LXe 30/FC Installation Guide - Page 6
See Shared Storage.): No. of Disk Arrays No. of Controllers See "Basic Configuration Cabling Diagrams with Single or Cascaded Hubs Cabling Diagrams with Single or Cascaded Hubs." A3724A HP 10-port Short Wave Fibre Channel (FC) Hub A4839A HP 10-port Long Wave FC Hub Basic Configuration: - HP LH4r | HP Netserver LX & LXe 30/FC Installation Guide - Page 7
See Shared Storage Cables for a list of cables that can be connected to the Short Wave Ports of the hub. Port connections to this hub are for example only. You can use any port, except for port 10 on Long Wave Hubs. The remaining ports can be used for connection of additional Disk Arrays. Basic - HP LH4r | HP Netserver LX & LXe 30/FC Installation Guide - Page 8
See Shared Storage Cables for a list of cables that can be connected to the Short Wave Ports of the hub. Port connections to these hubs are for example only. You can use any port, except for port 10 on Long Wave Hubs. The remaining ports can be used for connection of additional Disk Arrays. See - HP LH4r | HP Netserver LX & LXe 30/FC Installation Guide - Page 9
See Shared Storage Cables for a list of cables that can be connected to the Short Wave Ports of the hub. Port connections to these hubs are for example only. You can use any port, except for port 10 on Long Wave Hubs. The remaining ports can be used for connection of additional Disk Arrays. - HP LH4r | HP Netserver LX & LXe 30/FC Installation Guide - Page 10
See Shared Storage Cables for a list of cables that can be connected to the Short Wave Ports of the hub. Port connections to these hubs are for example only. You can use any port, except for port 10 on Long Wave Hubs. The remaining ports can be used for connection of additional Disk Arrays. See - HP LH4r | HP Netserver LX & LXe 30/FC Installation Guide - Page 11
HP NetServer Microsoft Cluster Installation Guide with Shared Storage System Supplement NetRAID (Storage System/6, Rack Storage/8 and Rack Storage/12) HP AutoRAID Disk Array Model 12H or HP A3661B Model 30/FC High Availability Disk Array 8 March 1999 - HP LH4r | HP Netserver LX & LXe 30/FC Installation Guide - Page 12
Microsoft Corp. • Windows and Windows NT are trademarks of Microsoft Corporation. • 3M is a registered Trademark of the 3M Company. Hewlett-Packard Network Server Division 10955 Tantau Avenue Cupertino, CA 95014-0770, USA © Copyright 1999, Hewlett-Packard Company HP NetServer Installation Guide 2 - HP LH4r | HP Netserver LX & LXe 30/FC Installation Guide - Page 13
22 LX/LXR PRO ...24 LXR 8000 ...25 INSTALL SERVICE PACK FOR ALL HP NETSERVERS 27 6 SHARED STORAGE SOFTWARE SETUP 28 SHARED STORAGE SETUP ...28 CREATE THE ARRAY FILE SYSTEMS...28 MATCH DRIVE LETTER ASSIGNMENTS ...33 7 MICROSOFT CLUSTER SERVER SOFTWARE SETUP 35 INSTALL MSCS ON SYSTEM B...35 INSTALL - HP LH4r | HP Netserver LX & LXe 30/FC Installation Guide - Page 14
local storage. Added installation instructions in part 5 for the LC3. Initial release Intended Audience The guide is for the person who installs, administers, and troubleshoots the Microsoft Cluster Server. Hewlett-Packard assumes this person is qualified to service computer equipment and trained - HP LH4r | HP Netserver LX & LXe 30/FC Installation Guide - Page 15
A Graphical Overview to Setting Up the Cluster CAUTION Departing from the sequence shown here may cause unnecessary work and unpredictable results. HP NetServer Installation Guide 5 - HP LH4r | HP Netserver LX & LXe 30/FC Installation Guide - Page 16
Windows NT, version 4.0 and Service Pack (SP). See the Configuration Guide for your cluster solution for the applicable Windows NT and SP versions and Microsoft Cluster Server installation software. NOTE Some HP NetServers, as stated in part "5 NetServer Software Setup," require installing Windows - HP LH4r | HP Netserver LX & LXe 30/FC Installation Guide - Page 17
• Torx™ T-25 driver supplied in the Rack Installation Toolkit. For rack installed clusters only. • Portable Field Service Grounding Kit (3M® part number 8505, or equivalent). Need More Help? HP Information Assistant provides extensive support information and is available on the HP NetServer Online - HP LH4r | HP Netserver LX & LXe 30/FC Installation Guide - Page 18
to the Shared Storage Systems and must be installed in specific PCI slots. See the Configuration Guide for your cluster configuration for the HP NetServer PCI slots to use. See instructions supplied with the component or see part "2 NetServer Hardware Setup" of the Shared Storage Supplement for - HP LH4r | HP Netserver LX & LXe 30/FC Installation Guide - Page 19
3 Shared Storage Hardware Setup part "3 Shared Storage Hardware Setup" in the Shared Storage Supplement HP NetServer Installation Guide 9 - HP LH4r | HP Netserver LX & LXe 30/FC Installation Guide - Page 20
Guide on the HP NetServers Clustering Solutions web site at: http://www.hp.com/netserver/products/cluster. Racked clusters - Follow the Road Map supplied with the system and instructions Cluster part "4 Cluster Cabling and Setup" in the Shared Storage Supplement HP NetServer Installation Guide 10 - HP LH4r | HP Netserver LX & LXe 30/FC Installation Guide - Page 21
the Microsoft Service Pack On page ... 11 12 13 14 16 18 20 22 24 25 27 LCII Configure NetServer Hardware and BIOS 1. Make sure you power down System A and power up System B. 2. Insert the HP NetServer Navigator CD in the CD-ROM drive of System B and restart the server. The server boots from - HP LH4r | HP Netserver LX & LXe 30/FC Installation Guide - Page 22
addresses must be on different subnets. LC3 Configure NetServer Hardware and BIOS 1. Make sure you power down System A and power up System B. 2. Insert the HP NetServer Navigator CD in the CD-ROM drive of System B and restart the server. The server boots from the CD and displays the Navigator Main - HP LH4r | HP Netserver LX & LXe 30/FC Installation Guide - Page 23
sure you power down System A and power up System B. 2. Insert the HP NetServer Navigator CD in the CD-ROM drive of System B and restart the server. The server boots from , disable the Embedded IDE Hard Disk Controller. (The embedded IDE controller is not used on HP NetServer systems.) 8. Save and - HP LH4r | HP Netserver LX & LXe 30/FC Installation Guide - Page 24
driver version as specified in the Configuration Guide for your cluster. If you are using two HP D5013A NICs, load the driver NetServer Hardware and BIOS 1. Make sure you power down System A and power up System B. 2. Insert the HP NetServer Navigator CD in the CD-ROM drive and restart the server - HP LH4r | HP Netserver LX & LXe 30/FC Installation Guide - Page 25
in part "1 What's Needed" for additional information. 1. Remove the HP NetServer Navigator CD, insert the boot floppy for Windows NT4.0, and exit Navigator to reboot the server. 2. When Setup prompts to detect mass storage devices, skip detection and manually specify the mass storage drivers: • The - HP LH4r | HP Netserver LX & LXe 30/FC Installation Guide - Page 26
D5013A NIC drivers must be manually set to the correct LAN speed. Log on and from the start menu select: Settings, Control Panel, NetServer Hardware and BIOS 1. Make sure you power down System A and power up System B. 2. Insert the HP NetServer Navigator CD in the CD-ROM drive and restart the server - HP LH4r | HP Netserver LX & LXe 30/FC Installation Guide - Page 27
drivers you need. If you are using the embedded SCSI channels, load the Symbios driver at this time. 4. Continue the installation and select the following options when prompted: • Choose the unpartitioned space and install Windows NT. • Choose NTFS file system HP NetServer Installation Guide - HP LH4r | HP Netserver LX & LXe 30/FC Installation Guide - Page 28
These procedures provide instructions for servers using NetRAID, AutoRAID Model 12H, and Model 30/FC shared storage solutions. Configure NetServer Hardware and BIOS 1. Make sure you power down System A and power up System B. 2. Insert the HP NetServer Navigator CD in the CD-ROM drive and restart the - HP LH4r | HP Netserver LX & LXe 30/FC Installation Guide - Page 29
Configuration Guide for your cluster. If you are using two HP D5013A NICs, load the driver twice, once for the intra-cluster NIC and once for the client NIC. • Make sure TCP/IP Protocol is selected. Other protocols may be selected in addition, but TCP/IP is required. HP NetServer Installation Guide - HP LH4r | HP Netserver LX & LXe 30/FC Installation Guide - Page 30
and Shared Storage) on page 22. Configure NetServer Hardware and BIOS 1. Make sure you power down System A and power up System B. 2. Insert the HP NetServer Navigator CD in the CD-ROM drive and restart the server. 3. If you have special NetServer local SCSI bus options enter the Symbios utility - HP LH4r | HP Netserver LX & LXe 30/FC Installation Guide - Page 31
in part "1 What's Needed" for additional information. 1. Remove the HP NetServer Navigator CD, insert the boot floppy for Windows NT4.0, and exit Navigator to reboot the server. 2. When Setup prompts to detect mass storage devices, skip detection and manually specify the mass storage drivers: • The - HP LH4r | HP Netserver LX & LXe 30/FC Installation Guide - Page 32
storage, you must use two adapters. Configure NetServer Hardware and BIOS 1. Make sure you power down System A and power up System B. 2. Insert the HP NetServer Navigator CD in the CD-ROM drive and restart the server. 3. If you have special NetServer local SCSI bus options enter the Symbios utility - HP LH4r | HP Netserver LX & LXe 30/FC Installation Guide - Page 33
server. 2. When Setup prompts to detect mass storage devices, skip detection and manually specify the mass storage drivers: 3. Load drivers using the NetRAID-3Si Cluster Firmware and Driver floppy disk you created in part 1 "What's Needed" and the NT 4.0 Drivers . HP NetServer Installation Guide 23 - HP LH4r | HP Netserver LX & LXe 30/FC Installation Guide - Page 34
Do not use the Auto setting. LX/LXr Pro Configure NetServer Hardware and BIOS 1. Make sure you power down System A and power up System B. 2. Insert the HP NetServer Navigator CD in the CD-ROM drive of System B and restart the server. The server boots from the CD and displays the Navigator Main menu - HP LH4r | HP Netserver LX & LXe 30/FC Installation Guide - Page 35
These procedures provide instructions for servers using NetRAID, AutoRAID Model 12H, and Model 30/FC shared storage solutions Configure NetServer Hardware and BIOS 1. Make sure you power down System A and power up System B. 2. Insert the HP NetServer Navigator CD in the CD-ROM drive and restart the - HP LH4r | HP Netserver LX & LXe 30/FC Installation Guide - Page 36
the server. 2. When Setup prompts to detect mass storage devices, skip detection and manually specify the mass storage drivers: • The drivers are loaded from the NT 4.0 Drivers floppy disk you created from the Navigator CD. • First, load the driver for the device you want to boot from. For drives in - HP LH4r | HP Netserver LX & LXe 30/FC Installation Guide - Page 37
with Service Pack 3 at this time. NOTE Do not install the Microsoft Cluster Server Software (MSCS) at this time. NOTE After completing these procedures, power down System B and power up System A. Repeat all of the procedures in this part for System A. HP NetServer Installation Guide 27 - HP LH4r | HP Netserver LX & LXe 30/FC Installation Guide - Page 38
Part "6 Shared Storage Software Setup" in the Shared Storage Supplement Create the Array File Systems Use the instructions below and Windows NT Disk Administrator to partition, assign drive letters, and format the shared logical drives by the shared disk arrays. HP NetServer Installation Guide 28 - HP LH4r | HP Netserver LX & LXe 30/FC Installation Guide - Page 39
dialog appears indicating the maximum size of a single drives. 3. Click OK to include the full disk in the partition (the default). In the following example, Disk 1 has been partitioned and Disk Administrator assigned a temporary drive letter to the disk array. HP NetServer Installation Guide - HP LH4r | HP Netserver LX & LXe 30/FC Installation Guide - Page 40
Disk Administrator, Partitioned Disk Array NOTE Do not partition a disk into separate drives. Microsoft Cluster Server Software will only manage one partition per disk. 4. Repeat steps 1 through assigned the next sequential letter to the disk array. HP NetServer Installation Guide 30 - HP LH4r | HP Netserver LX & LXe 30/FC Installation Guide - Page 41
Drive Letter. Disk Administrator displays the Assign Drive Letter dialog. 3. In the dialog, select a drive letter, and click OK. To avoid confusion later, HP recommends that you choose sequential drive letters. The example in this guide uses drive letters X and Y. HP NetServer Installation Guide - HP LH4r | HP Netserver LX & LXe 30/FC Installation Guide - Page 42
the Format dialog make sure that File System is set for NTFS. 4. In the Volume Label field type a label (name) for the drive. Choosing a descriptive label such as "Shared Drive X" will be helpful later when you need to match drive letter assignments at System B. HP NetServer Installation Guide 32 - HP LH4r | HP Netserver LX & LXe 30/FC Installation Guide - Page 43
5 to format each drive to be shared in the cluster. The following example depicts both drives formatted with permanent drive letters assigned. Disk Administrator ). 4. Leave the prompt displayed and the computer powered on. The computer is powered on but idle. HP NetServer Installation Guide 33 - HP LH4r | HP Netserver LX & LXe 30/FC Installation Guide - Page 44
permanent drive letter assignments for each array initialized with System A. 6. When done, Disk Administrator will show matched drive letter assignments as in the opposite node. Exit Disk Administrator. The arrays are now fully configured for use by the cluster. HP NetServer Installation Guide 34 - HP LH4r | HP Netserver LX & LXe 30/FC Installation Guide - Page 45
CD of Microsoft Windows NT Server, Enterprise Edition in the CD-ROM drive of System B. 2. Run the Microsoft Cluster Server setup program. Setup.exe Cluster Server software setup of System A. Click Next. Microsoft Cluster Administrator, Assigning a Cluster Name HP NetServer Installation Guide 35 - HP LH4r | HP Netserver LX & LXe 30/FC Installation Guide - Page 46
correct MS Domain account, consult the Windows NT documentation supplied with your system. 7. Setup presents a two-column systems. Normally you would share all disks listed. Microsoft Cluster Server Setup, Assigning Shared Disks to the Cluster 8. Setup prompts HP NetServer Installation Guide 36 - HP LH4r | HP Netserver LX & LXe 30/FC Installation Guide - Page 47
IP Address already filled in. However, your configuration may display the Client LAN first. Microsoft Cluster Server Setup, Assigning a Network Name to the intra-cluster LAN 10. Repeat the previous step for has the highest priority. See the example dialog below. HP NetServer Installation Guide 37 - HP LH4r | HP Netserver LX & LXe 30/FC Installation Guide - Page 48
specifications and starts the cluster service. 15. Microsoft Cluster Server is now fully installed on System B. Reboot System B. 16. To finish installation of the Microsoft Cluster Server, leave System B running, go to the next procedure and install MSCS on System A. HP NetServer Installation Guide - HP LH4r | HP Netserver LX & LXe 30/FC Installation Guide - Page 49
not already downloaded clusfixi.exe, see "Software" in part "1 What's Needed." 2. Install the Microsoft hotfix clusfixi.exe on System A and System B. NOTE When downloading the file, refer to the Microsoft readme file for instructions on installing the hotfix. HP NetServer Installation Guide 39 - HP LH4r | HP Netserver LX & LXe 30/FC Installation Guide - Page 50
the first time Configuration Assistant is selected after a reboot. The Hardware Verification and Labeling Utility is supplied with a README.TXT file. This file contains detailed information on the utility and instructions for setting up and running the utility. HP NetServer Installation Guide 40 - HP LH4r | HP Netserver LX & LXe 30/FC Installation Guide - Page 51
to download this program. Run CIT Follow the instructions in the CIT program. If additional information is needed refer to CIT on-line help. CIT help is context sensitive and has been expanded to provide detailed instructions for each step of the program. HP NetServer Installation Guide 41 - HP LH4r | HP Netserver LX & LXe 30/FC Installation Guide - Page 52
HP A3661B Model 30/FC High Availability Disk Array Supplement to HP NetServer Microsoft Cluster Installation Guide July 1, 1998 - HP LH4r | HP Netserver LX & LXe 30/FC Installation Guide - Page 53
Microsoft Corporation. ArrayGUIdeTM is a trademark and CLARiiON® is a U.S. registered trademark of Data General Corporation. Enterprise NetServer Division 5301 Stevens Creek Boulevard P.O. Box 58059 Santa Clara, CA 95052-8059, USA © Copyright Hewlett-Packard Company 1998. All rights reserved. 2 - HP LH4r | HP Netserver LX & LXe 30/FC Installation Guide - Page 54
ARRAY 14 4 - CLUSTER CABLING AND SETUP ...26 5 - HP NETSERVER SOFTWARE SETUP...34 6 - SHARED STORAGE SOFTWARE SETUP...35 INSTALL THE FIBRE CHANNEL DRIVER ON WINDOWS NT ...35 POWER UP THE HP MODEL 30/FC HIGH AVAILABILITY DISK ARRAY 36 INSTALL THE HP MODEL 30/FC HIGH AVAILABILITY DISK ARRAY SOFTWARE - HP LH4r | HP Netserver LX & LXe 30/FC Installation Guide - Page 55
Disk Array is supported in clustered environments on HP NetServer LXr Pro8 Series systems running the Microsoft Windows NT 4.0 Service Pack 3 or later operating system. It is not supported as a boot device on HP NetServers. The required Fibre Channel driver for Windows NT is supplied on a diskette - HP LH4r | HP Netserver LX & LXe 30/FC Installation Guide - Page 56
Service Manual (part number A3232-90002). ì Hewlett-Packard Model 30/FC High Availability Disk Array User's Guide and Service Manual Addendum for Microsoft Windows NT 4.0 (part number A3661-90019). The manuals are enclosed with the hardware components. To part 1 of the HP NetServer Installation - HP LH4r | HP Netserver LX & LXe 30/FC Installation Guide - Page 57
PCI slot as specified in the Configuration Guide for the HP NetServer. Installation steps are shown for both vertical and horizontal installations. Install a FC I/O adapter in each HP NetServer in the cluster. a. Make sure the HP NetServer is powered down. b. Remove the chassis cover. c. Locate the - HP LH4r | HP Netserver LX & LXe 30/FC Installation Guide - Page 58
because the GBIC and guide rails inside the FC I/O adapter receptacle are keyed. Installing the GBIC Figure 2. GBIC Module Do not attach Fibre Channel cables to the FC I/O adapter at this time. Also, do not reboot the HP NetServers at this time. To part 2 of the HP NetServer Installation Guide. 7 - HP LH4r | HP Netserver LX & LXe 30/FC Installation Guide - Page 59
Storage Hardware Setup Install the HP FC-AL Hub 1. Unpack the HP FC-AL Hub a. Unpack and inspect the HP FC-AL hub for any your sales representative if items are missing. FC-AL hub FC-AL Hub Service and User Manual Power cord FC port covers in each port Mounting ear bracket Rubber feet Nylon - HP LH4r | HP Netserver LX & LXe 30/FC Installation Guide - Page 60
1 indicated) 5. FC-AL short-wave ports and port LEDs 6. 10Base-T Port (reserved for future use) 7. MAC address (reserved for future use) 8. RS-232 port 9. AC power connector 10. Port LED (Port 1 indicated) Figure 4. HP FC-AL short-wave hub The front panel of the long-wave hub - HP LH4r | HP Netserver LX & LXe 30/FC Installation Guide - Page 61
-wave port with the long-wave loopback cable (A4839-63001). The long-wave loopback cable includes "9/125" as part of the identification information printed on the cable. NOTE The HP FC-AL hub's power supply automatically adjusts to a range of 100 VAC ±10% and 240 VAC ±10%. Interruptions to the - HP LH4r | HP Netserver LX & LXe 30/FC Installation Guide - Page 62
10 Fibre Channel connectors. a. Record the serial number, located on the bottom of the HP FC-AL hub, before installing the HP FC-AL hub into the cabinet. b. Power down the cabinet and unplug it from the power source. Refer to the cabinet documentation for more information. Make sure the cabinet is - HP LH4r | HP Netserver LX & LXe 30/FC Installation Guide - Page 63
column, and insert a 10-32 x .625 machine screw. Securely tighten the screws (see figure 7). Figure 7. Installing the HP FC-AL hub into the cabinet h. The plenum shroud is a back cover that slides onto the HP FC-AL hub. Set the plenum shroud on the front side of the cabinet. Align the holes - HP LH4r | HP Netserver LX & LXe 30/FC Installation Guide - Page 64
-AL hub correctly installed in a cabinet If cascading HP FC-AL hubs are being used, install the second HP FC-AL hub, following the same steps used in installing the first HP FC-AL hub. Do not attach Fibre Channel cables or power cords to the HP FC-AL hub at this time. Also, do - HP LH4r | HP Netserver LX & LXe 30/FC Installation Guide - Page 65
of the Hewlett-Packard Model 30/FC High Availability Disk Array Service Manual (part number A3661-90002) to make sure the installation site meets these requirements. The HP Model 30/FC High Availability Disk Array uses 200VAC to 240VAC nominal; 110VAC is not supported. One power distribution unit - HP LH4r | HP Netserver LX & LXe 30/FC Installation Guide - Page 66
), but rated adequately for steady state currents. For European installations, Hewlett-Packard strongly recommends installing 20A circuit breakers, Type C or Type D per IEC 898, or Type K per IEC 947-2. All electrical wiring to the service point (plug) for the disk array should be sized adequately - HP LH4r | HP Netserver LX & LXe 30/FC Installation Guide - Page 67
is shipped with the disk array, consists of: - 2 rails (part number A3661-00002) - 20 retaining screws (part number 2680-0278) - 16 clip nuts (part number 0590-0804) - 1 custom trim panel (part number A3661-00001) a. Make sure the cabinet is powered down. Refer to the cabinet documentation for more - HP LH4r | HP Netserver LX & LXe 30/FC Installation Guide - Page 68
c. Attach the mounting rails to the cabinet as shown (see figure 11). - Determine the location in the cabinet where the disk array is to be mounted. The disk array should be mounted in the lowest position available in the cabinet. - Install two clip nuts (A in figure 11) over the two holes in the - HP LH4r | HP Netserver LX & LXe 30/FC Installation Guide - Page 69
Press the release latches in the direction shown. - Pull the fan pack away from the chassis. CAUTION Do not lift a fan pack by its handle as doing so can damage the fan pack. Replace light (amber) Lock/unlock button ac power cord release latches Back of storage system Holding module at slight - HP LH4r | HP Netserver LX & LXe 30/FC Installation Guide - Page 70
b. Remove the battery backup unit (BBU) from the back of the disk array. - Locate the BBU. It is above the power supply units. - Grasp the BBU by inserting your thumbs in the holes and your forefingers into the latches. - Slide the latches inward and hold. - Pull the - HP LH4r | HP Netserver LX & LXe 30/FC Installation Guide - Page 71
c. Remove the power supply units from the back of the disk array - Grasp a power supply unit by its handle. - Squeeze the latch toward the handle. - Pull the power supply unit out of the chassis. - Repeat for the other power supply units. Figure 15. Removing a power supply unit 20 - HP LH4r | HP Netserver LX & LXe 30/FC Installation Guide - Page 72
least two persons are needed to lift and safely install a disk array into a cabinet. CAUTION The disk array must be installed so that opening the fan pack door does not interfere with any plug on the cabinet PDU, any cables, any PDUs, or any other devices. - Slide the chassis onto the - HP LH4r | HP Netserver LX & LXe 30/FC Installation Guide - Page 73
from its carton. Use ESD kit P/N 5182-4119 (supplied with each disk array). Make sure each disk module's chapter 1 of the Hewlett-Packard Model 30/FC High Availability Disk Array Service Manual (A3661-90002). Make Guide slot Disk module's guide Disk module's rail ESD wrist strap Figure 17. - HP LH4r | HP Netserver LX & LXe 30/FC Installation Guide - Page 74
18. Replacing a power supply unit g. Replace the BBU. - Locate the slot where the BBU is to be installed. - Slide the BBU into the slot until it engages the backplane connector. - Press firmly until the BBU seats fully into the chassis and the latches lock. h. Replace the fan pack. CAUTION The - HP LH4r | HP Netserver LX & LXe 30/FC Installation Guide - Page 75
power up the cabinet at this time. 5. Set the Fibre Channel ID for the SP in the Disk Array Each HP Model 30/FC High Availability Disk Array can have two SPs (storage processor controllers), which are located in the back of the disk array. In a basic cluster consisting of two HP NetServers, one HP - HP LH4r | HP Netserver LX & LXe 30/FC Installation Guide - Page 76
7A 122 7B 123 7C 124 7D 125 7E 126 To install additional HP Model 30/FC High Availability Disk Arrays into the same cabinet, first verify Channel cables or power cords at this time. Also, do not power up the cabinet at this time. To part 3 of the HP NetServer Installation Guide. 25 - HP LH4r | HP Netserver LX & LXe 30/FC Installation Guide - Page 77
FC-AL connections to the FC I/O adapters. Power down the HP NetServers if they are not already powered down. The HP Model 30/FC High Availability Disk Array and the cabinet should still be powered down at this time. CAUTION Incorrect wiring can lead to problems, such as devices left off the loop - HP LH4r | HP Netserver LX & LXe 30/FC Installation Guide - Page 78
hub. 4. Connect the FC I/O Adapter to the HP FC-AL Hub a. Connect the HP FC-AL hub to the FC I/O adapter on each HP NetServer. Figure 22. An example of an HP FC-AL hub connected to an HP NetServer LXr Pro8 Figure 23. An example of an HP FC-AL hub connected to two HP NetServer LXr Pro8s 27 - HP LH4r | HP Netserver LX & LXe 30/FC Installation Guide - Page 79
above the SPs. One Fibre Channel connector is associated with each SP. The HP Model 30/FC High Availability Disk Array can have one or two SPs: SP A and SP B (see figure 24). If connecting the disk array to a single HP FC-AL hub, make the connection to SP A. FC address switchesSP A FC connectors SP - HP LH4r | HP Netserver LX & LXe 30/FC Installation Guide - Page 80
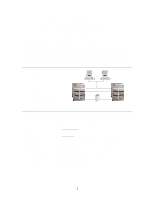
Figure 26. Example of a cluster with two HP NetServer LXr Pro8s, one HP FC-AL hub and one disk array 29 - HP LH4r | HP Netserver LX & LXe 30/FC Installation Guide - Page 81
Figure 27. Example of a cluster with two HP NetServer LXr Pro8s and cascaded hubs 30 - HP LH4r | HP Netserver LX & LXe 30/FC Installation Guide - Page 82
10 of a short-wave hub. Hub A Hub B To Device 1 To Device 2 Figure 28. Cascaded HP FC-AL short-wave hub (HP A3724A) configuration Correct cabling example, HP FC-AL long-wave hub (HP A48394A) In a cascaded configuration of HP FC-AL long-wave hubs, use a long-wave cable to connect the long-wave - HP LH4r | HP Netserver LX & LXe 30/FC Installation Guide - Page 83
connections will be eliminated from the FC-AL loop. Figure 30. Incorrect cabling example: connected ports on the same HP FC-AL hub Do NOT leave cables that are connected to the HP FC-AL hub disconnected at the opposite end of the cable. Figure 31. Incorrect cabling example: disconnected cable Do - HP LH4r | HP Netserver LX & LXe 30/FC Installation Guide - Page 84
an HP FC-AL hub to more than one other HP FC-AL hub is NOT a supported configuration. Figure 34. Non-supported cabling example: more than two HP FC-AL hubs connected Do not attach power cords or power up the disk array or the cabinet at this time. To part 4 of the HP NetServer Installation Guide. 33 - HP LH4r | HP Netserver LX & LXe 30/FC Installation Guide - Page 85
5 - HP NetServer Software Setup To part 5 of the HP NetServer Installation Guide. 34 - HP LH4r | HP Netserver LX & LXe 30/FC Installation Guide - Page 86
HP NetServer if it is not already powered up. b. Start Windows NT if it is not running and log into an account with administrative privileges. c. Insert the Hewlett-Packard driver diskette into the floppy drive. d. From the Start bar, select Settings. e. From the Settings menu, click Control Panel - HP LH4r | HP Netserver LX & LXe 30/FC Installation Guide - Page 87
position. Back of storage system B. Plug power cord into power connector. Note: Fan not shown for clarity Figure 35. Connecting the power cord (typical) 2. Connect the HP FC-AL Hub's Power Cord a. Connect the power cord to the HP FC-AL hub. b. Plug the other end of the power cord into one of the - HP LH4r | HP Netserver LX & LXe 30/FC Installation Guide - Page 88
the disk drive modules do not light up, check that the disk array's power cord is properly installed and connected to the cabinet's PDU. Back of storage system POWER Front of storage system Note: Fan not shown for clarity Figure 36. Powering up the disk array 5. Power Up the HP NetServers When - HP LH4r | HP Netserver LX & LXe 30/FC Installation Guide - Page 89
HP NetServer. Install this software utility by following the detailed instructions included in the NT Addendum, Hewlett-Packard Model 30/FC High Availability Disk Array User's Guide and Service Manual Addendum for Microsoft Windows NT 4.0 (part number A3661-90019). The disk array should be powered - HP LH4r | HP Netserver LX & LXe 30/FC Installation Guide - Page 90
Turn off Auto-Trespass a. Make sure that ArrayGUIde has been installed onto the HP NetServers. b. From the Start bar, select Programs. b. Click Windows NT Explorer. c. causes all disk arrays attached to the HP NetServers to reboot automatically. To part 6 of the HP NetServer Installation Guide. 39
-
 1
1 -
 2
2 -
 3
3 -
 4
4 -
 5
5 -
 6
6 -
 7
7 -
8
-
9
-
10
-
11
-
12
-
13
-
14
-
15
-
16
-
17
-
18
-
19
-
20
-
21
-
22
-
23
-
24
-
25
-
26
-
27
-
28
-
29
-
30
-
31
-
32
-
33
-
34
-
35
-
36
-
37
-
38
-
39
-
40
-
41
-
42
-
43
-
44
-
45
-
46
-
47
-
48
-
49
-
50
-
51
-
52
-
53
-
54
-
55
-
56
-
57
-
58
-
59
-
60
-
61
-
62
-
63
-
64
-
65
-
66
-
67
-
68
-
69
-
70
-
71
-
72
-
73
-
74
-
75
-
76
-
77
-
78
-
79
-
80
-
81
-
82
-
83
-
84
-
85
-
86
-
87
-
88
-
89
-
90
 |
 |

Microsoft Cluster Installation
Documentation
To assist you in installing your HP NetServer Microsoft Cluster, this file contains three
separate documents combined into one pdf file.
•
Configuration Guide
- This guide provides configuration information specific to your
cluster configuration that you will need during the installation of your cluster.
•
HP NetServer Microsoft Cluster Installation Guide
- This is the first of two
documents used to install the cluster.
It covers the installation of all cluster supported
HP NetServers and the cluster software, and references the Shared Storage Supplement
for installation and setup of the shared storage.
•
Shared Storage Supplement
- This supplement is specific to the shared storage device
you are using and must be used with the installation guide.
It provides instructions for
installing and setting up your shared storage devices.
17 March 1999
(See next page)