HP LaserJet P2030 HP LaserJet P2030 Series - Manage and Maintain
HP LaserJet P2030 Manual
 |
View all HP LaserJet P2030 manuals
Add to My Manuals
Save this manual to your list of manuals |
HP LaserJet P2030 manual content summary:
- HP LaserJet P2030 | HP LaserJet P2030 Series - Manage and Maintain - Page 1
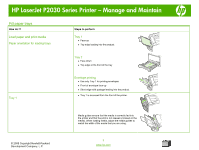
HP LaserJet P2030 Series Printer - Manage and Maintain Fill paper trays How do I? Load paper and print media Paper orientation for loading trays Steps to perform Tray 1 ● Face-up ● Top edge leading into the product Tray 2 ● Face down ● Top edge at the front of the tray Tray 1 Envelope printing - HP LaserJet P2030 | HP LaserJet P2030 Series - Manage and Maintain - Page 2
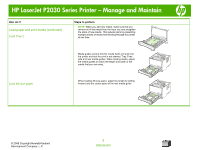
HP LaserJet P2030 Series Printer - Manage and Maintain How do I? Load paper and print media ( printer at one time. Media guides ensure that the media feeds correctly into the printer and that the print is not skewed. Tray 2 has side and rear media guides. When loading media, adjust the media guides - HP LaserJet P2030 | HP LaserJet P2030 Series - Manage and Maintain - Page 3
HP LaserJet P2030 Series Printer - Manage and Maintain Tray and bin capacity How do I? Tray 1 Tray 2 Steps to perform Paper ● Maximum stack height: 5 mm (0.3 inch) ● Equivalent to 50 sheets of 75 g/ m2 (20 lb) bond Envelopes ● Up to 10 envelopes Labels ● Maximum stack height: 5 mm (0.3 inch) - HP LaserJet P2030 | HP LaserJet P2030 Series - Manage and Maintain - Page 4
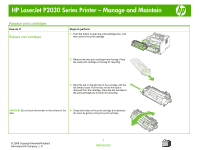
HP LaserJet P2030 Series Printer - Manage and Maintain Replace print cartridges How do I? Replace print cartridges Steps to perform 1 Push the button to open the print-cartridge door, and then remove the print cartridge. 2 Remove the new print cartridge from the bag. Place the used print - HP LaserJet P2030 | HP LaserJet P2030 Series - Manage and Maintain - Page 5
HP LaserJet P2030 Series Printer - Manage and Maintain How do I? Replace print cartridges (continued) Steps to perform 5 Align the print cartridge with the tracks inside the product, insert the print cartridge until it is firmly seated, and then close the print-cartridge door. 6 Installation is - HP LaserJet P2030 | HP LaserJet P2030 Series - Manage and Maintain - Page 6
HP LaserJet P2030 Series Printer - Clear Jams Clear paper jams How do I? Clear jams from internal areas Print-cartridge area and paper path Steps to perform When clearing jams, be careful not to tear jammed paper. If a small piece of paper remains in the - HP LaserJet P2030 | HP LaserJet P2030 Series - Manage and Maintain - Page 7
HP LaserJet P2030 Series Printer - Clear Jams How do I? Clear jams from internal areas ( areas Tray 1 1 Push the button to open the print-cartridge door, and then remove the print cartridge. CAUTION: To prevent damage, do not expose the print cartridge to light. Cover it with a piece of paper. - HP LaserJet P2030 | HP LaserJet P2030 Series - Manage and Maintain - Page 8
HP LaserJet P2030 Series Printer - Clear Jams How do I? Clear jams from the input-tray 4 If no jammed paper is visible in the tray area, open the print-cartridge door, remove the print cartridge, and pull down the upper media guide. With both hands, grasp the jammed paper and slowly pull it out - HP LaserJet P2030 | HP LaserJet P2030 Series - Manage and Maintain - Page 9
HP LaserJet P2030 Series Printer - Clear Jams How do I? Clear jams from the output bins CAUTION: To avoid damaging the product, do not attempt to clear and slowly pull it out of the product. 3 Close the jam-release door. © 2008 Copyright Hewlett-Packard Development Company, L.P. 4 www.hp.com
-
 1
1 -
 2
2 -
 3
3 -
 4
4 -
 5
5 -
 6
6 -
 7
7 -
8
-
9
 |
 |
HP LaserJet P2030 Series Printer – Manage and Maintain
© 2008 Copyright Hewlett-Packard
Development Company, L.P.
1
www.hp.com
Fill paper trays
How do I?
Steps to perform
Load paper and print media
Paper orientation for loading trays
Tray 1
●
Face-up
●
Top edge leading into the product
Tray 2
●
Face down
●
Top edge at the front of the tray
Envelope printing
●
Use only Tray 1 for printing envelopes.
●
Front of envelope face-up
●
Short edge with postage leading into the product
●
Tray 1 is accessed from the front of the printer.
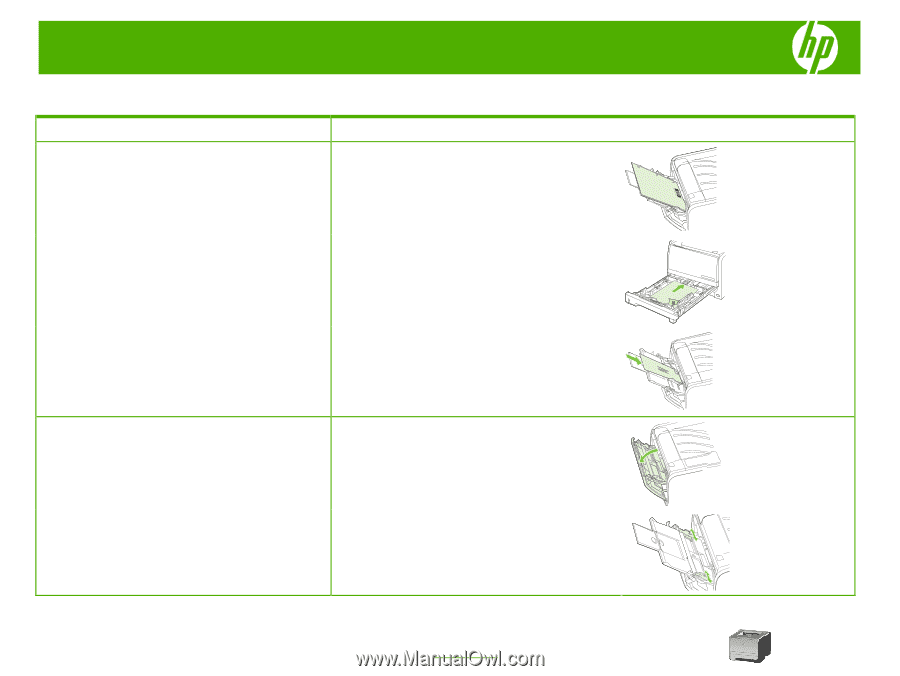
Tray 1
Media guides ensure that the media is correctly fed into
the printer and that the print is not skewed (crooked on the
media). When loading media, adjust the media guides to
match the width of the media that you are using.