HP M525 User Guide
HP M525 - Photosmart Digital Camera Manual
 |
UPC - 882780525474
View all HP M525 manuals
Add to My Manuals
Save this manual to your list of manuals |
HP M525 manual content summary:
- HP M525 | User Guide - Page 1
HP Photosmart M425/M525 Digital Camera User Guide - HP M525 | User Guide - Page 2
to change without notice. The only warranties for HP products and services are set forth in the express warranty statements accompanying such products and services. Nothing herein should be construed as constituting an additional warranty. HP shall not be liable for technical or editorial errors - HP M525 | User Guide - Page 3
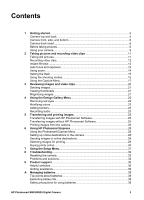
8 Troubleshooting 32 Resetting the camera 32 Problems and solutions 32 9 Product support 36 Helpful websites...36 Getting assistance 36 A Managing batteries 38 Top points about batteries 38 Extending battery life 38 Safety precautions for using batteries 38 HP Photosmart M425/M525 Digital - HP M525 | User Guide - Page 4
Power indicators...39 Number of shots per battery type 39 Battery performance 40 Recharging NiMH batteries 40 Safety precautions for recharging batteries 41 B Specifications...42 Memory capacity 43 Image quality...44 Index...45 4 - HP M525 | User Guide - Page 5
controls, set up your digital camera for use, and begin taking pictures. Camera top and back 1 3 4 567 2 15 14 8 9 10 11 13 12 1 Shutter button. 2 Video button. 3 Flash button-See Setting the flash on page 15. 4 Photosmart Express button-See Using HP Photosmart Express on page 28 - HP M525 | User Guide - Page 6
, it will come with multiple clear inserts. When setting up an optional dock for use with this camera, use the dock insert with the square green tag. See the dock User Guide for instructions. Before taking pictures Complete the following procedures before taking pictures or recording video clips. 6 - HP M525 | User Guide - Page 7
(approximately 12-15 hours). Turn on the camera To turn on the camera, press the button. Choose the language Use to choose the language you want, then press . To change the language later, use the Setup menu (see Using the Setup Menu on page 31). HP Photosmart M425/M525 Digital Camera 7 - HP M525 | User Guide - Page 8
of the video signal for displaying camera images on a television when connected through an optional HP Photosmart Premium dock or wireless dock base 22. For information about supported memory cards, see Storage on page 43. Install the software The HP Photosmart Software provides features for - HP M525 | User Guide - Page 9
9. Note If you have trouble installing or using the HP Photosmart Software, see the HP Customer Care website for more information: www.hp.com/support. Windows If your Windows computer does not meet the system requirements as stated on your camera packaging, HP Photosmart Essential is installed (see - HP M525 | User Guide - Page 10
Gallery Menu on page 22 For information on transferring images from your camera to a computer See Transferring images with HP Photosmart Software on page 25 For information on printing images See Printing images from the camera on page 26 Tip To switch between Live View and Playback, press - HP M525 | User Guide - Page 11
focus and exposure on page 12). Taking still pictures You can take a picture almost any time the camera is on, regardless of what is shown on the Image Display. 1. Press until appears briefly in the Shutter button down, then release it when done. HP Photosmart M425/M525 Digital Camera 11 - HP M525 | User Guide - Page 12
clip, the camera displays it briefly in Instant Review. If you want to delete the image or video clip, press , select This Image from the Delete sub-menu, then press . Note To hear audio associated with still images or video clips, transfer them to your computer using the HP Photosmart Software or - HP M525 | User Guide - Page 13
halfway down, the camera also measures the light level to set the proper exposure. If the camera is set to a shooting mode other than Fast Shot (see Fast Shot under Using the shooting modes on page 15) and determines the scene will require a very long HP Photosmart M425/M525 Digital Camera 13 - HP M525 | User Guide - Page 14
physically extends the lens to make the subject of your picture appear closer. After you have extended the lens fully using optical zoom, the camera employs digital zoom. Digital zoom uses no moving lens parts. Tip The more you zoom in on the subject of your picture, the more small movements of the - HP M525 | User Guide - Page 15
existing light. The Flash setting remains in effect until it is changed again, or you turn off the camera. Note The flash is not available in Burst, Fast Shot, Landscape, or Sunset shooting modes, nor when the subject is a moderate to long distance away. HP Photosmart M425/M525 Digital Camera 15 - HP M525 | User Guide - Page 16
the action. Night Portrait-For capturing images of people at night. This mode uses the flash and a long exposure. As a result, you must set the camera on a tripod or stable surface. Beach and Snow-For capturing scenes against bright backgrounds such as at the beach or in snow. Sunset-For capturing - HP M525 | User Guide - Page 17
taken, each image appears one at a time in Instant Review (see Instant Review on page 12). You can delete the entire burst sequence in Instant Review. To delete individual images, see Deleting images on page printing images up to 28 x 36 cm (11 by 14 in). HP Photosmart M425/M525 Digital Camera 17 - HP M525 | User Guide - Page 18
time imprinted on the image. ● Date Only-Date permanently imprinted. ● Date & Time-Date and time permanently imprinted. Exposure Compensation-Overrides the camera's automatic exposure setting. For more information, see Exposure Compensation on page 18. ● To make the images you are about to capture - HP M525 | User Guide - Page 19
Compensation. White Balance Different lighting conditions cast different colors. This setting allows the camera to compensate for this, reproducing colors more accurately and ensuring that whites appear (or noise) and, therefore, can be of lower quality. HP Photosmart M425/M525 Digital Camera 19 - HP M525 | User Guide - Page 20
images and video clips You can review and manipulate images and video clips in Playback as indicators on page 39). 2 Memory card indicator. 3 1 Number of electronic Photosmart Share destinations (see Using HP Photosmart Express on page 28). 4 Number of images to print (see Transferring and - HP M525 | User Guide - Page 21
currently displayed image is magnified 2x. 2. Use and to pan around the magnified image. 3. Use and to change the magnification. 4. Press to return to Playback. HP Photosmart M425/M525 Digital Camera 21 - HP M525 | User Guide - Page 22
. 3. Use to highlight an option, then press and follow the on-screen instructions. Remove Red Eyes-See Removing red eyes on page 22. Modify Color-See screen prompts. Removing red eyes When you select Remove Red Eyes, the camera processes the current still image to remove red eyes from the subjects. - HP M525 | User Guide - Page 23
to select the color scheme and display the Creative sub-menu. Follow the on-camera instructions to adjust the color. 4. Press to save a copy of the image using the HP Photosmart Software or use an optional HP Photosmart dock to connect the camera to a TV. HP Photosmart M425/M525 Digital Camera 23 - HP M525 | User Guide - Page 24
Chapter 4 If the currently displayed image already has an audio clip attached to it, the Record Audio sub-menu displays instead when you select Record Audio. ● Keep Current Clip-Retains the current audio clip and returns to the Design Gallery Menu. ● Record New Clip-Records a new audio clip, - HP M525 | User Guide - Page 25
for sharing or printing (see Using HP Photosmart Express on page 28), verify that the computer is connected to a printer and/or the Internet. 2. Connect the camera and computer using the USB cable that came with your camera. 3. Turn on the camera and follow the instructions on the computer screen to - HP M525 | User Guide - Page 26
If you encounter problems, set the camera's USB Configuration manually. For more information about how to copy files, visit Mac help. Using a memory card reader You can put your camera's optional memory card into a (separately purchased) memory card reader. Some computers and HP Photosmart printers - HP M525 | User Guide - Page 27
use on the camera to change the setting. 5. Press to begin printing. Note If you connect the camera to a nonHP printer and encounter problems with printing, contact your printer manufacturer. HP does not provide customer support for non-HP printers. HP Photosmart M425/M525 Digital Camera 27 - HP M525 | User Guide - Page 28
30) the next time you connect the camera to your computer or printer. You can also customize the Photosmart Express Menu to include e-mail addresses, group distribution lists, online albums, or other online services that you specify. To customize the Photosmart Express Menu: 1. Set up your custom - HP M525 | User Guide - Page 29
to display an image, press , and repeat Step 4. 6. To exit the Photosmart Express Menu, press . 7. Connect the camera to a PictBridge-certified printer using the USB cable that came with your camera. The images you selected are automatically printed. HP Photosmart M425/M525 Digital Camera 29 - HP M525 | User Guide - Page 30
press . A appears over Buy Prints Online in the Photosmart Express Menu. To deselect the image, press again. 5. Turn off the camera, connect it to your computer using the USB cable that came with your camera, then turn on the camera. Follow the instructions in the Buy Prints Online dialog box to - HP M525 | User Guide - Page 31
camera images on a TV. ● NTSC-Used primarily in North America, parts of South America, Japan, Korea, and Taiwan. ● PAL-Used primarily in Europe, Uruguay, Paraguay, Argentina, and parts of Asia. (Language)-Sets the language. See Choose the language on page 7. HP Photosmart M425/M525 Digital Camera - HP M525 | User Guide - Page 32
8 Troubleshooting Use this section to find information on: ● Resetting the camera (see Resetting the camera on page 32) ● Possible problems and solutions (see Problems and solutions on page 32) Resetting the camera If your camera does not respond when you press buttons, reset the camera. 1. Turn off - HP M525 | User Guide - Page 33
the camera on page 32). My image is blurry. ● Use Focus Lock (see Using Focus Lock on page 13). ● Use a tripod to hold the camera steady, or improve lighting conditions. ● Set the flash to Auto Flash or Flash On and set the shooting mode to Action. HP Photosmart M425/M525 Digital Camera 33 - HP M525 | User Guide - Page 34
. The Power light is on but the Image Display is off. ● Reset the camera (see Resetting the camera on page 32). ● Press Live View/Playback to reactivate the Image Display. The camera responds sluggishly when trying to review images. See Storage on page 43 and Memory capacity on page 43 for tips - HP M525 | User Guide - Page 35
camera packaging. ● Refer to the HP Customer Care website: www.hp.com/support. How can I get professional-quality prints if I don't have a photo printer? Use the Buy Prints Online feature on the Photosmart Express Menu (see Buying prints online on page 30). HP Photosmart M425/M525 Digital Camera - HP M525 | User Guide - Page 36
for your digital camera, including links to helpful websites and an overview of the support process. Helpful websites Camera tips, product registration, newsletter subscriptions, driver and software updates, purchase HP supplies and accessories www.hp.com www.hp.com/photosmart (English only - HP M525 | User Guide - Page 37
or upgrade your camera's warranty, please contact the store where you bought the camera or check the HP Care Pack offers at www.hp.com/support. 6. If you already purchased an HP Care Pack Service, please check the support conditions on your contract. HP Photosmart M425/M525 Digital Camera 37 - HP M525 | User Guide - Page 38
15). ● Use optical zoom sparingly. ● If you are turning on the camera only to view images, hold down while turning on the camera to start in Playback without extending the lens. ● Connect the camera to the optional HP AC power adapter when you transfer or print. Safety precautions for using - HP M525 | User Guide - Page 39
reset and you may be prompted to update it the next time you power on the camera. Number of shots per battery type The following table shows the minimum, maximum, and obtained using the standards established by the Camera and Imaging Products Association. HP Photosmart M425/M525 Digital Camera 39 - HP M525 | User Guide - Page 40
Fair Fair Good Good Recharging NiMH batteries You can recharge NiMH batteries in the camera when the camera is connected to an optional HP AC power adapter. You can also charge the batteries in an optional HP Photosmart dock that has a battery bay or with an optional quick recharger. The following - HP M525 | User Guide - Page 41
camera, dock, or quick recharger if NiMH batteries appear damaged. ● Do not disassemble the camera, dock, or quick recharger. ● Unplug the HP AC power adapter or quick recharger from the electrical outlet before cleaning the power adapter or quick recharger. HP Photosmart M425/M525 Digital Camera - HP M525 | User Guide - Page 42
103.6 mm F-Number: ● Wide-f/2.8 to f/8 ● Telephoto-f/4.7 to f/7.6 Viewfinder None Zoom ● 3x optical zoom with 8 positions between wide and telephoto ● Digital zoom, M425-1x to 6x ● Digital zoom, M525-1x to 7x Focus Focus settings: Auto (default), Macro Auto: ● Wide-500 mm (20 in) to infinity - HP M525 | User Guide - Page 43
flash memory. ● Slot for memory card. ● This camera supports standard and high speed, HP-branded Secure Digital (SD) memory cards, 8MB to 2GB. ● A video clips Interfaces Dock connector-Molex 55768-2011, which connects to HP Photosmart docks with USB Mini AB connector, DC input connector, and - HP M525 | User Guide - Page 44
number and average size of still images that can be stored in internal memory when the camera is set to different Image Quality settings (see Image Quality under Using the Capture Menu on page 17). HP Photosmart M425 5MP Best Normal (5MP) 3MP 1MP VGA 3 images (3MB each) 8 images (1.25MB each) 13 - HP M525 | User Guide - Page 45
software 8 Instant Review 12, 17 interfaces 43 internal memory 11, 43 ISO Speed 18, 19 L Landscape mode 16 Language 7, 31 LEDs 5, 6 lights on camera 5, 6 Live zoom 14 P parts of camera 5, 6 Photosmart Express button 5 Photosmart Express Menu 28, 28, 29 HP Photosmart M425/M525 Digital Camera 45 - HP M525 | User Guide - Page 46
43 print images 26, 28 prints, buy online 30 problems and solutions 32 R record audio clips 23 video clips 12 redeye removal 22 Region 8 remaining pictures count 11 removing red eyes 22 resolution 42 reviewing images 20 transfer images 25 troubleshooting 32 turn on/off power 7 TV Configuration 31
-
 1
1 -
 2
2 -
 3
3 -
 4
4 -
 5
5 -
 6
6 -
 7
7 -
8
-
9
-
10
-
11
-
12
-
13
-
14
-
15
-
16
-
17
-
18
-
19
-
20
-
21
-
22
-
23
-
24
-
25
-
26
-
27
-
28
-
29
-
30
-
31
-
32
-
33
-
34
-
35
-
36
-
37
-
38
-
39
-
40
-
41
-
42
-
43
-
44
-
45
-
46
 |
 |

User Guide
HP Photosmart M425/M525
Digital Camera