HP P4015dn HP LaserJet P4010 and P4510 Series - 400-sheet Custom Media Tray In
HP P4015dn - LaserJet B/W Laser Printer Manual
 |
UPC - 884420126553
View all HP P4015dn manuals
Add to My Manuals
Save this manual to your list of manuals |
HP P4015dn manual content summary:
- HP P4015dn | HP LaserJet P4010 and P4510 Series - 400-sheet Custom Media Tray In - Page 1
CB527A 02 12 02 12 02 12 02 12 02 17 02 17 02 17 02 17 07 17 07 17 07 17 07 17 07 22 07 22 07 22 07 22 12 30 12 12 12 - HP P4015dn | HP LaserJet P4010 and P4510 Series - 400-sheet Custom Media Tray In - Page 2
such products and services. Nothing herein should be construed as constituting an additional warranty. HP shall not be liable for technical or editorial errors or omissions contained herein. Edition 1, 3/2008 CB527-90901 Copyright et licence © 2008 Copyright Hewlett-Packard Development Company - HP P4015dn | HP LaserJet P4010 and P4510 Series - 400-sheet Custom Media Tray In - Page 3
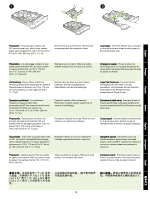
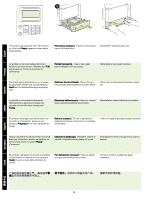
contains one HP custom paper tray, which holds smaller paper sizes ranging from 102 x 170 mm (4.0 x 6.7 in) to 148 x 282 mm (5.8 x 11.1 in). Remove the tray from the box. Remove the orange tape and the cardboard insert. Load paper. Pinch the release that is located on the left guide and slide - HP P4015dn | HP LaserJet P4010 and P4510 Series - 400-sheet Custom Media Tray In - Page 4
on the rear paper guide and slide it to the correct paper size. Load paper into the tray. Make sure that the stack is flat at all four corners and that the top of the stack is below the maximum-height indicators. Installation Remove the tray that is currently in the Tray 2 position. Pincez le - HP P4015dn | HP LaserJet P4010 and P4510 Series - 400-sheet Custom Media Tray In - Page 5
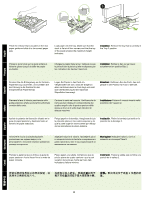
Insert the custom paper tray into the Tray 2 position. Prepare for printing. On the control panel, press MENU, press to highlight CONFIGURE DEVICE, and press OK. Press to highlight SYSTEM SETUP, and press OK. Press to highlight TRAY BEHAVIOR, and press OK. Press to highlight TRAY 2 MODEL, and then - HP P4015dn | HP LaserJet P4010 and P4510 Series - 400-sheet Custom Media Tray In - Page 6
The product automatically turns off and then on. Wait until Ready appears on the controlpanel display. Remove the accessory. Pull the custom paper tray out of the product. Reinstall the standard paper tray. Le produit se met automatiquement hors tension, puis sous tension. Attendez que Pr - HP P4015dn | HP LaserJet P4010 and P4510 Series - 400-sheet Custom Media Tray In - Page 7
SYSTEM SETUP, and press OK. Press to highlight TRAY BEHAVIOR, and press OK. Press to highlight TRAY 2 MODEL, and then select STANDARD TRAY. Press OK. The product automatically turns off and then on. Wait until Ready appears on the controlpanel display. Sur le panneau de commande, appuyez sur MENU - HP P4015dn | HP LaserJet P4010 and P4510 Series - 400-sheet Custom Media Tray In - Page 8
á je umístěna na levém vodítku, a nastavte boční vodítka na správný formát papíru. Čeština Klargøring. Denne pakke indeholder en HP bakke til specialpapir, der kan indeholde mindre papirformater fra 102 x 170 mm (4,0 x 6,7") til 148 x 282 mm (5,8 x 11,1"). Tag bakken ud af æsken. Fjern den orange - HP P4015dn | HP LaserJet P4010 and P4510 Series - 400-sheet Custom Media Tray In - Page 9
for, at papiret ligger fladt i alle fire hjørner, og at den øverste del af stakken ikke overskrider niveauerne for maksimal stakhøjde. Installation Fjern den bakke, der i øjeblikket findes på bakke 2's plads. Knijp de ontgrendeling op de achterste papiergeleider samen en schuif de geleider naar de - HP P4015dn | HP LaserJet P4010 and P4510 Series - 400-sheet Custom Media Tray In - Page 10
Valitse -painikkeella LOKERON TOIMINTA ja paina OK-painiketta. Valitse -painikkeella LOKERO 2 KÄYTTÖ ja valitse MUKAUTETTU LOKERO. Valitse OK. TRAY BEHAVIOR OK TRAY 2 MODEL 2 CUSTOM TRAY OK. Nyomja meg a gombot a TÁLCA VISELKEDÉSE kijelöléséhez, majd nyomja meg az OK gombot. A gombbal jelölje - HP P4015dn | HP LaserJet P4010 and P4510 Series - 400-sheet Custom Media Tray In - Page 11
schakelt automatisch uit en weer in. Wacht tot Klaar wordt weergegeven op het display van het bedieningspaneel. Het accessoire verwijderen. Trek de aangepaste papierlade uit het product. Installeer de standaard papierlade opnieuw. Toode lülitub automaatselt välja ja seejärel sisse. Oodake - HP P4015dn | HP LaserJet P4010 and P4510 Series - 400-sheet Custom Media Tray In - Page 12
weer in. Wacht tot Klaar wordt weergegeven op het display van het bedieningspaneel. Juhtpaneelil vajutage MENU (Menüü), RENDSZERBEÁLLÍTÁS kijelöléséhez, majd nyomja meg az OK gombot. TRAY BEHAVIOR OK TRAY 2 MODEL 2 STANDARD TRAY OK. Nyomja meg a gombot a TÁLCA VISELKEDÉSE kijelöléséhez - HP P4015dn | HP LaserJet P4010 and P4510 Series - 400-sheet Custom Media Tray In - Page 13
līdz pareizajam papīra lielumam. Parengimas. Šiame pakete yra vienas HP pasirinktinis popieriaus dėklas, kuriame laikomas mažesnio formato popierius, pradedant nuo į popieriaus formatą. Klargjøring. Denne pakken inneholder en HP egendefinert papirskuff som rommer små papirstørrelser fra 102 x - HP P4015dn | HP LaserJet P4010 and P4510 Series - 400-sheet Custom Media Tray In - Page 14
ana. Noņemiet paplāti, kas pašlaik atrodas pozīcijā Tray 2 (2. paplāte). Suimkite atlaisvinimo mechanizmą, esantį ant galinio popieriaus og at toppen på bunken er lavere enn indikatorene som viser maksimum høyde. Installering. Fjern skuffen som er i skuff 2posisjonen. Ściśnij dźwignię zwalniającą - HP P4015dn | HP LaserJet P4010 and P4510 Series - 400-sheet Custom Media Tray In - Page 15
. OK 2 OK 2 용지함 2 MENU CONFIGURE DEVICE OK SYSTEM SETUP OK OK OK TRAY BEHAVIOR OK TRAY 2 MODEL (2 CUSTOM TRAY OK OK 2 OK Ievietojiet pielāgoto papīra paplāti pozīcijā Tray 2 (2. paplāte). Į 2 dėklo vietą įdėkite pasirinktinį popieriaus dėklą. Sett inn den - HP P4015dn | HP LaserJet P4010 and P4510 Series - 400-sheet Custom Media Tray In - Page 16
å seg av og deretter på igjen. Vent til Klar vises i kontrollpanelvinduet. Fjern ekstrautstyret. Trekk den egendefinerte papirskuffen ut av produktet. Installer standardpapirskuffen på nytt. Urządzenie automatycznie wyłączy się, a następnie włączy się ponownie. Zaczekaj, aż na wyświetlaczu panelu - HP P4015dn | HP LaserJet P4010 and P4510 Series - 400-sheet Custom Media Tray In - Page 17
. Tunggu hingga Ready [Siap] muncul pada layar panel kontrol. MENU CONFIGURE DEVICE OK SYSTEM SETUP OK OK OK TRAY BEHAVIOR OK TRAY 2 MODEL (2 STANDARD TRAY OK OK 2 OK Ready Uz vadības paneļa nospiediet MENU (Izvēlne), nospiediet , lai izceltu CONFIGURE DEVICE - HP P4015dn | HP LaserJet P4010 and P4510 Series - 400-sheet Custom Media Tray In - Page 18
í prvok, ktorý sa nachádza na ľavom vodiacom prvku a posuňte bočné vodiace prvky na správnu veľkosť papiera. Priprava. Ta paket vsebuje en HP-jev pladenj za papir po meri, v katerega je mogoče naložiti manjše velikosti papirja v obsegu od 102 x 170 mm (4,0 x 6,7 palca) do 148 x 282 mm (5,8 x 11 - HP P4015dn | HP LaserJet P4010 and P4510 Series - 400-sheet Custom Media Tray In - Page 19
dra den till rätt pappersstorlek. Fyll på papper i facket. Kontrollera att bunten ligger platt i alla fyra hörn och att bunten inte överstiger markörerna för maxhöjden. Installation Ta bort det fack som för närvarande är i placeringen fack 2. 2 ออก 18 - HP P4015dn | HP LaserJet P4010 and P4510 Series - 400-sheet Custom Media Tray In - Page 20
(V redu). Tryck på för att markera FACKINSTÄLLNING och tryck på OK. Tryck på för att markera FACK 2 MODELL och välj sedan EGET FACK. Tryck på OK. 2 MENU CONFIGURE DEVICE OK SYSTEM SETUP OK TRAY BEHAVIOR OK TRAY 2 MODEL 2 CUSTOM TRAY OK Slovenčina Slovenščina Svenska ไทย 19 - HP P4015dn | HP LaserJet P4010 and P4510 Series - 400-sheet Custom Media Tray In - Page 21
O produto desligará e ligará em seguida automaticamente. Aguarde até aparecer Pronto no visor do painel de controle. Remova o acessório. Puxe a bandeja de papel personalizada para fora do produto. Reinstale a bandeja de papel padrão. Produsul se opreşte şi apoi porneşte automat. Aşteptaţi până câ - HP P4015dn | HP LaserJet P4010 and P4510 Series - 400-sheet Custom Media Tray In - Page 22
em seguida, selecione BANDEJA PADRÃO. Pressione OK. Apăsaţi pt. a evidenţia TRAY BEHAVIOR (Comportament tavă) şi apăsaţi OK. Apăsaţi pentru a evidenţiaTRAY och tryck på OK. Tryck på för att markera FACK 2 MODELL och välj sedan STANDARDRACK. Tryck på OK. Produkten slås automatiskt av och sedan på - HP P4015dn | HP LaserJet P4010 and P4510 Series - 400-sheet Custom Media Tray In - Page 23
paket, boyutları 102 x 170 mm (4,0 x 6,7 inç) ile 148 x 282 mm (5,8 x 11,1 inç) arasında değişen küçük kağıtlar alan bir adet HP özel kağıt tepsisi içerir. Tepsiyi kutudan çıkarın. Turuncu bandı ve karton dolguları çıkarın. Kağıt yükleyin. Soldaki kılavuzda bulunan sabitleyiciyi sıkıştırın ve yan - HP P4015dn | HP LaserJet P4010 and P4510 Series - 400-sheet Custom Media Tray In - Page 24
繁體中文 Türkçe 2 Arka kağıt kılavuzunda bulunan sabitleyiciyi sıkıştırın ve doğru kağıt boyutuna getirin. Tepsiye kağıt yerleştirin. Yığının dört köşesinin de düz olmasına ve üst kısmının maksimum yükseklik işaretlerinin altında olmasına dikkat edin. Kurulum Tepsi 2 konumunda bulunan - HP P4015dn | HP LaserJet P4010 and P4510 Series - 400-sheet Custom Media Tray In - Page 25
İ 2 MODELİ seçeneğini vurgulayın ve ÖZEL TEPSİ seçeneğini seçin. TAMAM düğmesine basın. TRAY BEHAVIOR OK TRAY 2 MODEL 2 CUSTOM TRAY OK. Bấm để đánh dấu TRAY BEHAVIOR (HOẠT ĐỘNG KHAY), và bấm OK. Bấm để đánh dấu TRAY 2 MODEL (KIỂU KHAY 2), sau đó chọn CUSTOM TRAY (KHAY TÙY CHỈNH). Bấm OK. 24 - HP P4015dn | HP LaserJet P4010 and P4510 Series - 400-sheet Custom Media Tray In - Page 26
繁體中文 Türkçe Ürün otomatik olarak kapanır ve açılır. Kontrol paneli ekranında Hazır görüntülenene kadar bekleyin. Aksesuarı çıkarın. Özel kağıt tepsisini üründen dışarı çekin. Standart kağıt tepsisini yeniden takın. Ready Sản phẩm sẽ tự động tắt sau đó bật lại. Chờ cho - HP P4015dn | HP LaserJet P4010 and P4510 Series - 400-sheet Custom Media Tray In - Page 27
TEPSİ seçeneğini seçin. TAMAM'a basın. TRAY BEHAVIOR OK TRAY 2 MODEL 2 STANDARD TRAY OK. Bấm để đánh dấu TRAY BEHAVIOR (IN CẤU HÌNH), và bấm OK. Bấm để đánh dấu TRAY 2 MODEL (KIỂU KHAY 2), sau đó chọn STANDARD TRAY (KHAY CHUẨN). Bấm OK. Ürün otomatik olarak kapanır ve açılır. Kontrol - HP P4015dn | HP LaserJet P4010 and P4510 Series - 400-sheet Custom Media Tray In - Page 28
27 - HP P4015dn | HP LaserJet P4010 and P4510 Series - 400-sheet Custom Media Tray In - Page 29
Ready TRAY BEHAVIOR OK TRAY 2 MODEL STANDARD TRAY OK MENU CONFIGURE DEVICE OK SYSTEM ) SETUP OK 28 - HP P4015dn | HP LaserJet P4010 and P4510 Series - 400-sheet Custom Media Tray In - Page 30
TRAY BEHAVIOR OK TRAY 2 ) MODEL CUSTOM TRAY OK ENUM CONFIGURE ) DEVICE OK SYSTEM SETUP OK Ready 29 - HP P4015dn | HP LaserJet P4010 and P4510 Series - 400-sheet Custom Media Tray In - Page 31
HP 30 - HP P4015dn | HP LaserJet P4010 and P4510 Series - 400-sheet Custom Media Tray In - Page 32
© 2008 Hewlett-Packard Development Company, L.P. www.hp.com 铅 (Pb) X X 汞 (Hg) 0 0 镉 (Cd) 六价铬 (Cr(VI)) 0 0 0 0 PBB PBDE) 0 0 0 0 0 SJ/T11363-2006 X SJ/T11363-2006 *CB527-90901* *CB527-90901* CB527-90901
-
 1
1 -
 2
2 -
 3
3 -
 4
4 -
 5
5 -
 6
6 -
 7
7 -
8
-
9
-
10
-
11
-
12
-
13
-
14
-
15
-
16
-
17
-
18
-
19
-
20
-
21
-
22
-
23
-
24
-
25
-
26
-
27
-
28
-
29
-
30
-
31
-
32
 |
 |
CB527A
02
02
02
02
02
02
02
02
07
07
07
07
07
07
07
07
12
12
12
12
12
12
12
12
17
17
17
17
17
17
17
17
22
22
22
22
30