HP Presario SA4000 Upgrading and Servicing Guide
HP Presario SA4000 - Desktop PC Manual
 |
View all HP Presario SA4000 manuals
Add to My Manuals
Save this manual to your list of manuals |
HP Presario SA4000 manual content summary:
- HP Presario SA4000 | Upgrading and Servicing Guide - Page 1
Upgrading and Servicing Guide - HP Presario SA4000 | Upgrading and Servicing Guide - Page 2
577,216, 4,819,098, and 4,907,093 licensed for limited viewing uses only. Other brand or product names are trademarks of their respective holders. HP supports lawful use of technology and does not endorse or encourage the use of our products for purposes other than those permitted by copyright law. - HP Presario SA4000 | Upgrading and Servicing Guide - Page 3
a Memory Module 8 Removing or Installing an Add-in Card 9 Removing an Add-in Card 9 Installing an Add-in Card 9 Replacing the Battery 10 Upgrading and Servicing Guide iii - HP Presario SA4000 | Upgrading and Servicing Guide - Page 4
iv Upgrading and Servicing Guide - HP Presario SA4000 | Upgrading and Servicing Guide - Page 5
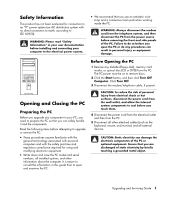
all installed options, and other information about the computer. It is easier to consult the information in this guide than to open and examine the PC. Before Opening the PC 1 Remove any diskette (floppy disk), by briefly touching a grounded metal object. Upgrading and Servicing Guide 1 - HP Presario SA4000 | Upgrading and Servicing Guide - Page 6
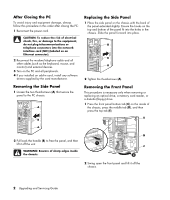
it off the unit. WARNING: Beware of sharp edges inside the chassis. 2 Swing open the front panel and lift it off the chassis. 2 Upgrading and Servicing Guide - HP Presario SA4000 | Upgrading and Servicing Guide - Page 7
or may be empty (blank plate). F Memory card reader (select models) or may be empty (blank plate). G Front connector panel (no replacement instructions). H Hard disk drive, primary (with operating system partition). K, L Additional hard disk drives (select models) or may be empty. Disconnecting the - HP Presario SA4000 | Upgrading and Servicing Guide - Page 8
then pry the shield free. 5 Pull the drive out of the drive bay. 6 If you are replacing the old drive with a new drive, remove the guide screws from the old drive. The optical drives have two screws on each side; the memory card reader and diskette drive have two screws on - HP Presario SA4000 | Upgrading and Servicing Guide - Page 9
An optical drive may include a sound cable. Connect this cable also. Cable select jumper 4 Install the guide screws on the sides of the new drive. (The optical drives have two screws on each side; the that uses a wide data cable. Connecting the optical drive cables Upgrading and Servicing Guide 5 - HP Presario SA4000 | Upgrading and Servicing Guide - Page 10
the drive. 5 If you are replacing the old drive with a new drive, remove the four guide screws (two screws on each side) from the old drive. You need these screws to install Cable select jumper 3 Install four guide screws on the sides of the new drive (two screws on each side). The screws help - HP Presario SA4000 | Upgrading and Servicing Guide - Page 11
Your PC comes with random access memory (RAM), which temporarily stores data and instructions on your PC. The PC ships with one or more memory modules, and Support Guide and click the Support link. WARNING: Using the wrong type of memory module can damage the system. Upgrading and Servicing Guide 7 - HP Presario SA4000 | Upgrading and Servicing Guide - Page 12
the memory module. CAUTION: When handling a memory module, be careful not to touch any of the contacts. Doing so may damage the module. 8 Upgrading and Servicing Guide - HP Presario SA4000 | Upgrading and Servicing Guide - Page 13
the PC. See "Opening and Closing the PC" on page 1. NOTE: If the new card or device isn't working, read through the card manufacturer's installation instructions, and recheck all connections, including those to the card, power supply, keyboard, and monitor. Upgrading and - HP Presario SA4000 | Upgrading and Servicing Guide - Page 14
Replace only with the same, or equivalent, type of battery. Discard used batteries according to the manufacturer's instructions. 1 Complete the procedures to prepare the PC, and to remove the side panel. See "Opening and PC. See "Opening and Closing the PC" on page 1. 10 Upgrading and Servicing Guide - HP Presario SA4000 | Upgrading and Servicing Guide - Page 15
- HP Presario SA4000 | Upgrading and Servicing Guide - Page 16
Printed in
-
 1
1 -
 2
2 -
 3
3 -
 4
4 -
 5
5 -
 6
6 -
 7
7 -
8
-
9
-
10
-
11
-
12
-
13
-
14
-
15
-
16
 |
 |

Upgrading and Servicing Guide