HP ProLiant SL4545 HP ProLiant SL4500 Series Quick Setup Instructions (2 node)
HP ProLiant SL4545 Manual
 |
View all HP ProLiant SL4545 manuals
Add to My Manuals
Save this manual to your list of manuals |
HP ProLiant SL4545 manual content summary:
- HP ProLiant SL4545 | HP ProLiant SL4500 Series Quick Setup Instructions (2 node) - Page 1
Instructions HP ProLiant SL4500 Series Translated versions To view, select a language: • English http://www.hp.com/support/SL4540_SL4545_2N_QSI_en • Français http://www.hp.com/support/SL4540_SL4545_2N_QSI_fr • Español http://www.hp.com/support/SL4540_SL4545_2N_QSI_sp • Deutsch http://www.hp manual - HP ProLiant SL4545 | HP ProLiant SL4500 Series Quick Setup Instructions (2 node) - Page 2
The chassis supports up to where the cord extends from the server. To install the component: Insert the HP ProLiant SL4500 Series Setup and Installation Guide. For more information For more detailed setup and configuration information, see the HP ProLiant SL4500 Series Setup and Installation Guide
-
 1
1 -
 2
2
 |
 |

Quick Setup Instructions
HP ProLiant SL4500 Series
Part Number: 708285-002
December 2012
Edition: 2
*708285-002*
708285-002
Translated versions
To view, select a language:
•
English
•
Français
•
Español
•
Deutsch
•
•
Site requirements
Select an installation site that meets the detailed installation site requirements
described in the site planning guide on the Documentation CD and on the HP
website
.
Verifying the pallet contents
Item
Description
1
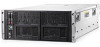
The HP ProLiant SL4500 Series chassis
2
Nodes (2)
3
Hard drive blank*
4
Hard drive*
5
Power supply blank*
6
Management module
7
Power supply*
8
I/O modules (2)
9
System fans (5)
10
Access panel
11
Rack rails and cable management arm**
12
Documentation CD**
* The quantity depends on the configuration ordered.
** Not shown
Chassis component identification
Before installing front or rear components into the chassis, review device bay
numbering for each component.
Front panel components
Item
Description
1
Node 1
2
Node drives
3
LFF drive health LED
4
LFF drive UID
5
Drives controlled by node 1 P420i array controller
6
Node 2
7
Drives controlled by node 2 P420i array controller
8
Hard drive display boards
9
Node VGA connector
10
Node USB connectors
11
Node Power On/Standby button and system power LED
12
Node health LED
13
Node release button
14
Node UID LED button
Configuration rules
•
Fans must be installed in all fan bays to meet thermal requirements.
•
An I/O module or I/O blank must be installed in all I/O bays.
•
A power supply or power supply blank must be installed in all power supply
bays.
Rear panel components
I
tem
Description
1
System fans
2
I/O module
3
Management module
4
Power supplies
5
I/O module
© Copyright 2012 Hewlett-Packard Development Company, L.P.
The information contained herein is subject to change without notice. The only warranties
for HP products and services are set forth in the express warranty statements accompanying
such products and services. Nothing herein should be construed as constituting an additional
warranty. HP shall not be liable for technical or editorial errors or omissions contained herein.
Device bay numbering
Setting up the chassis
WARNING:
The chassis is very heavy. To reduce the risk of personal
injury or damage to the equipment:
• Observe local occupational health and safety requirements and
guidelines for manual material handling.
• Remove all installed components from the chassis before installing or
moving the chassis.
• Use caution and get help to lift and stabilize the chassis during
installation or removal, especially when the chassis is not fastened to
the rack.
WARNING:
To reduce the risk of personal injury or damage to the
equipment, you must adequately support the chassis during installation
and removal.
1.
Select the proper location for setting up the chassis, based on requirements
provided in the
HP ProLiant SL4500 Series Setup and Installation Guide
.
2.
Remove the packing materials from the pallet.
3.
Remove any installed components from the chassis:
o
Chassis hard drives
o
Nodes
o
System fans
o
I/O modules
o
Management module
o
Power supplies
Installing the chassis
The chassis requires installation in a rack. Install the rack rails, and then install the
chassis and other components.
For more information, see the
HP ProLiant SL4500 Series Setup and Installation
Guide and the Quick Deploy Rail System Installation Instruction
s that ship with the
rack hardware kit.
Installing the front components
CAUTION:
To prevent improper cooling and thermal damage, do not
operate the
HP ProLiant SL4500 Series
unless all hard drive and device
bays are populated with either a component or a blank.
Add any ordered options to the node.
Installing the nodes into the chassis
Install the component as indicated.