HP T1500J HP R/T2200 UPS Installation Instructions
HP T1500J Manual
 |
View all HP T1500J manuals
Add to My Manuals
Save this manual to your list of manuals |
HP T1500J manual content summary:
- HP T1500J | HP R/T2200 UPS Installation Instructions - Page 1
the UPS user guide located on the documentation CD or HP website (http://www.hp.com/go/rackandpower). Precautions Save these instructions. This document contains important safety instructions that should be followed during installation, operation, and maintenance of the UPS and batteries. WARNING - HP T1500J | HP R/T2200 UPS Installation Instructions - Page 2
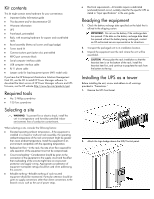
in "Input specifications" in the user guide. Readying the equipment 1. Check the battery recharge date specified on the label that battery if the recharge date has passed. If the date on the battery recharge date label has passed without the battery being recharged, contact an HP authorized service - HP T1500J | HP R/T2200 UPS Installation Instructions - Page 3
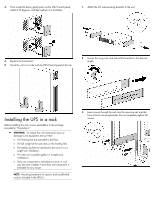
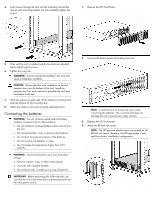
3. From inside the bezel, gently push out the LED/Control panel, rotate it 90 degrees, and then replace it in the bezel. 1. Attach the 2U side-mounting brackets to the unit. 4. Replace the front bezel. 5. Stand the unit on its side with the LED/Control panel at the top. 2. Loosen the wing nuts - HP T1500J | HP R/T2200 UPS Installation Instructions - Page 4
terminal. NOTE: A small amount of arcing may occur when connecting the batteries. This is normal and does not damage the unit or present any safety concern. 3. Replace the UPS front bezel. 4. Attach the RETMA rail covers. NOTE: The HP logo and product name are printed on the RETMA rail covers - HP T1500J | HP R/T2200 UPS Installation Instructions - Page 5
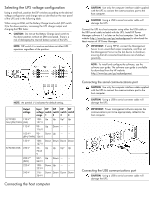
battery system of the UPS. NOTE: DIP switch 4 is inactive and does not affect UPS operation regardless of the position. NOTE: An asterisk (*) indicates the default setting. Output voltage Input DIP DIP DIP DIP voltage switch switch switch switch range 1 2 3 4 R/T2200 120 V* NA/JPN/TWN (NA - HP T1500J | HP R/T2200 UPS Installation Instructions - Page 6
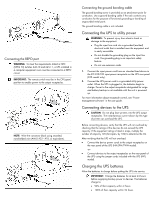
of the UPS (NA/JPN/TWN model). -or• Connect devices to the output receptacles on the rear panel of the UPS using the jumper cords included with the UPS (INTL model). Charging the UPS batteries Allow the batteries to charge before putting the UPS into service. IMPORTANT: Charge the batteries for at - HP T1500J | HP R/T2200 UPS Installation Instructions - Page 7
Powering up the UPS Press and hold the Power On/Standby button until the UPS beeps. The Power LED illuminates solid green, indicating that power is available at the UPS output receptacles.
-
 1
1 -
 2
2 -
 3
3 -
 4
4 -
 5
5 -
 6
6 -
 7
7
 |
 |

HP R/T2200 UPS
Installation Instructions
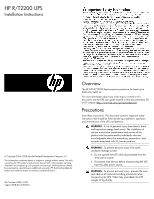
Overview
The HP UPS R/T2200 features power protection for loads up to
2200 VA/1600 W.
For more information about any of the topics covered in this
document, see the UPS user guide located on the documentation CD
or HP website (http://www.hp.com/go/rackandpower
).
Precautions
Save these instructions. This document contains important safety
instructions that should be followed during installation, operation,
and maintenance of the UPS and batteries.
WARNING:
A risk of personal injury from electric shock
and hazardous energy levels exists. The installation of
options and routine maintenance and service of this
product must be performed by individuals who are
knowledgeable about the procedures, precautions, and
hazards associated with AC power products.
WARNING:
To prevent personal injury from earth
conductor leakage current:
•
Do not operate the UPS while disconnected from the
utility power source.
•
Disconnect load devices before disconnecting the UPS
from the utility power source.
WARNING:
To prevent personal injury, prepare the area
and observe all materials handling procedures when
transporting the UPS. When fully assembled, the UPS
weighs 29 kg (64 lb).
© Copyright 2006, 2008 Hewlett-Packard Development Company, L.P.
The information contained herein is subject to change without notice. The only
warranties for HP products and services are set forth in the express warranty
statements accompanying such products and services. Nothing herein should
be construed as constituting an additional warranty. HP shall not be liable for
technical or editorial errors or omissions contained herein.
Part Number 404313-004
August 2008 (Fourth Edition)