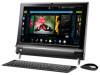
HP TouchSmart 300-1340 User Guide
HP TouchSmart 300-1340 Manual
 |
View all HP TouchSmart 300-1340 manuals
Add to My Manuals
Save this manual to your list of manuals |
HP TouchSmart 300-1340 manual content summary:
- HP TouchSmart 300-1340 | User Guide - Page 1
User Guide - HP TouchSmart 300-1340 | User Guide - Page 2
services are set forth in the express statements accompanying such products and services. Nothing herein should be construed as constituting an additional warranty. HP this device to communicate with other 802.11n WLAN devices. HP supports lawful use of technology and does not endorse or encourage - HP TouchSmart 300-1340 | User Guide - Page 3
Front and right side of the HP TouchSmart PC 4 Left side of the HP TouchSmart PC 6 Back of the HP TouchSmart PC 7 Activity LED indicator Determining whether your system is 64-bit or 32-bit 13 Optical Disc Drive ...13 Connecting to the Internet...14 Wireless home network...14 Wired home network - HP TouchSmart 300-1340 | User Guide - Page 4
...39 Video playlists ...39 Transferring videos to the computer 39 Uploading videos to YouTube 40 Recording home movies ...40 Video chats and conference calls 40 HP TouchSmart Movie Themes 41 HP TouchSmart Calendar ...41 iv User Guide (Features may vary by model) - HP TouchSmart 300-1340 | User Guide - Page 5
Live TV...44 HP TouchSmart Link ...44 Updating Software ...44 Software Quick Reference Table 44 Remote Control ...47 Using the remote control ...47 Software Troubleshooting and System Recovery 51 Software Troubleshooting ...51 Software repair overview ...51 Updating drivers ...51 Microsoft System - HP TouchSmart 300-1340 | User Guide - Page 6
find additional troubleshooting help. Upgrade or replace components of your computer. Find computer warranty information. Get technical support. Get up-to-date information and help from the Windows community. Learn how to make your computer adaptable to wall mounting. On the HP TouchSmart home page - HP TouchSmart 300-1340 | User Guide - Page 7
. The interactive screen makes wall mounting a good choice for the HP TouchSmart PC. The hardware to adapt the computer for wall mounting (not computer may not exactly match the illustrations and descriptions in this guide. *** VESA mount adapter availability varies by country/region. Separate - HP TouchSmart 300-1340 | User Guide - Page 8
cable Remote control Computers with wall-mounting option VESA plate adapter assembly 2 User Guide (Features may vary by model) Use to connect computer to power source. without TV tuners. Mount on the back of the computer to adapt the computer for separate wall-mounting hardware (not included). - HP TouchSmart 300-1340 | User Guide - Page 9
Cables not included but that may be required Ethernet (LAN) cable Use to connect to a wired network. Coaxial cable S-Video cable Audio/video composite cable TV tuner (composite video to S-Video) adapter Use to connect to an Internet connection with a cable modem, or to connect the TV signal - HP TouchSmart 300-1340 | User Guide - Page 10
and delightfully responsive. Experience the ease of managing your digital life by touch with the HP TouchSmart software. * High definition (HD) content is required to view HD images. Most current including more of the background. * Internet access required. 4 User Guide (Features may vary by model) - HP TouchSmart 300-1340 | User Guide - Page 11
hard drive disks, digital cameras, and MP3 players. J IR receiver window Infrared (IR) receiver window, located on the lower-right side of the (select models only) computer. Allows for use with a remote control. K HP TouchSmart button Turn your HP TouchSmart PC on and open your HP TouchSmart - HP TouchSmart 300-1340 | User Guide - Page 12
Ambient Light button (select models only) The HP TouchSmart Ambient Light casts a glow from the computer directly from a memory card. Supported formats include Extreme Digital (xD), MS-Pro) memory cards. Your memory card reader also supports adapters for the following memory cards: Mini SD, RS- - HP TouchSmart 300-1340 | User Guide - Page 13
Back of the HP TouchSmart USB devices (USB 2.0) such as printers, external hard disk drives, digital cameras, and MP3 players. D Digital audio port Connect to your home theater system or your surround sound digital (SPDIF Out) speakers. Supports - HP TouchSmart 300-1340 | User Guide - Page 14
HP TouchSmart PC: LED What it does A Webcam Indicates webcam activity. B Power Indicates the power state: blue indicates power on, and amber indicates Sleep mode. C Optical disc drive Indicates optical disc drive is in use. D Hard disk drive Indicates hard disk drive from the back of the - HP TouchSmart 300-1340 | User Guide - Page 15
power cord into an AC power source through a surge protector/uninterruptible power supply (UPS). Cable Management The HP TouchSmart PC includes an easy-to-use cable-management feature; all cables connected at the back of the computer are routed through the opening in the computer stand. Welcome 9 - HP TouchSmart 300-1340 | User Guide - Page 16
stand open. Then, if you want to change the angle of the HP TouchSmart PC, hold each side of the computer and tilt it back to an angle of between 5 degrees and 40 degrees from the vertical. may result in damage to the hardware components. A B B C 10 User Guide (Features may vary by model) - HP TouchSmart 300-1340 | User Guide - Page 17
mouse is in the On position (the keyboard does not have a Power switch). Then, turn on the computer. If you have trouble using the keyboard and mouse, manually synchronize them as explained in the next procedure. NOTE: Select models may have a wired keyboard and mouse. The keyboard is designed to - HP TouchSmart 300-1340 | User Guide - Page 18
manually synchronize the wireless keyboard or mouse if they are not functioning. To synchronize them: Make sure the keyboard and mouse are next to the HP TouchSmart then re-insert the wireless keyboard and mouse receiver from the back of the computer and then synchronize the keyboard and mouse again. - HP TouchSmart 300-1340 | User Guide - Page 19
HP TouchSmart Support. 2 Tap Troubleshooting drive. You can also tap the Start button, tap Computer, press and hold (or with the mouse, right-click) the CD drive, and then tap Eject. If the disc gets stuck, refer to the Limited Warranty and Support Guide for the telephone number to contact HP Support - HP TouchSmart 300-1340 | User Guide - Page 20
on the manufacturer. Follow the manufacturer's instructions. 4 Connect your computer to the network. NOTE: A DSL wall connection is shown here. If you have a cable modem, the modem will be connected to the wall using a coaxial cable. 5 Configure the HP TouchSmart PC to connect to the wireless - HP TouchSmart 300-1340 | User Guide - Page 21
you: 1 Purchase high-speed Internet service from an Internet service provider (ISP). 2 Purchase a depending on the manufacturer. Follow the manufacturer's instructions. 4 Connect the DSL cable (shown) or the HP TouchSmart PC is located on the back of the computer, behind the connector cover. 6 - HP TouchSmart 300-1340 | User Guide - Page 22
click Hardware and Sound. Find your Bluetooth device and follow the onscreen instructions. 3 If your Bluetooth device is a printer, tap the Start guide. See "Windows Media Center setup wizard" on page 19. 4 Point the remote control at the IR receiver on the lower-right side of the HP TouchSmart - HP TouchSmart 300-1340 | User Guide - Page 23
Please read "Additional Safety Information" in the Limited Warranty and Support Guide before installing and connecting your HP TouchSmart PC to the electrical power system. To connect a TV signal to the TV In (A) connector located on the back of the computer, behind the computer stand. A Welcome 17 - HP TouchSmart 300-1340 | User Guide - Page 24
Video cable to the S-Video In connector (A), located at the back of the computer behind the connector cover. Connect the other end of the cable to your set-top left (white) and right (red) Audio Line In connectors (B) on the back of the computer. Setting up for remote control use (optional) You must - HP TouchSmart 300-1340 | User Guide - Page 25
front of the HP TouchSmart PC (E), not at the set-top box. Windows Media Center setup wizard Select models only 1 Tap the Start button, tap All Programs, and then tap Windows Media Center. 2 Follow the onscreen instructions to set up your TV tuner and Windows Media Center TV program guide. For more - HP TouchSmart 300-1340 | User Guide - Page 26
or 5.1 powered speakers Audio receiver Headphones NOTES: The HP TouchSmart PC supports powered speaker systems only. Powered speakers require a the back of the computer and then use the following procedure to enable the speakers or audio receiver. If necessary, refer to the instructions that - HP TouchSmart 300-1340 | User Guide - Page 27
Experience, Recording Experience, and Advanced buttons. NOTE: To switch back to the internal speakers after the digital speakers are enabled, the left side of the computer. If you are playing music in HP TouchSmart software, use the Volume controls from the Music application that remain onscreen - HP TouchSmart 300-1340 | User Guide - Page 28
the sides or back of the HP TouchSmart PC, or you can use a wireless printer. NOTE: The HP TouchSmart PC does not support printers that require download a printer driver that works with Windows 7. To verify your operating system and compatibility, go to www.hp.com/support 22 User Guide (Features may - HP TouchSmart 300-1340 | User Guide - Page 29
the computer into a deeper sleep, with more energy savings. In Hibernate mode, all peripheral power shuts down and all data is saved to your hard drive. When the computer comes out of Hibernate mode, your previous session is restored. This process takes a little longer than awakening from Sleep mode - HP TouchSmart 300-1340 | User Guide - Page 30
your desk (or other stationary object) and the other to the security slot on the computer. Secure the security lock with the key. 24 User Guide (Features may vary by model) - HP TouchSmart 300-1340 | User Guide - Page 31
TouchSmart with Safety and Comfort Before you begin using the computer, arrange the computer and your work area to maintain your comfort and productivity. Refer to the Safety & Comfort Guide for important ergonomic information: visit www.hp upper back muscles and neck, try increasing the height - HP TouchSmart 300-1340 | User Guide - Page 32
Recycling Your Old Computer Hardware Disposing of electronic waste responsibly has been an HP priority for more than 20 years. If this computer is a replacement an older PC you no longer need, go to www.hp.com/go/recycle to find out how HP can help you dispose of your old computer with minimum impact - HP TouchSmart 300-1340 | User Guide - Page 33
table shows additional ways to access and navigate programs within HP TouchSmart: Action Go to HP TouchSmart homepage Description Tap the House icon to go to the HP TouchSmart homepage. Minimize or close HP TouchSmart Go back to a previous window Tap the Minimize (-) button or Close (X) button - HP TouchSmart 300-1340 | User Guide - Page 34
in Canvas) using two fingers Use Windows Input Panel (onscreen keyboard) 28 User Guide (Features may vary by model) Description (continued) Tap the Windows 7 icon in the upper-left corner to minimize HP TouchSmart and go to the Microsoft Windows desktop. To quickly scroll left and right or - HP TouchSmart 300-1340 | User Guide - Page 35
is not available in all languages. If your language is not available, you can use the onscreen keyboard to enter text. HP TouchSmart Tiles When you open HP TouchSmart software, you see a row of large tiles and a row of small tiles below that. Tiles are shortcuts to software programs, features - HP TouchSmart 300-1340 | User Guide - Page 36
: 1 From the HP TouchSmart homepage, tap the Personalize button. 2 In the list of tiles, tap a tile that is disabled. 3 Tap Show in the Visibility field. 4 Tap Done to save your changes and return to the HP TouchSmart homepage. The tile you enabled is now visible. 30 User Guide (Features may vary - HP TouchSmart 300-1340 | User Guide - Page 37
monitor your favorite Web sites as they change content throughout the day. The HP TouchSmart Browser supports only standard HTML pages. It does not support other display formats, such as RSS feeds. To view RSS feeds, use the HP TouchSmart RSS feed tile. If you are doing heavy Web surfing, and using - HP TouchSmart 300-1340 | User Guide - Page 38
the right pane. When you make a slideshow of your photos, rotate your photos so each photo appears in its correct orientation. From HP TouchSmart, you can access photos stored anywhere on your hard drive. HP TouchSmart Photo supports the .jpg file format. 32 User Guide (Features may vary by model) - HP TouchSmart 300-1340 | User Guide - Page 39
You can view any photos you have on your hard drive with HP TouchSmart Photos. To get photos from your camera: 1 your camera memory card directly from the HP TouchSmart homepage (but not download them): 1 Tap the back arrow in the upper-left corner of the HP TouchSmart window. 2 Tap Removable Disc. - HP TouchSmart 300-1340 | User Guide - Page 40
to access your music from either your Music folder on your hard drive, or from your iTunes folder. You cannot view both libraries at once. The iTunes choice is disabled if you have not downloaded iTunes. HP TouchSmart Music supports the following music file formats: .mp3, .wma, .wav, .aac, .m4p, and - HP TouchSmart 300-1340 | User Guide - Page 41
HP TouchSmart Music will show music files: 4 From the HP TouchSmart homepage, tap Music. 5 Tap Settings, and then tap either Use HP TouchSmart Media library (which is the Music folder on your hard drive your cursor over the blank CD (the album with no cover art), and right-click. 4 In the pull-down - HP TouchSmart 300-1340 | User Guide - Page 42
Internet and download it to your hard drive. You might find the artwork of the original CD cover, and choose that. 2 Open dragging songs to the Playlist window. 1 Open HP TouchSmart, and select the Music tile. 2 Select library, navigate to your hard drive (from the Windows desktop), open the Music - HP TouchSmart 300-1340 | User Guide - Page 43
), you can search for music by What's New, Genres, Channel Guide (radio stations), Playlists, or your own custom playlists. You can anywhere on your hard drive. HP TouchSmart Video supports the following video file formats: .mpg, .mpeg, .dvr-ms, .wmv, .asf, and .avi. * HP supports the lawful use - HP TouchSmart 300-1340 | User Guide - Page 44
instant messaging software (download the instant messaging software of your choice; it is not included with HP TouchSmart). The webcam (A) and microphones (B) are at the top center of the computer. To adjust tap the Help icon (?) to access the Help menu. 38 User Guide (Features may vary by model) - HP TouchSmart 300-1340 | User Guide - Page 45
to the computer by using a USB connector, and follow the onscreen instructions to transfer videos to your hard drive. Or Download videos from the Internet. 2 After you add your videos to the computer, view them in HP TouchSmart Video. HP TouchSmart Video can play videos stored anywhere on your - HP TouchSmart 300-1340 | User Guide - Page 46
HP TouchSmart Video. 1 Open HP TouchSmart, and select the Video tile. 2 Select Dates or Folders. 3 Tap the video you want to upload to YouTube. 4 Tap Upload to YouTube. 5 Follow the onscreen instructions onscreen instructions to not be included with HP TouchSmart. Before you can of HP TouchSmart). The - HP TouchSmart 300-1340 | User Guide - Page 47
or export events to store in an industry-standard calendar file format (an .ics file) stored in a location you choose on your hard drive. HP TouchSmart Notes With HP TouchSmart Notes, you can create text notes and voice notes using touch, the keyboard, a video, photos, or by recording your own voice - HP TouchSmart 300-1340 | User Guide - Page 48
Your City box. 5 Select Fahrenheit or Celsius. 6 Tap OK to confirm the settings. Tap the House icon to return to the HP TouchSmart homepage. HP TouchSmart Clock Personalize your TouchSmart clock to show the time for one, two, or three different time zones. 42 User Guide (Features may vary by model) - HP TouchSmart 300-1340 | User Guide - Page 49
do not need to refer to a recipe; you get it all by the HP TouchSmart voice instruction. The instructions stop after each line, so you can complete the procedure at your own pace. When you say the command to Start, the guide gives you the recipe, but stops after each line until you say Continue - HP TouchSmart 300-1340 | User Guide - Page 50
guide so you can easily find TV programs. Use the digital video recorder (DVR) function to record your favorite shows.* HP TouchSmart Link With TouchSmart HP TouchSmart PC using Bluetooth wireless technology that comes with the mobile phone. HP TouchSmart Link works with mobile phones that support - HP TouchSmart 300-1340 | User Guide - Page 51
disc. Create song title inserts for your CD cases. CyberLink PowerDirector HP Advisor Record movie files to create VCDs and DVDs that you can play convenient shopping search engine. Get HP software and driver updates. Get important messages from HP. Access PC Health and Security and PC Help - HP TouchSmart 300-1340 | User Guide - Page 52
46 User Guide (Features may vary by model) - HP TouchSmart 300-1340 | User Guide - Page 53
Using the remote control Select models only Remote Control The remote control works with Windows Media Center and other software. This remote control helps you navigate on the computer just as a TV remote control helps you navigate cable TV options or control the playback of a movie in a DVD - HP TouchSmart 300-1340 | User Guide - Page 54
Center. 5 Guide - (Windows Media Center only) Opens the Television Program Guide. 6 Recorded TV main menu of a DVD movie, if available. 9 Back - Returns to the previous window. 10 More Info - a selected television program and stores it on the hard disk drive. 15 Play - Plays the selected media. 16 - HP TouchSmart 300-1340 | User Guide - Page 55
21 A/V source button - For HP TouchSmart600 PC game console models only. 22 Picture - (Windows Media 27 Slide Show - (Windows Media Center only) Plays a slide show of all the pictures on the hard disk drive. 28 Ch+ and Ch- - Changes the TV channels or moves pages up and down, depending on available - HP TouchSmart 300-1340 | User Guide - Page 56
50 User Guide (Features may vary by model) - HP TouchSmart 300-1340 | User Guide - Page 57
item (for example, HP DVD Writer 640b). 5 Click the Driver tab. 6 To update a driver, click Update Driver, and then follow the onscreen instructions. Or To revert to an earlier version of a driver, click Rollback Driver, and then follow the onscreen instructions. Software Troubleshooting and System - HP TouchSmart 300-1340 | User Guide - Page 58
software problem existed. onscreen instructions. To manually add Support. 2 Type system restore in the Search Help box, and then press Enter. Software program and hardware driver reinstallation If an individual factory-installed software program or hardware driver Guide (Features may vary by model) - HP TouchSmart 300-1340 | User Guide - Page 59
follow the onscreen instructions. 5 When you or hardware drivers. Creating data external hard disk drive. When hard disk drive with the data copied to the disc to ensure it is an exact copy. Depending on your disc recording software, you may need to manually If you encounter problems with your computer - HP TouchSmart 300-1340 | User Guide - Page 60
hard disk drive, deleting all data files you have created. System recovery reinstalls the operating system, programs, and drivers your hard disk drive. The portion of the hard disk drive that cannot be your hard disk drive. To hard disk drive Follow the onscreen instructions. Label each disc as - HP TouchSmart 300-1340 | User Guide - Page 61
hard disk drive, by pressing the F11 key on the keyboard during system startup. 3 Through recovery discs that you create. 4 Through recovery discs purchased from HP Support. To purchase recovery discs, go to www.hp.com/support and visit the Software & Driver back Troubleshooting and System Recovery 55 - HP TouchSmart 300-1340 | User Guide - Page 62
the data files you want to save. When you are done, remove the backup disc from the drive tray. CAUTION: All data on the hard disk drive will be deleted. You will lose data if it is not backed up. 2 Disconnect all peripheral devices from the computer, except the keyboard and mouse. 3 Insert recovery - HP TouchSmart 300-1340 | User Guide - Page 63
diagnostics, and guided assistance. To open HP Support Assistant, tap the Start button, All Programs, HP, and then tap HP Support Assistant. Windows 7 Troubleshooting Tools Windows 7 provides troubleshooting tools that can automatically troubleshoot and fix common computer problems. To access - HP TouchSmart 300-1340 | User Guide - Page 64
58 User Guide (Features may vary by model) - HP TouchSmart 300-1340 | User Guide - Page 65
13 audio Line In connector 6 Line Out connector 7 troubleshooting 20 Windows Media Center 22 B backup 53 backup discs, creating 53 Bluetooth antenna features 4 using 16 Browser tile 31 button computer power/sleep 5 DVD control 5 HP TouchSmart 5 C cable management 9 Calendar tile 41 camera distance - HP TouchSmart 300-1340 | User Guide - Page 66
lock 7, 24 keyboard and mouse about 11 receiver LED 8 receiver location 7 troubleshooting 12 L LAN (local area network) 14 antenna features 5 connecting to the LED 8 using with HP TouchSmart 47 repairing software 51 repetitive strain injury (RSI), see Safety & Comfort Guide resolution, monitor 4 - HP TouchSmart 300-1340 | User Guide - Page 67
or audio receiver 20 features 5 support information vi support tutorials vi, 31 S-Video adapter 29 cleaning 25 features 4 TouchSmart Link tile 44 tutorials vi, 31 Tutorials tile 31 TV TV In connector 7 Twitter tile 43 U updating, drivers 51 upgrading hardware 13 software 13 USB connector 7 - HP TouchSmart 300-1340 | User Guide - Page 68
Part number: 575631-001
-
 1
1 -
 2
2 -
 3
3 -
 4
4 -
 5
5 -
 6
6 -
 7
7 -
8
-
9
-
10
-
11
-
12
-
13
-
14
-
15
-
16
-
17
-
18
-
19
-
20
-
21
-
22
-
23
-
24
-
25
-
26
-
27
-
28
-
29
-
30
-
31
-
32
-
33
-
34
-
35
-
36
-
37
-
38
-
39
-
40
-
41
-
42
-
43
-
44
-
45
-
46
-
47
-
48
-
49
-
50
-
51
-
52
-
53
-
54
-
55
-
56
-
57
-
58
-
59
-
60
-
61
-
62
-
63
-
64
-
65
-
66
-
67
-
68
 |
 |

User Guide