HP TouchSmart 610-1150f Wall-Mounting your HP TouchSmart User Guide
HP TouchSmart 610-1150f Manual
 |
View all HP TouchSmart 610-1150f manuals
Add to My Manuals
Save this manual to your list of manuals |
HP TouchSmart 610-1150f manual content summary:
- HP TouchSmart 610-1150f | Wall-Mounting your HP TouchSmart User Guide - Page 1
Wall-Mounting your HP TouchSmart User Guide - HP TouchSmart 610-1150f | Wall-Mounting your HP TouchSmart User Guide - Page 2
services. Nothing herein should be construed as constituting an additional warranty. HP shall not be liable for technical or editorial errors or omissions contained herein. HP device to communicate with other 802.11n WLAN devices. HP supports lawful use of technology and does not endorse or encourage - HP TouchSmart 610-1150f | Wall-Mounting your HP TouchSmart User Guide - Page 3
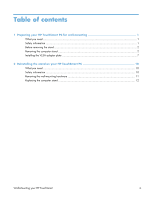
information ...1 Before removing the stand ...2 Removing the computer stand ...2 Installing the VESA adapter plate 7 2 Reinstalling the stand on your HP TouchSmart PC 10 What you need ...10 Safety information ...10 Removing the wall-mounting hardware 11 Replacing the computer stand 12 Wall - HP TouchSmart 610-1150f | Wall-Mounting your HP TouchSmart User Guide - Page 4
iv Wall-Mounting your HP TouchSmart - HP TouchSmart 610-1150f | Wall-Mounting your HP TouchSmart User Guide - Page 5
" in the Limited Warranty and Support Guide before installing and connecting your system to the electrical power system. WARNING! The computer is heavy. Take proper precautions when lifting or moving your computer. WARNING! Always disconnect the HP TouchSmart PC from the power source before removing - HP TouchSmart 610-1150f | Wall-Mounting your HP TouchSmart User Guide - Page 6
such as any CD, DVD, memory cards, USB devices, or external hard disk drives) from the HP TouchSmart PC. CAUTION: Static electricity can damage the electronic components of the HP TouchSmart PC or optional equipment. Ensure that you are discharged of static electricity by briefly touching a grounded - HP TouchSmart 610-1150f | Wall-Mounting your HP TouchSmart User Guide - Page 7
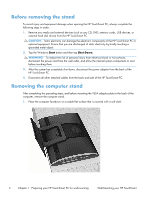
2. Insert your finger, or a flathead screwdriver, into the slot on the stand cover to pry it off of the computer stand. 3. Remove the stand cover from the computer stand. Wall-Mounting your HP TouchSmart Removing the computer stand 3 - HP TouchSmart 610-1150f | Wall-Mounting your HP TouchSmart User Guide - Page 8
a Phillips screwdriver to remove the four screws attaching the VESA adapter plate to the bottom of the computer stand. Save the screws. 4 Chapter 1 Preparing your HP TouchSmart PC for wall-mounting Wall-Mounting your - HP TouchSmart 610-1150f | Wall-Mounting your HP TouchSmart User Guide - Page 9
6. Remove the VESA adapter plate from the bottom of the computer stand. 7. Use a flathead screwdriver to remove the four screws attaching the computer stand to the back of the computer. Wall-Mounting your HP TouchSmart Removing the computer stand 5 - HP TouchSmart 610-1150f | Wall-Mounting your HP TouchSmart User Guide - Page 10
the computer, the VESA adapter plate must be replaced on the bottom of the computer stand in order to properly support the computer. Follow all the steps in Reinstalling the stand on your HP TouchSmart PC on page 10. 6 Chapter 1 Preparing your HP TouchSmart PC for wall-mounting Wall-Mounting your - HP TouchSmart 610-1150f | Wall-Mounting your HP TouchSmart User Guide - Page 11
on the rails. 2. Attach the VESA adapter plate to the back of the computer, using a Phillips screwdriver to tighten the four screws. Wall-Mounting your HP TouchSmart Installing the VESA adapter plate 7 - HP TouchSmart 610-1150f | Wall-Mounting your HP TouchSmart User Guide - Page 12
). Replace the VESA adapter plate by installing and tightening the four screws, then slide the plate up until it locks in place. 8 Chapter 1 Preparing your HP TouchSmart PC for wall-mounting Wall-Mounting your - HP TouchSmart 610-1150f | Wall-Mounting your HP TouchSmart User Guide - Page 13
the wall-mounting hardware (purchased separately) to the VESA adapter plate, according to the manufacturer's instructions, using either the 100 mm x 100 mm screw holes or the 100 mm x 200 mm as when the computer is on the stand. Wall-Mounting your HP TouchSmart Installing the VESA adapter plate 9 - HP TouchSmart 610-1150f | Wall-Mounting your HP TouchSmart User Guide - Page 14
" in the Limited Warranty and Support Guide before installing and connecting your system to the electrical power system. WARNING! The computer is heavy. Take proper precautions when lifting or moving your computer. WARNING! Always disconnect the HP TouchSmart PC from the power source before removing - HP TouchSmart 610-1150f | Wall-Mounting your HP TouchSmart User Guide - Page 15
cloth. CAUTION: The computer is heavy and may require two people to remove it from the wall. 6. Following the manufacturer's instructions, remove the wall-mounting hardware from the VESA adapter plate on the HP TouchSmart PC. Wall-Mounting your HP TouchSmart Removing the wall-mounting hardware 11 - HP TouchSmart 610-1150f | Wall-Mounting your HP TouchSmart User Guide - Page 16
stand is on the computer, replace the VESA adapter plate on the bottom of the computer stand. This stabilizes the computer stand so that it supports the weight of your HP TouchSmart PC. 1. Use a Phillips screwdriver to remove the four screws from the VESA adapter plate at the back of the - HP TouchSmart 610-1150f | Wall-Mounting your HP TouchSmart User Guide - Page 17
computer, and align the four screw holes. 4. Use a flathead screwdriver to replace the four screws attaching the computer stand to the computer. Wall-Mounting your HP TouchSmart Replacing the computer stand 13 - HP TouchSmart 610-1150f | Wall-Mounting your HP TouchSmart User Guide - Page 18
lock. You will hear a click. Then slowly move the computer stand down to the bottom of the computer. 14 Chapter 2 Reinstalling the stand on your HP TouchSmart PC Wall-Mounting your HP TouchSmart - HP TouchSmart 610-1150f | Wall-Mounting your HP TouchSmart User Guide - Page 19
the computer stand. CAUTION: Do not skip steps 7 and 8 when replacing the computer stand. The VESA adapter plate is required on the computer stand to support the weight of the computer. Wall-Mounting your HP TouchSmart Replacing the computer stand 15 - HP TouchSmart 610-1150f | Wall-Mounting your HP TouchSmart User Guide - Page 20
stand and snap it back into place. Make sure that there are no gaps between the computer stand and the stand cover. 10. Place the HP TouchSmart PC in an upright position. 11. Adjust the vertical position and tilt of the display. 12. Connect the power cord. 13. Connect any cables that were
-
 1
1 -
 2
2 -
 3
3 -
 4
4 -
 5
5 -
 6
6 -
 7
7 -
8
-
9
-
10
-
11
-
12
-
13
-
14
-
15
-
16
-
17
-
18
-
19
-
20
 |
 |

Wall-Mounting your HP TouchSmart
User Guide