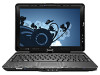
HP TouchSmart tx2-1020ca Multimedia - Windows Vista
HP TouchSmart tx2-1020ca Manual
 |
View all HP TouchSmart tx2-1020ca manuals
Add to My Manuals
Save this manual to your list of manuals |
HP TouchSmart tx2-1020ca manual content summary:
- HP TouchSmart tx2-1020ca | Multimedia - Windows Vista - Page 1
Multimedia User Guide - HP TouchSmart tx2-1020ca | Multimedia - Windows Vista - Page 2
products and services. Nothing herein should be construed as constituting an additional warranty. HP shall not be liable for technical or editorial errors or omissions contained herein. First Edition: November 2008 Document Part Number: 501597-001 Product notice This user guide describes features - HP TouchSmart tx2-1020ca | Multimedia - Windows Vista - Page 3
Multimedia features Identifying your multimedia components 1 Using the multimedia buttons ...3 Adjusting the volume ...3 2 Multimedia software Using HP MediaSmart software ...5 Using other preinstalled Creating (burning) a CD or DVD ...15 Removing an optical disc ...16 6 Webcam 7 Troubleshooting iii - HP TouchSmart tx2-1020ca | Multimedia - Windows Vista - Page 4
external display 21 The process of burning a disc does not begin, or it stops before completion 21 A DVD playing in Windows Media Player produces no sound or display 21 A device driver must be reinstalled ...21 Obtaining Microsoft device drivers 22 Obtaining HP device drivers 22 Index ...24 iv - HP TouchSmart tx2-1020ca | Multimedia - Windows Vista - Page 5
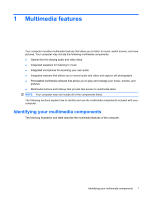
Your computer may include the following multimedia components: ● Optical drive for playing audio and video discs ● Integrated speakers for listening to ● Multimedia buttons and hotkeys that provide fast access to multimedia tasks NOTE: Your computer may not include all of the components listed. - HP TouchSmart tx2-1020ca | Multimedia - Windows Vista - Page 6
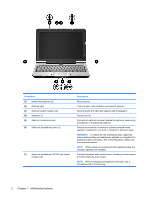
software accesses the webcam. Records audio and video and captures still photographs. Produce sound. Connects an optional computer headset microphone, stereo array microphone, or monaural microphone. Produce sound when connected to optional powered stereo speakers, headphones, ear buds, a headset - HP TouchSmart tx2-1020ca | Multimedia - Windows Vista - Page 7
to music, and view pictures. With the rotate button (2), you can change the orientation of the image on the screen. Pressing the MediaSmart button launches the MediaSmart program. Pressing the rotate button rotates the screen image counter-clockwise into 4 orientations: landscape primary, portrait - HP TouchSmart tx2-1020ca | Multimedia - Windows Vista - Page 8
◦ To increase volume, press the volume up button (3). ● Windows® volume control: a. Click the Volume icon in the notification area, at the far right of the taskbar. b. Increase or decrease the volume by moving the - HP TouchSmart tx2-1020ca | Multimedia - Windows Vista - Page 9
the MediaSmart button on the right side of the computer display. - or - Use a 2-finger "wave" gesture on the touch screen. - or - Use your finger or the digitizer pen to double-tap the MediaSmart icon on the computer desktop. For more information on using MediaSmart, select Start > Help and Support - HP TouchSmart tx2-1020ca | Multimedia - Windows Vista - Page 10
use. For example, if you want to use Windows Media Player to play an audio CD, click Windows Media Player. NOTE: Some programs may be located into the optical drive. 2. When the installation wizard opens, follow the on-screen instructions. 3. Restart the computer if you are prompted to do so. NOTE: - HP TouchSmart tx2-1020ca | Multimedia - Windows Vista - Page 11
the computer.) ● Be sure to install any drivers required by the external device. NOTE: A driver is a required program that acts like a translator . 2. Click Hardware and Sound. 3. Click Sound. 4. When the Sound window opens, click the Sounds tab. Under Program, select any sound event, such as a - HP TouchSmart tx2-1020ca | Multimedia - Windows Vista - Page 12
of the computer, follow these steps: 1. Select Start > All Programs > Accessories > Sound Recorder. 2. Click Start Recording and speak into the microphone. Save the file to your desktop. 3. Open Windows Media Player or MediaSmart and play back the sound. NOTE: For best results when recording, speak - HP TouchSmart tx2-1020ca | Multimedia - Windows Vista - Page 13
Play games over the Internet ● Edit pictures and video and create presentations ● Connect external video devices ● Watch TV, including high-definition TV ( Repeatedly pressing fn+f4 alternates the screen image between the computer display and the device. Connecting an external monitor or projector - HP TouchSmart tx2-1020ca | Multimedia - Windows Vista - Page 14
drive, also know as a BD drive, you can also watch high-definition video from disc. Identify the kind of device installed in your computer to see Combo Drive ● DVD±RW/R and CD-RW Combo Drive with Double-Layer (DL) support NOTE: Double-layer discs can store more data than single-layer discs. However, - HP TouchSmart tx2-1020ca | Multimedia - Windows Vista - Page 15
a much higher storage capacity. NOTE: The optical drive on your computer may not support all the types of optical discs discussed in this section. CD-R discs Use CD project files ● Transporting work files ● Making weekly backups of hard drive files ● Updating photos, video, audio, and data - HP TouchSmart tx2-1020ca | Multimedia - Windows Vista - Page 16
format for the storage of digital information, including high-definition video. A single-layer BD can store 25 GB, over five on the computer. 2. Press the release button (1) on the optical drive bezel to release the disc the disc by the edges to avoid touching the flat surfaces and position the disc - HP TouchSmart tx2-1020ca | Multimedia - Windows Vista - Page 17
AutoPlay dialog box opens. It prompts you to select how you want to use the media content. NOTE: For best results, be sure that your AC adapter is plugged into an external power source while playing a BD. Playing an optical disc 13 - HP TouchSmart tx2-1020ca | Multimedia - Windows Vista - Page 18
Save. NOTE: For more information about AutoPlay, refer to Help and Support. Watching a movie Your optical drive allows you to watch movies from 7. Launch the DVD playback feature in MediaSmart by pressing the MediaSmart button. 8. Then click the DVD icon and follow the instructions on the screen. - HP TouchSmart tx2-1020ca | Multimedia - Windows Vista - Page 19
tasks such as installing software, running utilities, or changing Windows settings. Refer to Help and Support for more information. 3. Click the plus sign (+) computer includes an optical drive that supports CD-RW, DVD-RW, or DVD+RW discs, you can burn data, video, and audio files, including MP3 and - HP TouchSmart tx2-1020ca | Multimedia - Windows Vista - Page 20
home systems usually do not support all DVD formats. Refer to the user guide that came with your DVD player for a list of supported formats. ● An MP3 program you have selected. For specific instructions, refer to the software manufacturer's instructions. These instructions may be provided with the - HP TouchSmart tx2-1020ca | Multimedia - Windows Vista - Page 21
webcam, follow these steps: 1. Click the HP MediaSmart icon on the desktop. 2. Select the video icon at the far right of the MediaSmart SmartMenu. 3. Click Webcam. NOTE: For more information on using HP MediaSmart, click Start > Help and Support, and type MediaSmart in the Search field. For optimum - HP TouchSmart tx2-1020ca | Multimedia - Windows Vista - Page 22
7 Troubleshooting The following sections describe several common issues and resolutions. The optical disc the spindle while lifting the outer edges of the disc. Hold the disc by the edges and avoid touching the flat surfaces. NOTE: If the tray is not fully accessible, tilt the disc carefully as you - HP TouchSmart tx2-1020ca | Multimedia - Windows Vista - Page 23
. ● Scan for hardware changes. Windows scans your system for installed hardware and installs any required drivers. ● Click Properties to see if the device is working properly: ◦ Click Troubleshoot to fix problems. ◦ Click the Driver tab to update, disable, or uninstall drivers for this device. NOTE - HP TouchSmart tx2-1020ca | Multimedia - Windows Vista - Page 24
or - ◦ The playback window in the multimedia program may close. To return to playing the disc, click the Play button in your multimedia program to restart the disc. In rare cases, you may need to exit devices, such as a printer, scanner, camera, or handheld device. 20 Chapter 7 Troubleshooting - HP TouchSmart tx2-1020ca | Multimedia - Windows Vista - Page 25
question not covered in this guide, select Start > Help and Support. The process of burning a Windows Media Player produces no sound or display Use MediaSmart to play a DVD. MediaSmart is installed on the computer and is also available from the HP Web site at http://www.hp.com. A device driver - HP TouchSmart tx2-1020ca | Multimedia - Windows Vista - Page 26
, programs, and hardware. 4. Follow the on-screen instructions to install Microsoft Update. If prompted by User Account Control, click Continue. 5. Click Change settings and select a time for Microsoft Update to check for updates to the Windows operating system and other Microsoft products. 6. If - HP TouchSmart tx2-1020ca | Multimedia - Windows Vista - Page 27
browser, and go to http://www.hp.com/support. 2. Select your country or region. 3. Click the option for software and driver downloads, and then type your computer model number in the product box. 4. Press enter, and then follow the on-screen instructions. A device driver must be reinstalled 23 - HP TouchSmart tx2-1020ca | Multimedia - Windows Vista - Page 28
button 3 S software installing 6 MediaSmart 5 multimedia 6 Windows Media Player 6 speakers 2 T troubleshooting device driver 21 disc burning 21 disc play 19, 20 DVD movie play 20 external display 21 HP device drivers 22 Microsoft drivers 22 optical disc tray 18 optical drive detection 19 V video - HP TouchSmart tx2-1020ca | Multimedia - Windows Vista - Page 29
W webcam 2 webcam light 2 webcam, using 17 Index 25 - HP TouchSmart tx2-1020ca | Multimedia - Windows Vista - Page 30
-
 1
1 -
 2
2 -
 3
3 -
 4
4 -
 5
5 -
 6
6 -
 7
7 -
8
-
9
-
10
-
11
-
12
-
13
-
14
-
15
-
16
-
17
-
18
-
19
-
20
-
21
-
22
-
23
-
24
-
25
-
26
-
27
-
28
-
29
-
30
 |
 |

Multimedia
User Guide