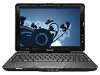
HP TouchSmart tx2-1310au Pointing Devices and Keyboard - Windows 7
HP TouchSmart tx2-1310au Manual
 |
View all HP TouchSmart tx2-1310au manuals
Add to My Manuals
Save this manual to your list of manuals |
HP TouchSmart tx2-1310au manual content summary:
- HP TouchSmart tx2-1310au | Pointing Devices and Keyboard - Windows 7 - Page 1
Pointing Devices and Keyboard User Guide - HP TouchSmart tx2-1310au | Pointing Devices and Keyboard - Windows 7 - Page 2
products and services. Nothing herein should be construed as constituting an additional warranty. HP shall not be liable for technical or editorial errors or omissions contained herein. First Edition: August 2009 Document Part Number: 539912-001 Product notice This user guide describes features - HP TouchSmart tx2-1310au | Pointing Devices and Keyboard - Windows 7 - Page 3
Using the touch screen ...7 Setting touch screen preferences ...10 3 Using the keyboard Using hotkeys ...11 Displaying system information (fn+esc 12 Opening Help and Support (fn+f1 12 Opening the Print Options window (fn+f2 12 Opening a Web browser (fn+f3 13 Switching the screen image (fn+f4 13 - HP TouchSmart tx2-1310au | Pointing Devices and Keyboard - Windows 7 - Page 4
5 Cleaning the TouchPad and keyboard Index ...19 iv - HP TouchSmart tx2-1310au | Pointing Devices and Keyboard - Windows 7 - Page 5
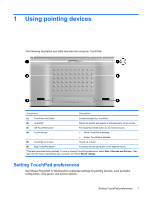
1 Using pointing devices The following illustration and table describe the computer TouchPad. Component Description (1) TouchPad on/off button (2) TouchPad* (3) Left TouchPad button* (4) TouchPad light (5) TouchPad scroll zone Enables/disables the TouchPad. Moves the pointer and selects or - HP TouchSmart tx2-1310au | Pointing Devices and Keyboard - Windows 7 - Page 6
To access Mouse Properties, select Start > Devices and Printers. Then, right-click the device representing your computer, and select Mouse settings. 2 Chapter 1 Using pointing devices - HP TouchSmart tx2-1310au | Pointing Devices and Keyboard - Windows 7 - Page 7
Using the TouchPad To move the pointer, slide your finger across the TouchPad surface in the direction you want the pointer to go. Use the left and right TouchPad buttons like the corresponding buttons on an external mouse. To scroll up and down using the TouchPad scroll zone, slide your finger up - HP TouchSmart tx2-1310au | Pointing Devices and Keyboard - Windows 7 - Page 8
2 Using the digitizer and touch screen You have two easy ways to make selections on the screen: ● The digitizer allows you to make selections or activate items on the screen using the digitizer pen included with your computer. ● The touch screen allows you to make selections or activate items on the - HP TouchSmart tx2-1310au | Pointing Devices and Keyboard - Windows 7 - Page 9
Using the digitizer pen You can write with the pen in pen-specific programs such as Tablet PC Input Panel, in all Microsoft® Office applications, and in most other Windows programs and utilities. The information you write on the screen with the pen can be filed, searched, and shared among most - HP TouchSmart tx2-1310au | Pointing Devices and Keyboard - Windows 7 - Page 10
Storing the pen To store the pen when you are not using it, insert the pen, tip first, into the pen holder on the computer. 6 Chapter 2 Using the digitizer and touch screen - HP TouchSmart tx2-1310au | Pointing Devices and Keyboard - Windows 7 - Page 11
digitizer pen to perform certain actions on the touch screen: NOTE: The instructions in this section are based on the preferences set at the factory. Panel > Hardware and Sound > Pen and Touch. NOTE: All movements may not be supported in all programs. ● Tap (or click)-Tap or double-tap an item on the - HP TouchSmart tx2-1310au | Pointing Devices and Keyboard - Windows 7 - Page 12
● Drag-Press your finger on an item on the screen and then move your finger to drag the item to a new location. You can also use this motion to slowly scroll through documents. ● Pinch-Touch the screen with two fingers held apart over an area and pinch the fingers together to decrease an object's - HP TouchSmart tx2-1310au | Pointing Devices and Keyboard - Windows 7 - Page 13
● Rotate-Touch an image on the screen with your thumb and forefinger (placing both fingers on the screen at the same time). Then move your forefinger in a semi-circular motion. Using the touch screen 9 - HP TouchSmart tx2-1310au | Pointing Devices and Keyboard - Windows 7 - Page 14
Start > Control Panel > Hardware and Sound > Pen and Touch > Flicks tab. 2. Click Navigational flicks and editing flicks, and then click Customize. 3. Follow the on-screen instructions to change or create a flick assignment. 4. Click OK. 10 Chapter 2 Using the digitizer and touch screen - HP TouchSmart tx2-1310au | Pointing Devices and Keyboard - Windows 7 - Page 15
. NOTE: Your computer may look slightly different from the illustration in this section. Function Display system information. Open Help and Support. Open the Print Options window. Open a Web browser. Switch the screen image. Initiate Sleep. Initiate QuickLock. Decrease screen brightness. Increase - HP TouchSmart tx2-1310au | Pointing Devices and Keyboard - Windows 7 - Page 16
, drivers, and the software provided on your computer ● Checkups for computer functionality ● Automated and interactive troubleshooting, repair solutions, and system recovery procedures ● Links to support specialists Opening the Print Options window (fn+f2) Press fn+f2 to open the Print Options - HP TouchSmart tx2-1310au | Pointing Devices and Keyboard - Windows 7 - Page 17
Connection Wizard. After you have set up your Internet or network services and your Web browser home page, you can press fn+f3 to computer. The following video transmission types, with examples of devices that use them, are supported by the fn+f4 hotkey: ● LCD (computer display) ● External VGA (most - HP TouchSmart tx2-1310au | Pointing Devices and Keyboard - Windows 7 - Page 18
or a Windows administrator password is entered. NOTE: Before you can use QuickLock, you must set a Windows user password or a Windows administrator password. For instructions, refer to Help and Support. To use QuickLock, press fn+f6 to display the Log On window and lock the computer. Then follow the - HP TouchSmart tx2-1310au | Pointing Devices and Keyboard - Windows 7 - Page 19
Stopping an audio CD or a DVD (fn+f10) Press fn+f10 to stop the play of an audio CD or a DVD. Playing previous track or section of an audio CD or a DVD (fn+f11) While an audio CD or a DVD is playing, press fn+f11 to play the previous track of the CD or the previous section of the DVD. Playing next - HP TouchSmart tx2-1310au | Pointing Devices and Keyboard - Windows 7 - Page 20
4 Using keypads The computer has an embedded numeric keypad and also supports an optional external numeric keypad or an optional external keyboard that includes a numeric keypad. Component (1) fn key (2) Num lock light (3) num lk key (4) Embedded numeric - HP TouchSmart tx2-1310au | Pointing Devices and Keyboard - Windows 7 - Page 21
Using the embedded numeric keypad The 15 keys of the embedded numeric keypad can be used like the keys on an external keypad. When the embedded numeric keypad is turned on, each key on the keypad performs the function indicated by the icon in the upper-right corner of the key. Enabling and disabling - HP TouchSmart tx2-1310au | Pointing Devices and Keyboard - Windows 7 - Page 22
5 Cleaning the TouchPad and keyboard Dirt and grease on the TouchPad can cause the pointer to jump around on the screen. To avoid this, clean the TouchPad with a damp cloth, and wash your hands frequently when using the computer. WARNING! To reduce the risk of electric shock or damage to internal - HP TouchSmart tx2-1310au | Pointing Devices and Keyboard - Windows 7 - Page 23
brightness 14 description 11 displaying system information 12 increasing screen brightness 14 initiating QuickLock 14 initiating Sleep 14 opening Help and Support 12 opening Print Options window 12 opening Web browser 13 switching screen image 13 using 12 K keyboard 11 keyboard hotkeys, identifying - HP TouchSmart tx2-1310au | Pointing Devices and Keyboard - Windows 7 - Page 24
-
 1
1 -
 2
2 -
 3
3 -
 4
4 -
 5
5 -
 6
6 -
 7
7 -
8
-
9
-
10
-
11
-
12
-
13
-
14
-
15
-
16
-
17
-
18
-
19
-
20
-
21
-
22
-
23
-
24
 |
 |

Pointing Devices and Keyboard
User Guide