HP WF1907 w19b, w19e, w19ev, W19q LCD Monitor - User's Guide
HP WF1907 - Compaq 19" LCD Monitor Manual
 |
UPC - 882780774438
View all HP WF1907 manuals
Add to My Manuals
Save this manual to your list of manuals |
HP WF1907 manual content summary:
- HP WF1907 | w19b, w19e, w19ev, W19q LCD Monitor - User's Guide - Page 1
's Guide • Preface • Safety and Maintenance Guidelines • Setup • Using the Monitor • Installing Drivers and Using the Auto-Adjustment Feature • Technical Support FAQs • Specifications • LCD Monitor Quality and Pixel Policy • Agency Regulatory Notices The only warranties for HP products and services - HP WF1907 | w19b, w19e, w19ev, W19q LCD Monitor - User's Guide - Page 2
Using the Monitor • Installing Drivers and Using the Auto-Adjustment Feature • Technical Support FAQs • Specifications • LCD Monitor Quality you how to avoid the problem. WARNING: A WARNING indicates the potential for bodily harm and tells you how to avoid the problem. Some warnings may appear in - HP WF1907 | w19b, w19e, w19ev, W19q LCD Monitor - User's Guide - Page 3
computer and its peripheral devices (such as a monitor, printer, or scanner) to a surge protection device such as a power strip with surge protection or uninterruptible power supply (UPS). Not all power strips provide surge protection; the power strips must be specifically labeled as having this - HP WF1907 | w19b, w19e, w19ev, W19q LCD Monitor - User's Guide - Page 4
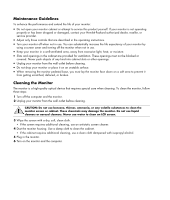
, or service provider. • Adjust only those controls that are described in the operating instructions. • Turn your monitor off when clean the monitor screen or cabinet. These chemicals may damage the monitor. Do not use liquid cleaners or aerosol cleaners. Never use water to clean an LCD screen. 3 - HP WF1907 | w19b, w19e, w19ev, W19q LCD Monitor - User's Guide - Page 5
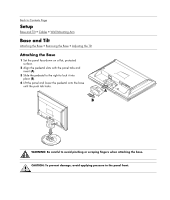
Back to Contents Page Setup Base and Tilt • Cables • Wall Mounting Arm Base and Tilt Attaching the Base • Removing the Base • Adjusting the Tilt Attaching the Base 1 Set the panel face-down on a flat, protected surface. 2 Align the pedestal slots with the panel tabs and insert (A). 3 Slide the - HP WF1907 | w19b, w19e, w19ev, W19q LCD Monitor - User's Guide - Page 6
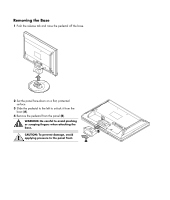
Removing the Base 1 Push the release tab and raise the pedestal off the base. 2 Set the panel face-down on a flat, protected surface. 3 Slide the pedestal to the left to unlock it from the base (A). 4 Remove the pedestal from the panel (B). WARNING: Be careful to avoid pinching or scraping fingers - HP WF1907 | w19b, w19e, w19ev, W19q LCD Monitor - User's Guide - Page 7
the screen tilt to your own preference, as follows: 1 Face the front of the monitor and hold the stand so that you do not topple the monitor while changing the tilt. 2 Adjust the tilt by moving the monitor's top edge toward or away from you. CAUTION: To avoid breakage or other damage, do - HP WF1907 | w19b, w19e, w19ev, W19q LCD Monitor - User's Guide - Page 8
the Cables You can attach a VGA cable (provided), a DVI-D cable (select models only), or both to this monitor. To use DVI, your computer must have a DVI-compliant graphics card. Connectors are found on the back of the monitor. If both cables are installed, the source of input can be selected using - HP WF1907 | w19b, w19e, w19ev, W19q LCD Monitor - User's Guide - Page 9
3 If you are attaching a VGA cable, connect one end of the 15-pin D-Sub VGA cable (blue connector) to the back of the monitor and connect the other end to the computer VGA port. 4 If you are attaching a DVI cable, connect one end of the 24-pin DVI cable ( - HP WF1907 | w19b, w19e, w19ev, W19q LCD Monitor - User's Guide - Page 10
power cord to the back of the monitor and plug the other end into a grounded outlet. 6 Secure the cables by routing them through the clasp. 7 Turn on your monitor and computer. If your monitor displays an image, installation is complete. If it does not display an image, see Technical Support FAQs - HP WF1907 | w19b, w19e, w19ev, W19q LCD Monitor - User's Guide - Page 11
Arm Preparing to Install a Wall Mounting Arm (Not supplied) This monitor can be attached to a wall mounting arm that you purchase separately. CAUTION: Before disassembling the monitor, turn off the monitor power, and disconnect all power, video, and audio cables. 1 Disconnect the cables from - HP WF1907 | w19b, w19e, w19ev, W19q LCD Monitor - User's Guide - Page 12
Back to Contents Page Using the Monitor Operating Instructions • External Controls • LED Indicators • Settings •Setting the Optimal Resolution • Adjusting the Volume • Using Headphones • Locking the OSD • Adjusting OSD Settings • OSD Menu Operating Instructions Control buttons are located on the - HP WF1907 | w19b, w19e, w19ev, W19q LCD Monitor - User's Guide - Page 13
External Controls A AUTO-configuration / Exit B Volume decrease / Left navigation C Power D Volume increase / Right navigation E MENU / Enter F Headphone jack LED Indicators Status Full Power Mode Active-off Mode See Technical Support FAQs for more information. LED Color Green Orange - HP WF1907 | w19b, w19e, w19ev, W19q LCD Monitor - User's Guide - Page 14
. 2 Click Settings. 3 Click Control Panel. 4 Double-click Display. 5 Click Settings. 6 Set the resolution slide bar to 1440 by 900. NOTE: If 1440 by 900 is not shown, download the monitor driver from the Web. See Using the Monitor for instructions. Adjusting the Volume Press the volume increase and - HP WF1907 | w19b, w19e, w19ev, W19q LCD Monitor - User's Guide - Page 15
. Pressing MENU again will display the sub-menu for this function. Main Menu and Sub-Menu Items for Adjusting the OSD Main Menu Main Menu Item Icon Sub-Menu Item Sub-Menu Icon Luminance Contrast Description Contrast from digital-register Brightness Backlight adjustment Image Setup Focus - HP WF1907 | w19b, w19e, w19ev, W19q LCD Monitor - User's Guide - Page 16
Timeout Adjust the OSD timeout Language Language N/A Select the language you like Information Reset Exit Information Yes No N/A N/A N/A N/A N/A Show the resolution, H/V frequency and input port of current input timing Clear each old status of auto-configuration Do not execute reset, return - HP WF1907 | w19b, w19e, w19ev, W19q LCD Monitor - User's Guide - Page 17
to: http://www.hp.com/support 2 Select your country/region. 3 Select Download Drivers and Software. 4 Enter the model number of your monitor. The software download pages for your monitor will be displayed. 5 Download and install the driver and software files using the instructions in the download - HP WF1907 | w19b, w19e, w19ev, W19q LCD Monitor - User's Guide - Page 18
's video cable and make sure none of the pins are bent. • Make sure the HP monitor drivers are installed (HP monitor drivers are available at: http://www.hp.com/support). • Adjust the contrast and brightness controls. • Make sure you are not using an extension cable or switch box. We recommend - HP WF1907 | w19b, w19e, w19ev, W19q LCD Monitor - User's Guide - Page 19
problem. • Adjust RGB color or select color temperature. Unable to set the monitor to the optimal resolution • Make sure that the graphics card supports the optimal resolution (1440 x 900). • Make sure that the latest supported driver is installed for the graphics card. For HP and Compaq systems - HP WF1907 | w19b, w19e, w19ev, W19q LCD Monitor - User's Guide - Page 20
represent the typical specifications provided by HP's component manufacturers; actual performance may vary either higher or lower. General Model number LCD Panel (19") Driving system Size Video Separate sync. Display color Dot clock Face treatment Resolution Horizontal scan range Horizontal scan - HP WF1907 | w19b, w19e, w19ev, W19q LCD Monitor - User's Guide - Page 21
SXGA WXGA+ WXGA+ Resolution 720 x 400 640 x 480 640 x 480 800 x 600 800 x 600 1024 x 768 1024 x 768 1024 x 768 1280 x 1024 1280 x 1024 1440 x 900 1440 x 900 Physical Characteristics Connector Types Signal Cable Type Dimensions & Weight: Height (with base) Width Depth Weight (monitor only) Weight - HP WF1907 | w19b, w19e, w19ev, W19q LCD Monitor - User's Guide - Page 22
Cord Set Requirements The monitor power supply is provided with automatic line switching (ALS). This feature allows the monitor to operate on input voltages in the range of 100-240V , 50/60 Hz, 1.5A. The power cord set (flexible cord or wall plug) received with the monitor meets the requirements for - HP WF1907 | w19b, w19e, w19ev, W19q LCD Monitor - User's Guide - Page 23
Data 2/4 Shield 11 TMDS Data 1/3 Shield 19 TMDS Data 0/5 Shield 4 TMDS Data Data 5+ 6 DDC Clock 14 +5V Power 22 TMDS Clock Shield 7 DDC Data monitor to inform the host system of its identity and, depending on the level of DDC used, communicate additional information about its display - HP WF1907 | w19b, w19e, w19ev, W19q LCD Monitor - User's Guide - Page 24
standards, to help guarantee trouble-free performance. Nevertheless, the display may have cosmetic imperfections that appear as small bright or dark spots. This is common to all LCD displays used in products supplied by all vendors and is not specific to the HP LCD Monitor. These imperfections are - HP WF1907 | w19b, w19e, w19ev, W19q LCD Monitor - User's Guide - Page 25
. This equipment generates, uses, and can radiate radio frequency energy and, if not installed and used in accordance with the instructions, may cause harmful interference to radio communications. However, there is no guarantee that interference will not occur in a particular installation - HP WF1907 | w19b, w19e, w19ev, W19q LCD Monitor - User's Guide - Page 26
Company P. O. Box 692000, Mail Stop 510101 Houston, Texas 77269-2000 Or call: 1-(281)-514-3333 To identify this product, refer to the part, series, or model number found on the product. - HP WF1907 | w19b, w19e, w19ev, W19q LCD Monitor - User's Guide - Page 27
Canadian Notice This Class B digital apparatus meets all requirements of the Canadian Interference-Causing Equipment Regulations. Avis Canadien Cet appareil numérique de la classe B respecte toutes les exigences du Règlement sur le matériel brouilleur du Canada. European Union Regulatory Notice This - HP WF1907 | w19b, w19e, w19ev, W19q LCD Monitor - User's Guide - Page 28
environment. For more information about where you can drop off your waste equipment for recycling, please contact your local city office, your household waste disposal service or the shop where you purchased the product. Japanese Notice - HP WF1907 | w19b, w19e, w19ev, W19q LCD Monitor - User's Guide - Page 29
Japanese Power Cord Notice Japanese Material Content Declaration A Japanese regulatory declaration for this product, visit www.hp.com/go/jisc0950 Korean Notice Materials Disposal This HP product contains Mercury in the fluorescent lamp in the display LCD that might require special handling at end - HP WF1907 | w19b, w19e, w19ev, W19q LCD Monitor - User's Guide - Page 30
vary by geography because of differences in regulatory requirements and local customer demand. For information on the HP recycling program, refer to the HP Web site at: http://www.hp.com/recycle EPA Energy Star Compliance Products marked with the ENERGY STAR® logo on the packaging box qualify - HP WF1907 | w19b, w19e, w19ev, W19q LCD Monitor - User's Guide - Page 31
of the features of the TCO'03 Display requirements: Ergonomics • Good visual ergonomics and image quality in order to improve the working environment for the user and to reduce sight and strain problems. Important parameters are luminance, contrast, resolution, reflectance, color rendition and image - HP WF1907 | w19b, w19e, w19ev, W19q LCD Monitor - User's Guide - Page 32
the end of the 1980s TCO has been involved in influencing the development of IT equipment in a more friendly direction. Our labeling system started with displays in 1992 and is now requested by users and IT-manufacturers all over the world. For more information, please visit www.tcodevelopment.com
-
 1
1 -
 2
2 -
 3
3 -
 4
4 -
 5
5 -
 6
6 -
 7
7 -
8
-
9
-
10
-
11
-
12
-
13
-
14
-
15
-
16
-
17
-
18
-
19
-
20
-
21
-
22
-
23
-
24
-
25
-
26
-
27
-
28
-
29
-
30
-
31
-
32
 |
 |

w19b / w19e / W19q LCD Monitor
User’s Guide
•
Preface
•
Safety and Maintenance Guidelines
•
Setup
•
Using the Monitor
•
Installing Drivers and Using the Auto-Adjustment Feature
•
Technical Support FAQs
•
Specifications
•
LCD Monitor Quality and Pixel Policy
•
Agency Regulatory Notices
The only warranties for HP products and services are set forth in the express warranty statements accompanying such
products and services. Nothing herein should be construed as constituting an additional warranty. HP shall not be liable for
technical or editorial errors or omissions contained herein.
HP assumes no responsibility for the use or reliability of its software on equipment that is not furnished by HP.
This document contains proprietary information that is protected by copyright. No part of this document may be photocopied,
reproduced, or translated to another language without the prior written consent of HP.
Hewlett-Packard Company
P.O. Box 4010
Cupertino, CA 95015-4010
USA
Copyright © 2006 Hewlett-Packard Development Company, L.P.
Microsoft and Windows are U.S. registered trademarks of Microsoft Corporation.
Adobe and Acrobat are trademarks of Adobe Systems Incorporated.
Bluetooth is a trademark owned by its proprietor and used by Hewlett-Packard Company under license.
HP supports lawful use of technology and does not endorse or encourage the use of its products for purposes other than those
permitted by copyright law.
The information in this document is subject to change without notice.
Part number: 433010-002