HP Xw8400 Second Xeon processor installation
HP Xw8400 - Workstation - 4 GB RAM Manual
 |
UPC - 883585271085
View all HP Xw8400 manuals
Add to My Manuals
Save this manual to your list of manuals |
HP Xw8400 manual content summary:
- HP Xw8400 | Second Xeon processor installation - Page 1
to install a second Xeon processor in HP xw6000 or xw8000 series workstations with Land Grid Array (LGA) processor sockets. Kit contents The following components are included in your processor kit: ■ Xeon processor ■ CPU heatsink ■ Warranty ■ Installation instructions Observe warnings and cautions - HP Xw8400 | Second Xeon processor installation - Page 2
, including powering down the workstation, disconnecting power from the workstation, opening the access panel, and removing components. For product-specific information, refer to the Service and Technical Reference Guide for your HP workstation at http://www.hp.com/support/workstation_manuals - HP Xw8400 | Second Xeon processor installation - Page 3
to that piece of equipment. Ä CAUTION: Failure to follow the workstation preparation instructions and these installation steps could result in an improperly installed processor, causing extensive system damage. Ä CAUTION: Processor socket pins are delicate and bend easily. Use extreme care when - HP Xw8400 | Second Xeon processor installation - Page 4
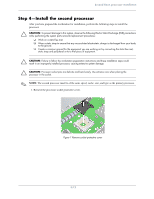
cover plate while closing the socket lever. Figure 3 Install processor Step 5-Install the CPU heatsink 1. Remove and discard the thermal grease protective liner from the bottom of the new heatsink and set the heatsink over the processor. ✎ NOTE: Do not touch the exposed thermal grease when handling - HP Xw8400 | Second Xeon processor installation - Page 5
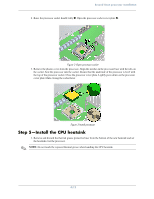
5 Tighten heatsink screws Step 6-Reassemble the workstation After installing the second processor and related components, reassemble the workstation using the instructions in the workstation documentation. The reassembly process involves reinstalling the side access panel and restoring power to the - HP Xw8400 | Second Xeon processor installation - Page 6
Second Xeon processor installation Step 7-Configure the operating system Windows XP After the workstation has undergone a software unbundling process, a Hardware Abstraction Layer (HAL) upgrade is necessary when installing a second processor. However, Windows XP detects the new processor and - HP Xw8400 | Second Xeon processor installation - Page 7
2 番目の Xeon 2 番目の Xeon LGA HP xw6000/xw8000 2 番目の Xeon Land Grid Array (LGA HP xw6000 ま たは xw8000 Xeon CPU Å 7/12 - HP Xw8400 | Second Xeon processor installation - Page 8
手順 1 Microsoft® Windows CD ま たは Red Hat Linux http://www.hp.com/support/workstation_manuals 手順 2 BIOS 2 番目の Xeon http://www.hp.com/go/bizsupport BIOS BIOS 手順 3 http://www.hp.com/support/workstation_manuals HP Workstation の 『Service and Technical Reference Guide 8/12 - HP Xw8400 | Second Xeon processor installation - Page 9
2 番目の Xeon 手順 4 - 2 ESD 2 1 1 図 1 9/12 - HP Xw8400 | Second Xeon processor installation - Page 10
2 番目の Xeon 2 1 2 参照 )。 図 2 3 図 3 手順 5 - CPU 1 CPU 10/12 - HP Xw8400 | Second Xeon processor installation - Page 11
2 番目の Xeon 2 1 2 2 参照 )。 図 4 3 4 1 2 6.9 kg-cm (6 in.-lbs 図 5 手順 6 2 11/12 - HP Xw8400 | Second Xeon processor installation - Page 12
2 番目の Xeon 手順 7 Windows XP 2 Hardware Abstraction Layer (HAL Windows XP HAL Found New Hardware Red Hat Linux Red Hat Linux Red Hat Linux (HP xw6400 と xw8400 SMP 418797-001 418797-001 © 2006 Hewlett-Packard Development Company, L.P. The HP Invent logo is a registered trademark of
-
 1
1 -
 2
2 -
 3
3 -
 4
4 -
 5
5 -
 6
6 -
 7
7 -
8
-
9
-
10
-
11
-
12
 |
 |
1
/12
Second Xeon processor installation
Second Xeon processor installation
HP xw6000/xw8000 series workstations w/LGA sockets
This document describes how to install a second Xeon processor in HP xw6000 or xw8000 series
workstations with Land Grid Array (LGA) processor sockets.
Kit contents
The following components are included in your processor kit:
■
Xeon processor
■
CPU heatsink
■
Warranty
■
Installation instructions
Observe warnings and cautions
Å
WARNING:
Any surface or area of the equipment marked with these symbols indicates the presence of
a hot surface or hot component. If this surface is contacted, the potential for injury exists. To reduce the
risk of injury from a hot component, allow the surface to cool before touching.
Å
WARNING:
Any surface or area of the equipment marked with these symbols indicates the presence of
an electrical shock hazard. To reduce the risk of injury from electrical shock, do not open any enclosed
area.
Å
WARNING:
To reduce the risk of electric shock or damage to your equipment:
❏
Do not disable the power cord grounding plug. The grounding plug is an important safety feature.
❏
Plug the power cord in a grounded (earthed) outlet that is easily accessible at all times.
❏
Disconnect power from the equipment by unplugging the power cord from the electrical outlet.