HP p2-1311 Quick Setup Guide
HP p2-1311 Manual
 |
View all HP p2-1311 manuals
Add to My Manuals
Save this manual to your list of manuals |
HP p2-1311 manual content summary:
- HP p2-1311 | Quick Setup Guide - Page 1
- HP p2-1311 | Quick Setup Guide - Page 2
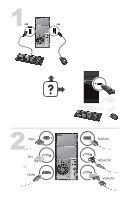
DC IN 18.5 - 19V - HP p2-1311 | Quick Setup Guide - Page 3
- HP p2-1311 | Quick Setup Guide - Page 4
services. Nothing herein should be construed as constituting an additional warranty. HP shall not be liable for technical or editorial errors or omissions contained herein. HP . Microsoft and Windows are trademarks of Microsoft Corporation in the U.S. and other countries. HP supports lawful use of - HP p2-1311 | Quick Setup Guide - Page 5
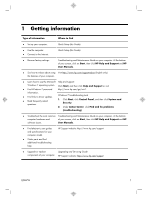
. Quick Setup (this Guide) ● Use the computer. ● Connect to the Internet. Quick Setup (this Guide) ● Recover factory settings. Troubleshooting and Maintenance Guide on your computer. At the bottom of your screen, click on Start, then click HP Help and Support and HP User Manuals. ● See how-to - HP p2-1311 | Quick Setup Guide - Page 6
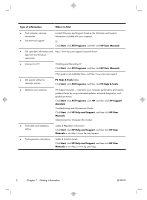
PC Help & Tools. ● Maintain your computer. HP Support Assistant - Maintains your computer performance and resolve problems faster by using automated updates, on-board diagnostics, and guided assistance. Click Start, click All Programs, click HP, and then click HP Support Assistant. Troubleshooting - HP p2-1311 | Quick Setup Guide - Page 7
computer is currently running. (Click Start > Control Panel and double-click System. The operating system and version are shown under Windows edition.) b. Open your internet browser and go to http://www.hp.com/support. c. Select your country and language, if necessary, and click Support & Drivers - HP p2-1311 | Quick Setup Guide - Page 8
. h. Follow the on-screen instructions to install each downloaded update. 4. Look in the computer box for additional printed details or updates. 5. Read the Safety and Regulatory Information document in the HP User Manuals folder. 6. Read the Safety & Comfort Guide for proper workstation setup - HP p2-1311 | Quick Setup Guide - Page 9
Online Services provides a list of ISPs; however, you might choose another ISP or transfer an existing account to this computer. To transfer existing accounts, follow the instructions provided by the ISP. 3. Using your Internet connection through your ISP, open a web browser and browse the Internet - HP p2-1311 | Quick Setup Guide - Page 10
: Your HDMI monitor must be connected to the graphics card before you activate sound and adjust resolution. Activating sound 1. Right-click the Volume icon (white speaker) on the system tray. 2. Click Playback Devices. The Sound window opens. 6 Chapter 3 Setting up additional features ENWW - HP p2-1311 | Quick Setup Guide - Page 11
, click Realtek HDMI Output. 5. Click Set Default. 6. Click OK to close the window. This completes the steps to activate HDMI sound. Adjusting resolution To adjust resolution, follow the instructions for your type of graphics card. Right click an empty area of the desktop, and then: ● If NVIDIA - HP p2-1311 | Quick Setup Guide - Page 12
graphics cards 1. Right-click an empty area of the desktop, and then click NVIDIA Control Panel. The View Selection window opens. 2. In the Selecting a Task area on the left, under Display, click Change resolution. The Change resolution window opens. 3. If your HP computer is connected to an HP - HP p2-1311 | Quick Setup Guide - Page 13
to bring up ATI Catalyst Control Center™, or select Start, select All Programs, and select Catalyst Control Center™. 2. Select CCC-Advanced, select Graphics, and select Desktop & Displays, then follow the onscreen instructions to set up the layout for the two- or three-monitor display. ENWW - HP p2-1311 | Quick Setup Guide - Page 14
debris that has accumulated in and around the computer connectors (for example, the Ethernet and USB connectors). Cleaning the keyboard and mouse When cleaning the keyboard keys, use a low setting on a battery-powered vacuum cleaner, to avoid removing key caps and springs. 1. Vacuum between the - HP p2-1311 | Quick Setup Guide - Page 15
Hard disk drive error. Restart the computer. 1. Press the Ctrl+Alt+Delete keys on the keyboard simultaneously. 2. Click the Arrow button next to the red Shut Down button, and then click Restart. Or, press and hold the Power button on the computer for 5 or more seconds to turn off the computer, and - HP p2-1311 | Quick Setup Guide - Page 16
to turn off the computer, and then press the Power button to restart the computer. Error message: Invalid system disk or NonSystem disk or Disk error. When drive activity stops, remove the disc and press the spacebar on the keyboard. The computer should start up. 12 Chapter 5 Troubleshooting - HP p2-1311 | Quick Setup Guide - Page 17
the mouse to make the screen display visible again. Press the Sleep button (select models only), or Esc on the keyboard, to resume from Sleep mode. Press the Power button to turn on the computer. Inspect the monitor video connector for bent pins: ● If any of the pins are bent, replace the monitor - HP p2-1311 | Quick Setup Guide - Page 18
on the keyboard simultaneously to display the Windows Start menu. 5. Use the arrow keys to select the Arrow button that is next to Shut Down. Select Shut Down, and then press Enter. 6. After the shutdown is complete, unplug and reconnect the mouse connector to the back of your computer, and then - HP p2-1311 | Quick Setup Guide - Page 19
vary. IMPORTANT: During these steps, place the wireless keyboard and wireless mouse on the same level as the receiver, within 30 cm (12 inches) of the receiver, and away from interference from other devices. 1. Unplug the receiver from a USB connector on the computer, and then reconnect it. Your - HP p2-1311 | Quick Setup Guide - Page 20
Under Hardware and Sound, click Troubleshoot and audio playback. If you use an High-Definition Multimedia Interface (HDMI) connector on the graphics card (select models only) to connect your monitor to the computer, you should also connect analog speakers to the computer Audio Line Out connector if - HP p2-1311 | Quick Setup Guide - Page 21
in this table). - Restores the software (if it came with the product) or hardware driver to factory defaults. ● System Recovery (see Troubleshooting and Maintenance Guide on your computer. At the bottom of your screen, click on Start, then click HP Help and Support and HP User Manuals. ) - Erase and - HP p2-1311 | Quick Setup Guide - Page 22
click Rollback Driver, and then follow the on-screen instructions. Microsoft System Restore If you have a problem that might be due to software that was installed on your computer, use System Restore to return the computer to a previous restore point. You can also set restore points manually. NOTE - HP p2-1311 | Quick Setup Guide - Page 23
of your factory-installed software programs or hardware drivers are damaged, you can reinstall it by using the Recovery Manager program (select models only). NOTE: Do not use the Recovery Manager program to reinstall software programs that came on CDs or DVDs included in the computer box. Reinstall - HP p2-1311 | Quick Setup Guide - Page 24
, and software build number) can be viewed by pressing the Ctrl+Alt+S keys on the keyboard at the same time. Don't forget to register! Go to: http://www.hp.com/apac/register. Where to get help 1. Use the Help and Support Center for help with hardware and software questions. Click Start, and then - HP p2-1311 | Quick Setup Guide - Page 25
Support Guide. Before upgrading your hardware Any hardware upgrades that you intend to do should only be done after you have completely set up your new computer. Refer to the setup poster included with your system for help with setting up. If you have any problems setting up your system and turning - HP p2-1311 | Quick Setup Guide - Page 26
- HP p2-1311 | Quick Setup Guide - Page 27
- HP p2-1311 | Quick Setup Guide - Page 28
the power settings. The power management tools on this computer are set to minimize energy use without impacting performance. Please do not disable them. We design our products to use better and fewer materials. Ensuring the health of you, your family, and our planet is a key priority at HP. We
-
 1
1 -
 2
2 -
 3
3 -
 4
4 -
 5
5 -
 6
6 -
 7
7 -
8
-
9
-
10
-
11
-
12
-
13
-
14
-
15
-
16
-
17
-
18
-
19
-
20
-
21
-
22
-
23
-
24
-
25
-
26
-
27
-
28
 |
 |
