HP xw4000 HP xw Workstation series - CRU Dataport DX115 kit installation
HP xw4000 Manual
 |
View all HP xw4000 manuals
Add to My Manuals
Save this manual to your list of manuals |
HP xw4000 manual content summary:
- HP xw4000 | HP xw Workstation series - CRU Dataport DX115 kit installation - Page 1
workstation. Kit contents Ensure that the following components are included in your drive kit: ● Warranty ● DX115 unit (case and drive carrier) ● Installation document ● SATA or SAS cable ● Five M3 screws ● Five 6-32 screw ● Tape label ENWW © 2008 Hewlett-Packard Development Company, L.P. The HP - HP xw4000 | HP xw Workstation series - CRU Dataport DX115 kit installation - Page 2
incorrectly can damage the system board. Contact an HP authorized reseller or service provider to install the processor. If you plan to install the processor yourself, read all of the instructions carefully before you begin. - Failure to follow the workstation preparation instructions can result in - HP xw4000 | HP xw Workstation series - CRU Dataport DX115 kit installation - Page 3
damage to the workstation, observe the following Electrostatic Discharge (ESD) precautions while performing the system parts removal and replacement units to that piece of equipment. NOTE: HP accessories are for use in HP Workstation products. They have been extensively tested for reliability - HP xw4000 | HP xw Workstation series - CRU Dataport DX115 kit installation - Page 4
. Follow the instructions for shutting down power and disconnecting all power from the system. 2. Remove the access panel and front bezel of your workstation. If necessary, refer to the Service and Technical Reference Guide for your HP Workstation at http://www.hp.com/support/ workstation_manuals - HP xw4000 | HP xw Workstation series - CRU Dataport DX115 kit installation - Page 5
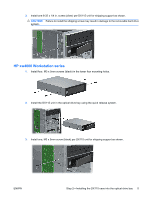
3. Install one 6-32 x 1/4 in. screw (silver) per DX115 unit for shipping support as shown. CAUTION: Failure to install the shipping screw may result in damage to the removable hard drive system. HP xw4000 Workstation series 1. Install four, M3 x 5mm screws (black) in the lower four mounting holes. - HP xw4000 | HP xw Workstation series - CRU Dataport DX115 kit installation - Page 6
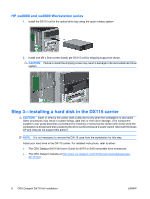
is booted and then powering the drive via the enclosure's power switch. Microsoft Windows XP and Vista do not support this action.) NOTE: It is not necessary to remove the DX115 case from the workstation for this step. Install your hard drive in the DX115 carrier. For detailed instructions, refer to - HP xw4000 | HP xw Workstation series - CRU Dataport DX115 kit installation - Page 7
may result in system hangs, data loss or even drive damage. (The component supplier's user guide describes a procedure for inserting or removing the carrier (with drive) while the workstation is booted and then powering the drive via the enclosure's power switch. Microsoft Windows XP and Vista do - HP xw4000 | HP xw Workstation series - CRU Dataport DX115 kit installation - Page 8
CAUTION: Failure to lock the drive during shipment may result in damage to your removable hard drive system. Failure to install the shipping screw may result in damage to the removable hard drive system. 5. Replace workstation bezel and access panel. 8 CRU Dataport DX115 kit installation ENWW
-
 1
1 -
 2
2 -
 3
3 -
 4
4 -
 5
5 -
 6
6 -
 7
7 -
8
 |
 |

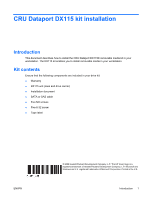
CRU Dataport DX115 kit installation
Introduction
This document describes how to install the CRU Dataport DX115® removable media kit in your
workstation. The DX115 kit enables you to install removable media in your workstation.
Kit contents
Ensure that the following components are included in your drive kit:
●
Warranty
●
DX115 unit (case and drive carrier)
●
Installation document
●
SATA or SAS cable
●
Five M3 screws
●
Five 6-32 screw
●
Tape label
© 2008 Hewlett-Packard Development Company, L.P. The HP Invent logo is a
registered trademark of Hewlett-Packard Development Company, L.P. Microsoft and
Windows are U.S. registered trademarks of Microsoft Corporation. Printed in the U.S.
ENWW
Introduction
1