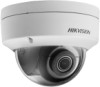
Hikvision DS-2CD2185FWD-IS Quick Start Guide
Hikvision DS-2CD2185FWD-IS Manual
 |
View all Hikvision DS-2CD2185FWD-IS manuals
Add to My Manuals
Save this manual to your list of manuals |
Hikvision DS-2CD2185FWD-IS manual content summary:
- Hikvision DS-2CD2185FWD-IS | Quick Start Guide - Page 1
Network Dome Camera Quick Start Guide 0 - Hikvision DS-2CD2185FWD-IS | Quick Start Guide - Page 2
Network Dome Camera·Quick Start Guide Quick Start Guide COPYRIGHT © 2017 Hangzhou Hikvision Digital Technology Co., Ltd. ALL or implied, regarding to the Manual. About this Manual This Manual is applicable to 21xx Network Camera. The Manual includes instructions for using and managing the product - Hikvision DS-2CD2185FWD-IS | Quick Start Guide - Page 3
Network Dome Camera·Quick Start Guide logos mentioned below are the properties of their respective owners. INSPECTION, OR OTHER INTERNET SECURITY RISKS; HOWEVER, HIKVISION WILL PROVIDE TIMELY TECHNICAL SUPPORT IF REQUIRED. SURVEILLANCE LAWS VARY BY JURISDICTION. PLEASE CHECK ALL RELEVANT LAWS IN - Hikvision DS-2CD2185FWD-IS | Quick Start Guide - Page 4
Guide APPLICABLE LAW. HIKVISION SHALL NOT BE LIABLE IN THE EVENT THAT THIS PRODUCT IS USED WITH ILLEGITIMATE PURPOSES. IN THE EVENT OF ANY CONFLICTS BETWEEN THIS MANUAL AND THE APPLICABLE LAW, THE LATER PREVAILS. Regulatory Information For products that support with the instructions, may cause - Hikvision DS-2CD2185FWD-IS | Quick Start Guide - Page 5
Network Dome Camera·Quick Start Guide -Increase the separation between the equipment and receiver. -Connect the equipment into an outlet on a circuit different from that to which the receiver is connected. - - Hikvision DS-2CD2185FWD-IS | Quick Start Guide - Page 6
Network Dome Camera·Quick Start Guide 2006/66/EC (battery directive): This product contains a battery that cannot be disposed of as unsorted municipal waste in the European Union. See the product - Hikvision DS-2CD2185FWD-IS | Quick Start Guide - Page 7
Network Dome Camera·Quick Start Guide radio interference to other users, the antenna type and its distance minimale de 20 cm entre le radiateur et votre corps. For products that do not support Wi-Fi or cellular data: FCC Information Please take attention that changes or modification not expressly - Hikvision DS-2CD2185FWD-IS | Quick Start Guide - Page 8
Network Dome Camera·Quick Start Guide energy and, if not installed and used in accordance with the instructions, may cause harmful interference to radio communications. However, there is no guarantee that interference will not occur in a particular installation. If this equipment does cause - Hikvision DS-2CD2185FWD-IS | Quick Start Guide - Page 9
Network Dome Camera·Quick Start Guide 2012/19/EU (WEEE directive): Products marked with this symbol 003 Compliance This device meets the CAN ICES-3 (B)/NMB-3(B) standards requirements. Safety Instruction These instructions are intended to ensure that user can use the product correctly to avoid - Hikvision DS-2CD2185FWD-IS | Quick Start Guide - Page 10
Network Dome Camera·Quick Start Guide Warnings Follow these safeguards to prevent serious injury or death. Cautions Follow these precautions to prevent potential injury or rise from the device, turn off the power at once and unplug the power cable, and then please contact the service center. 9 - Hikvision DS-2CD2185FWD-IS | Quick Start Guide - Page 11
Network Dome Camera·Quick Start Guide ● Proper configuration of all passwords and other security settings is the responsibility of the installer and/or end-user. Cautions ● Make sure the power supply - Hikvision DS-2CD2185FWD-IS | Quick Start Guide - Page 12
Camera·Quick Start Guide ● While in instructions provided by the battery manufacturer. ● If the product does not work properly, please contact your dealer or the nearest service center. Never attempt to disassemble the camera yourself. (We shall not assume any responsibility for problems - Hikvision DS-2CD2185FWD-IS | Quick Start Guide - Page 13
Network Dome Camera·Quick Start Guide Table of Contents 1 Appearance Description 13 1.1 Type I 13 1.2 Type II 14 1.3 via Web Browser 50 5 Operate via Hik-Connect App 52 5.1 Enable Hik-Connect Service on Camera 52 5.2 Hik-Connect Setup 55 5.3 Add Camera to Hik-Connect 55 5.4 Initialize the Memory - Hikvision DS-2CD2185FWD-IS | Quick Start Guide - Page 14
Network Dome Camera·Quick Start Guide 1 Appearance Description There are five types of camera appearance for this series of camera according to the different models. 1.1 Type I 5 1 6 2 7 3 8 9 4 10 Figure 1-1 Overview of Type I - Hikvision DS-2CD2185FWD-IS | Quick Start Guide - Page 15
Network Dome Camera·Quick Start Guide No. Description No. 5 Network Interface 6 Description Power Interface 7 IR LED 8 Lens 9 Black Liner 10 Safety Rope Note: Press RESET about 10s when the camera is - Hikvision DS-2CD2185FWD-IS | Quick Start Guide - Page 16
Network Dome Camera·Quick Start Guide Table 1-2 Description of Type II Camera No. Description No. Description 1 Black Liner 10 Safety Rope Audio Interface (Only Alarm Interface (Only 11* supported by the camera 12* supported by the camera with "-S" in its model) with "-S" in its model - Hikvision DS-2CD2185FWD-IS | Quick Start Guide - Page 17
Network Dome Camera·Quick Start Guide 1.3 Type III DC12VIN 1 2* 3* 5 4 6 7 8 9 10 Figure 1-3 Overview Of Type III Camera 16 - Hikvision DS-2CD2185FWD-IS | Quick Start Guide - Page 18
Network Dome Camera·Quick Start Guide Table 1-3 Description of Type III Camera No. Description 1 Power 9 Memory card slot 10 Reset button Note: ● The items marked with the "*" are only supported by certain camera models. ● Press RESET about 10s when the camera is powering on or rebooting - Hikvision DS-2CD2185FWD-IS | Quick Start Guide - Page 19
Network Dome Camera·Quick Start Guide 1.4 Type IV 1 2 3 4 5 6 7 8 Figure 1-4 Overview Of Type IV Camera 18 - Hikvision DS-2CD2185FWD-IS | Quick Start Guide - Page 20
Network Dome Camera·Quick Start Guide Table 1-4 Description of Type IV Camera No. Description 1 RJ45 self-adaptive network interface (supports PoE) 2 HDMI 3 Mounting base 4 Black liner 5 Lens 6 Bubble 7 Memory card slot 8 Reset button Note: Press RESET about 10s when the camera - Hikvision DS-2CD2185FWD-IS | Quick Start Guide - Page 21
Network Dome Camera·Quick Start Guide 4 1 5 2 6 7 8 3 9 Figure 1-5 Overview Of Type V Camera Table 1-5 Description of Type V Camera No. Description No. Description 1 Mounting Base 2 Horizontal Stand 3 Bubble 4 Network Interface 5 Power Interface 6 IR LED 7 - Hikvision DS-2CD2185FWD-IS | Quick Start Guide - Page 22
Network Dome Camera·Quick Start Guide Note: Press RESET about 10s when the camera is powering on or rebooting to restore the default settings, including the user name, password, IP address, port No., etc. 21 - Hikvision DS-2CD2185FWD-IS | Quick Start Guide - Page 23
Network Dome Camera·Quick Start Guide 2 Installation Before you start: ● Make sure the device enough to withstand four times the weight of the camera and the bracket. For the camera that supports IR, you are required to pay attention to the following precautions to prevent IR reflection: ● Dust - Hikvision DS-2CD2185FWD-IS | Quick Start Guide - Page 24
Network Dome Camera·Quick Start Guide 2.1 Memory Card Installation For camera models that support memory card as local storage, you can follow the steps to mount and unmount the memory card. This camera series shares a similar structure, type III - Hikvision DS-2CD2185FWD-IS | Quick Start Guide - Page 25
Network Dome Camera·Quick Start Guide 2. Find the memory card slot to insert the memory card. Figure 2-2 Insert Memory Card 3. (Optional) To unmount the memory card, push to get it ejected. 2.2 - Hikvision DS-2CD2185FWD-IS | Quick Start Guide - Page 26
Network Dome Camera·Quick Start Guide 1 1 A Drill Template Hole A: for cables routed through the ceiling Screw hole 1: for Mounting Base 1 Figure 2-3 Drill Template Notes: ● If you choose to route cable through - Hikvision DS-2CD2185FWD-IS | Quick Start Guide - Page 27
Network Dome Camera·Quick Start Guide 3. Route the cables and fix the mounting base on the ceiling with three screws. Figure 2-5 Fix the Mounting adjust the panning position. 3). Hold the lens to adjust the rotating position. Note: Rotating position adjustment is not supported by Type I camera. 26 - Hikvision DS-2CD2185FWD-IS | Quick Start Guide - Page 28
Network Dome Camera·Quick Start Guide 0°~360° Tilting Adjust Screw 0°~65° Figure 2-6 Angle Adjustment of Type I Camera Tilt: 0°to 75° Pan: 0°to 355° Tilting Adjust Screw Rotate: 0°to 355° Figure 2-7 Angle Adjustment of Type II Camera 27 - Hikvision DS-2CD2185FWD-IS | Quick Start Guide - Page 29
Network Dome Camera·Quick Start Guide Figure 2-8 Angle Adjustment of Type III Camera 5. Install the bubble back to the camera. Figure 2-9 Install Bubble 28 - Hikvision DS-2CD2185FWD-IS | Quick Start Guide - Page 30
Network Dome Camera·Quick Start Guide 2.3 Mounting with Brackets This camera series supports mounting with wall mounting bracket, pendant mounting bracket, and incline mounting bracket. We take Type III camera as the demonstration example. 2.3.1 Wall Mounting The wall - Hikvision DS-2CD2185FWD-IS | Quick Start Guide - Page 31
Network Dome Camera·Quick Start Guide 2. Drill 4 screw holes for expansion screws. 3. Unscrew the bubble of the camera. 4. (Optional) Insert the memory card to the camera, if your camera supports memory card installation. Refer to Section 2.1. 5. Route the cables and fix the camera to the cap of the - Hikvision DS-2CD2185FWD-IS | Quick Start Guide - Page 32
Network Dome Camera·Quick Start Guide Figure 2-12 Fix the Wall Mounting Bracket to Wall 7. Adjust surveillance angle of camera. Refer to Step 4 in Section 2.2. 8. Install the bubble back to the camera. Figure 2-13 Install the Bubble 31 - Hikvision DS-2CD2185FWD-IS | Quick Start Guide - Page 33
Network Dome Camera·Quick Start Guide 2.3.2 Wall Mounting with Junction Box The wall mounting bracket with junction box is not included in the package. You need to prepare one, if you - Hikvision DS-2CD2185FWD-IS | Quick Start Guide - Page 34
Network Dome Camera·Quick Start Guide Cover Figure 2-15 Unscrew the Cover 4. Route and connect the cables. Source cables of network, power, etc., go in from the side outlet of the - Hikvision DS-2CD2185FWD-IS | Quick Start Guide - Page 35
Network Dome Camera·Quick Start Guide Source Cable Camera Cable Figure 2-16 Cable Routing 6. Unscrew the bubble of the camera. 7. (Optional) Insert the memory card to the camera, if your camera supports memory card installation. Refer to Section 2.1. 8. Fix the camera to the cap of the wall - Hikvision DS-2CD2185FWD-IS | Quick Start Guide - Page 36
Network Dome Camera·Quick Start Guide Figure 2-17 Fix the Camera to Wall Mounting Bracket 9. Adjust surveillance angle of camera. Refer to Step 4 in Section 2.2. 10. Install the bubble back to the camera. Figure 2-18 Install the Bubble 35 - Hikvision DS-2CD2185FWD-IS | Quick Start Guide - Page 37
Network Dome Camera·Quick Start Guide 2.3.3 Pendant Mounting The pendant mounting bracket is not included in 2-19 Fix Pendant Mount 4. (Optional) Insert the memory card to the camera, if your camera supports memory card installation. Refer to Section 2.1. 5. Fix the camera to the cap of the pendant - Hikvision DS-2CD2185FWD-IS | Quick Start Guide - Page 38
Network Dome Camera·Quick Start Guide Cap Figure 2-20 Fix the Camera to Cap 6. Screw the cap to the pendant mounting bracket. Figure 2-21 Install the Cap 37 - Hikvision DS-2CD2185FWD-IS | Quick Start Guide - Page 39
Network Dome Camera·Quick Start Guide 7. Adjust surveillance angle of camera. Refer to Step 4 in Section 2.2. 8. Install the bubble back to the camera. 2.3.4 Incline Mounting The incline mounting bracket is not - Hikvision DS-2CD2185FWD-IS | Quick Start Guide - Page 40
Network Dome Camera·Quick Start Guide Figure 2-23 Fix Incline Mounting Bracket to Wall 4. Unscrew the bubble of the camera. 5. (Optional) Insert the memory card to the camera, if your camera supports memory card installation. Refer to Section 2.1. 6. Route the cables and fix the camera to the - Hikvision DS-2CD2185FWD-IS | Quick Start Guide - Page 41
Network Dome Camera·Quick Start Guide 7. Adjust surveillance angle of camera. Refer to Step 4 in Section 2.2. 8. Install the bubble back to the camera. Figure 2-25 Install the Bubble 2.4 (Optional) Network Cable - Hikvision DS-2CD2185FWD-IS | Quick Start Guide - Page 42
Network Dome Camera·Quick Start Guide ①② ③ ④ ⑤ ⑥⑦ Figure 2-26 Waterproof Accessory Components Table 2-1 Components No. Components 1 Camera's Network Interface Socket 2 O-Type Gasket 3 Network Plug 4 Waterproof Endcap 5 Waterproof Rubber Gasket 6 Lock Nut 7 Network - Hikvision DS-2CD2185FWD-IS | Quick Start Guide - Page 43
Network Dome Camera·Quick Start Guide 3. Place the O-type gasket ② onto the end of the camera's network interface socket ①. 4. Insert the network plug ③ into the camera's network interface socket ①. 5. Insert the - Hikvision DS-2CD2185FWD-IS | Quick Start Guide - Page 44
Network Dome Camera·Quick Start Guide 3 Set the Network Camera over the LAN Note: You shall your own protection. If the product does not work properly, contact your dealer or the nearest service center for help. 3.1 Wiring Connect the camera to network according to the following figures. or - Hikvision DS-2CD2185FWD-IS | Quick Start Guide - Page 45
, activation via SADP, and activation via client software are all supported. We will take activation via SADP software and activation via web browser as examples to introduce the camera activation. Note: Refer to the User Manual of Network Camera for Activation via Client Software. 3.2.1 Activation - Hikvision DS-2CD2185FWD-IS | Quick Start Guide - Page 46
Network Dome Camera·Quick Start Guide Figure 3-3 Activation Interface (Web) 3. Create a password and input the password into the password field. STRONG PASSWORD RECOMMENDED- We highly recommend you create a strong password of - Hikvision DS-2CD2185FWD-IS | Quick Start Guide - Page 47
Network Dome Camera·Quick Start Guide Get the SADP software from the supplied disk or the and confirm password. Figure 3-4 SADP Interface Note: The SADP software supports activating the camera in batch. Refer to the user manual of SADP software for details. 3. Create and input the new password - Hikvision DS-2CD2185FWD-IS | Quick Start Guide - Page 48
Network Dome Camera·Quick Start Guide STRONG PASSWORD RECOMMENDED- We highly recommend you create can better protect your product. Note: You can enable the Hik-Connect service for the device during activation. Refer to Chapter 5.1 for detailed information. to the user manual of client software. 47 - Hikvision DS-2CD2185FWD-IS | Quick Start Guide - Page 49
Network Dome Camera·Quick Start Guide Steps: 1. Run the SADP software. 2. Select an active device. 3. Change the device IP address to the same subnet with your computer by either modifying the IP address manually or checking Enable DHCP. Figure 3-5 Modify the IP Address 48 - Hikvision DS-2CD2185FWD-IS | Quick Start Guide - Page 50
the Hik-Connect service for the device during activation. Refer to Chapter 5.1 for detailed information. 4. Input the admin password and click Modify to activate your IP address modification. The batch IP address modification is supported by the SADP. Refer to the user manual of SADP for details - Hikvision DS-2CD2185FWD-IS | Quick Start Guide - Page 51
Network Dome Camera·Quick Start Guide 4 Access via Web Browser System Requirement: Operating System: Microsoft Windows XP SP1 and above version CPU: 2.0 GHz or higher RAM: 1G or higher Display: 1024× - Hikvision DS-2CD2185FWD-IS | Quick Start Guide - Page 52
Network Dome Camera·Quick Start Guide 4. Click Login. Figure 4-1 Login Interface 5. Install the plug-in before viewing the the installation of the plug-in and repeat steps 2 to 4 to login. Note: For detailed instructions of further configuration, please refer to the user manual of network camera. 51 - Hikvision DS-2CD2185FWD-IS | Quick Start Guide - Page 53
Network Dome Camera·Quick Start Guide 5 Operate via Hik-Connect App Purpose: Hik-Connect is an application for mobile devices. With the App, you can view live image of the camera, receive alarm notification and so on. Note: Hik-Connect service is not supported by certain camera models. 5.1 Enable - Hikvision DS-2CD2185FWD-IS | Quick Start Guide - Page 54
Dome Camera·Quick Start Guide Figure 5-1 Verification Code Setting (SADP) Note: The verification code is required when you add the camera to Hik-Connect app. 3. Click and read "Terms of Service" and "Privacy Policy". 4. Confirm the settings. 5.1.2 Enable Hik-Connect Service via Web Browser Before - Hikvision DS-2CD2185FWD-IS | Quick Start Guide - Page 55
Network Dome Camera·Quick Start Guide Steps: 1. Access the camera via web browser. Refer to Chapter 4. 2. Enter Select Platform Access Mode as Hik-Connect. 4. Check Enable. 5. Click and read "Terms of Service" and "Privacy Policy" in pop-up window. 6. Create a verification code or change the - Hikvision DS-2CD2185FWD-IS | Quick Start Guide - Page 56
Quick Start Guide 5.2 Hik Hik-Connect Before you start: You need to enable the Hik-Connect service on camera before adding it to your Hik-Connect account. Refer to to connect the camera with a router if the camera does not support Wi-Fi. Figure 5-3 Connect a Router Note: After the camera connects - Hikvision DS-2CD2185FWD-IS | Quick Start Guide - Page 57
the camera or on the cover of the Quick Start Guide of the camera in the package. Figure 5-4 Scan QR code is the code you create or change when you enabling Hik-Connect service on camera. ● If you forget the verification code, you can check , refer to the user manual of the Hik-Connect app. 56 - Hikvision DS-2CD2185FWD-IS | Quick Start Guide - Page 58
Network Dome Camera·Quick Start Guide 5.4 Initialize the Memory Card Steps: Check the memory card status by tapping on the Storage Status in the Device Settings interface. If the memory card - Hikvision DS-2CD2185FWD-IS | Quick Start Guide - Page 59
UD07705B 0
-
 1
1 -
 2
2 -
 3
3 -
 4
4 -
 5
5 -
 6
6 -
 7
7 -
8
-
9
-
10
-
11
-
12
-
13
-
14
-
15
-
16
-
17
-
18
-
19
-
20
-
21
-
22
-
23
-
24
-
25
-
26
-
27
-
28
-
29
-
30
-
31
-
32
-
33
-
34
-
35
-
36
-
37
-
38
-
39
-
40
-
41
-
42
-
43
-
44
-
45
-
46
-
47
-
48
-
49
-
50
-
51
-
52
-
53
-
54
-
55
-
56
-
57
-
58
-
59
 |
 |

0
Network Dome Camera
Quick Start Guide