Hitachi 51F510 Owners Guide
Hitachi 51F510 Manual
 |
View all Hitachi 51F510 manuals
Add to My Manuals
Save this manual to your list of manuals |
Hitachi 51F510 manual content summary:
- Hitachi 51F510 | Owners Guide - Page 1
PROJECTION COLOR TV Operating Guide for 57F510, 51F510 IMPORTANT SAFETY INSTRUCTIONS 2-3 FIRST TIME USE ...4-18 THE REMOTE CONTROL 19-32 ON-SCREEN DISPLAY...33-65 CARE OF YOUR HITACHI TELEVISION 66 RECEPTION PROBLEMS...67 USEFUL INFORMATION / INDEX 68-72 As an ENERGY STAR® Partner, Hitachi, Ltd. - Hitachi 51F510 | Owners Guide - Page 2
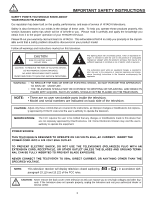
a safety problem should be discovered in your product model. Follow all warnings and instructions marked on this television. CAUTION RISK OF ELECTRIC SHOCK DO NOT OPEN CAUTION: TO REDUCE THE RISK OF ELECTRIC SHOCK, DO NOT REMOVE COVER (OR BACK). NO USER SERVICEABLE PARTS INSIDE. REFER SERVICING TO - Hitachi 51F510 | Owners Guide - Page 3
LEAD IN WIRE GROUND CLAMP ELECTRIC SERVICE EQUIPMENT NEC NATIONAL ELECTRICAL CODE ANTENNA DISCHARGE UNIT (NEC SECTION 810-20) GROUNDING CONDUCTORS (NEC SECTION 810-21) GROUNDING CONDUCTORS POWER SERVICE GROUNDING ELECTRODE SYSTEM (NEC ART 250 PART H) Note to the CATV system installer: This - Hitachi 51F510 | Owners Guide - Page 4
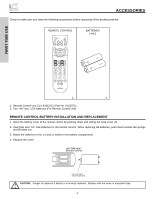
sure you have the following accessories before disposing of the packing material. REMOTE CONTROL BATTERIES ("AA") FIRST TIME USE 1. 2. 1. Remote Control Unit CLU-4341UG2 (Part No. HL02071). 2. Two "AA" size, 1.5V batteries (For Remote Control Unit). REMOTE CONTROL BATTERY INSTALLATION AND - Hitachi 51F510 | Owners Guide - Page 5
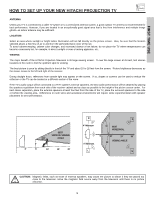
cabinet warping, cabinet color changes, and increased chance of set failure, do not place the TV where temperatures can become excessively hot, for example, in direct sunlight or near a heating appliance, etc. VIEWING The major benefit of the HITACHI Projection Television is its large viewing screen - Hitachi 51F510 | Owners Guide - Page 6
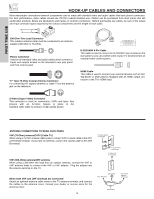
the TV's HDMI input. S-Video (Super Video) Connector This connector is used on camcorders, VCRs and laser- disc players with an S-Video feature in place of the standard video cable to produce a high quality picture. ANTENNA CONNECTIONS TO REAR JACK PANEL VHF (75-Ohm) antenna/CATV (Cable TV) When - Hitachi 51F510 | Owners Guide - Page 7
sound level. The volume level will be displayed on the TV screen. These buttons also serve as the cursor left (̇) and right (̈) buttons when in MENU mode. When the TV power is turned OFF at a volume level 31 or greater, the volume level will default to 30 when the TV is turned ON. However, if it is - Hitachi 51F510 | Owners Guide - Page 8
camcorder or VCR as shown in the following examples: INPUT 5 AUDIO S-VIDEO VIDEO L/MONO R INPUT 5 AUDIO S-VIDEO VIDEO L/MONO R FIRST TIME panel jacks. If you do not, the played back picture may be abnormal. 2. If you have a S-VHS VCR, use the S-INPUT cable in place of the standard video cable. 3. - Hitachi 51F510 | Owners Guide - Page 9
OUT S-VIDEO INPUT 4 INPUT 3 INPUT 2 Y/ VIDEO PB INPUT 1 Y/ VIDEO PB HDMI 1 VIDEO L AUDIO R AUDIO TO HI-FI PR PR (MONO) (MONO) (MONO) (MONO) RS232C 1 2 345 6 789 ባ ቧ ቨ ቢ Antenna Input/Output The remote control allows you to switch between two separate 75-Ohm RF antenna inputs, ANT A and - Hitachi 51F510 | Owners Guide - Page 10
multi-channel audio in a single cable. Because digital television (DTV) signals remain in digital format, HDMI assures that pristine high-definition images retain the highest video quality from the source all the way to your television screen. Use the HDMI input for your external devices such as Set - Hitachi 51F510 | Owners Guide - Page 11
FIRST TIME USE DVD Player OUTPUT Y PB/CB PR/CR L R Outside antenna or digital cable INPUT OUTPUT Cable TV Box ANT A To Converter ANT B MONITOR OUT S-VIDEO INPUT 4 INPUT 3 INPUT 2 Y/ VIDEO PB INPUT 1 Y/ VIDEO PB HDMI 1 VIDEO L AUDIO R PR PR (MONO) (MONO) (MONO) (MONO) RS232C 1 2 345 - Hitachi 51F510 | Owners Guide - Page 12
3 in the example on page 11). Refer to your VCR operating guide for more information on line input-output connections. • You may use VIDEO or S-VIDEO inputs to connect to Input 3, Input 4 or Input 5, but only one of these may be used at a time. • Connect only 1 component (VCR, DVD player, camcorder - Hitachi 51F510 | Owners Guide - Page 13
the audio level of an external audio amplifier with the remote control, connect the system as shown below. REAR PANEL OF TELEVISION ANT A To Converter ANT B MONITOR OUT S-VIDEO INPUT 4 INPUT 3 INPUT 2 Y/ VIDEO PB INPUT 1 Y/ VIDEO PB HDMI 1 VIDEO L AUDIO R AUDIO TO HI-FI PR PR (MONO - Hitachi 51F510 | Owners Guide - Page 14
, laserdisc player, DVD player, or HDTV Set Top Box to your TV set is dependent on the model and features of each component. Check the owner's manual of each component for the location of video and audio inputs and outputs. The following connection diagrams are offered as suggestions. However, you - Hitachi 51F510 | Owners Guide - Page 15
OSD label disappears automatically after approximately four seconds. 5. Select Antenna from the INPUTS menu to return to the previous channel. ANT A To Converter ANT B MONITOR OUT S-VIDEO INPUT 4 INPUT 3 INPUT 2 Y/ VIDEO PB INPUT 1 Y/ VIDEO PB HDMI 1 VIDEO L AUDIO R AUDIO TO HI-FI PR PR - Hitachi 51F510 | Owners Guide - Page 16
OSD label disappears automatically after approximately four seconds. 5. Select Antenna from the INPUTS menu to return to the previous channel. ANT A To Converter ANT B MONITOR OUT S-VIDEO INPUT 4 INPUT 3 INPUT 2 Y/ VIDEO PB INPUT 1 Y/ VIDEO PB HDMI 1 VIDEO L AUDIO R AUDIO TO HI-FI PR PR - Hitachi 51F510 | Owners Guide - Page 17
when connecting to rear panel jacks. The picture and sound that is played back will be abnormal if the connection is loose. 2. The HDMI input on INPUT 1 contains the copy protection system called High-bandwidth Digital Content Protection (HDCP). HDCP is a cryptographic system that encrypts video - Hitachi 51F510 | Owners Guide - Page 18
or HDTV set top box. The VIDEO OSD label disappears automatically after approximately four seconds. 7. Select Antenna from the INPUTS menu to return to the previous channel. ANT A To Converter ANT B MONITOR OUT S-VIDEO INPUT 4 INPUT 3 INPUT 2 Y/ VIDEO INPUT 1 Y/ VIDEO PB PB HDMI 1 VIDEO - Hitachi 51F510 | Owners Guide - Page 19
your TV, point the remote control at the screen of the TV and press the TV button. The remote will now control your television. To operate your VCR, point the remote at the remote sensor of the VCR and press the VCR button. The remote will now control your VCR (see page 31 for instructions on - Hitachi 51F510 | Owners Guide - Page 20
HOW TO USE THE REMOTE TO CONTROL YOUR TV ቢ ባ ቧ ብ ቦ ቨ ቩ ቫ ቭ ተ ቱ ቲ ታ ቤ THE REMOTE CONTROL ቢ POWER button Press this button to turn the TV set on or off when the remote is in TV mode. (See page 19 for instructions on how to set the remote control to TV mode.) ባ MODE buttons These - Hitachi 51F510 | Owners Guide - Page 21
REMOTE TO CONTROL YOUR TV ቦ ASPECT button Press this button to quickly change the picture format ASPECT ratio. Depending on the input signal format received, the picture in the lighted area of the picture will age more mode to display 16:9 sources like HDTV and DVD's preserving the original 16:9 - Hitachi 51F510 | Owners Guide - Page 22
USE THE REMOTE TO CONTROL YOUR TV ቧ INPUTS button When the remote control is in TV mode, press this button to access the INPUTS menu. Use the CURSOR and SELECT buttons to select the inputs that are being used. Pressing the INPUTS button repeatedly will also cycle through the Inputs menu items. Then - Hitachi 51F510 | Owners Guide - Page 23
CONTROL HOW TO USE THE REMOTE TO CONTROL YOUR TV ቨ PICTURE-IN-PICTURE button See separate section on pages 25-27 for a description. ቩ MENU button The MENU button will start the On-Screen Display. ቪ GUIDE button [Cable Box (CBL), Satellite Receiver (SAT)/Set-Top-Box (STB) mode only] The use of - Hitachi 51F510 | Owners Guide - Page 24
30 or less, the volume level will be at the level it was set when the TV is turned ON. ተ CHANNEL SELECTOR/FAVORITE CHANNEL (FAV CH) buttons The CHANNEL SELECTOR buttons are used to select channels, lock access code, etc. Use the CHANNEL SELECTOR buttons to enter one, two, or three numbers to select - Hitachi 51F510 | Owners Guide - Page 25
PICTURE-IN-PICTURE (PIP) Your HITACHI Projection TV incorporates Two Tuner technology designed for improved viewing enjoyment. This Two Tuner feature allows you to view antenna inputs on both the main picture and sub-picture simultaneously, with separate tuning control for each. ANT A input can be - Hitachi 51F510 | Owners Guide - Page 26
that during the Surf Mode, you could navigate to a particular sub-picture and press the Select button to go to that channel. This was an typing mistake. It can not be done on this model. The original Owner's Manual also stated that by pressing the cursor keys, the Surf Mode would stop allowing - Hitachi 51F510 | Owners Guide - Page 27
or Money Order Only 1-800-555-1212 SPLIT FREEZE Press the PAUSE button to freeze the picture you are currently viewing (only the right sub-picture will freeze). Press the EXIT button to return to normal viewing. Main Picture Sub Picture THE REMOTE CONTROL STROBE FREEZE Press the PAUSE button to - Hitachi 51F510 | Owners Guide - Page 28
box as shown on page 32. Release the CBL button. 5. Aim the remote at the cable box and press the POWER button. The remote will turn off your cable box when the correct two digit preset code is entered. When this occurs, the remote control is programmed for your cable box. If the cable box does not - Hitachi 51F510 | Owners Guide - Page 29
at the set-top-box/satellite receiver and press the POWER button. The remote will turn off your set-top-box/satellite receiver when the correct two digit preset code is entered. When this occurs, the remote control is programmed for your settop-box/satellite receiver. If the set-top-box/satellite - Hitachi 51F510 | Owners Guide - Page 30
and press the POWER button. The remote will turn off your DVD player when the correct two digit preset code is entered. When this occurs, the remote control is programmed for your DVD player. If the DVD player does not turn off, try a different two digit preset code. 6. The remote will now control - Hitachi 51F510 | Owners Guide - Page 31
VCR and press the POWER button. The remote will turn off your VCR when the correct two digit preset code is entered. When this occurs, the remote control is programmed for your VCR. If the VCR does not turn off, try a different four digit preset code. 6. The remote will now control your VCR. NOTES - Hitachi 51F510 | Owners Guide - Page 32
11, 12 DIGITAL CABLE BRAND . . . . . CODE PIONEER 29 SCIENTIFIC ATLANTA 30 SATELLITE BRAND CODE ECOSTAR 03 HITACHI 00 HUGHES 04 RCA 01 SONY 02 SET TOP BOX BRAND CODE PANASONIC 05 RCA 06 SAMSUNG 07 ZENITH 08 VCR, CABLE, SATELLITE, AND DVD CODES FOR REMOTE CONTROL THE REMOTE CONTROL 32 - Hitachi 51F510 | Owners Guide - Page 33
the different features on your HITACHI Projection TV. 2. Press the CURSOR and SELECT buttons to navigate and highlight a different feature of the On-Screen Display menu. 3. Press EXIT on the remote control to quickly exit from a menu. This part of the screen shows which selections are available - Hitachi 51F510 | Owners Guide - Page 34
16:9 Standard 16:9 Zoom ON-SCREEN DISPLAY (OSD) Select between the two picture modes; Day and Night. Adjust contrast. Adjust brightness. Adjust color. Adjust tint. Adjust sharpness. Set this to High for less intense color with more blue, set to Medium for natural color, set to Standard for standard - Hitachi 51F510 | Owners Guide - Page 35
system. Set Clock Settings. Set Sleep Timer intervals (30 min. intervals, 00:30-3:00). Set Day/Night picture mode settings. Set viewing reservation for TV programs. Automatic and manual alignment of the red, green and blue colors to make white. Choose English, French, or Spanish text. Label Video - Hitachi 51F510 | Owners Guide - Page 36
Edge Enhancement Auto Color Noise Reduction Color Management (Set User Colors) Auto Movie Mode (TV/Cinema Detection) Day 100% 50% 50% 50% 50% High Middle High Off Off Off Off Night 70% 55% 50% 50% 40% Standard Low Low Off Off Off Off Reset Reset the video menu settings on current input to the Day - Hitachi 51F510 | Owners Guide - Page 37
Edge Enhancement Set this to High for cooler color with more blue, set to Medium for more natural color, set to Standard for accurate color or set to Black/White for more reddish color. Use this function to enhance the picture brightness in light scenes using the settings off, low, middle and - Hitachi 51F510 | Owners Guide - Page 38
or more pure depending on the user's preference. Video Color Management Color Decoding Auto Color Noise Reduction Auto Movie Mode Move SEL Select Off Off Off Video Color Management Set User Colors Magenta 50% Red 50% Yellow 50% Green 50% Cyan 50% Blue 50% Reset Move SEL Return - Hitachi 51F510 | Owners Guide - Page 39
. When Auto Movie Mode is turned ON from the VIDEO menu, your Hitachi Projection Television will activate the circuitry for this special feature to improve video performance when watching film based sources. NOTES: 1. When using Progressive Scan Component, HDMI or DVI input (Ex. 480p, 720p, 1080i - Hitachi 51F510 | Owners Guide - Page 40
balance of the Projection TV internal speakers. SRS Based on the principles of the human hearing system, SRS 3D technology delivers an exciting and realistic 3D Sound experience from just two external speakers or the two internal speakers found in your HITACHI Television. SRS will also enhance - Hitachi 51F510 | Owners Guide - Page 41
will be displayed at the top right edge of the TV. The source you select will to use only speakers from a separate stereo system. Auto Noise Cancel This will automatically adjust volume so each channel and input has the same average volume level. This function turns loudness ON or OFF. It will - Hitachi 51F510 | Owners Guide - Page 42
example, it will be useful for centering the picture area at both the top and bottom of the picture with 480i/480P signal. Adjustable range is -10 (video center is toward bottom of screen) to +10 (video center is toward top of screen). Press the CURSOR buttons ̆, ̄, to select menu item. Press the - Hitachi 51F510 | Owners Guide - Page 43
on VHF 2~13 the screen 2 ~ 13 Mid band A~1 A-5 ~ A-1 14 ~ 22 95 ~ 99 Super band J~W 23 ~ 36 Hyper band 37 ~ 64 W + 1 ~ W + 28 Ultraband W + 29 ~ W + 84 65 ~ 125 Reception channels for each mode are shown at the left. Refer to your cable or TV guide for channel identification standards - Hitachi 51F510 | Owners Guide - Page 44
button is pressed while AUTO CHANNEL SCAN function is engaged, programming will stop. If two antennas are connected, switch antenna inputs and repeat AUTO CHANNEL SCAN for the second antenna input. Remember to select the correct ANTENNA/CABLE mode before using AUTO CHANNEL SCAN. See CHANNEL MANAGER - Hitachi 51F510 | Owners Guide - Page 45
Off CH ID Move SEL Return Lock Press CURSOR buttons ̆ or ̄ to review more channels. Press EXIT to quit the menu. Scan Use this feature after Auto Channel Scan is completed to add (On) or skip (Off) additional channels to the remote control channel ̆ or ̄ buttons. Chan. Manager Ant. A Ch - Hitachi 51F510 | Owners Guide - Page 46
which will make TV viewing easier and more enjoyable. Use this feature to give up to 20 channels a name when ANTENNA signal and ANT B are in the same ANTENNA/CABLE mode, the CHANNEL ID for both antenna inputs will be the same. 2. CHANNEL ID will not be displayed when PIP is ON. ON-SCREEN DISPLAY 46 - Hitachi 51F510 | Owners Guide - Page 47
key number. This will reset the access code number back to the factory preset 0000. Press EXIT to quit the menu. NOTE: 1. When using TV TIME LOCK make sure the clock is set (see page 52). 2. Text appears on the screen to indicate that TV TIME LOCK is activated. 3. If MOVIE/TV Ratings Lock function - Hitachi 51F510 | Owners Guide - Page 48
Change Access Code Engage Lock TV Time Lock Movie Ratings TV Ratings Canadian adult guardian. No one 17 and under TV will not block it. 2. Blocking "NOT RATED (NR)" programs may block emergency programming, sports, news, public service announcements, religious programs and weather. ON-SCREEN - Hitachi 51F510 | Owners Guide - Page 49
that you want to block. Press select to block the TV RATINGS that you have selected. Press EXIT to quit the menu or select TV RATINGS to return to the previous menu. TV Parental Guide Ratings Chart N/A TV-Y TV-Y7 TV-G TV-PG TV-14 TV-MA FV V S L D None. All children. The themes and elements in - Hitachi 51F510 | Owners Guide - Page 50
be inappropriate in its content. Locks Change Access Code Engage Lock TV Time Lock Movie Ratings TV Ratings Canadian Ratings (Eng) Canadian Ratings (Frn) higher (G, PG, 14+ and 18+) will be blocked automatically. Press EXIT to quit menu. Canadian Ratings English Chart C C8+ G SCREEN DISPLAY 50 - Hitachi 51F510 | Owners Guide - Page 51
Change Access Code Engage Lock TV Time Lock Movie Ratings TV Ratings will be automatically blocked. Press EXIT to quit menu or select the CURSOR button ̇ to return to the previous menu audience but contains light or occasional violence violent scenes or one or more sufficiently SCREEN DISPLAY 51 - Hitachi 51F510 | Owners Guide - Page 52
Day, and Year. Use the CURSOR buttons ̆, ̄ to adjust settings. Press the SELECT button to set the Time and Date. Press EXIT to quit the menu. NOTES: When "Daylight Saving Correction" is checked "✓", the TV will automatically calculate the clock adjustment for Daylight Saving. ON-SCREEN DISPLAY 52 - Hitachi 51F510 | Owners Guide - Page 53
30, 2:00, 2:30 and 3:00. Set Day/Night Timer Select this feature to activate and set your TV's Day/Night Picture Mode automatically. Timers Set The Clock Set Sleep Timer Set Day/Night Timer Set Event Timer Timers Set Day/Night to select Day Mode Off and to set it's timer. ON-SCREEN DISPLAY 53 - Hitachi 51F510 | Owners Guide - Page 54
Set Event Timer This function will automatically operate the Projection TV viewing reservation of a program. If the clock is not set, you can not use this function and the screen below will appear. The message on the screen will disappear after 3 seconds, then the screen automatically goes to the - Hitachi 51F510 | Owners Guide - Page 55
Setup Magic Focus Tune Up Menu Preference Set The Inputs Set Virtual HD Set Black Side Panel Set Closed Captions Set Monitor Out Set AV Control About Your TV Move SEL Return Use the CURSOR buttons to highlight the sub-menu of your choice. Press the SELECT button to select. ON-SCREEN DISPLAY 55 - Hitachi 51F510 | Owners Guide - Page 56
Digital Convergence Adjustment Please turn ON your television for at least 20 minutes before using this feature. The Magic Focus button on control panel will not work when adjustment mode is set to Manual (see page 57 or 58). Your HITACHI Projection TV has three color projection tubes: one for red - Hitachi 51F510 | Owners Guide - Page 57
Tune Up Menu Preference Set The Inputs Set Virtual HD Set Black Side Panel Set Closed Captions Set Monitor Out Set AV Control About Your TV Move SEL Return Setup Magic Focus Tune Up Aligns the Red, Green, and Blue colors to correct for Magnetic Influences. Adjustment Mode Auto 9 Point Manual 117 - Hitachi 51F510 | Owners Guide - Page 58
Tune Up Menu Preference Set The Inputs Set Virtual HD Set Black Side Panel Set Closed Captions Set Monitor Out Set AV Control About Your TV Move SEL Return Setup Magic Focus Tune Up Aligns the Red, Green, and Blue colors to correct for Magnetic Influences. Adjustment Mode Auto 9 Point Manual 117 - Hitachi 51F510 | Owners Guide - Page 59
feature will allow you to select any one of three different languages for all on-screen displays. Setup Magic Focus Tune Up Menu Preference Set The Inputs Set Virtual HD Set Black Side Panel Set Closed Captions Set Monitor Out Set AV Control About Your TV Move SEL Return Setup Menu Preference - Hitachi 51F510 | Owners Guide - Page 60
menu screen), or select SHADED for a light background. Set The Inputs Use this feature to give a name to any of the five video inputs. Setup Magic Focus Tune Up Menu Preference Set The Inputs Set Virtual HD Set Black Side Panel Set Closed Captions Set Monitor Out Set AV Control About Your TV - Hitachi 51F510 | Owners Guide - Page 61
button will substitute for your video input device play button. However, intended operation is for use with your VCR, laserdisc, or DVD play button. 3. If no remote control button is pressed after the TV is turned on by AUTO LINK, the TV will automatically turn off after three hours. ON-SCREEN - Hitachi 51F510 | Owners Guide - Page 62
Standard mode. The top/bottom gray bar will appear in SPLIT MODE PIP and SPLIT FREEZE. The TV set will always return to "Set Black Side Panel - OFF" setting every time the TV is powered "OFF". NOTE: To maximize operating life of the TV's picture tubes when watching 4:3 signal, Black Side Panel is - Hitachi 51F510 | Owners Guide - Page 63
, and/or sound effects of a television program or home video which are displayed on the TV screen. Your local TV program guide denotes these programs as or . Setup Magic Focus Tune Up Menu Preference Set The Inputs Set Virtual HD Set Black Side Panel Set Closed Captions Set Monitor Out Set AV - Hitachi 51F510 | Owners Guide - Page 64
Out This feature will select the source of the Monitor Output. Setup Magic Focus Tune Up Menu Preference Set The Inputs Set Virtual HD Set Black Side Panel Set Closed Captions Set Monitor Out Set AV Control About Your TV Move SEL Return Setup Set Monitor Out Monitor Out Monitor TV Tuner Out Audio - Hitachi 51F510 | Owners Guide - Page 65
Your TV The TV model name and dimensions will be displayed on the TV screen. The dimensions of each TV model are listed on page 69. Setup Magic Focus Tune Up Menu Preference Set The Inputs Set Virtual HD Set Black Side Panel Set Closed Captions Set Monitor Out Set AV Control About Your TV Move - Hitachi 51F510 | Owners Guide - Page 66
, and extremely dusty places. Remove the plug from the wall outlet if your Television will not be used for a long period of time, for instances, when you go on vacation. DO NOT Do not clean your screen or cabinet with strong cleaners, polishes or a chemically treated cloth. Do not place rubber or - Hitachi 51F510 | Owners Guide - Page 67
or horizontal streaks may appear, picture may flutter or drift. Usually caused by interference from automobile ignition systems, neon lamps, electrical drills, and other electrical appliances. • GHOSTS: Ghosts are caused by the television signal following two paths. One is the direct path and the - Hitachi 51F510 | Owners Guide - Page 68
poor © Picture OK, sound poor © © ©©© © © Picture blurred © © ©©© © Lines or streaks in picture © ©©© © Poor reception on some channels © ©©© © Picture rolls vertically © © No color © © ©©© © Poor color © © ©©© ©© HITACHI Projection Television incorporates advanced power surge - Hitachi 51F510 | Owners Guide - Page 69
) On-Screen Menu • Full Set of Input Jacks, including S-VIDEO • COMPONENT VIDEO: Y-PB/PR • Velocity Modulation • Six Aspect Modes • Closed Caption Decoder • 2-Tuner Picture in Picture • Magic Focus (Auto Digital Convergence and 9-point/117-point Manual Adjustment) • Dual Antenna Inputs - Hitachi 51F510 | Owners Guide - Page 70
made every effort to assure you hours of trouble free operation from your unit. However, should you require service, a network of Hitachi Authorized Service Facilities has been established in all 50 states and Puerto Rico. Each facility will provide you with convenient and expedient assistance. Our - Hitachi 51F510 | Owners Guide - Page 71
EST 9:00am - 7:00pm Saturday EST 9:00am - 5:00pm Look for your French Manual on the outside of the box. If the manual is missing, call 1-800-HITACHI (1-800-448-2244) for a copy. Pour de plus amples renseignements sur le service durant la période couverte par la garantie, sur le fonctionnement ou - Hitachi 51F510 | Owners Guide - Page 72
A Accessories 4 Antennas ( TV Ratings (Canadian - French 51 Loudness 41 M Magic Focus Auto Convergence 7, 56 Manual Convergence 57-58 Menu Preference Language 59 Background 60 Monitor Out 9, 64 P Picture Mode 36 Picture-in-Picture (PIP 25-27 Picture-outside-Picture (POP 25 R Remote - Hitachi 51F510 | Owners Guide - Page 73
NOTES 73 - Hitachi 51F510 | Owners Guide - Page 74
NOTES 74 - Hitachi 51F510 | Owners Guide - Page 75
NOTES 75 - Hitachi 51F510 | Owners Guide - Page 76
QR60611
-
 1
1 -
 2
2 -
 3
3 -
 4
4 -
 5
5 -
 6
6 -
 7
7 -
8
-
9
-
10
-
11
-
12
-
13
-
14
-
15
-
16
-
17
-
18
-
19
-
20
-
21
-
22
-
23
-
24
-
25
-
26
-
27
-
28
-
29
-
30
-
31
-
32
-
33
-
34
-
35
-
36
-
37
-
38
-
39
-
40
-
41
-
42
-
43
-
44
-
45
-
46
-
47
-
48
-
49
-
50
-
51
-
52
-
53
-
54
-
55
-
56
-
57
-
58
-
59
-
60
-
61
-
62
-
63
-
64
-
65
-
66
-
67
-
68
-
69
-
70
-
71
-
72
-
73
-
74
-
75
-
76
 |
 |
PROJECTION COLOR TV
Operating Guide for 57F510, 51F510
IMPORTANT SAFETY INSTRUCTIONS
................................................................................
2-3
FIRST TIME USE
..................................................................................................................
4-18
THE REMOTE CONTROL
..................................................................................................
19-32
ON-SCREEN DISPLAY
........................................................................................................
33-65
CARE OF YOUR HITACHI TELEVISION
..................................................................................
66
RECEPTION PROBLEMS
..........................................................................................................
67
USEFUL INFORMATION / INDEX
......................................................................................
68-72
As an E
NERGY
S
TAR
®
Partner, Hitachi, Ltd. has determined that this
product meets the E
NERGY
S
TAR
®
guidelines for energy efficiency.