Hitachi 65M200 Owners Guide
Hitachi 65M200 Manual
 |
View all Hitachi 65M200 manuals
Add to My Manuals
Save this manual to your list of manuals |
Hitachi 65M200 manual content summary:
- Hitachi 65M200 | Owners Guide - Page 1
PROJECTION MONITOR Operating Guide for 51M200, 65M200, 51M200A IMPORTANT SAFETY INSTRUCTIONS 2-3 FIRST TIME USE ...4-19 THE REMOTE CONTROL 20-30 ON-SCREEN DISPLAY...31-52 CARE OF YOUR ASPECT PROJECTION MONITOR AND REMOTE CONTROL 53 USEFUL INFORMATION ...54-57 INDEX ...58 - Hitachi 65M200 | Owners Guide - Page 2
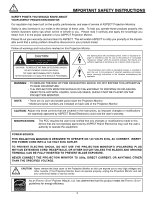
no user serviceable parts inside the Projection Monitor. • Model and serial numbers are indicated on back side of the Projection Monitor. CAUTION: Adjust only those controls that are covered in the instructions, as improper changes or modifications not expressly approved by ASPECT Brand Electronics - Hitachi 65M200 | Owners Guide - Page 3
the manufacturer. 12 and supporting SERVICE GROUNDING ELECTRODE SYSTEM (NEC ART 250 PART specific instructions pertaining to your resident state. For disposal or recycling information, please contact your local authorities or the Electronic Industries Alliance: www.eiae.org. Projection Monitor - Hitachi 65M200 | Owners Guide - Page 4
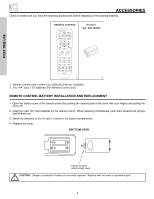
POWER TV CBL/SAT DVD/VCR SWAP PIP MODE PIP FREEZE C.C. DAY/NIGHT MENU HL02251 "AA" BATTERIES SELECT MUTE EXIT LAST CH VOL CH 1 2 3 4 5 6 7 8 9 ANT 0 INFO VID1 REC VID2 VID5 VID3 SIZE VID4 SLEEP CLU-433OUG 1. 2. 1. Remote Control Unit is either CLU-4330UG (Part No - Hitachi 65M200 | Owners Guide - Page 5
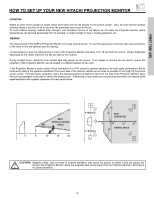
TIME USE HOW TO SET UP YOUR NEW HITACHI PROJECTION MONITOR LOCATION Select an area where sunlight or bright in direct sunlight or near a heating appliance, etc. VIEWING The major benefit of the ASPECT Projection Monitor is its large viewing screen. To see this large screen at its best, test various - Hitachi 65M200 | Owners Guide - Page 6
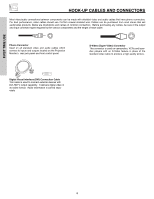
video and audio cables which connect to inputs and outputs located on the Projection Monitor's rear jack panel and front control panel. S-Video (Super Video) cable is used to connect external devices with DVI-HDTV output capability. It delivers digital video in its native format. Audio information - Hitachi 65M200 | Owners Guide - Page 7
̆ EXIT SELECT ቢ MENU/SELECT button ቨ ቧ ብ ቤ ባቢ This button allows you to enter the MENU, making it possible to set Projection Monitor features to your preference without using the remote. This button also serves as the SELECT button when in MENU mode. ባ INPUT/EXIT button Press this button to - Hitachi 65M200 | Owners Guide - Page 8
S-INPUT cable in place of the standard video cable. 3. If you have a mono VCR, insert the audio cable into the left audio jack of your Projection Monitor. 8 - Hitachi 65M200 | Owners Guide - Page 9
PANEL JACKS IMPORTANT: This is a monitor only product. No TV or Cable tuner is included. ቢ ቧ ቦ AUDIO TO HI-FI L R INPUT 1 INPUT 2 DVI-HDTV PR PB Y R (MONO)/L this connection, the audio to the stereo can be controlled by the television's main volume. ብ S-VIDEO Inputs 3 and 4 Inputs 3 and - Hitachi 65M200 | Owners Guide - Page 10
tCheBCMRo.nitIonrt'shiPs Rcaisnep,uct.onnect the component CB output to the Monitor's 4. It may be necessary to adjust TINT to obtain optimum such as 1080i, 720p, 480i and 480p are available for DVI-HDTV input. 2. The DVI-HDTV input is NOT compatible when used with a DVD player from a - Hitachi 65M200 | Owners Guide - Page 11
DVD Player OUTPUT Y PB/CB PR/CR L R HDTV Set-Top Box Y PBOUTPPRUT L R D-VHS DIGITAL OUTPUT LR OUTPUT AUDIO TO HI-FI L R INPUT 1 DVI-HDTV PR PB Y R (MONO)/L AUDIO INPUT 2 included with the purchase of this Projection Monitor. 11 S-VIDEO V L R OUTPUT Laserdisc player, VCR, camcorder, etc. - Hitachi 65M200 | Owners Guide - Page 12
REAR PANEL CONNECTIONS • S-VIDEO and DVI-HDTV connections are provided for high performance laserdisc players mono sound), connect it to the left audio jack on the Projection Monitor. • Refer to the operating guide of your other electronic equipment for additional information on connecting your - Hitachi 65M200 | Owners Guide - Page 13
To control the audio level of an external audio amplifier with the remote control, connect the system as shown below. REAR PANEL OF PROJECTION MONITOR AUDIO TO HI-FI L R INPUT 1 INPUT 2 INPUT 3 DVI-HDTV PR PB Y R (MONO)/L AUDIO PR PB Y/VIDEO R (MONO)/L AUDIO R (MONO)/L VIDEO S-VIDEO - Hitachi 65M200 | Owners Guide - Page 14
The exact arrangement you use to connect the VCR, camcorder, laserdisc player, DVD player, or HDTV Set Top Box to your Projection Monitor is dependent on the model and features of each component. Check the owner's manual of each component for the location of video and audio inputs and outputs. The - Hitachi 65M200 | Owners Guide - Page 15
or the laserdisc player to the INPUT (VIDEO) jack, as shown on the Projection Monitor below. 2. Connect the cable from the AUDIO OUT of the VCR or the HDTV PR PB Y R (MONO)/L AUDIO PR PB Y/VIDEO R (MONO)/L AUDIO INPUT 3 R (MONO)/L VIDEO S-VIDEO INPUT 4 R (MONO)/L VIDEO S-VIDEO MONITOR - Hitachi 65M200 | Owners Guide - Page 16
or the laserdisc player to the INPUT (VIDEO) jack, as shown on the Projection Monitor below. 2. Connect the cable from the AUDIO OUT R of the VCR or DVI-HDTV PR PB Y R (MONO)/L AUDIO PR PB Y/VIDEO R (MONO)/L AUDIO R (MONO)/L VIDEO S-VIDEO INPUT 4 R (MONO)/L VIDEO S-VIDEO MONITOR OUT R - Hitachi 65M200 | Owners Guide - Page 17
or the laserdisc player to the INPUT (S-VIDEO) jack, as shown on the Projection Monitor below. 2. Connect the cable from the AUDIO OUT R of the VCR or DVI-HDTV PR PB Y R (MONO)/L AUDIO PR PB Y/VIDEO R (MONO)/L AUDIO R (MONO)/L VIDEO S-VIDEO INPUT 4 R (MONO)/L VIDEO S-VIDEO MONITOR OUT - Hitachi 65M200 | Owners Guide - Page 18
CAPABILITY TO INPUT 1. 1. Connect the DVI connection cable from the output of the HDTV set top box or DVD player to the DVI-HDTV input as shown on the Projection Monitor below. 2. Connect the cable from the AUDIO OUT R of the HDTV set top box or DVD player to the INPUT (AUDIO/R) jack. 3. Connect the - Hitachi 65M200 | Owners Guide - Page 19
VIDEO SOURCES CONNECTING A COMPONENT SOURCE TO INPUT 1 OR 2: Y-PBPR. 1. Connect the cable from the Y OUT of the Laserdisc/DVD player or HDTV set top box to the INPUT (Y) jack, as shown on the Projection Monitor below. 2. Connect the cable from the CB/PB OUT or B-Y OUT of the Laserdisc/DVD player or - Hitachi 65M200 | Owners Guide - Page 20
player (see pages 28 and 30 for instruction on how to program the remote to control your DVD/VCR player.) POWER TV CBL/SAT DVD/VCR SWAP PIP MODE PIP FREEZE C.C. DAY/NIGHT MENU These buttons allow the remote to control your TV (Projection Monitor), VCR, DVD or cable/satellite box depending - Hitachi 65M200 | Owners Guide - Page 21
VID4 SLEEP ቩ VID1~VID5 buttons CLU-433OUG ቫ SLEEP button ቪ SIZE button ᕃ POWER button Press this button to turn the Projection Monitor on or off when the remote is in TV (Monitor) mode. ባ PICTURE-IN-PICTURE buttons See separate section on pages 25, 26 and 27 for description. ቤ DAY/NIGHT button - Hitachi 65M200 | Owners Guide - Page 22
CONTROL ▲ ▲ ▲ HOW TO USE THE REMOTE TO CONTROL YOUR PROJECTION MONITOR ቦ VOLUME, MUTE button Press the VOLUME up Only] The ANT button is only applicable when the Remote Control is in SAT mode. ቩ VID1 ~ VID5 When the remote control is in TV (Monitor) mode, press these buttons to directly select the - Hitachi 65M200 | Owners Guide - Page 23
HOW TO USE THE REMOTE TO CONTROL YOUR PROJECTION MONITOR ቪ SIZE button Press this button to quickly change sources. 16:9 Standard Use this size mode to display 16:9 sources like HDTV and DVD's preserving the original 16:9 aspect ratio. 16:9 Zoom Use this size mode to zoom 16:9 images. (1) - Hitachi 65M200 | Owners Guide - Page 24
HOW TO USE THE REMOTE TO CONTROL YOUR PROJECTION MONITOR ቫ SLEEP button Show and set your SLEEP Source YPBPR:1 When a COMPONENT VIDEO: Y-PBPR Input is connected to VIDEO: 1. Day/Night Mode Aspect Mode Vitual HD Day CC On 4:3 Expanded HD1080i Zzzz -:-- Closed Captioning Sleep Timer S - IN: - Hitachi 65M200 | Owners Guide - Page 25
tuning, press the SWAP button on the remote. The green highlighted Video input display will move HDTV PR PB Y R (MONO)/L AUDIO PR PB Y/VIDEO R (MONO)/L AUDIO INPUT 3 R (MONO)/L VIDEO S-VIDEO INPUT 4 R (MONO)/L VIDEO S-VIDEO MONITOR OUT R L AUDIO VIDEO S-VIDEO ባ ቢ POWER TV - Hitachi 65M200 | Owners Guide - Page 26
on the type of input signal. PICTURE-IN-PICTURE (PIP) MODES POP PIP SPLIT 480i YES x YES 480p 720p 1080i x x YES x x YES x YES YES THE REMOTE CONTROL 26 - Hitachi 65M200 | Owners Guide - Page 27
has many details, for example, a close play in a sporting event or a golf swing. FREEZE FREEZE NOTES: Each freeze frame is delayed about 0.1 (1/10) second. THE REMOTE CONTROL 27 - Hitachi 65M200 | Owners Guide - Page 28
record a program. ቤ EXCLUSIVE TV (Monitor) Buttons These buttons are for operating the Projection Monitor. VOL CH ባ 1 2 3 4 5 6 7 8 9 VCR BRAND CODE Aiwa 48 Daewoo 45 Emerson 20,21,22,23,24 Fisher 34,37,38,39 Funai 52 General Electric 33 Goldstar 36 Hitachi 00,01,02,03 - Hitachi 65M200 | Owners Guide - Page 29
allows the remote to control your cable/satellite box by setting it to CABLE/SATELLITE mode. ባ PRECODED CABLE/SATELLITE BOX Buttons These buttons transmit the chosen precoded cable/satellite codes. ቤ EXCLUSIVE TV (Monitor) Buttons These buttons are for operating the Projection Monitor. CABLE BRAND - Hitachi 65M200 | Owners Guide - Page 30
This button allows the remote to control your DVD player by setting it to DVD mode. ባ PRECODED DVD Buttons These buttons transmit the chosen precoded DVD codes. ቤ EXCLUSIVE TV (Monitor) Buttons These buttons are for operating the Projection Monitor. DVD BRAND CODE Hitachi 53, 59, 60 Panasonic - Hitachi 65M200 | Owners Guide - Page 31
features on your ASPECT Projection Monitor. 2. Press the CURSOR ̇, ̈, ̆ and ̄ to highlight a different feature, then press SELECT to choose. 3. Press EXIT on the remote control to quickly exit from a menu. 4. Press CURSOR ̇ or ̈ to access Favorite Channels menu. MENU SELECT EXIT This part of the - Hitachi 65M200 | Owners Guide - Page 32
format aspect ratio. Change Access Code Engage Lock Movie Ratings TV Ratings television programming based on the Canadian French ratings system. Automatic and manual alignment of the red, green and blue colors to make white. Choose English, French, or Spanish text. Set the Projection Monitor - Hitachi 65M200 | Owners Guide - Page 33
to initial conditions. Picture Mode Use this function to choose from automatic picture settings to optimize your Projection Monitor's performance. MENU Video Audio Aspect Locks Setup Move SEL Sel Video Picture Mode Contrast Brightness Color Tint Sharpness Color Temperature Black Enhancement - Hitachi 65M200 | Owners Guide - Page 34
VIDEO MENU Video Audio Aspect Locks Setup Move SEL Sel SELECT or Video Picture Mode Contrast Brightness Color Tint Sharpness Color Temperature Black Enhancement Edge Enhancement Reset Video Settings Move - Hitachi 65M200 | Owners Guide - Page 35
VIDEO Reset Video Settings This function allows you to Reset the Video Menu Settings of the present input and return it to the Day VIDEO mode. SELECT Video Picture Mode Contrast Brightness Color Tint Sharpness Color Temperature Black Enhancement Edge Enhancement Reset Video Settings Move SEL - Hitachi 65M200 | Owners Guide - Page 36
HDTV input, Auto Color will not be available (grayed out). Noise Reduction Auto Movie Mode The NOISE REDUCTION function automatically reduces conspicuous noise in the picture without degrading picture quality. Set NOISE REDUCTION to OFF if the Projection Monitor your ASPECT Projection Monitor will - Hitachi 65M200 | Owners Guide - Page 37
AUDIO Audio Select AUDIO to adjust the Projection Monitor to your preference and to improve the sound quality. Video Audio Audio Treble 45% MENU Aspect Locks Setup Move SEL Sel Bass 50% Balance L R Sound Enhancement Off SELECT Internal Speakers On Perfect Volume On or Loudness - Hitachi 65M200 | Owners Guide - Page 38
two external speakers (or) the two internal speakers of your ASPECT Projection Monitor. If your ASPECT Projection Monitor is connected to an external audio system, SRS will also symbol are registered trademarks of BBE Sound, Inc. Manufactured under license from BBE Sound, Inc. ON-SCREEN DISPLAY 38 - Hitachi 65M200 | Owners Guide - Page 39
top of screen). Press CURSOR ̆ or ̄ to select menu item. Press CURSOR ̇ or ̈ to adjust the function. Press EXIT to quit the MENU, or select ASPECT to return to the main menu. NOTE: Vertical Position will not be available in 4:3 Standard and 16:9 Standard modes. ON-SCREEN DISPLAY 39 - Hitachi 65M200 | Owners Guide - Page 40
used to keep the Projection Monitor from being viewed Aspect Locks Setup Move SEL Sel SELECT or Please Enter Access Code [ - - - - ] [# Keys] Enter Code Locks Change Access Code Engage Lock Movie Ratings TV TV RATINGS is selected, various types of television programming based on a parental guide - Hitachi 65M200 | Owners Guide - Page 41
due to its content. MENU Locks Change Access Code Engage Lock Movie Ratings TV Ratings Canadian Ratings (Eng) Canadian Ratings (Frn) Move SEL Select SELECT or Projection Monitor will not block it. 2. Blocking "NOT RATED" programs may block emergency programming, sports, news, public service - Hitachi 65M200 | Owners Guide - Page 42
will still permit TVMALS programs. This means that the Projection Monitor will block violence in TV-14 and higher (TV-MA), but not language and sex. 2. TV program ratings are dependent on the broadcaster. If the program is not rated, the Projection Monitor will not block it. ON-SCREEN DISPLAY 42 - Hitachi 65M200 | Owners Guide - Page 43
television program in Canada (Eng) that you feel might be inappropriate in its content. MENU Locks Change Access Code Engage Lock Movie Ratings TV or sexual content. Programming generally considered acceptable for children 8 years and over to watch on their own - Violence Guidelines: Violence - Hitachi 65M200 | Owners Guide - Page 44
in its content. MENU Locks Change Access Code Engage Lock Movie Ratings TV Ratings Canadian Ratings (Eng) Canadian Ratings (Frn) Move SEL Select . Once rating is selected, for example 8 ans+, all movies and television programs rated 8 ans+ and higher will be automatically blocked. Press EXIT - Hitachi 65M200 | Owners Guide - Page 45
SETUP Setup Select SETUP when setting your Projection Monitor up for the first time. Use the CURSOR ̆ or ̄ on the remote to highlight the function desired. MENU Video Audio Aspect Locks Setup Move SEL Sel SELECT or Setup Magic Focus Tune Up Menu Preference Set The Clock Set The Inputs Set The - Hitachi 65M200 | Owners Guide - Page 46
will not work when adjustment mode is set to Manual (see page 47). Your ASPECT Projection Monitor has three color projection tubes: one for red, one for green, one Virtual HD Set Black Side Panel Set Closed Captions About Your TV Move SEL Select Setup Magic Focus Tune Up Aligns the Red, Green, - Hitachi 65M200 | Owners Guide - Page 47
Projection Monitor for at least 20 minutes before using this feature. 2. Auto Adjustment Mode is recommended. If convergence is still not acceptable, use the Manual manual adjust mode settings will be erased. Using the Remote Control, select SETUP-MAGIC FOCUS TUNE UP-MANUAL Aspect Locks TV Move SEL - Hitachi 65M200 | Owners Guide - Page 48
Up Menu Preference Set The Clock Set The Inputs Set The Color System Set Virtual HD Set Black Side Panel Set Closed Caption About Your TV Move SEL Select SELECT or Setup Menu Preferences Set The Language English Francais Español Set The Menu Background Shaded Solid Move SEL Return Setup - Hitachi 65M200 | Owners Guide - Page 49
Up Menu Preference Set The Clock Set The Inputs Set The Color System Set Virtual HD Set Black Side Panel Set Closed Caption About Your TV Move SEL Select SELECT or Setup Set The Clock Time : 03:57 PM Apr 29, 2005 Move SEL Return Setup Set The Clock Time : 03 - Hitachi 65M200 | Owners Guide - Page 50
Virtual HD Set Black Side Panel Set Closed Caption About Your TV Move SEL Select SELECT or Setup Set The Inputs Video1 Rename movie with your VCR, laserdisc player, or DVD player. When REMOTE is selected, the Projection Monitor will turn on and switch to Video2 automatically when the Video2 - Hitachi 65M200 | Owners Guide - Page 51
HDTV - High Definition Television - Use for High Vision Signal Y-PBPR from HDTV Set-Top Box. SDTV/DVD - Standard Definition Television MODE PIP and SPLIT FREEZE. NOTE: To maximize operating life of the Projection Monitor's picture tubes when watching 4:3 signal, Black Side Panel is cancelled at - Hitachi 65M200 | Owners Guide - Page 52
of a television program or home video which are displayed on the Projection Monitor screen. Your local TV program guide denotes these About Your TV The Projection Monitor model name and set dimensions will be displayed on the screen. The set dimensions of the Projection Monitor model is listed - Hitachi 65M200 | Owners Guide - Page 53
vinyl products or cellophane tape on your Projection Monitor. Do not touch the screen too often. Do not subject the remote control to shocks such as dropping it on the floor, etc. Physical damage to the precision parts may result. Avoid placing the remote control in a high humidity place or getting - Hitachi 65M200 | Owners Guide - Page 54
Problems • IGNITION NOISE: Black spots or horizontal streaks may appear, picture may flutter or drift. Usually caused by interference from automobile ignition systems, neon lamps, electrical drills, and other electrical appliances. • GHOSTS: Ghosts are caused by the television The Projection Monitor - Hitachi 65M200 | Owners Guide - Page 55
Picture rolls vertically © No color © © Poor color © ©© ASPECT Projection Monitor incorporates advanced power surge protection technology designed to protect against component or protective technology should provide for years of lasting entertainment from your ASPECT Projection Monitor. 55 - Hitachi 65M200 | Owners Guide - Page 56
Aspect Modes • Closed Caption Decoder • Picture in Picture • Magic Focus (Auto Digital Convergence and Manual panel at the back of the Projection Monitor • Video 1.0Vp-p, 75 65M200 59 7/8 1,520.7 61 1,549.0 28 3/16 716 324 147.0 NOTE: Due to improvements, specifications in this operating guide - Hitachi 65M200 | Owners Guide - Page 57
Canada, DIAL TOLL FREE 7 days a week, 24 hours a day ASPECT Brand Electronics ASPECT has made every effort to assure you hours of trouble free operation from your unit. However, should you require service, a network of ASPECT Authorized Service Facilities has been established in all 50 states and - Hitachi 65M200 | Owners Guide - Page 58
, 4 Aspect Ratio, 23 TV Ratings (Canadian - French), 44 Loudness, 37 M Magic Focus Auto Convergence, 7, 46 Manual Convergence, 47 Menu Preference Language, 48 Background, 49 Monitor Out, 9 P Picture Mode, 33 Picture-in-Picture (PIP), 25 - 27 Picture-outside-Picture (POP), 25 INDEX R Remote - Hitachi 65M200 | Owners Guide - Page 59
NOTES 59 - Hitachi 65M200 | Owners Guide - Page 60
NOTES 60 - Hitachi 65M200 | Owners Guide - Page 61
NOTES 61 - Hitachi 65M200 | Owners Guide - Page 62
NOTES 62 - Hitachi 65M200 | Owners Guide - Page 63
NOTES 63 - Hitachi 65M200 | Owners Guide - Page 64
QR64461
-
 1
1 -
 2
2 -
 3
3 -
 4
4 -
 5
5 -
 6
6 -
 7
7 -
8
-
9
-
10
-
11
-
12
-
13
-
14
-
15
-
16
-
17
-
18
-
19
-
20
-
21
-
22
-
23
-
24
-
25
-
26
-
27
-
28
-
29
-
30
-
31
-
32
-
33
-
34
-
35
-
36
-
37
-
38
-
39
-
40
-
41
-
42
-
43
-
44
-
45
-
46
-
47
-
48
-
49
-
50
-
51
-
52
-
53
-
54
-
55
-
56
-
57
-
58
-
59
-
60
-
61
-
62
-
63
-
64
 |
 |

PROJECTION MONITOR
Operating Guide for
51M200, 65M200, 51M200A
IMPORTANT SAFETY INSTRUCTIONS
................................................................................
2-3
FIRST TIME USE
..................................................................................................................
4-19
THE REMOTE CONTROL
..................................................................................................
20-30
ON-SCREEN DISPLAY
........................................................................................................
31-52
CARE OF YOUR ASPECT PROJECTION MONITOR AND REMOTE CONTROL
..................
53
USEFUL INFORMATION
....................................................................................................
54-57
INDEX
........................................................................................................................................
58