Hitachi L42V651 Owners Guide
Hitachi L42V651 - 42" LCD TV Manual
 |
View all Hitachi L42V651 manuals
Add to My Manuals
Save this manual to your list of manuals |
Hitachi L42V651 manual content summary:
- Hitachi L42V651 | Owners Guide - Page 1
LCD Flat Panel TELEVISION Operating Guide for L47V651 & L42V651 IMPORTANT SAFETY INSTRUCTIONS 2-3 FIRST TIME USE ...4-21 THE REMOTE CONTROL...22-37 ON-SCREEN DISPLAY ...38-61 USEFUL INFORMATION...62-68 OPERATING GUIDE IN SPANISH 69-136 END USER LICENSE AGREEMENT FOR HITACHI DTV SOFTWARE 137-145 - Hitachi L42V651 | Owners Guide - Page 2
Hitachi. This will enable Hitachi to notify you promptly in the improbable event that a safety problem servicing to qualified service personnel. Follow all warnings and instructions marked on this LCD Flat Panel television. Servicing SERVICEABLE PARTS INSIDE. REFER SERVICING TO QUALIFIED SERVICE - Hitachi L42V651 | Owners Guide - Page 3
high voltages and other hazards. If the television does not operate properly, unplug the LCD television and call your authorized dealer or service center. Caution Adjust only those controls that are covered in the instructions, as improper changes or modifications not expressly approved by Hitachi - Hitachi L42V651 | Owners Guide - Page 4
, please access our web site at: www.hitachi.ca/tv CAUTION: 1. Ceiling mounting is not recommended. Mounting the panel on the ceiling does not provide adequate ventilation for the electronics or proper support for the front glass panel. This LCD television product is designed for a maximum tilting - Hitachi L42V651 | Owners Guide - Page 5
47" 12.5 cm B 12 in. 30 cm (a) Power Swivel NOT USED (b) Power Swivel USED * Please adjust the wire length to avoid touching the wall when turning the TV. NOTES: 1. Do not block the ventilation holes of the LCD to any danger of hitting themselves (for example their , then support the bottom - Hitachi L42V651 | Owners Guide - Page 6
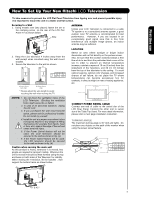
How to set up your new Hitachi LCD Television AC CORD AND POWER SWIVEL CABLE INSTALLATION INSTRUCTION The AC cord and power swivel cable provided with your new LCD Flat Panel Television need to be installed correctly to avoid their disconnection when rotating the TV on its Table top stand. Located - Hitachi L42V651 | Owners Guide - Page 7
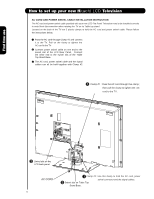
dimensions of the WALL MOUNT assembly please refer to page 66. STAND METAL 5 SCREWS TV STAND BASE For Model L47V651 & L42V651 CAUTION- This LCD Flat Panel for use only with Hitachi WM07S Wall Mount. Use with other Wall Mount is capable of resulting in instability causing possible injury. NOTE - Hitachi L42V651 | Owners Guide - Page 8
to set up your new HITACHI LCD Television VIEWING The best picture is seen by sitting directly in front of the TV and about 10 to 18 optional antenna cable mixer to the TV antenna terminal, and connect the cables to the antenna mixer. Consult your dealer or service store for the antenna mixer. AIR - Hitachi L42V651 | Owners Guide - Page 9
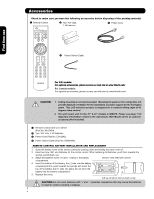
the output and input connector types required audio cables which connect to inputs and outputs located on the signals (antenna or cable TV) to the antenna jack video cable to produce a high quality picture. Optical Cable This TV's HDMI input. Stereo Cable (3.8mm plug to connect to inputs and - Hitachi L42V651 | Owners Guide - Page 10
Press it a third time to restore audio level. NUMERIC BUTTONS (TV, DVD, SAT/CBL, PVR/VCR) Used to manually enter the TV channel, and used for numeric entry when navigating through the the OSD, INPUTS. (-) BUTTON (TV,STB) The (-) button is used when the remote is in Set-Top-Box (STB) mode or when the - Hitachi L42V651 | Owners Guide - Page 11
FRONT VIEW ቢ SIDE PANEL ቦ CONTROLS ቧ ብ ባ First time use ቪቩ ቫ ቤ PHOTO INPUT ቨ ቢ SIDE POWER button Press this button to turn the LCD Television ON/OFF. It can also be turned ON/OFF by remote control. The "MAIN POWER" can only be turn OFF by unplugging the power cord from the outlet. After this - Hitachi L42V651 | Owners Guide - Page 12
NOTES: 1. Your HITACHI LCD TV will appear to be turned OFF (lights orange) if there is no video input when INPUT : 1, 2, 3, Front and HDMI 1, 2 , Front. Check the Power Light to make sure the TV is turned off or in Stand-by mode (lights red) when not in use. 2. Remote Control can not turn ON/OFF the - Hitachi L42V651 | Owners Guide - Page 13
use ባ Audio/Video Inputs 1, 2 and 3 By using the INPUTS button, the CURSOR PAD (̆ and ̄), and the SELECT button or CURSOR PAD ̈ of the remote control, you can may be used for recording, only when the input is of S-VIDEO type. ቧ HDMI 1, 2 (High Definition Multimedia Interface) ABOUT HDMI - HDMI is - Hitachi L42V651 | Owners Guide - Page 14
PANEL Note : Special device cables will be according to the own device specifications. HDMI DIGITAL OUTPUT CAPABILITY DVD , Set Top Box, Video Game Console. PHOTO INPUT DVI to HDMI Cable Back of HDTV Set-Top-Box or DIGITALOUTPUT DVD Player AUDIO OUTPUT R L Note : Special device cables will - Hitachi L42V651 | Owners Guide - Page 15
into L/Mon o input jack . Video Camera Note : Special device cables will be according to the own device specifications. NOTE:1. Completely insert LCD TV is dependent on the model and features of each component. Check the owner's manual of each component for the location of video and audio inputs - Hitachi L42V651 | Owners Guide - Page 16
OUTPUT DVI to HDMI HDMI to HDMI VCR #2 S-VIDEO V L R INPUT Optional DVD Player OUTPUT Y PB/CB PR/CR L R Optional Y PB PR L R OUTPUT OUTPUT S-VIDEO V L R ANT IN HDTV Set-Top Box VCR #1 Outside Antenna or Cable TV coaxial cable 2-Way signal splitter NOTE: Cables are optional, except - Hitachi L42V651 | Owners Guide - Page 17
guide for more information on line input-output connections. • Connect only 1 component (VCR, DVD player, camcorder, etc.) to each input jack. • COMPONENT: Y-PBPR (Input 2 & 3) connections are provided for high output to the TV's PB input and the components R-Y output to the TV's PR input. • Your - Hitachi L42V651 | Owners Guide - Page 18
. Refer to your VCR operating guide for more information on line inputoutput connections. 3. When INPUT 2 or 3 are used, it input jack of the TV . CONNECTING AN S-VIDEO AND STEREO AUDIO SOURCE TO INPUT 1 1. Connect the cable from the S-VIDEO OUT of the S-VHS VCR or the laserdisc player to the INPUT - Hitachi L42V651 | Owners Guide - Page 19
or DVI to HDMI connection cable from the output of the HDTV set top box or DVD player to the HDMI input as shown on the Rear panel below. 2. With DVI output is loose. 2. The HDMI input on HDMI 1 , 2 and FRONT contains the copy protection system called High-bandwidth Digital Content Protection (HDCP). - Hitachi L42V651 | Owners Guide - Page 20
the cable from the AUDIO OUT L of the Laserdisc/DVD player or HDTV set top box to the INPUT (AUDIO/L) jack. 6. Press the INPUTS button, then select INPUT 2 or 3 from the INPUTS menu to view the program from the Laserdisc/DVD player or HDTV set top box. 7. Select CABLE, AIR to return to the last - Hitachi L42V651 | Owners Guide - Page 21
menu to return to the previous channel. (For INPUT FRONT please see page 15 for reference). CONNECTING AN EXTERNAL AUDIO AMPLIFIER CABLE or Air signal Back of VCR VIDEOOUT AUDIOOUT OUTPUT VCR To monitor the audio level of the LCD TV to an external audio amplifier, connect the system as shown - Hitachi L42V651 | Owners Guide - Page 22
addition to controlling all the functions on your HITACHI LCD TV, the new remote control is designed to operate different types the remote. The PVR/VCR mode indicator will blink, indicating that the remote will now control your VCR/PVR (see page 34 for instructions on how to program the remote to - Hitachi L42V651 | Owners Guide - Page 23
³ POWER button Press this button to turn the TV set on or off when the remote is in TV mode. (See page 22 for instructions on how to set the remote control to TV mode). ³ · MODE Indicator · » Turns on or blinks three times to show remote control mode. ¿ » SOURCE SELECT button 19 Press this - Hitachi L42V651 | Owners Guide - Page 24
Use this aspect mode to display 16:9 sources like HDTV and DVD's preserving the original 16:9 aspect ratio showing 100% of the size. 16:9 ZOOM Use this aspect to Zoom-in once while in 16:9 aspect. The Remote Control • Antenna-Analog Channel • S-Video/Video Input (Auto Aspect: Off) • HDMI-480i/480p - Hitachi L42V651 | Owners Guide - Page 25
MMC/SD Flash memory or memory card connected to the Photo Input in the side panel of the LCD TV (see pages 26-27). AIR/CABLE Select between Air or button is only applicable when the remote control is in (CBL) and (SAT/STB) mode. Press this button to access the Channel Guide of the (CBL), and (SAT - Hitachi L42V651 | Owners Guide - Page 26
Control How to Use the Remote to Control Your TV PHOTO INPUT This feature is useful for viewing digital still pictures from your digital camera, MMC/SD memory cards using the Photo Input in the side panel of the TV. 1. Press the INPUTS button to cycle through the INPUTS selections until the PHOTO - Hitachi L42V651 | Owners Guide - Page 27
Use the Remote to Control Your TV ROTATE Rotate Slideshow Start Interval 5sec NOTES: 1. Automatic contrast reduction also applies during SLIDESHOW, then press on a main directory with a "dcim" file name format. 3. Supported image types are up to 3072 x 2304; JPEG format should conform with - Hitachi L42V651 | Owners Guide - Page 28
GREEN to WHITE. Cable 6 Volume 8 Soft Mute 8 FAV Cable 6 The Remote Control Cable 6 Mute 8 Closed Captioning will display automatically when MUTE/SOFT MUTE is on and Closed Caption is set to AUTO (see page 59). When the TV power is turned off at a volume level 31 or greater, the volume level - Hitachi L42V651 | Owners Guide - Page 29
Remote Control Picture-In-Picture (PIP) Your HITACHI LCD TV incorporates one Tuner technology designed for improved viewing enjoyment This feature allows you to view Digital Channels and Video inputs ቢ Main Picture SWAP Sub Picture PIP Specifications Table PIP Mode SPLIT Sub Picture Digital - Hitachi L42V651 | Owners Guide - Page 30
The Remote Control PHiocwturteo-UIns-ePitchteurRee(mPIoPt)e to Control Your TV ባ PAUSE button Press the PAUSE button repeatedly to toggle between FREEZE modes (Main Freeze, SPLIT and STROBE). This is convenient when trying to write down - Hitachi L42V651 | Owners Guide - Page 31
the remote at the cable box and press the POWER button. The remote will turn off TV buttons These buttons are for operating the TV : -Day/Night -Aspect -PIP -Pause -CC -Vol Up & Down -Mute -Inputs (only if programmed, refer to page 35) MY CABLE BOX CODE IS: NOTE: Refer to instruction manual - Hitachi L42V651 | Owners Guide - Page 32
-Channel Up & Down -Guide -Last CH ባ EXCLUSIVE TV buttons These buttons are for operating the TV : -Day/Night -Aspect -PIP -CC -Vol Up & Down -Pause MY Satellite RECEIVER/ SET-TOP-BOX CODE IS: -Mute -Inputs (Only if programmed, refer to page 35). NOTE: Refer to instruction manual of the Set - Hitachi L42V651 | Owners Guide - Page 33
the remote at the DVD player and press the POWER button. The remote will turn off TV Buttons These buttons are for operating the TV : -Day/Night -Aspect -PIP -Exit -CC -Inputs (Only if -Vol Up & Down programmed, refer -Mute to page 35) MY DVD PLAYER CODE IS: NOTE: Refer to instruction manual - Hitachi L42V651 | Owners Guide - Page 34
4. Aim the remote at the VCR/PVR and press the POWER button. The remote will turn off your PVR TV Buttons These buttons are for operating the TV : -Day/Night -Aspect -PIP -CC -Vol Up & Down -Mute -Inputs (only if programmed, refer to page 35) MY VCR/PVR CODE IS: NOTE: Refer to instruction manual - Hitachi L42V651 | Owners Guide - Page 35
blink 3 times to confirm proper setup. 6. The remote will now control the desired device. 7. Pressing the INPUTS button will now access the video input of the desired device. SETUP EXAMPLE (Hitachi DVD with precode 0573 connected to INPUT 1 of the TV) ᕃ Select DVD mode by using your SOURCE - Hitachi L42V651 | Owners Guide - Page 36
Remote Control Remote Control Codes Cable BRAND Codes ABC 0003,0008,0011 Americast 0899 Amino 1602 Bell South 0899 Clearmaster 0883 ClearMax 0883 Coolmax 0883 Digeo 1187 Director 0476 General Instrument.. 0476,0810,0276,0003, 0011 GoldStar 0144 Hamlin 0009,0273 Hitachi - Hitachi L42V651 | Owners Guide - Page 37
Control Codes The Remote Control DBS/PVR Codes Combo BRAND Hughes Network 1730 Go Vision 1071,1072 GoldStar 0741 GPX 0699,0769 Greenhill 0717 Harman/Kardon 0582,0702 Hitachi 0573,0664,1247,1919 Hiteker 0672 iLo 1348 Initial 0717 Insignia 1268 Integra 0627 JBL 0702 - Hitachi L42V651 | Owners Guide - Page 38
HITACHI LCD TV. 2. Use the CURSOR PAD (buttons ̆,̄,̇ and ̈) and highlight a different feature of the On-Screen Display menu. Press the SELECT button to select. 3. Press EXIT on the remote control to quickly exit from a menu. This part Enhancement Contrast Mode Noise Reduction 38 Set this to High for - Hitachi L42V651 | Owners Guide - Page 39
Inputs, VCR, DVD, etc. Feature to display dialogue/text. Select The Quick Start Option Reset The Software Select the TV Quick Start Up Option. Select to upgrade TV software and to Reset TV . TV Ratings Block various types of movies and television programming based on a parental guide ratings - Hitachi L42V651 | Owners Guide - Page 40
input will reset to initial conditions. Picture Mode Use this function to choose from automatic picture settings to optimize your TV High of color in the picture. Contrast Next/Prev 100% Change SEL Return LCD panel, this will increase or decrease the brightness of the LCD panel but not the brightness - Hitachi L42V651 | Owners Guide - Page 41
middle and high. NOTE: 1. If CONTRAST is selected, you are adjusting CONTRAST. The OFF if the TV experiences picture MODE is turned ON from the VIDEO menu, your Hitachi LCD Television will input, Auto Color will not be available (grayed out). Black Side Panel The BLACK SIDE PANEL function turns - Hitachi L42V651 | Owners Guide - Page 42
Aspect Ratio. Auto Aspect Automatically adjust the Aspect Ratio depending on the input Input 1, only Input 1 will return to factory conditions. Video Black Enhancement Contrast Mode Noise Reduction MPEG NR Auto Movie Mode Auto Color Black Side Panel Aspect Reset Video Settings Move SEL Return High - Hitachi L42V651 | Owners Guide - Page 43
Return Treble This function controls the high frequency audio to all speakers. Bass control the left to right balance of the LCD TV internal speakers. Surround Surround sound is the or ̈ to select Off, Normal or Wide. Off : turns off the surround sound effect. Normal Surround: : Provides the - Hitachi L42V651 | Owners Guide - Page 44
, Digital Output and DRC are only available when viewing digital programs. Use the functions at right if your TV is connected to an amplifier/receiver with optical digital input with Dolby® Digital or PCM decoder capabilities. NOTE: 1.- The DRC control affects only Dolby® Digital signals decoded - Hitachi L42V651 | Owners Guide - Page 45
Channel Manager Channel Manager Select CHANNEL MANAGER to set your Antenna options, run Auto Channel Scan, Check Signal Meter and Set Channel List. 1. Press CURSOR PAD ̆,̄ to highlight functions. 2. Press the SELECT button or CURSOR PAD ̈ to select. Video Audio Channel Manager Locks Timers Setup - Hitachi L42V651 | Owners Guide - Page 46
select LOCK column, input the access code. TV's digital tuner will receive available over-the-air digital television broadcasts using an antenna and other digital television broadcasts using compatible cable, satellite or other digital television system connections. Please review this Owner's Guide - Hitachi L42V651 | Owners Guide - Page 47
of the selected channel or video input. The code to enter the Locks is turned on, the picture and sound for the chosen channel will be blocked out. When FRONT PANEL LOCK is turned on 48). When TV RATINGS is selected, various types of television programming based on a parental guide ratings will be 47 - Hitachi L42V651 | Owners Guide - Page 48
only NOTE: 1. A movie rating is dependent upon the movie that is viewed. If the movie does not carry a rating, the TV will not block it. 2. Blocking NOT RATED programs may block emergency programming, sports, news, public service announcements, religious programs and weather. On-Screen Display 48 - Hitachi L42V651 | Owners Guide - Page 49
(Frn) Region 5 Move SEL Select Locks TV Ratings Sub Rating OR Status D L S V FV TV-Y TV-Y7 TV-G TV-PG TV-14 TV-MA Move SEL Return TV Parental Guide Ratings Table TV-Y All children. The themes and elements in this program are specifically designed for a very young audience, including - Hitachi L42V651 | Owners Guide - Page 50
EXIT to quit the menu or select CANADIAN RATINGS (ENG) to return to the previous menu. Locks Change Access Code Engage Lock Movie Ratings TV Ratings Canadian Ratings (Eng) Canadian Ratings (Frn) Region 5 Move SEL Select Locks Canadian Ratings (Eng) Status OR C C8+ G PG 14+ 18+ Move SEL - Hitachi L42V651 | Owners Guide - Page 51
the CURSOR PAD ̆, ̄ to select the CANADIAN RATINGS (FRN) category that you want to block. Locks Change Access Code Engage Lock Movie Ratings TV Ratings Canadian Ratings (Eng) Canadian Ratings (Frn) Region 5 Move SEL Select 2. Press SELECT to block the CANADIAN RATINGS (FRN) that you have selected - Hitachi L42V651 | Owners Guide - Page 52
press the INFO key on the R/C. See fig. (1) for reference. Once the TV has received Region 5 Ratings data, the Region 5 option in the lock menu 5 KDEF-DT Multi DTVCC CF-18 ans+ 1080i 10:35 AM CH ID/Input ID Current Time Receiving Signal Format Receiving Digital Closed Caption A uto Fig. (1) - Hitachi L42V651 | Owners Guide - Page 53
to the previous menu. NOTE: 1. When AUTOMATICALLY ADJUST CLOCK FOR DAYLIGHT SAVING CHANGES is checked ■✔, the TV will automatically calculate the clock adjustment for Daylight Saving. 2. The TV counts electrical pulses for regulating the TIMERS. When the power cord is unplugged then plugged quickly - Hitachi L42V651 | Owners Guide - Page 54
and 3:00. NOTE: The Sleep Timer info will show for 1 minute before the TV turns off. Timers Set The Clock Set Sleep Timer Set Day/Night Timer Set Event Set Day/Night Timer Select this feature to activate and set your TV's DAY/NIGHT PICTURE MODE automatically. This feature is not available until - Hitachi L42V651 | Owners Guide - Page 55
Set Event Timer This function will automatically operate the LCD TV viewing reservation of a program. If the clock display the current date ON/OFF timer . 2. The OFF TIMER will only activate if the TV was turned on by the ON TIMER, and any menu operations (includes channel selection) were not made - Hitachi L42V651 | Owners Guide - Page 56
Timers Setup Power Swivel Move SEL Select Setup Setup The Menu Options OR Set The Power Saving Set The Inputs Set The Closed Captions Select The Quick Start Option Reset The Software Move SEL Select Set The Menu Options Setup the Language and background of the Menu OSD. Set The Language - Hitachi L42V651 | Owners Guide - Page 57
modes Max, Med or Min. Automatic Power Saving Use this feature to have the TV turned OFF automatically when a video signal is not detected for about 12 seconds. 1. Set The Power Saving Set The Inputs Set The Closed Captions Select The Quick Start Option Reset The Software Move SEL Select Setup Set - Hitachi L42V651 | Owners Guide - Page 58
Closed Captions Select The Quick Start Option Reset The Software Move SEL Select NOTA: The inputs labeled Gray Out(Skip) or Hide(Skip) are disabled in the INPUTS selection. OR INPUT 3 Auto Link Use this function to automatically turn the TV on and tune to INPUT 3 when it detects a video signal to - Hitachi L42V651 | Owners Guide - Page 59
. Your local TV program guide denotes these programs as or . 1. Use the CURSOR PAD ̇, ̈, ̆ and ̄ to highlight and select the function to change. Setup Setup The Menu Options Set The Power Saving Set The Inputs Set The Closed Captions Select The Quick Start Option Reset The Software Move SEL Select - Hitachi L42V651 | Owners Guide - Page 60
The Menu Options Set The Power Saving Set The Inputs Set The Closed Captions Select The Quick Start Option Reset The Software Move SEL Select Setup Select The Quick Start Option Select ON to have the TV tune channels quickly at OR 1st turn on. Select OFF to save electricity Off On Move - Hitachi L42V651 | Owners Guide - Page 61
controls the motorized stand. It allows the customer to turn the LCD Television left or right using the remote control. This feature is only available when the Table Press the CURSOR PAD ̈ to rotate the TV to the right. 3. Press the CURSOR PAD ̇ to rotate the TV to the left. 4. Release the CURSOR PAD - Hitachi L42V651 | Owners Guide - Page 62
LCD Television. Avoid repeatedly touching the screen. Do not subject the remote control to shocks such as dropping it on the floor, etc. This may cause damage to the precision parts. Avoid placing the remote control in a high )frTcNteTSDV) TROUBLESHOOTING Your HITACHI LCD Television incorporates - Hitachi L42V651 | Owners Guide - Page 63
some cases, causes loss of contrast in the picture. • turning off all other equipment other than the television. If you find a problem receiving Radio when using the television, check the instructions mentioned above. BLOCK NOISE (DIGITAL INPUT The TV set can generate sound distortion in external - Hitachi L42V651 | Owners Guide - Page 64
digital device, pursuant to Part 15 of the FCC Rules in accordance with the instructions, may cause harmful interference reception, which can be determined by turning the equipment off and on, the user rules. Order Hitachi spares as replacement cables. Note This LCD Television receiver will - Hitachi L42V651 | Owners Guide - Page 65
prior notice. Please access www.hitachi.us/tv for detailed specifications and dimensions for custom installations. UltraVision Digital is a registered trademark of Hitachi Home Electronics (America), Inc. HDMI, the HDMI logo and High-Definition Multimedia Interface are trademarks or registered - Hitachi L42V651 | Owners Guide - Page 66
.7 42 Inch Models (Includes Table Top Stand) Weight (lbs./kg): 61.3/27.8 Useful Information Rear View, Use as Reference for Wall Mount Bracket 47" Units A B C D E F G H I J K L M N O P Q R S T Inches 11-1/16 14-1/4 45-5/16 41-5/16 23 40-15/16 23-7/16 15-3/4 13-5/8 29-3/8 31-11/16 2-5/16 5-7/16 - Hitachi L42V651 | Owners Guide - Page 67
, 24 hours a day 1-800-HITACHI (1-800-448-2244) HITACHI AMERICA, LTD. HOME ELECTRONICS DIVISION HITACHI has made every effort to assure you hours of trouble free operation from your unit. However, should you require service, a network of HITACHI Authorized Service Facilities has been established in - Hitachi L42V651 | Owners Guide - Page 68
Information When you call HITACHI SERVICE HOTLINE they will require some information related to the TV MODEL NAME and SERIAL # in order to give you the proper support. This information is located on the back of the TV and also on the RIGHT SIDE of your TV set. Please follow the next steps to find - Hitachi L42V651 | Owners Guide - Page 69
TELEVISOR de LCD Pantalla Plana Guía de funcionamiento para L47V651 y L42V651 INSTRUCCIONES IMPORTANTES DE SEGURIDAD 70-71 USO POR PRIMERA VEZ ...72-89 EL CONTROL REMOTO ...90-105 MENÚ EN PANTALLA ...106-129 INFORMACIÓN ÚTIL ...130-136 - Hitachi L42V651 | Owners Guide - Page 70
de LCD pantalla plana Hitachi. Complete su tarjeta de garantía y envíela por correo a Hitachi. Esto le permitirá a Hitachi notificarlo SERVICIO DE ALIMENTACION DE SISTEMA ELECTRODO DE PUESTA A TIERRA (NEC ART 250, PARTE H) Nota para el instalador del sistema CATV. Este recordatorio se provee para - Hitachi L42V651 | Owners Guide - Page 71
o modificaciones que no estén expresamente aprobadas por Hitachi podrían anular la garantía. Nota • No existen partes remplazables por el usuario dentro del televisor de LCD. • Los números de serie y modelo se indican en la parte Advertencia posterior y el lado derecho del televisor de - Hitachi L42V651 | Owners Guide - Page 72
, visitar nuestro sitio de internet : www.hitachi.ca/tv PRECAUCIÓN: 1. El montaje en el techo no es recomendable. Montar el panel en el techo no provee la adecuada ventilación a lo electrónico ó el apropiado soporte al panel frontal de vidrio. Este televisor de LCD está diseñado para una inclinaci - Hitachi L42V651 | Owners Guide - Page 73
LCD HITACHI Como tomar medidas para evitar que el televisor de LCD . A B A B 42" 5 in. 47" 12.5 cm 12 in. 30 cm Cable Cable TV toque la pared al girarla. NOTAS: 1. No bloquee los ranuras de ventilación del televisor de LCD SWIVEL" de la parte posterior del televisor de LCD. Conecte el otro - Hitachi L42V651 | Owners Guide - Page 74
LCD Hitachi INSTRUCCIÓN DE COMO COLOCAR EL CABLE DE AC Y EL CABLE DE LA BASE GIRATORIA El cable de AC y el cable de la base giratoria que vienen incluidos en su nuevo Televisor de LCD base giratoria al conector "SWIVEL" de la parte posterior del televisor de LCD. Conecte el otro extremo del cable al - Hitachi L42V651 | Owners Guide - Page 75
nuevo televisor de LCD Hitachi CONFIGURACIÓN PARA MONTAJE EN LA PARED PASO (1) : Localizar los soportes de metal de la BASE en la parte posterior del televisor. Para el Modelo L47V651 y L42V651 PRECAUCIÓN - Este televisor de LCD solo puede usar la base para la pared WM07S de Hitachi. Al usar otra - Hitachi L42V651 | Owners Guide - Page 76
por primera vez Cómo colocar su nuevo televisor de LCD Hitachi VISIÓN La mejor posición para ver la imagen aparecer en la pantalla. Si esto sucede, pueden ser usadas cortinas para reducir el reflejo o la TV puede cambiarse de lugar en el cuarto. Si el audio del televisor es conectado a las bocinas - Hitachi L42V651 | Owners Guide - Page 77
las entradas y salidas localizados en la parte posterior y panel de control lateral del televisor. Cable Para conectar señales de RF (antena ó cable TV) a la terminal de antena en el televisor. que conectan las entradas y salidas localizadas en la parte posterior o en el panel de control lateral del - Hitachi L42V651 | Owners Guide - Page 78
su Televisor de LCD Hitachi, el nuevo TV,DVD,SAT/CBL,PVR/VCR) Accesa el menú en pantalla (OSD menu). BOTÓN de Entradas (INPUTS) (TV) Accesa el menú de Entradas (INPUTS). BOTONES CURSOR/SELECT (TV TV está localizado en la parte inferior derecha de la pantalla. para controlar las funciones del TV - Hitachi L42V651 | Owners Guide - Page 79
LCD. También puede ser encendido aparezca en la esquina superior derecha de la imagen. ó apagado con el control remoto . La energía del TV Software (Upgrade Card) Está opción es para mejoras futuras de software. Hitachi le notificará si una actualización de software y salir INPUT/EXIT Presionar - Hitachi L42V651 | Owners Guide - Page 80
reproductores de DVD ó Videocamaras. NOTAS: 1. El Televisor de LCD HITACHI podrá aparentar estar apagado (Indicador Naranja) si no hay señal de entrada en INPUT : 1, 2, 3 ,FRONT y HDMI 1,2 y FRONT. Verificar la luz indicadora para asegurarse de que el TV está apagado ó está en modo de espera (Stand - Hitachi L42V651 | Owners Guide - Page 81
INPUT 1, pero solo una de estas entradas puede usarse a la vez. 2. La salida S-VIDEO puede usarse para grabación, solo cuando la entrada es del tipo S-VIDEO. ቧ Entradas HDMI 1, 2 (High Definition la salida por componente CB a la entrada PB del TV y la salida por componente CR a la entrada PR. 4. - Hitachi L42V651 | Owners Guide - Page 82
Equipo con Capacidad de Salida DIGITAL HDMI DVD , Set Top Box, Consola de Video Juegos. CONTROLES DEL PANEL LATERAL PHOTO INPUT Cable DVI á HDMI Parte posterior del HDTV Set-Top-Box ó Reproductor de DVD DIGITAL OUTPUT AUDIO OUTPUT R L Nota : Cables especiales de los equipos serán de acuerdo - Hitachi L42V651 | Owners Guide - Page 83
ser, DVD o Set Top Box HDTV para su televisión depende del modelo y funciones de cada componente. Revise el manual operativo de cada componente para la ubicaci un equipo externo a la terminal de ENTRADA, después presione el botón INPUTS para mostrar el Menú de ENTRADAS. Use los CURSORES (̆ y ̄) para - Hitachi L42V651 | Owners Guide - Page 84
con Capacidad de Salida Digital HDMI HDMI OUTPUT VCR #2 S-VIDEO V L R INPUT R #2 HDMI DVI a a HDMI Opcional HDMI Reproductor de DVD OUTPUT Y R OUTPUT OUTPUT S-VIDEO V L R ANT IN HDTV Set-Top Box VCR #1 Antena Externa ó TV por Cable TV (Cable coaxial) Divisor de señal 2-Vías NOTA: - Hitachi L42V651 | Owners Guide - Page 85
de la televisión. • Consulte el manual de operación de sus otros equipos electr un VCR no puede grabar su propio video o línea de salida (INPUT: 1 en el ejemplo de la página 84). Consulte la guía de la salida por componente CB a la entrada PB del TV y la salida por componente CR a la entrada PR - Hitachi L42V651 | Owners Guide - Page 86
de audio izquierda(AUDIO/L). 4. Presione el botón INPUTS, entonces seleccione la ENTRADA 1~ FRONTAL del Menú canal sintonizado. Cable ó Señal Aérea Parte posterior de la VCR Video OUTPUT VCR NOTA: Reproductor de Laserdisc a la entrada S-VIDEO de la TV, como se muestra en el Panel Posterior . - Hitachi L42V651 | Owners Guide - Page 87
Set Top Box HDTV o DVD a la entrada izquierda(AUDIO IN/L) tal como se muestra en la parte de abajo. 4. Presione el botón INPUTS, entonces seleccione HDMI y HDMIFRONTAL contienen el sistema de protección contra copiado llamado High-bandwidth Digital Content Protection(HDCP). El HDCP es un sistema - Hitachi L42V651 | Owners Guide - Page 88
INPUTS, entonces seleccione la ENTRADA 2 ó 3 del Menú de Entradas para para ver el programa del Set Top Box HDTV o el Reproductor de DVD/Laserdisc. 7. Seleccione CABLE ó AÉREA en el Menú de Entradas para regresar al último canal sintonizado. CABLE ó Señal Aérea Reproductor de DVD Parte posterior - Hitachi L42V651 | Owners Guide - Page 89
la entrada (MONO)/AUDIO IN L) de su TV . 3. Presione el botón INPUTS, entonces seleccione la ENTRADA 1,2,3 ó Frontal del Men controlar el nivel de audio del TV de LCD con un amplificador externo de audio, Posterior a la entrada VIDEO del VCR. Parte posterior del VCR VIDEOOUT AUDIOOUT OUTPUT VCR - Hitachi L42V651 | Owners Guide - Page 90
El Control Remoto El Control Remoto Además de controlar todas las funciones de su TV Plasma HITACHI, el nuevo control remoto está diseñado para operar diferentes tipos de VCRs, receptores de cable, receptores satelitales, reproductores DVD, y otros equipos de audio/video - Hitachi L42V651 | Owners Guide - Page 91
cuando el remoto este en modo TV. (Ver página 90 para las instrucciones de como programar el control remoto en modo TV). ³ · Indicadores de MODO · modos de Día para ver durante el día con mayor brillo y contraste para competir con la luz interior del cuarto. Seleccione Noche para ver durante - Hitachi L42V651 | Owners Guide - Page 92
Como Utilizar el Control Remoto de su TV ² Botón de ASPECTO (ASPECT) Presione este botón para cambiar 95% del tamaño. 16:9 ESTÁNDAR 2 Use este modo de aspecto para desplegar fuentes 16:9 como HDTV y DVD's conservando la relación de aspecto original 16:9 mostrando el 100% del tamaño. 16:9 ZOOM Use - Hitachi L42V651 | Owners Guide - Page 93
¾ Botón de entradas (INPUTS) Cuando el control remoto está en el modo TV, presione este botón para accesar en la entrada de Fotos lateral de la TV LCD (ver págs. 94-95). AEREA/CABLE para desactivar los Subtítulos. Ƹ Botón de GUIA (GUIDE) Presione este botón para accesar la Guía de Canales del - Hitachi L42V651 | Owners Guide - Page 94
Como Utilizar el Control Remoto de su TV FOTOS Esta función es útil para ver imágenes digitales fijas de su unidad SD o tarjeta de memoria SD usando la entrada de Fotos en el panel lateral de su televisor. 1. Presione el botón de ENTRADAS (INPUTS) para navegar através de las diferentes ENTRADAS - Hitachi L42V651 | Owners Guide - Page 95
El Control Remoto Como Utilizar el Control Remoto de su TV ROTAR Seleccione esta opción del menú para rotar las fotos en NOTAS: 1. Durante la PRESENTACIÓN también funciona la Reducción Automática de contraste, para continuar presione luego cualquier botón 2. Los nombres modificados de los archivos - Hitachi L42V651 | Owners Guide - Page 96
el número "0" para canales del 1 al 9, o simplemente presione el único dígito del canal que se desea sintonizar y presione el botón ENTER para que la TV lo sintonice. Para Canales Digitales, use los botones del SELECTOR DE CANALES con el botón del GUIÓN (-). La selección de canales también puede ser - Hitachi L42V651 | Owners Guide - Page 97
Su televisor Plasma HITACHI tiene incorporada una en el modo PIP, favor de ver la tabla en la parte de abajo. Para seleccionar entre la imagen principal y la sub de un programa al mismo tiempo. Usted puede ver un programa de TV mientras ve otros programas de cualquiera de las entradas de video. Use - Hitachi L42V651 | Owners Guide - Page 98
El Control Remoto l Picture-In-Picture (PIP) ባ Botón de PAUSA (PAUSE) Presione el botón PAUSE repetidamente para cambiar entre modos de congelamiento (FREEZE) (Freeze principal, modo dividido y modo por pasos). Esta función es conveniente cuando se desea escribir la dirección de una compañía - Hitachi L42V651 | Owners Guide - Page 99
de cable programado : -Power -Menu -Exit -Guide -Cursor/Select -Info -Selector de Canales -Last CH -Números -Enter ባ Botones EXCLUSIVOS DE TV Estos botones son para operar solamente el TV : -Day/Night -Aspect -PIP -Pausa -CC -Volumen -Mute -Inputs (Solo si es programado, ver pág. 103) EL - Hitachi L42V651 | Owners Guide - Page 100
al STB/Receptor Satelital programado: -Power -Menu -Exit -Guide -Cursor/Select -Info -Selector de Canales -Last CH -Números, Guión -Enter ባ Botones EXCLUSIVOS DE TV Estos botones son para operar solamente el TV : -Day/Night -CC -Inputs (Solo si es pro- -Aspect -Volumen gramado, ver - Hitachi L42V651 | Owners Guide - Page 101
-Menu -Reproducir, Detener, -Info -Cursor/Select Pausa, RWD, FWD, Skip RWD, Skip FWD. ባ Botones EXCLUSIVOS DE TV Estos botones son para operar solamente el TV: -Day/Night -CC -Inputs (Solo si -Aspect -Volumen es programado, -PIP -Mute ver pág.103) -Exit EL CÓDIGO DE MI REPRODUCTOR DE - Hitachi L42V651 | Owners Guide - Page 102
meros -Last CH -RWD -Enter -Guión (-) -Reproducir, Pausa, Detener -FWD, Skip FWD Botones EXCLUSIVOS DE TV Estos botones son para operar solamente el TV : -Day/Night -Aspect -PIP -CC -Volumen -Mute -Inputs (solo si es programada, ver pág. 103) EL CÓDIGO DE MI VCR/PVR ES: NOTA: Consulte la gu - Hitachi L42V651 | Owners Guide - Page 103
ón SOURCE SELECT para accesar una entrada específica de la TV. La configuración para esta función solamente es aplicable al INPUTS, se accessará a la entrada de video del dispositivo deseado. EJEMPLO DE CONFIGURACIÓN (DVD Hitachi con código de lista 0573 conectado a la entrada 1 de la TV - Hitachi L42V651 | Owners Guide - Page 104
GE 0566 General Instrument ........0869 GOI 0775,1775 Goodmans 1246 Hisense 1535 Hitachi 0819,1250 HTS 0775,1775 Hughes Network System 1142,0749,1749,1442 0041,0061,0106,0175 Alienware 1972 America Action 0278 American High 0035 Asha 0240 Audiovox 0037,0278 Beaumark 0240 Bell & - Hitachi L42V651 | Owners Guide - Page 105
,0869,1044,1075, 1099,1144,1158,1304, 1730 Go Vision 1071,1072 GoldStar 0741 GPX 0699,0769 Greenhill 0717 Harman/Kardon 0582,0702 Hitachi 0573,0664,1247,1919 Hiteker 0672 iLo 1348 Initial 0717 Insignia 1268 Integra 0627 JBL 0702 Jensen 1016 JSI 1423 JVC 0558,0623,0867 - Hitachi L42V651 | Owners Guide - Page 106
desplegar las diferentes funciones de su TV LCD HITACHI. 2. Utilice los CURSORES (botones Pantalla Mover SEL Elegir Esta parte del menú en pantalla LCD HITACHI. Video Modo de Imagen Contraste Brillantez Seleccione uno de los tres modos; Día (Dinámico), Día (Normal) y Noche. Ajusta el contraste - Hitachi L42V651 | Owners Guide - Page 107
clasificación de las imágenes. Clasificación de TV Bloqueé varios tipos de películas y programas de TV basados en la clasificación de programas. Clasificaci del televisor. Seleccione para ver/actualizar la versión de software y restablecer la configuración del televisor. Girar Pantalla Activado - Hitachi L42V651 | Owners Guide - Page 108
una de las opciones automáticas Video Aérea de la imagen para optimizar el desempeño de su TV. 1. Utilice los botones del CURSOR ̇ o ̈ para resaltar Modo de Imagen Día (Dinámico) ó Contraste Brillantez 100% 50% y seleccionar las opciones del MODO DE IMAGEN Día-Normal, Día-Dinámico o Noche - Hitachi L42V651 | Owners Guide - Page 109
alto. NOTA: 1. Si se elige CONTRASTE, usted ajustará el CONTRASTE de la imagen. Las demás Configure la función MPEG NR a OFF si la TV experimenta bloqueo de la imagen. Modo Automático de activado del Menú de VIDEO, su televisión de LCD HITACHI activará la circuitería para esta función especial para - Hitachi L42V651 | Owners Guide - Page 110
Vertical regresa automáticamente a "0" cuando se apaga y se enciende la TV. Restaurar Video Esta función le permite restaurar las opciones del menú de ̄ para resaltar las funciones deseadas. Realzar Nivel de Negro Modo de Contraste Reducción de Ruido Alto Off Bajo 2. Presione el botón SELECT o - Hitachi L42V651 | Owners Guide - Page 111
Audio Video Audio Organizar Canales Seleccione el menú AUDIO para ajustar la TV a su preferencia y mejorar la calidad del sonido. Censuras Horarios izquierdo a derecho de las bocinas internas de la televisión de LCD HITACHI. Surround El sonido Surround es el concepto de expandir la percepción - Hitachi L42V651 | Owners Guide - Page 112
utilizan solo las bocinas internas. Seleccione esta opción cuando se configuran las bocinas externas de un sistema estéreo separado. Las bocinas de la TV trabajaran como la bocina central. Seleccione esta opción si usted prefiere usar solo bocinas de un sistema estéreo separado. Auto Cancelar Ruido - Hitachi L42V651 | Owners Guide - Page 113
Organizar Canales Organizar Canales Seleccione ORGANIZAR CANALES para configurar las opciones de la antena, correr la autoprogramación de canales, verificar el medidor de señal y configurar la lista de canales. 1. Presione los CURSORES ̆, ̄ para resaltar la función en el menú. 2. Presione el botón - Hitachi L42V651 | Owners Guide - Page 114
és del 17 de Febrero del 2009. De acuerdo a esto, el sintonizador analógico de su TV no será capaz de recibir ninguna transmisión analógica aérea cuando estos canales analógicos no est con respecto a estas conexiones, por favor revise este manual de operaciones de usuario. Menú en Pantalla 114 - Hitachi L42V651 | Owners Guide - Page 115
ÓN PARA CANADÁ para bloquear varios tipos de películas y programas de TV basados en los dos sistemas de clasificación usados en Canadá que usted REGIÓN 5 para bloquear varios tipos de películas y programas de TV basados en sistemas de clasificación usados en U.S.A. que usted crea sean inapropiados - Hitachi L42V651 | Owners Guide - Page 116
Desea Cambiar Clave? Activar Bloqueo Clasificación de Cine Clasificación de TV Clasificación para Canadá (Inglés) Clasificación para Canadá (Franc se esté viendo. Si la película no contiene una clasificación la TV no la bloqueará. 2. El bloquear programas SIN CLASIFICACIÓN puede bloquear programación - Hitachi L42V651 | Owners Guide - Page 117
para Canadá (Francés) Región 5 Mover SEL Elegir Censuras Clasificación de TV Subclasificación ó Estado D L S V FV TV-Y TV-Y7 TV-G TV-PG TV-14 TV-MA Mover SEL Regresar Tabla de Clasificación de Programas de TV TV-Y Para niños. Los temas y elementos en este programa son especificamente - Hitachi L42V651 | Owners Guide - Page 118
elegido. Una vez seleccionada, por ejemplo C8+, todas las películas y programas de TV clasificados C8+ o mayor (G, PG, 14+ y 18+) serán bloqueados automáticamente no ser apta para niños menores. Los padres pueden considerar parte del contenido inapropriado para ser visto sin supervisión por niños - Hitachi L42V651 | Owners Guide - Page 119
CLASIFICACIÓN PARA CANADÁ (Francés) que usted ha elegido. Una vez seleccionada, por ejemplo 8 ANS+, todas las películas y programas de TV clasificados 8 ANS+ o mayor serán bloqueados automáticamente. 3. Presione EXIT para salir del menú o seleccione CLASIFICACIÓN PARA CANADÁ (Francés) para regresar - Hitachi L42V651 | Owners Guide - Page 120
tecla INFO en el control remoto. Como referencia vea la fig.1. Una vez que la TV ha recibido los datos de la Región 5, la opción REGIÓN 5 en el men ¿Desea Cambiar Clave? Activar Bloqueo Clasificación de Cine Clasificación de TV Clasificación para Canadá (Inglés) Clasificación para Canadá (Francés) - Hitachi L42V651 | Owners Guide - Page 121
. NOTA: 1. Cuando se selecciona Automáticamente ajusta el reloj por el cambio de horario de verano, la TV calculará automáticamente el ajuste del reloj para el horario de verano. 2. La TV hace un conteo de pulsos eléctricos para regular los HORARIOS. Cuando el cable de alimentación sea desconectado - Hitachi L42V651 | Owners Guide - Page 122
25 AM PST 0:00 Sin Configurar Sin Configurar Programar Modo Día/Noche Seleccione esta función para activar y configurar el MODO DE IMAGEN DIA/NOCHE de su TV automáticamente. Esta función no está disponible hasta que se fije el reloj. 1. Use los CURSORES para resaltar las opciones del menú PROGRAMAR - Hitachi L42V651 | Owners Guide - Page 123
automáticamente operará las reservaciones de programas de su televisor LCD. Si el reloj no ha sido configurado, usted no podr de autoapagado de la fecha actual. 2. El Tiempo de apagado solo se activará si la TV fue encendida por el TIEMPO DE ENCENDIDO y no se realizó alguna operación del menú despu - Hitachi L42V651 | Owners Guide - Page 124
Configurar Configurar Seleccione CONFIGURAR cuando configure su TV por primera vez. 1. Use los CURSORES ̆, ̄, ̇ o ̈ para seleccionar el submenú de su elección. 2. Presione el botón SELECT para elegir. Video Audio Organizar Canales Censuras Horarios - Hitachi L42V651 | Owners Guide - Page 125
Configurar Elegir Fondo de Menú Esta función le permite elegir uno de dos tipos de fondos. 1. Use los CURSORES ̆ o ̄ para resaltar ELEGIR FONDO DE MENÚ. Use los CURSORES ̇ o ̈ para seleccionar Sombreado o Sólido. 2. Seleccione SÓLIDO para un fondo negro (ninguna imagen puede ser vista detrás del men - Hitachi L42V651 | Owners Guide - Page 126
OFF para desactivar esta función. 2. Presione EXIT para salir del menú o seleccione CONFIGURAR ENTRADAS para regresar al menú anterior. NOTA: 1. Una vez que la TV ha sido encendida usando AUTO LINK , esta función debe ser reiniciada antes de usar AUTO LINK otra vez. Para hacer esto, apague su VCR - Hitachi L42V651 | Owners Guide - Page 127
diferente a la de los Subtítulos Análogos. 4. La disponibilidad y el contenido de los Subtítulos Análogos y Digitales depende de la emisora de TV. Los Subtítulos Análogos estan diponibles cuando el icono es mostrado en pantalla. 5. El Lenguaje de los Subtítulos Digitales no estará disponible (letras - Hitachi L42V651 | Owners Guide - Page 128
y el sencillo procedimiento de actualización. Esta función permite al software de la TV ser actualizado usando una tarjeta de memoria MMC/SD. Si una actualización de software es requerida, HITACHI le notificará y proveerá una tarjeta de memoria. Como requisito para recibir una notificación escrita - Hitachi L42V651 | Owners Guide - Page 129
Pantalla. Antes de utilizar la base giratoria automática, favor de asegurarse que la trayectoria de la pantalla está libre de dedos, manos y cualquier otras partes del cuerpo para prevenir cualquier daño o lesión. Menú en Pantalla 129 - Hitachi L42V651 | Owners Guide - Page 130
el control remoto a golpes tales como dejarlo caer en el piso, etc. Esto puede resultar en daños en partes de precisión. Evite colocar el control remoto en lugares de alta humedad o dejar que se moje. No lo deje ón de Problemas Su Televisión de LCD HITACHI incorpora avanzada tecnología de protección - Hitachi L42V651 | Owners Guide - Page 131
ubicado en el límite de cobertura de una estación de TV donde la señal es débil, su imagen puede estar diagonales, y en algunos casos, causa pérdida de contraste en la imagen. • PREVENCIÓN DE OBSTACULOS PARA RECEPTORES Imagen cuadriculada puede aparecer en una parte o en toda la pantalla. Usualmente - Hitachi L42V651 | Owners Guide - Page 132
se incluya con el equipo debe ser reemplazado con cables idénticos para asegurar el cumplimiento de las Normas de la FCC. Ordene repuestos Hitachi para reemplazar sus cables. Nota Este receptor de televisión despliega subtítulos( ó ), en acuerdo con los párrafos 15.119 y 15.122 de las normas - Hitachi L42V651 | Owners Guide - Page 133
a www.hitachi.us/tv para especificaciones y dimensiones detalladas que le puedan servir para su instalación. UltraVision Digital es una marca registrada de Hitachi Home Electronics (America), Inc. • Video por Componentes Luminancia (Y 1.0Vp-p, 75 Ohm HDMI, el logo HDMI logo y High-Definition - Hitachi L42V651 | Owners Guide - Page 134
Base) Peso (lbs./kg): 61.3/27.8 Centro de la Pantalla Información Útil Vista Posterior, úsese como referencia para la instalación en muro. 47" Unidades A B C D E F G H I J K L M N O P Q R S T Pulgadas 11-1/16 14-1/4 45-5/16 41-5/16 23 40-15/16 23-7/16 15-3/4 13-5/8 29-3/8 31-11/16 2-5/16 - Hitachi L42V651 | Owners Guide - Page 135
Sábado (EST 9:00am - 5:00pm Pour de plus amples renseignements sur le service durant la période couverte par la garantie, sur le fonctionnement ou pour de l'assistance technique communiquez avec: Au Canada: 1-800-HITACHI (1-800-448-2244) Lundi - Vendredi L'EST 9:00am - 7:00pm Samedi L'EST 9:00am - Hitachi L42V651 | Owners Guide - Page 136
Información de Servicio Al llamar a la línea de HITACHI SERVICE HOTLINE le preguntarán cierta información relacionada con el MODELO del Televisor y el número de SERIE para poder darle el soporte adecuado. Esta información se localiza en la parte POSTERIOR y al lado DERECHO del Televisor. Favor de - Hitachi L42V651 | Owners Guide - Page 137
. HITACHI is licensing the Software for use within North America only. You agree that you will not export or re-export the Software. You specifically agree not to export or reexport the Software: (i) to any country to which the U.S. has embargoed or restricted the export of goods or services - Hitachi L42V651 | Owners Guide - Page 138
Version 2.1 as defined by the Free Software Foundation, Inc. The operating system software incorporated in this Hitachi TV is shown in the table below and the applicable license(s) are detailed on the following pages of this Owner's Guide. Software Module Linux Kernel busybox dhcpcd ifupdow net - Hitachi L42V651 | Owners Guide - Page 139
software are designed to take away your freedom to share and change it. By contrast software, we are referring to freedom, not price. Our General Public Licenses are designed to make sure that you have the freedom to distribute copies of free software (and charge for this service sections as part of a - Hitachi L42V651 | Owners Guide - Page 140
differ in detail to address new problems or concerns. Each version is given Software Foundation. 10. If you wish to incorporate parts software which is copyrighted by the Free Software Foundation, write to the Free Software Foundation; we sometimes make exceptions for this. Our decision will be guided - Hitachi L42V651 | Owners Guide - Page 141
Software TO, THE IMPLIED WARRANTIES OF MERCHANTABILITY AND FITNESS FOR A PARTICULAR PURPOSE. THE ENTIRE RISK AS TO THE QUALITY AND PERFORMANCE OF THE PROGRAM IS WITH YOU. SHOULD THE PROGRAM PROVE DEFECTIVE, YOU ASSUME THE COST OF ALL NECESSARY SERVICING show the appropriate parts of the General - Hitachi L42V651 | Owners Guide - Page 142
software, we are referring to freedom of use, not price. Our General Public Licenses are designed to make sure that you have the freedom to distribute copies of free software (and charge for this service not be affected by problems that might be introduced by others. Finally, software patents pose a - Hitachi L42V651 | Owners Guide - Page 143
it contains, plus any associated interface definition files, plus the scripts used these conditions: a)The modified work must itself be a software library b) You must cause the files modified to copy. This option is useful when you wish to copy part of the code of the Library into a program that - Hitachi L42V651 | Owners Guide - Page 144
recompile the application to use the modified definitions.) b) Use a suitable shared library notice with the combined library of the fact that part of it is a work based on the Library, decide if he or she is willing to distribute software through any other system and a license cannot impose - Hitachi L42V651 | Owners Guide - Page 145
new problems or Software Foundation. 14. If you wish to incorporate parts software which is copyrighted by the Free Software Foundation, write to the Free Software Foundation; we sometimes make exceptions for this. Our decision will be guided NECESSARY SERVICING, (a library for tweaking knobs) written - Hitachi L42V651 | Owners Guide - Page 146
Appendixes Appendix A: Picture Format for Each Input Source Aspect Specifications ANT Analog ANT Digital Input 1 Input 2 Input 3 Input Front Input Signal Video NTSC Auto Aspect 웎 Aspect Video ID 4x3 Aspect 16:9 Standard 1 Yes 16:9 Standard 2 웎 YC BC R 480p 웎 16x9 Yes 웎 480i 웎 4x3 웎 - Hitachi L42V651 | Owners Guide - Page 147
Appendixes Appendix A: Picture Format for Each Input Source Aspect Specifications (Continuation) Input S ignal Auto As pect As pect V ideo ID HDMI 1 (Input1 -DVI) HDMI (DVI) 1080p/ 1080i/720p 480p 480i 웎 Auto ON HDMI 2 (Input2 -DVI) HDMI (DVI) - Hitachi L42V651 | Owners Guide - Page 148
11, 13, 14, 19 I Input Setup 25, 58 T Timers 53-55 Tint 40 Treble 43 Troubleshooting 62 V Video Settings 40-42 L Language Menu Language 56 Lip Sync 44 Locks Change Access Code 47 Channel Lock 47 Front Panel Lock 47 Movie Ratings 48 TV Ratings 49 TV Ratings (Canadian - English 50 148 - Hitachi L42V651 | Owners Guide - Page 149
Notes - Hitachi L42V651 | Owners Guide - Page 150
Notes
-
 1
1 -
 2
2 -
 3
3 -
 4
4 -
 5
5 -
 6
6 -
 7
7 -
8
-
9
-
10
-
11
-
12
-
13
-
14
-
15
-
16
-
17
-
18
-
19
-
20
-
21
-
22
-
23
-
24
-
25
-
26
-
27
-
28
-
29
-
30
-
31
-
32
-
33
-
34
-
35
-
36
-
37
-
38
-
39
-
40
-
41
-
42
-
43
-
44
-
45
-
46
-
47
-
48
-
49
-
50
-
51
-
52
-
53
-
54
-
55
-
56
-
57
-
58
-
59
-
60
-
61
-
62
-
63
-
64
-
65
-
66
-
67
-
68
-
69
-
70
-
71
-
72
-
73
-
74
-
75
-
76
-
77
-
78
-
79
-
80
-
81
-
82
-
83
-
84
-
85
-
86
-
87
-
88
-
89
-
90
-
91
-
92
-
93
-
94
-
95
-
96
-
97
-
98
-
99
-
100
-
101
-
102
-
103
-
104
-
105
-
106
-
107
-
108
-
109
-
110
-
111
-
112
-
113
-
114
-
115
-
116
-
117
-
118
-
119
-
120
-
121
-
122
-
123
-
124
-
125
-
126
-
127
-
128
-
129
-
130
-
131
-
132
-
133
-
134
-
135
-
136
-
137
-
138
-
139
-
140
-
141
-
142
-
143
-
144
-
145
-
146
-
147
-
148
-
149
-
150
 |
 |

LCD Flat Panel TELEVISION
Operating Guide for L47V651 & L42V651
IMPORTANT SAFETY INSTRUCTIONS
.......................................................................................
2-3
FIRST TIME USE
.........................................................................................................................
4-21
THE REMOTE CONTROL
.........................................................................................................
22-3
7
ON-SCREEN DISPLAY
............................................................................................................
3
8
-
61
USEFUL INFORMATION
..........................................................................................................
62
-6
8
END USER LICENSE AGREEMENT FOR HITACHI DTV SOFTWARE
................................
1
37
-1
45
APPENDIXES
..........................................................................................................................
1
46
-1
47
INDEX
............................................................................................................................................
14
8
OPERATING GUIDE IN SPANISH
.........................................................................................
6
9
-1
36