Hoover H3000 Manual
Hoover H3000 Manual
 |
UPC - 895916001179
View all Hoover H3000 manuals
Add to My Manuals
Save this manual to your list of manuals |
Hoover H3000 manual content summary:
- Hoover H3000 | Manual - Page 1
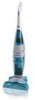
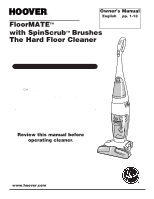
FloorMATE™ Owner's Manual English § pp. 1-13 Español § pàg. 15-22 Français § p. 24-31 with SpinScrub™ Brushes The Hard Floor Cleaner Thank you for selecting a HOOVER product. This cleaner inspected and packaged carefully before being shipped from the factory. If you should happen to need - Hoover H3000 | Manual - Page 2
sequence 9 To clean floor 9 Cleaning sealed wood floors ..10 Picking up spills 10 If You Have a Problem 12 Service 12 Important Safeguards 2 Maintenance 10-11 Cleaning the brushes .........10-11 Cleaning the nozzle 11 Warranty 13 © 2001 The Hoover Company www.hoover.com 2 Important - Hoover H3000 | Manual - Page 3
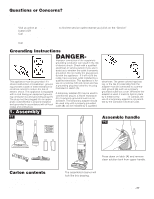
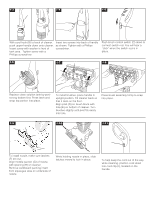
by the Canadian Electrical Code. 1. Assembly 1-1 Assemble handle 1-2 A C A B F D E Carton contents A. Hard floor cleaner B. Upper handle C. Screw packet (3 screws-1 with washer) D. Brush block E. Nozzle F. Floor cleaning concentrates Assemble Handle Press down on latch (A) and remove - Hoover H3000 | Manual - Page 4
D Replace clean solution tank by positioning bottom first. Press latch and snap top portion into place. To install brushes, place handle in upright position. Tilt cleaner back so that it rests on the floor. Align post (D) on brush block with hole (E) on bottom of cleaner. Turn brushes slightly - Hoover H3000 | Manual - Page 5
release buttons: Release nozzle for easy clean-up. 14. Brush release buttons: Remove brushes for easy clean-up. 15. Nozzle 16. Squeegee 17. Handle release pedal 18. Cord hooks: Top hook rotates for quick cord release. 19. Carrying handle 20. Soft-tread wheels This cleaner is intended for household - Hoover H3000 | Manual - Page 6
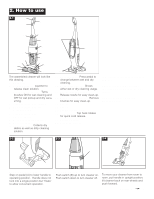
2-6 Your HOOVER FloorMate™ Cleaner can be used to both vacuum dry debris and wet clean non-carpeted floor surfaces such as vinyl, tile and sealed wood. It is not intended for use on carpet or rugs. HANDLE RELEASE DRY PICKUP WET PICKUP SCRUB D PUSH TO SELECT DRY OR WET F E The cleaner may also - Hoover H3000 | Manual - Page 7
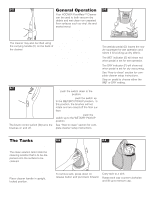
FloorMate' hard floor cleaner. For best results, use Machine Formula LYSOL® Floor Cleaning Concentrate when cleaning floor side against ledge (K) as shown. 2-14 Replace cap. Rotate cap clockwise until it locks in activates, the cleaner will not pick up debris and the sound of the motor will change. - Hoover H3000 | Manual - Page 8
Remove recovery tank and lid (Fig. 216 & 2-17). Remove filter lid (S), then remove filter. Remove loose debris from filter by either brushing or tapping the filter. The filter may also be rinsed for additional cleaning. Allow filter to air dry between uses. Replace filter lid. Press down firmly to - Hoover H3000 | Manual - Page 9
clean Recommended Cleaning Sequence Use your HOOVER 'FloorMate' Cleaner to: 1. Dry Vacuum to remove loose dirt, hair and debris. 2. Wet Clean the floor surface. The brushes will provide light agitation to help loosen dirt. 3. Wet Pickup reduces drying time of the floor surface. Follow the chart to - Hoover H3000 | Manual - Page 10
HOOVER 'FloorMate' Cleaner may be used to clean wood floors that have been sealed with a polyurethane coating and can be cleaned with water. CAUTION: To prevent damage to wood floors, follow the flooring manufacturer's cleaning recommendations. If using cleaner on sealed wood floors, inspect floor - Hoover H3000 | Manual - Page 11
. Allow to air dry. • Allow filter in recovery tank lid to dry. • Set the cleaner for "Dry Vacuuming" (pedal to "DRY" and Wet Control switch up). • Make sure that nothing is pressing on the nozzle squeegee. • Do not store cleaner on a wood surface unless cleaner is completely dry. Continued 11 - Hoover H3000 | Manual - Page 12
filter and filter lid are properly installed (Fig. 2-22). Problem: Cleaner pushes a line of dry debris in front of it Possible cause Possible solution • Cleaner not set for dry operation • Press wet/dry pedal to "DRY PICKUP" position. • Debris is too large to clear squeegee • Tip nozzle off floor - Hoover H3000 | Manual - Page 13
(Domestic Use) Your HOOVER® appliance is warranted in normal household use, in accordance with the Owner's Manual against original defects in material and workmanship for a period of one full year from date of purchase. This warranty provides, at no cost to you, all labor and parts to place this - Hoover H3000 | Manual - Page 14
14
-
 1
1 -
 2
2 -
 3
3 -
 4
4 -
 5
5 -
 6
6 -
 7
7 -
8
-
9
-
10
-
11
-
12
-
13
-
14
 |
 |
Review this manual before
operating cleaner
.
This cleaner inspected and packaged carefully before being shipped
from the factory.
If you should happen to need assistance during
assembly or operation:
Visit us online at
www.hoover.com
to find the service
outlet nearest you (click on the “Service” button) or
Call
1-800-944-9200
for an automated referral of authorized
service outlet locations (U.S. only) or
Call 1-330-499-9499 to speak with a representative in our
Consumer Response
Center.
PLEASE DO NOT RETURN THIS PRODUCT TO THE STORE.
Thank you for selecting a HOOVER product.
www.hoover.com
FloorMATE
™
with SpinScrub
™
Brushes
The Hard Floor Cleaner
Owner’s Manual
English
pp. 1-13
Español
pàg. 15-22
Français
p. 24-31