Hoover U2440 Manual
Hoover U2440 Manual
 |
View all Hoover U2440 manuals
Add to My Manuals
Save this manual to your list of manuals |
Hoover U2440 manual content summary:
- Hoover U2440 | Manual - Page 1
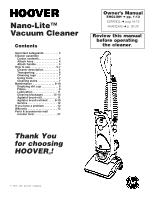
Nano-Lite™ Vacuum Cleaner Contents belt . . . . 9-10 Service 12 If you have a problem 12 Warranty 13 Parts & accessories mail reorder form 27 Owner's Manual ENGLISH § pp. 1-13 ESPAÑOL § pág 14-19 FRANÇAIS § p. 20-25 Review this manual before operating the cleaner. Thank You for choosing HOOVER - Hoover U2440 | Manual - Page 2
HOOVER SALES & SERVICE CENTERS ALABAMA 3980B Airport Blvd. Mobile, AL 36608 (251) 341-0304 (251 San Pedro, Suite 137 San Antonio, TX 78216 (210) 829-1906 (210) 805-0612 fax 19507 I-45, Suite #900 Cypresswood Ct. Spring, TX 77388 (281) 288-5803 (281) 288-5876 fax 1823 West Bay Area Blvd. Webster, TX - Hoover U2440 | Manual - Page 3
Thank you for choosing a HOOVER® product Please enter the COMPLETE model and serial numbers in the spaces provided. Model Serial number Hint: Attach your sales receipt to this owner's manual. Verification of date of purchase may be required for warranty service of your HOOVER product. Be sure to - Hoover U2440 | Manual - Page 4
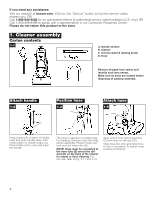
hoover.com. Click on the "Service" button to find the service outlet nearest you OR Call 1-800-944-9200 for an automated referral of authorized service dusting brush D. Hose Remove all parts from carton and D identify each item shown. Make sure all parts are located before B disposing of - Hoover U2440 | Manual - Page 5
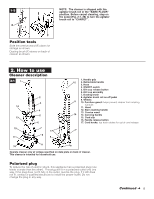
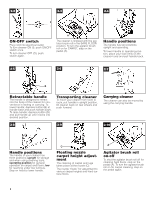
1-5 E F Position tools Slide the crevice wand (E) down for storage as shown. Dusting brush (F) stores on back of cleaner as shown. NOTE: The cleaner is shipped with the agitator brush roll in the "BARE FLOOR" position. Before carpet cleaning, step on the pedal (Fig. 2-1, #8) to turn the agitator - Hoover U2440 | Manual - Page 6
2-2 2-3 2-4 ON-OFF switch Plug cord into electrical outlet. To turn cleaner ON (I), push ON/OFF switch once. To turn cleaner OFF (O), push switch again. A The cleaner is shipped with the agitator brush roll in the BARE FLOOR position. To turn the agitator brush roll on for CARPET, step on the - Hoover U2440 | Manual - Page 7
Cleaning lightweight flexible rugs Stand on one end of rug and move cleaner toward other end or edge. Before reaching edge, push down on handle. This will lift up the nozzle (front of cleaner) and will prevent rug from clinging to cleaner. Continue to lift up nozzle so that when you have reached the - Hoover U2440 | Manual - Page 8
3. Maintenance Familiarize yourself with these home maintenance tasks as proper use and care of your cleaner will ensure continued cleaning effectiveness. 3-1 A 3-2 B How to empty Press dirt cup release button (B) and pivot cup out. Dirt cup When to empty It is recommended that the dirt cup be - Hoover U2440 | Manual - Page 9
broken. What to buy To assure effective operation, use only genuine HOOVER belts with your cleaner. When purchasing a new belt, ask for HOOVER belt package No. 40201-280 (belt part No. 2BEB120800300). Replacing flat belt Disconnect cleaner from electrical outlet. Put agitator brush roll in the HARD - Hoover U2440 | Manual - Page 10
agitator brush roll. Installing agitator brush roll Grasp agitator brush roll firmly and fit it into position by first sliding end opposite the belt into the rectangular slot (G) on side of cleaner. Pull other side of agitator brush roll into place. Reposition agitator cover over agitator. Replace - Hoover U2440 | Manual - Page 11
3-23 H Slide belt over motor shaft (H). Align belt between "U" shaped posts What to buy When purchasing a new agitator, ask for HOOVER part No. 2BEA131001900. To check condition of brushes, move edge Hoover Sales and Service Center or an Authorized Hoover Warranty Service Dealer. Continued § 11 - Hoover U2440 | Manual - Page 12
To obtain approved HOOVER service and genuine HOOVER parts, locate the nearest Hoover Sales and Service Center or Authorized Hoover Warranty Service Dealer (Depot) by: • checking the Yellow Pages under "Vacuum Cleaners Household" OR • checking the list of Sales and Service Centers provided with - Hoover U2440 | Manual - Page 13
Manual against original defects in material and workmanship for a period of one full year from date of purchase. This warranty provides, at no cost to you, all labor and parts if you mail your appliance to a Hoover Sales and Service Center for warranty service, transportation will be paid one way. - Hoover U2440 | Manual - Page 14
recibo de compra a este Manual del propietario. Para obtener el servicio de garantía de su producto HOOVER puede requerirse la verificación de , la ropa holgada, los dedos de las manos y pies y todas las partes del cuerpo alejados de las aberturas, del agitador rotatorio y otras piezas en movimiento - Hoover U2440 | Manual - Page 15
PROVISTAS EN EL MANUAL DE INGLÉS. Si necesita asistencia: Visite nuestra página en Internet hoover.com. Haga clic en el botón "Service" para encontrar el material de embalaje. 1-2 Coloque el mango Oprima el botón (A) en la parte posterior de la base del mango y empuje el mango hacia abajo, hasta - Hoover U2440 | Manual - Page 16
alfombra y pase la aspiradora hacia el otro extremo o borde. Antes de llegar al borde, empuje el mango hacia abajo. Esto levantará la boquilla (parte delantera de la aspiradora) y evitará que la alfombra se adhiera a la aspiradora. Continúe levantando la boquilla de modo que cuando llegue al borde - Hoover U2440 | Manual - Page 17
la aspiradora. Vuelva a colocar el filtro insertándolo debajo de las lengüetas en la parte posterior del cuerpo de la aspiradora. Qué comprar Cuando compre un nuevo filtro final, pida el paquete de filtro HOOVER No. 40110-013 (No. de pieza del filtro 1BEB124710000). Reemplazo de la correa La correa - Hoover U2440 | Manual - Page 18
ésta. 3-23 Con la parte inferior de la aspiradora hacia Vacuum Cleaners-Household" ("Aspiradoras Artículos del hogar") O - • consultando la lista de Centros de ventas y servicio de Hoover provista con esta aspiradora O - • consultando la sección "Service" (Servicio) de Hoover en Internet, hoover - Hoover U2440 | Manual - Page 19
aire a través del tubo de entrada de la manguera en la parte posterior de la aspiradora 5. Apague la aspiradora y desenchúfela. 6. Revise un año (Uso doméstico) Su aparato HOOVER® está garantizado para uso doméstico normal, según el Manual del propietario, contra defectos originales en el material
-
 1
1 -
 2
2 -
 3
3 -
 4
4 -
 5
5 -
 6
6 -
 7
7 -
8
-
9
-
10
-
11
-
12
-
13
-
14
-
15
-
16
-
17
-
18
-
19
 |
 |
Review this manual
before operating
the cleaner
.
Owner’s Manual
ENGLISH
➜
pp. 1-13
ESPAÑOL
➜
pág 14-19
FRANÇAIS
➜
p. 20-25
Thank You
for choosing
HOOVER
®
!
Important safeguards . . . . . . . . . 3
Cleaner assembly
Carton contents. . . . . . . . . . . . . 4
Attach hose . . . . . . . . . . . . . . . . 4
Attach handle. . . . . . . . . . . . . . . 4
How to use. . . . . . . . . . . . . . . . . 5-7
Cleaner description. . . . . . . . . . 5
Transporting
. . . . . . . . . . . . . . . 6
Cleaning rugs
. . . . . . . . . . . . . . 7
Using tools. . . . . . . . . . . . . . . . . 7
Cleaning stairs . . . . . . . . . . . . . 7
Maintenance
. . . . . . . . . . . . . . 8-10
Emptying dirt cup . . . . . . . . . . . 8
Filters . . . . . . . . . . . . . . . . . . . . . 9
Lubrication. . . . . . . . . . . . . . . . 11
Clearing blockages
. . . . . . 12-13
Agitator brush roll. . . . . . . . . . 11
Agitator brush roll belt
. . . . 9-10
Service . . . . . . . . . . . . . . . . . . . 12
If you have a problem
. . . . . . . . 12
Warranty . . . . . . . . . . . . . . . . . . . 13
Parts & accessories mail
reorder form. . . . . . . . . . . . . . . 27
Contents
© 2006 The Hoover Company
Nano-Lite™
Vacuum Cleaner